How to integrate In-App Purchase in Flutter (iOS)

Image by Author

Hello folks! It’s been so long that I haven’t written anything on Flutter. It’s because I was making an OTT (Over The Top) platform in Flutter and I’m happy to share that the app is successfully uploaded on the Play store as well on the App store. The Android part went very well and uploading my app to the play store was smooth. But while uploading the same app with a little bit of different configuration to Apple App Store, I faced lots of issues. One of the main issues I faced is integrating In-App Purchase. Which I will discuss in detail in this article and I will give you a solution with code for that with an explanation. So, without any further ado let’s get started.

P.S. The app I made was for my client.

The Issue

I have integrated a third-party payment service to sell my digital content in Android and for iOS I knew that Apple won’t allow third-party payment services until and unless there is a physical exchange of goods or services. So, here’s the mistake I have made. I Integrated Apple Pay to sell my digital content and the result is👇🏻👇🏻

Image by Author: App rejected issue 1
Image by Author: App rejected issue 2

In short, Apple wants me to integrate In-App Purchase (IAP) to meet its guidelines. I referred to tons of tutorials on how to integrate “In-App Purchase” in Flutter but no one worked for me. Either they had some issues or they had missed something which doesn’t work for me. So, I don’t want you to get stuck as I got. Here’s the step-by-step process to integrate IAP in your app so that your app publishing process goes smoothly on Apple App Store.

Workflow for configuring in-app purchases

Step 1: Sign a Paid Applications Agreement

The first and foremost thing you have to do is to accept the agreement. Go to app store connect -> Agreements, Tax, and Banking.

You will see two agreements. One for Free Apps and the second for Paid Apps.

Free Apps: Accept this agreement if you wanna upload your app on the App Store for free.

Paid Apps: If you want to sell your app on App Store or your app offers In-App Purchase, then this agreement is necessary.

Free apps agreement doesn’t require you to add your bank account and fill in the Tax information, but Paid Apps does require. We need to accept the Paid Apps agreement. Once you accepted the agreement and filled in the necessary information, your status of agreements will be active. Just like this 👇🏻👇🏻👇🏻

Image by Author: Agreement, Tax, and Banking

Step 2: Configure in-app purchases in App Store Connect

Now, I’m assuming that you’ve successfully filled in the required App information like creating an app on the App Store and filling in the version information, app privacy information, adding your app screenshots, and all those stuff. I will mainly focus on In-App Purchases.

Go to app store connect -> MyApps -> Your App Name -> features -> In-App Purchases -> Click on Plus sign button to create IAP

Image by Author: In-App Purchase Page

Now, you will be prompted with four different options. Just like this 👇🏻👇🏻👇🏻

Image by Author: In-App Purchase plans

Choose your option accordingly. Click on create, you’ll be redirected to the new web page where you have to fill the details like 👇🏻👇🏻👇🏻

Image by Author: Creating new In-App Purchase

Reference Name: As the name says it’s just for your reference. You can name it anything. For example, my application provides three subscription plans quarterly, half months, and one year. I named them as it is.

Product ID: The main and important thing. You must provide a unique product ID than any other IAP you have added. This product ID will be used in our Flutter code.

Pricing:

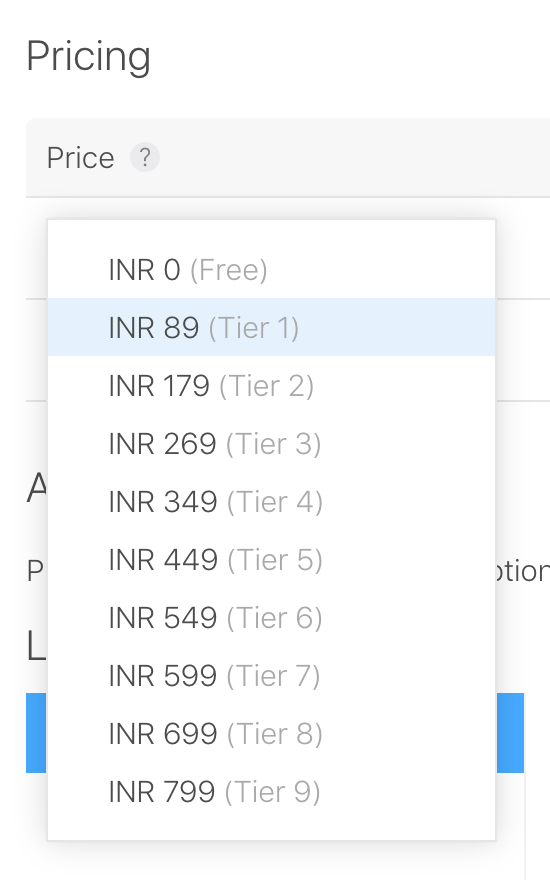
Apple doesn’t provide custom pricing. You have to select from the pricing options they have provided. Select as per your need.
Image by Author: In-App Purchase Pricing

Apple doesn’t provide custom pricing. You have to select from the pricing options they have provided. Select as per your need.

App Store Information:

Image by Author: App store information

This information is also an important thing you have to fill in properly as this information will be shown in our app. Fill in the Display name (e.g. Quarterly Plan) and description (e.g. Enjoy our digital content for three months)

Review Information:

Image by Author: Review Information

Add your app screenshot with dimension (640×920), any activity/page of your app, and a little bit of explanation (review notes) where you can describe your IAP plan. If you don’t fill in this information, your app will get rejected (trust me it happened to me). If you have filled in all the details, click on the Save button. On clicking the save button the status of IAP will become “Ready to Submit”

Image by Author: In-App Purchase created successfully

If you failed to provide any information your status will be “Missing Metadata”

Image by Author: In-App Purchase creation failed!

If you have followed the same thing which I mentioned above, you most probably won’t face any issues in your app review. On your IAP page, you will see all the IAP plans that you have created just like this 👇🏻👇🏻👇🏻

Image by Author: In-App Purchase created

Step 3: Enable in-app purchase in Xcode

The next step would be to add In-App purchase capability in your Flutter code. Open Runner.xcworkspace (can be found under the ios folder) inside your Xcode. (make sure you open Runner.xcworkspace and not Runner.xcodeproj).

Once you open your Runner file in Xcode then follow the following process:

Runner -> Targets -> Runner -> Signing & capabilities -> Add capability (+ capability ) -> Search for In-App Purchase -> Add.

Note: Make sure you added IAP for all and not only for Debug or Release.

Step 4: Adding IAP into our Flutter code

After so much headache, the real headache is going to start now. But don’t worry Jiten will tell you all the things you need so you don’t get the headache 🤯🤯🤯 I got.

We will be using a plugin called in_app_purchase. Add this plugin to your pubsec.yaml file. You can find the code from the below link 👇🏻👇🏻👇🏻

GitHub – TheBoy-WhoCode/iap_example

In the above Github repo, you will get two dart files. The one we want to refer to is main.dart

Inside main.dart, the main changes you want to make are, replacing the product IDs just like I did. Replace “Your Plan ID (Product ID)” with the Product IDs you’ve created in step no 2.

const String threeMontsPlanID = 'Your Plan ID (Product ID)';
const String halfYearPlan = 'Your Plan ID (Product ID)';
const String yearlyPlan = 'Your Plan ID (Product ID)';
const List<String> _kProductIds = <String>[
threeMontsPlanID,
halfYearPlan,
yearlyPlan
];

The code in main.dart is a bit lengthy and explaining each and everything would be difficult in one whole article but the plus point is, the code is self-explanatory. The only changes you have to make are the code that I mentioned above. The rest is taken care of. but…

How will I verify my purchase Jiten?

Inside main.dart, you will get _verifyPurchase() method. Using this method you can call your API to verify with your server whether or not your purchase is completed or not and update your database accordingly. Due to confidentiality, I won’t be able to share the exact code but I will provide you a little bit of an example so that your work will be done.

https://medium.com/media/882e3095bbff8553cfc775e6033e2713/href

I created Map to share my purchase data and I have created a function called iapService() which accepts the Map as a parameter. This function makes a POST request to my Node.js API which sends me the status of my payment. According to my status, I notify my users accordingly.

The important thing you want to know is, PurchaseDetails provides you with two different data, server, and local verification data. These two data are base64 encoded.

It also returns you with purchaseID and productID. The purchaseID will be unique which will be provided to you by Apple and the productID which the user has selected (the one that you’ve created and the user has selected). Return Future<bool>.value(true) accordingly (important).

Now, that you have integrated IAP into your app, the last step is to test your IAP

Step 5: Testing the IAP

For testing your IAP, you need to create a sandbox tester account.

Go to app store connect -> Users and Access, click Tester under sandbox.

Image by Author: Sandbox

Add the tester’s email ID. Make sure that you add Apple ID. Simply run your app, select from the plans which you have created, and while prompted, you can add the tester’s email ID (sandbox email ID) and password to test your IAP.

Note: You can’t test IAP in a simulated environment (iOS simulator) you will need a physical device for testing.

Hurray 🤩! We have successfully implemented In-App Purchase and tested it.

Here’s a quick demo of IAP which I integrated into my app. I wish I could share my app link but due to personal reasons, I won’t. Sorry for that.

GIF by Author: In-App Purchase demo

My app got rejected almost five times 🤯 by Apple but in the end, I solved issues one by one and finally, the app is on App Store. With 1K downloads and 400 active users. 🤩🥳

Last but not the least, I have also created a Flutter package called floating_frosted_bottom_bar (article coming soon) stay tuned for that 😉😉😉

As always, if you have any doubts, any issues, you can contact me on LinkedIn, Twitter, & Instagram. If my articles help you then you can always


How to integrate In-App Purchase in Flutter (iOS) was originally published in Level Up Coding on Medium, where people are continuing the conversation by highlighting and responding to this story.


This content originally appeared on Level Up Coding - Medium and was authored by Jiten Patel
Image by Author

Hello folks! It’s been so long that I haven’t written anything on Flutter. It’s because I was making an OTT (Over The Top) platform in Flutter and I’m happy to share that the app is successfully uploaded on the Play store as well on the App store. The Android part went very well and uploading my app to the play store was smooth. But while uploading the same app with a little bit of different configuration to Apple App Store, I faced lots of issues. One of the main issues I faced is integrating In-App Purchase. Which I will discuss in detail in this article and I will give you a solution with code for that with an explanation. So, without any further ado let’s get started.

P.S. The app I made was for my client.

The Issue

I have integrated a third-party payment service to sell my digital content in Android and for iOS I knew that Apple won’t allow third-party payment services until and unless there is a physical exchange of goods or services. So, here’s the mistake I have made. I Integrated Apple Pay to sell my digital content and the result is👇🏻👇🏻
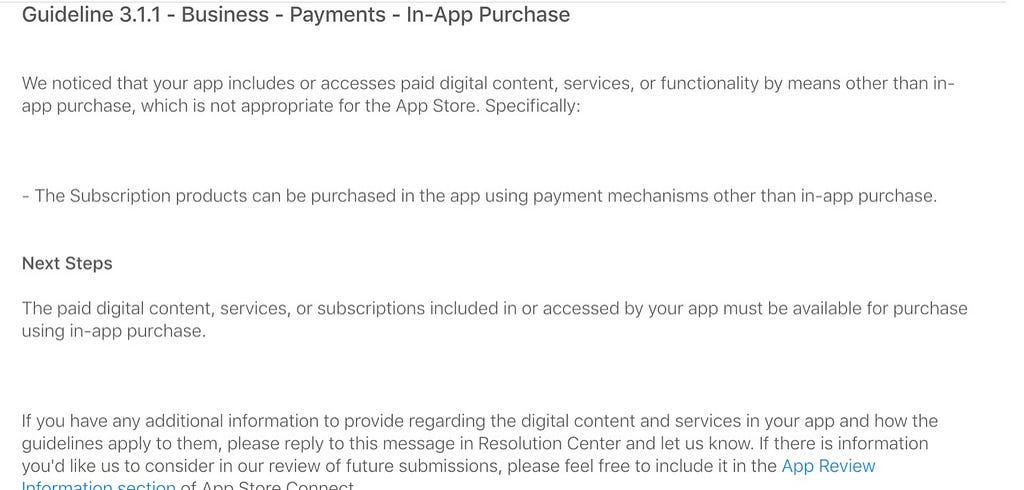
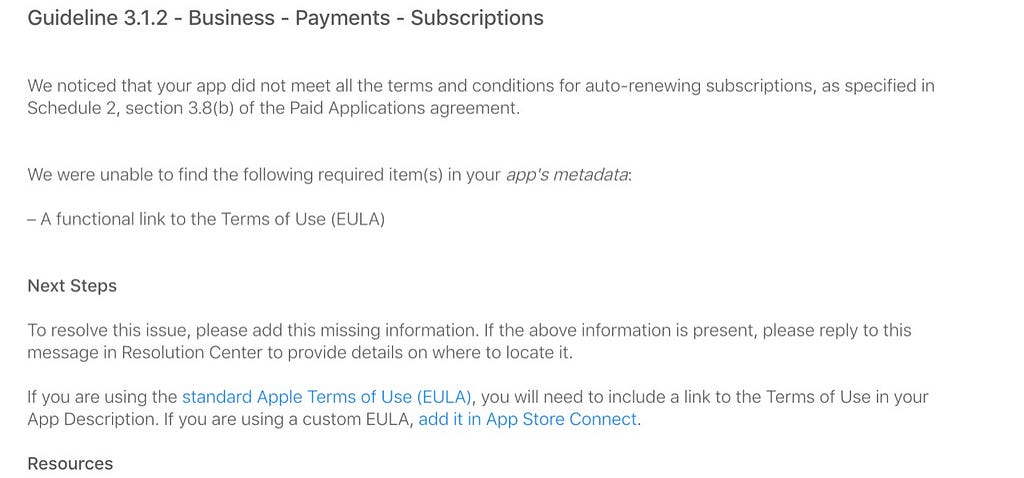
Image by Author: App rejected issue 1
Image by Author: App rejected issue 2

In short, Apple wants me to integrate In-App Purchase (IAP) to meet its guidelines. I referred to tons of tutorials on how to integrate “In-App Purchase” in Flutter but no one worked for me. Either they had some issues or they had missed something which doesn’t work for me. So, I don’t want you to get stuck as I got. Here’s the step-by-step process to integrate IAP in your app so that your app publishing process goes smoothly on Apple App Store.

Workflow for configuring in-app purchases

Step 1: Sign a Paid Applications Agreement

The first and foremost thing you have to do is to accept the agreement. Go to app store connect -> Agreements, Tax, and Banking.

You will see two agreements. One for Free Apps and the second for Paid Apps.

Free Apps: Accept this agreement if you wanna upload your app on the App Store for free.

Paid Apps: If you want to sell your app on App Store or your app offers In-App Purchase, then this agreement is necessary.

Free apps agreement doesn’t require you to add your bank account and fill in the Tax information, but Paid Apps does require. We need to accept the Paid Apps agreement. Once you accepted the agreement and filled in the necessary information, your status of agreements will be active. Just like this 👇🏻👇🏻👇🏻

Image by Author: Agreement, Tax, and Banking

Step 2: Configure in-app purchases in App Store Connect

Now, I’m assuming that you’ve successfully filled in the required App information like creating an app on the App Store and filling in the version information, app privacy information, adding your app screenshots, and all those stuff. I will mainly focus on In-App Purchases.

Go to app store connect -> MyApps -> Your App Name -> features -> In-App Purchases -> Click on Plus sign button to create IAP
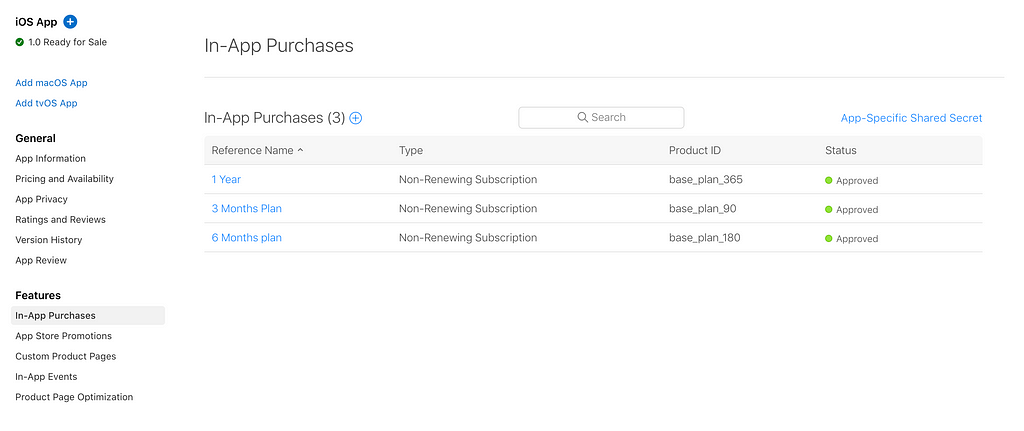
Image by Author: In-App Purchase Page

Now, you will be prompted with four different options. Just like this 👇🏻👇🏻👇🏻
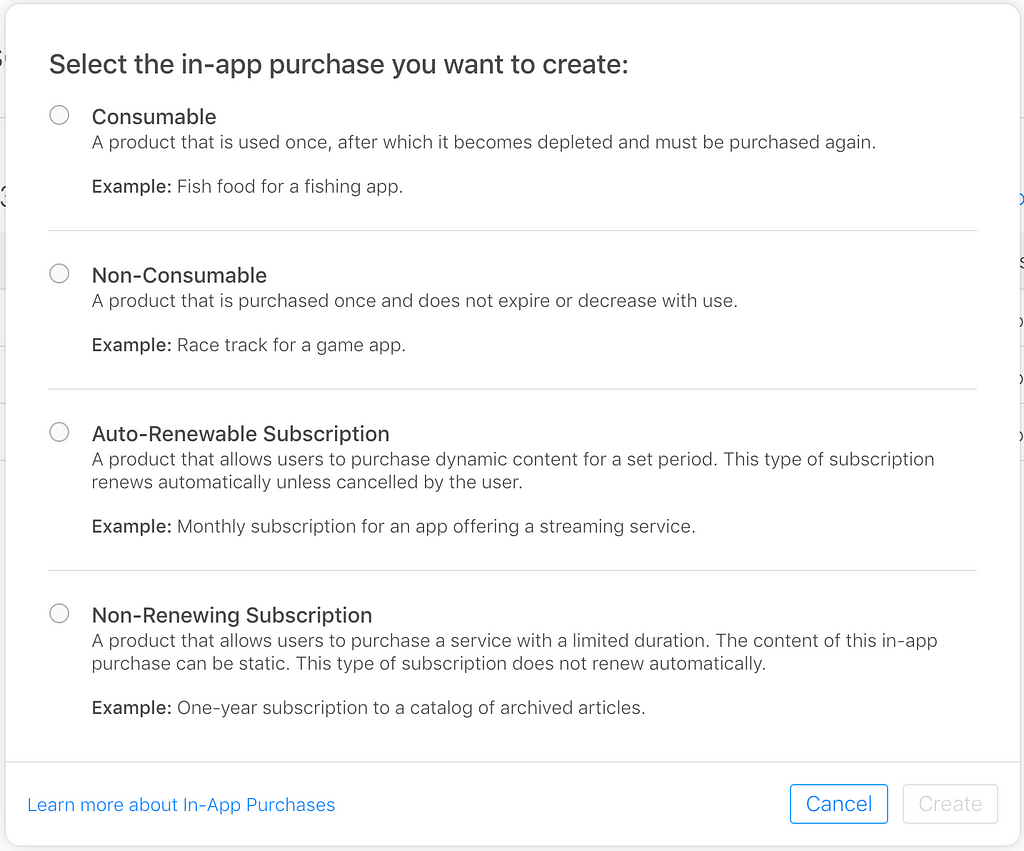
Image by Author: In-App Purchase plans

Choose your option accordingly. Click on create, you’ll be redirected to the new web page where you have to fill the details like 👇🏻👇🏻👇🏻
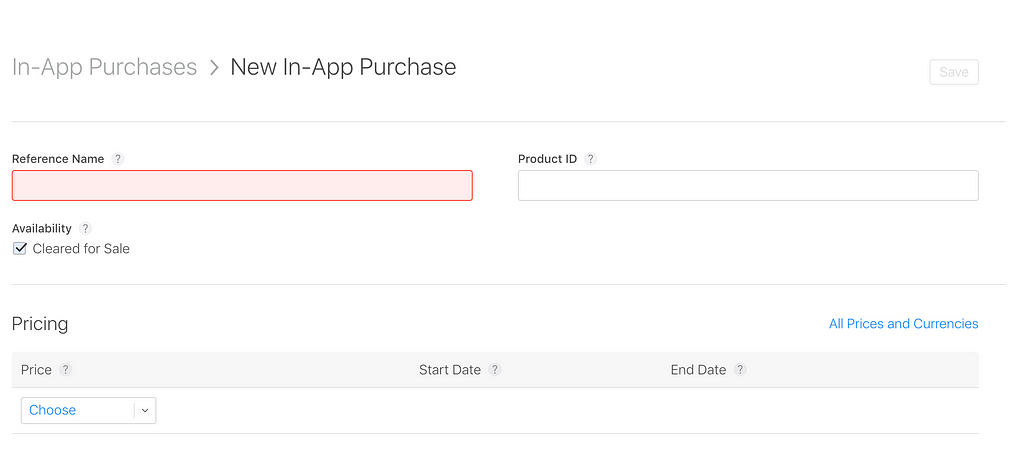
Image by Author: Creating new In-App Purchase

Reference Name: As the name says it’s just for your reference. You can name it anything. For example, my application provides three subscription plans quarterly, half months, and one year. I named them as it is.

Product ID: The main and important thing. You must provide a unique product ID than any other IAP you have added. This product ID will be used in our Flutter code.

Pricing:
Apple doesn’t provide custom pricing. You have to select from the pricing options they have provided. Select as per your need.
Image by Author: In-App Purchase Pricing

Apple doesn’t provide custom pricing. You have to select from the pricing options they have provided. Select as per your need.

App Store Information:
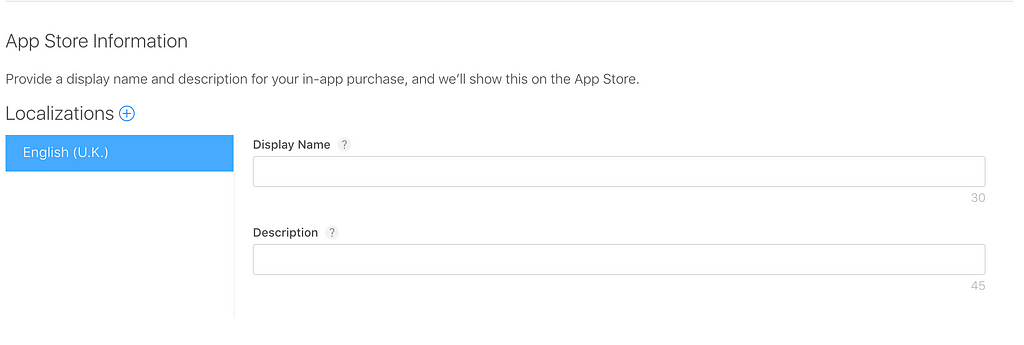
Image by Author: App store information

This information is also an important thing you have to fill in properly as this information will be shown in our app. Fill in the Display name (e.g. Quarterly Plan) and description (e.g. Enjoy our digital content for three months)

Review Information:

Image by Author: Review Information

Add your app screenshot with dimension (640x920), any activity/page of your app, and a little bit of explanation (review notes) where you can describe your IAP plan. If you don’t fill in this information, your app will get rejected (trust me it happened to me). If you have filled in all the details, click on the Save button. On clicking the save button the status of IAP will become “Ready to Submit”

Image by Author: In-App Purchase created successfully

If you failed to provide any information your status will be “Missing Metadata”

Image by Author: In-App Purchase creation failed!

If you have followed the same thing which I mentioned above, you most probably won’t face any issues in your app review. On your IAP page, you will see all the IAP plans that you have created just like this 👇🏻👇🏻👇🏻

Image by Author: In-App Purchase created

Step 3: Enable in-app purchase in Xcode

The next step would be to add In-App purchase capability in your Flutter code. Open Runner.xcworkspace (can be found under the ios folder) inside your Xcode. (make sure you open Runner.xcworkspace and not Runner.xcodeproj).

Once you open your Runner file in Xcode then follow the following process:

Runner -> Targets -> Runner -> Signing & capabilities -> Add capability (+ capability ) -> Search for In-App Purchase -> Add.

Note: Make sure you added IAP for all and not only for Debug or Release.

Step 4: Adding IAP into our Flutter code

After so much headache, the real headache is going to start now. But don’t worry Jiten will tell you all the things you need so you don’t get the headache 🤯🤯🤯 I got.

We will be using a plugin called in_app_purchase. Add this plugin to your pubsec.yaml file. You can find the code from the below link 👇🏻👇🏻👇🏻

GitHub - TheBoy-WhoCode/iap_example

In the above Github repo, you will get two dart files. The one we want to refer to is main.dart

Inside main.dart, the main changes you want to make are, replacing the product IDs just like I did. Replace “Your Plan ID (Product ID)” with the Product IDs you’ve created in step no 2.

const String threeMontsPlanID = 'Your Plan ID (Product ID)';
const String halfYearPlan = 'Your Plan ID (Product ID)';
const String yearlyPlan = 'Your Plan ID (Product ID)';
const List<String> _kProductIds = <String>[
threeMontsPlanID,
halfYearPlan,
yearlyPlan
];

The code in main.dart is a bit lengthy and explaining each and everything would be difficult in one whole article but the plus point is, the code is self-explanatory. The only changes you have to make are the code that I mentioned above. The rest is taken care of. but…

How will I verify my purchase Jiten?

Inside main.dart, you will get _verifyPurchase() method. Using this method you can call your API to verify with your server whether or not your purchase is completed or not and update your database accordingly. Due to confidentiality, I won’t be able to share the exact code but I will provide you a little bit of an example so that your work will be done.

I created Map to share my purchase data and I have created a function called iapService() which accepts the Map as a parameter. This function makes a POST request to my Node.js API which sends me the status of my payment. According to my status, I notify my users accordingly.

The important thing you want to know is, PurchaseDetails provides you with two different data, server, and local verification data. These two data are base64 encoded.

It also returns you with purchaseID and productID. The purchaseID will be unique which will be provided to you by Apple and the productID which the user has selected (the one that you’ve created and the user has selected). Return Future<bool>.value(true) accordingly (important).

Now, that you have integrated IAP into your app, the last step is to test your IAP

Step 5: Testing the IAP

For testing your IAP, you need to create a sandbox tester account.

Go to app store connect -> Users and Access, click Tester under sandbox.

Image by Author: Sandbox

Add the tester's email ID. Make sure that you add Apple ID. Simply run your app, select from the plans which you have created, and while prompted, you can add the tester's email ID (sandbox email ID) and password to test your IAP.

Note: You can’t test IAP in a simulated environment (iOS simulator) you will need a physical device for testing.

Hurray 🤩! We have successfully implemented In-App Purchase and tested it.

Here’s a quick demo of IAP which I integrated into my app. I wish I could share my app link but due to personal reasons, I won’t. Sorry for that.
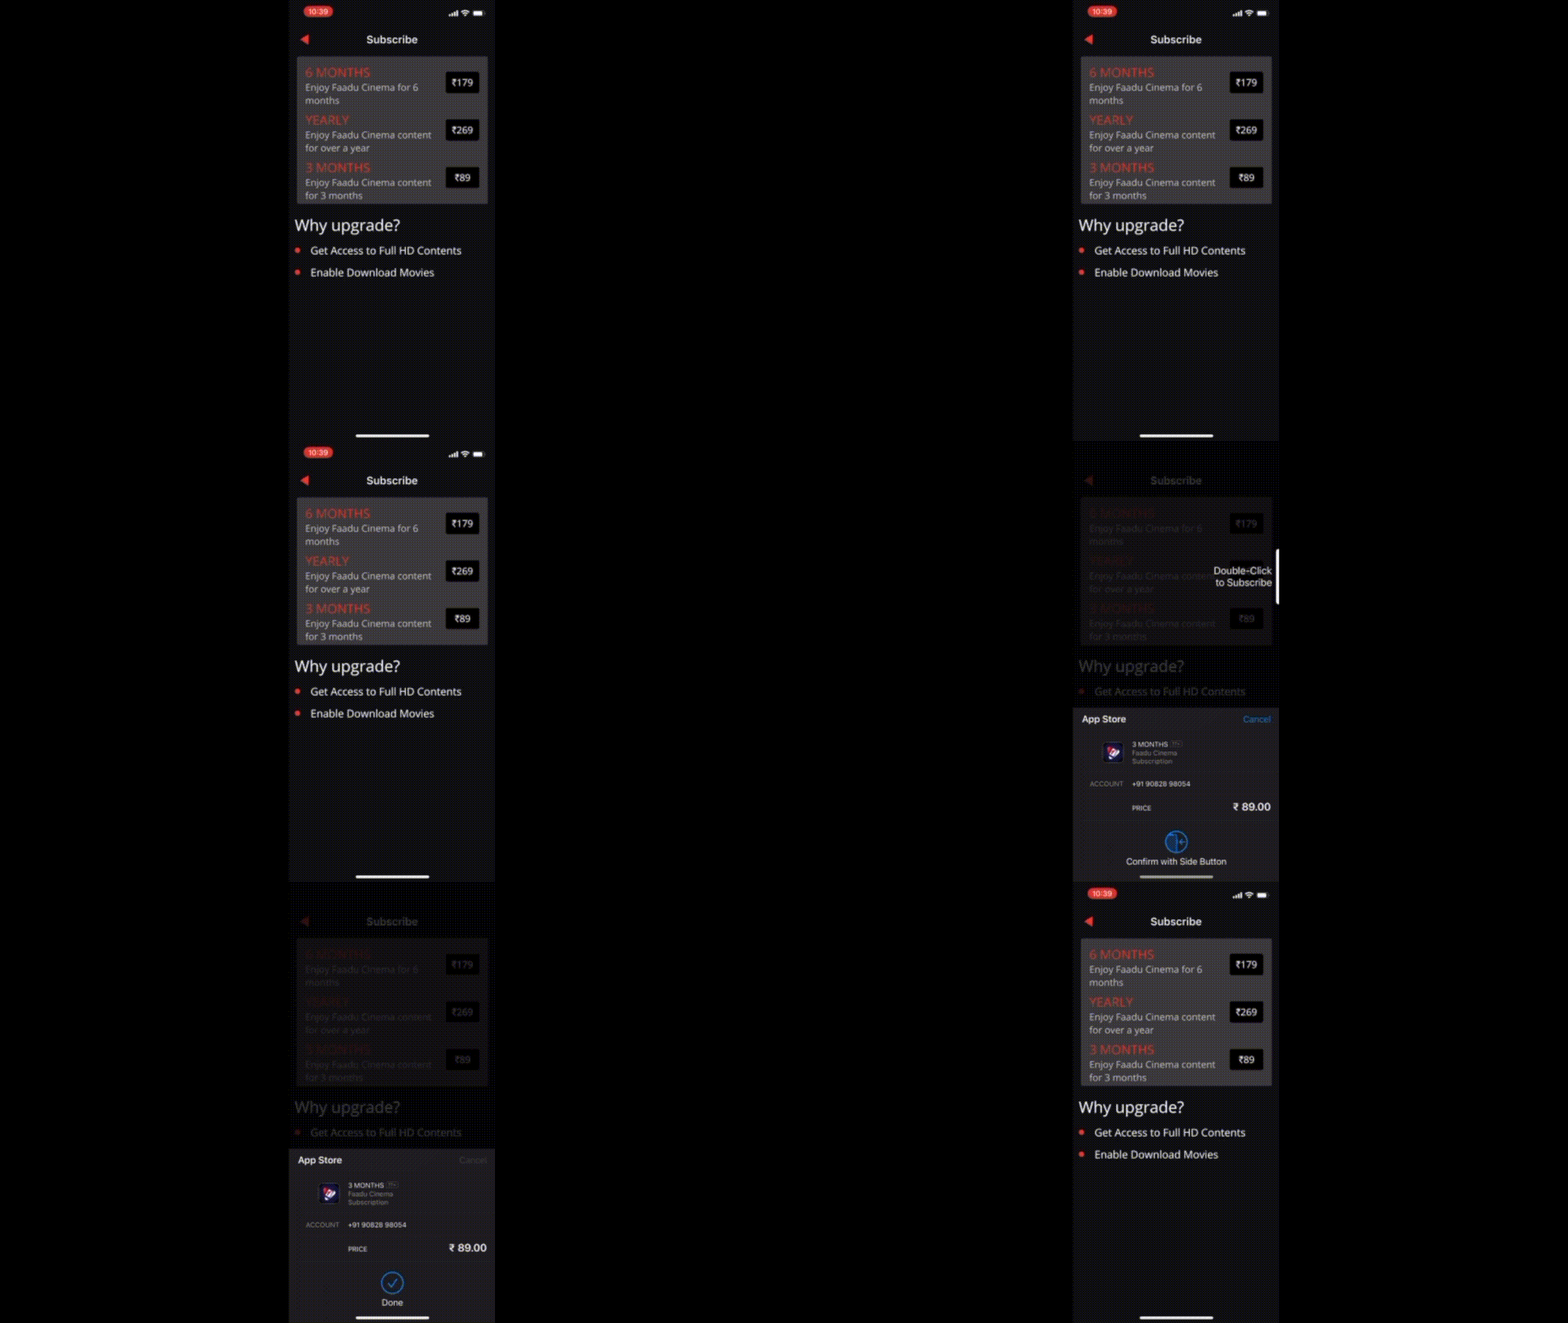
GIF by Author: In-App Purchase demo

My app got rejected almost five times 🤯 by Apple but in the end, I solved issues one by one and finally, the app is on App Store. With 1K downloads and 400 active users. 🤩🥳

Last but not the least, I have also created a Flutter package called floating_frosted_bottom_bar (article coming soon) stay tuned for that 😉😉😉

As always, if you have any doubts, any issues, you can contact me on LinkedIn, Twitter, & Instagram. If my articles help you then you can always


How to integrate In-App Purchase in Flutter (iOS) was originally published in Level Up Coding on Medium, where people are continuing the conversation by highlighting and responding to this story.


This content originally appeared on Level Up Coding - Medium and was authored by Jiten Patel


Print Share Comment Cite Upload Translate Updates
APA

Jiten Patel | Sciencx (2022-02-16T04:04:06+00:00) How to integrate In-App Purchase in Flutter (iOS). Retrieved from https://www.scien.cx/2022/02/16/how-to-integrate-in-app-purchase-in-flutter-ios/

MLA
" » How to integrate In-App Purchase in Flutter (iOS)." Jiten Patel | Sciencx - Wednesday February 16, 2022, https://www.scien.cx/2022/02/16/how-to-integrate-in-app-purchase-in-flutter-ios/
HARVARD
Jiten Patel | Sciencx Wednesday February 16, 2022 » How to integrate In-App Purchase in Flutter (iOS)., viewed ,<https://www.scien.cx/2022/02/16/how-to-integrate-in-app-purchase-in-flutter-ios/>
VANCOUVER
Jiten Patel | Sciencx - » How to integrate In-App Purchase in Flutter (iOS). [Internet]. [Accessed ]. Available from: https://www.scien.cx/2022/02/16/how-to-integrate-in-app-purchase-in-flutter-ios/
CHICAGO
" » How to integrate In-App Purchase in Flutter (iOS)." Jiten Patel | Sciencx - Accessed . https://www.scien.cx/2022/02/16/how-to-integrate-in-app-purchase-in-flutter-ios/
IEEE
" » How to integrate In-App Purchase in Flutter (iOS)." Jiten Patel | Sciencx [Online]. Available: https://www.scien.cx/2022/02/16/how-to-integrate-in-app-purchase-in-flutter-ios/. [Accessed: ]
rf:citation
» How to integrate In-App Purchase in Flutter (iOS) | Jiten Patel | Sciencx | https://www.scien.cx/2022/02/16/how-to-integrate-in-app-purchase-in-flutter-ios/ |

Please log in to upload a file.


There are no updates yet.
Click the Upload button above to add an update.

You must be logged in to translate posts. Please log in or register.