This content originally appeared on DEV Community and was authored by Mokhtar
Quirrel has recently been acquired by Netlify and this is exciting news for Simon @skn0tt, Quirrel's author, who joined their team!
The hosted service quirrel.dev is being deprecated later this year and has stopped taking new sign-ups. This leaves a hole in the job queuing as a service niche but thankfully, Quirrel is and will stay open-source which makes it possible to switch to self-hosted instances.
I've been running my own self-hosted Quirrel instance for both Shellphone and Remixtape on Fly.io and this blog post is here to help you with this.
In this guide, I won't go over setting up flyctl nor using Quirrel as their respective documentations would do a much better job than I at that.
TL;DR:
- Deploy Redis
- Deploy Quirrel
- Generate your app's Quirrel token
Deployment files and instructions can be found in this repository.
Deploying Redis
First, set up the Fly app to be deployed with the following Dockerfile and shell script named start-redis-server.sh. The script starts Redis with persistent storage which is needed for Quirrel.
FROM redis:alpine

ADD start-redis-server.sh /usr/bin/
RUN chmod +x /usr/bin/start-redis-server.sh

CMD ["start-redis-server.sh"]
#!/bin/sh
sysctl vm.overcommit_memory=1
sysctl net.core.somaxconn=1024
redis-server --requirepass $REDIS_PASSWORD --dir /data/ --appendonly yes
Then, initialize the Fly app that will host your Redis instance with the following fly.toml file. It references the redis_data Fly storage volume we haven't created yet which is needed for persistent storage.
app = "quirrel-redis"

[[mounts]]
  destination = "/data"
  source = "redis_data"
flyctl launch --name quirrel-redis --no-deploy --copy-config
Now that Fly knows about your Redis app, let's deploy the storage volume. I recommend deploying it in the same region as your Redis instance. In my case, it's CDG Paris, France.
flyctl volumes create redis_data --region cdg
Secure Redis with a strong random password. I usually use openssl to generate this kind of password. Keep it somewhere safe, we will need it to deploy Quirrel later.
openssl rand -hex 16 # copy its output
# you can use this alternative below if you can't use openssl
# node -e "console.log(crypto.randomBytes(16).toString('hex'))"
flyctl secrets set REDIS_PASSWORD=paste_redis_password_here
Now we can deploy Redis.
flyctl deploy
Deploying Quirrel
The next step is to deploy Quirrel with the following fly.toml file. It uses the Quirrel Docker image published to Quirrel's GitHub container registry.
app = "quirrel"

[build]
  image = "ghcr.io/quirrel-dev/quirrel:main"

[[services]]
  internal_port = 9181
  protocol = "tcp"

  [services.concurrency]
    hard_limit = 25
    soft_limit = 20
    type = "connections"

  [[services.http_checks]]
    interval = "10s"
    method = "get"
    path = "/health"
    protocol = "http"
    timeout = "2s"

  [[services.ports]]
    handlers = ["http"]
    port = 80

  [[services.ports]]
    handlers = ["tls", "http"]
    port = 443
flyctl launch --name quirrel --no-deploy --copy-config
Now that Fly knows about your Quirrel app, it's time to set up its environment variables, starting with Quirrel's secret passphrase. Like Redis' password, I'm using openssl to generate it.
openssl rand -hex 16 # copy its output
# you can use this alternative below if you can't use openssl
# node -e "console.log(crypto.randomBytes(16).toString('hex'))"
flyctl secrets set PASSPHRASES=paste_quirrel_passphrase_here
Then we need to tell Quirrel how to connect to our Redis instance, it's time to use that Redis password saved earlier! Fly servers use IPv6 only so make sure to append ?family=6 to connect to Redis over IPv6.
flyctl secrets set "REDIS_URL=redis://:paste_redis_password_here@cdg.quirrel-redis.internal:6379?family=6"
And now, we can deploy Quirrel.
flyctl deploy
Connect your app to your Quirrel instance
The last step is to connect your app to your freshly deployed Quirrel instance. First, let's acquire a Quirrel token from your instance. Note you can retrieve your instance's public URL from your Fly dashboard. Save the token returned from this command for your app, we're going to need it for the next step.
curl --user ignored:paste_quirrel_passphrase_here -X PUT https://quirrel.fly.dev/tokens/exampleapp
Finally, configure and deploy your application with the following environment variables.
QUIRREL_API_URL=https://quirrel.fly.dev # your Quirrel instance's public URL
QUIRREL_TOKEN=paste_quirrel_token_here # your Quirrel token previously generated
QUIRREL_BASE_URL=www.exampleapp.com # your app's URL
Bonus: using ui.quirrel.dev
Quirrel provides a development UI that can connect to any Quirrel instance and allow you to monitor queued jobs. A public version is hosted at ui.quirrel.dev but your Quirrel instance's public URL also hosts this development UI!
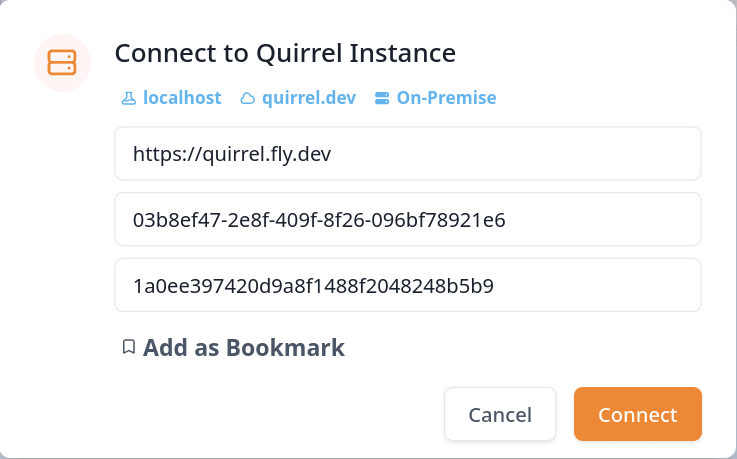
To connect to your self-hosted Quirrel instance, click on the dropdown menu next to the Quirrel logo in the header to open a connection modal.
Fill it out with your instance's public URL, your app's token, and the Quirrel passphrase you generated earlier. The modal should look like this:
Feel free to play around, queue a job, and see it appear in real-time in this development UI.
Closing notes
Congrats, you did it! You've deployed a Redis instance, a Quirrel instance, and configured your production app to use your self-hosted Quirrel instance.
Shout-out to Simon @skn0tt for building this cool piece of software! I hope this helps Quirrel users transition to self-hosting.
Want to get a headstart to build your next SaaS? I'm working on Remixtape, the modern Remix💿 boilerplate that includes everything you need to build better websites. Skip implementing standard functionality like background jobs, authentication, account management, sessions, subscription payments, teams, transactional emails... 😮💨 It gives you the solid foundation you need to build great web apps today and scale tomorrow.
This content originally appeared on DEV Community and was authored by Mokhtar
Mokhtar | Sciencx (2022-02-20T23:11:40+00:00) Self-hosting Quirrel. Retrieved from https://www.scien.cx/2022/02/20/self-hosting-quirrel/
Please log in to upload a file.
There are no updates yet.
Click the Upload button above to add an update.

