
This content originally appeared on DEV Community and was authored by DEV Community
What is SweetAlert2?
SweetAlert2 is a beautiful, customizable, accessible replacement for javascript's pop-up boxes with zero dependencies!
Read more about sweetalert2 here.
Now that you have a good understanding of sweetalert2, lets start!
STEP 1: Create Controller
Create user controller using this command:
php artisan make:controller UserController
Open user controller and paste this code:
<?php

namespace App\Http\Controllers;

use App\Models\User;
use Illuminate\Http\Request;

class UserController extends Controller
{
    // all users
    public function users()
    {
        $users = User::all();
        return view('users', compact('users'));
    }

    // delete user
    public function delete($id)
    {
        $delete = User::destroy($id);

        // check data deleted or not
        if ($delete == 1) {
            $success = true;
            $message = "User deleted successfully";
        } else {
            $success = true;
            $message = "User not found";
        }

        //  return response
        return response()->json([
            'success' => $success,
            'message' => $message,
        ]);
    }
}
Here we’ve created two functions. One for getting all users and another for deleting user.
Step 2: Define Routes & Insert Fake data
Let’s define routes for those two functions:
<?php

use App\Http\Controllers\UserController;
use Illuminate\Support\Facades\Route;

Route::get('users', [UserController::class, 'users']);
Route::post('delete/{id}', [UserController::class, 'delete']);
Now let's insert some fake user data using factory and seeder:
\App\Models\User::factory(5)->create(); // 5 fake user data
Read more about factory and seeder here.
Step 3: Set SweetAlert2 with AJAX in the Blade File
Create a view named users.blade.php and paste this code:
<!doctype html>
<html lang="en">
<head>
    <!-- meta tags -->
    <meta charset="utf-8">
    <meta name="viewport" content="width=device-width, initial-scale=1, shrink-to-fit=no">
    <!-- csrf-token -->
    <meta name="csrf-token" content="{{ csrf_token() }}">
    <!-- Bootstrap CSS -->
    <link rel="stylesheet" href="https://stackpath.bootstrapcdn.com/bootstrap/5.0.0-alpha2/css/bootstrap.min.css">
    <!-- jquery -->
    <script src="https://code.jquery.com/jquery-3.5.1.min.js"></script>
    <!-- SweetAlert2 -->
    <link rel="stylesheet" href="https://cdnjs.cloudflare.com/ajax/libs/limonte-sweetalert2/10.5.1/sweetalert2.min.css">
    <script src="https://cdnjs.cloudflare.com/ajax/libs/limonte-sweetalert2/10.5.1/sweetalert2.all.min.js"></script>

    <title>How to Use SweetAlert2 with AJAX in Laravel 8.x</title>
</head>
<body class="container" style="margin-top: 40px;">

<div class="row" style="margin-bottom: 20px;">
    <div class="col-lg-12 margin-tb">
        <div class="pull-left">
            <h3>Users</h3>
        </div>
    </div>
</div>

<table class="table table-bordered">
    <tr>
        <th>ID</th>
        <th>Name</th>
        <th>Email</th>
        <th width="280px">Actions</th>
    </tr>
    @foreach ($users as $user)
        <tr>
            <td>{{ $user->id }}</td>
            <td>{{ $user->name }}</td>
            <td>{{ $user->email }}</td>
            <td>
                <button class="btn btn-danger" onclick="deleteConfirmation({{$user->id}})">Delete</button>
            </td>
        </tr>
    @endforeach
</table>

<script type="text/javascript">
    function deleteConfirmation(id) {
        swal.fire({
            title: "Delete?",
            icon: 'question',
            text: "Please ensure and then confirm!",
            type: "warning",
            showCancelButton: !0,
            confirmButtonText: "Yes, delete it!",
            cancelButtonText: "No, cancel!",
            reverseButtons: !0
        }).then(function (e) {

            if (e.value === true) {
                var CSRF_TOKEN = $('meta[name="csrf-token"]').attr('content');

                $.ajax({
                    type: 'POST',
                    url: "{{url('/delete')}}/" + id,
                    data: {_token: CSRF_TOKEN},
                    dataType: 'JSON',
                    success: function (results) {
                        if (results.success === true) {
                            swal.fire("Done!", results.message, "success");
                            // refresh page after 2 seconds
                            setTimeout(function(){
                                location.reload();
                            },2000);
                        } else {
                            swal.fire("Error!", results.message, "error");
                        }
                    }
                });

            } else {
                e.dismiss;
            }

        }, function (dismiss) {
            return false;
        })
    }
</script>
</body>
</html>
Now that we've finished setting everything up, let's check it out!
Run and See Output
Run the Laravel project
php artisan serve
Visit this route http://localhost:8000/users and you will see a page like this:

Click Delete button and the SweetAlert2 confirmation box will appear:

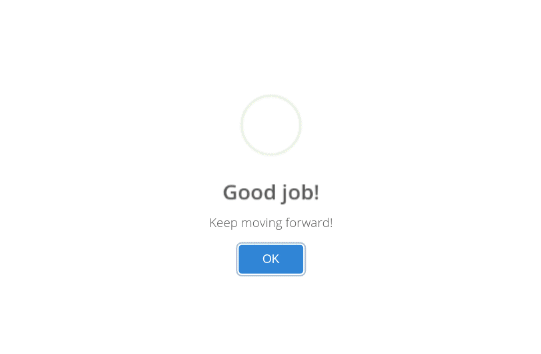
Click Yes button, the data will be deleted via AJAX and you will see a confirmation message like this:

Hurray! We have succesfully created and tested
sweetalert2, use this on your future projects to make it more beautiful!

This content originally appeared on DEV Community and was authored by DEV Community
DEV Community | Sciencx (2022-02-26T05:04:44+00:00) Laravel 8 – SweetAlert2 with AJAX (3 Easy Steps)🍬🍭🧁. Retrieved from https://www.scien.cx/2022/02/26/laravel-8-sweetalert2-with-ajax-3-easy-steps%f0%9f%8d%ac%f0%9f%8d%ad%f0%9f%a7%81/
Please log in to upload a file.
There are no updates yet.
Click the Upload button above to add an update.