This content originally appeared on DEV Community and was authored by DEV Community
Welcome to Day 21 of #30DaysOfPWA! New to the series? Three things you can do to catch up:
- Read the kickoff post below for context.
- Watch the GitHub Repository for updates.
- Bookmark #30DaysOfPWA Blog for resources.


Welcome to #30DaysOfPWA
Nitya Narasimhan for Microsoft Azure ・ Feb 14 ・ 2 min read
This is a shortened version of this canonical post for the #30DaysOfPWA.
About The Author
Today's post is authored by Jaylyn Barbee - a software engineer on the PWABuilder team at Microsoft. Follow Jaylyn at @jaylynsatwork.
Welcome to day week 3 day 7 of the 30 Days of PWA series! Today's blog post will walk you through the process of packaging your PWA for publication to the Microsoft Store for Windows apps.
Introduction
Great! You’ve just finished your web app and you are ready to send it off into the stores! Luckily for you, PWA Builder makes that as easy as pie. PWA Builder makes it possible to ship your app into multiple stores including the Google Play Store and Apple App Store. In this article we will focus on how to use our tools to package your PWA for the Microsoft Store, via the Partner Center. This is the last step, sharing your PWA with the world and now its time for all your hard work to pay off! Before we get started, here are some things you might want to have ready:
- A 512px by 512px icon (at least)
- This will be used for your app icon
- Screenshots
- For the Microsoft Store, you’re going to want laptop/tablet sized screenshots of your app to display in a carousel on your product description page. The exact pixel dimensions will be given to you in the Partner Center, where you will be publishing your app for the Microsoft Store (more on that later)
- Short Description & Long Description
- The short description may be the same as what you have in your manifest while the long description is a more in-depth summary of what your app is and what it does
- A privacy policy if your app can access, collect, or transmit personal information (data that could be used to identify a person).
- A personal Microsoft account (create one here if needed)
- $20 to pay for your Partner Center account.This covers the monitoring of your app and prevents spam apps from being submitted. (Google Play Store: $25, Apple App Store: $99)
- The URL to your site.
With the above four items, you are ready to begin.
Step 1: Packaging
In order to package for the Windows store, you are going to want to navigate to pwabuilder.com and enter the url to your web app on the home page.
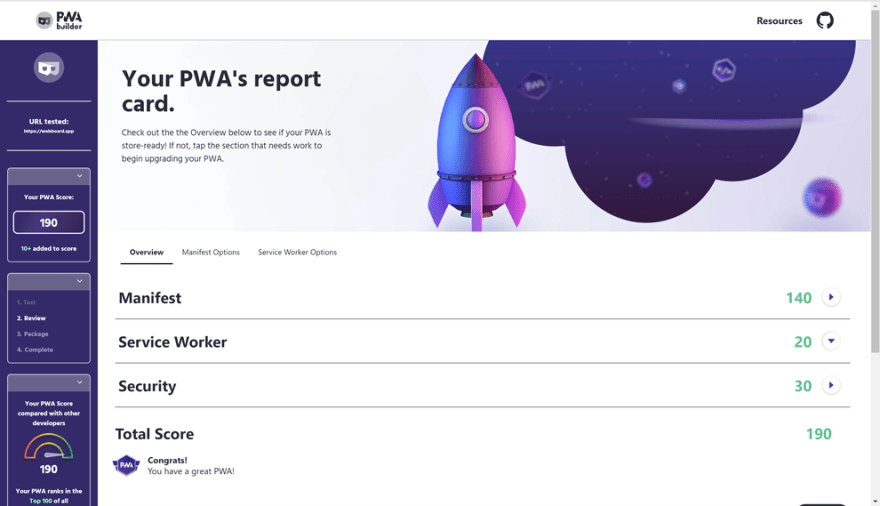
After a few tests run to verify the quality of your PWA, you’ll receive a report card detailing what you do well and some areas for improvement.
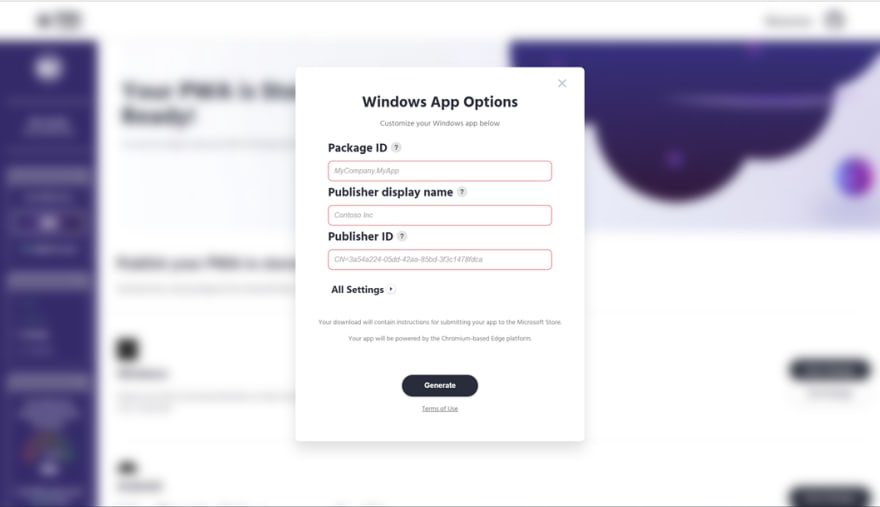
At the bottom of this page, you can press “Next” and you will be at the publishing page of PWABuilder. You can press “Store Package” in the Windows section and you are greeted with a pop up to input a few options.
In a new tab, you are going to want to head over to Partner Center and register your app.
It is important that you register your app on Partner Center with the same name you listed in your manifest. When it comes time to upload your app bundles, it will check if the bundle matches the name of the registered app.
Information on how to register your app can be found here and information on where to find the necessary Ids can be found here. Once you have inputted your publisher information, you can press generate and download your app bundles.
Step 2: Partner Center
If you are inside of your app on Partner Center, you will see a button that says, “Start your submission”. After clicking on that you will see a list of options you will need to take care of before your submission is ready to be reviewed. Since you made sure to have everything on the checklist above, these sections should be a breeze.
After completing each task under each headers, your app is ready for review. These tasks will include setting up your product description page, getting your IARC rating, and uploading your app bundles that you got from PWA Builder. The review process takes about 24 hours and the feedback will either be precisely what was wrong with your submission so you can fix it or a congratulations message letting your know that your submission has been processed and your app will be in the store within the next two hours.
PWA Builder helps you to create store ready PWAs with robust descriptions pages: all while keeping the app submission process as simple as possible.
Why the Microsoft Store?
The Microsoft store is an excellent place for your app to live. All of your in-app purchases (whether that be through Stripe or a custom payment system) go 100% to you. Microsoft will not take a cut. All of your analytics that you have running for your website will behave seemlessly. And most importantly, PWAs submitted through the Microsoft Store are TRUE PWAs; meaning they are not wrapped in a webview. There will be no "gotchas" or extra hoops to jump through in order for your app to feel native. It will just work. I promise I am not making this up, I submitted my very own app, "Sync'd - a Social Calendar App", to the Microsoft Store in early February. I downloaded the app and it looked flawless, exactly like I expected. The cherry on top is that my app was reviewed, approved and in the Store in 24 hours.
Wrapping Up
PWABuilder makes packaging for the Microsoft Store easier than ever. For additional resources on how to package and much more, you can visit the PWABuilder Blog page.
Next Week: Platforms & Practices!
We are are entering the final leg of our #30DaysOfPWA journey. By now, you should have a solid foundation of core concepts, have hands-on experience with advanced capabilities, and learned about core developer tools to improve your workflow!
Here's a sneak peek at what's in store for our final week - get ready to put the polish on your PWAs with a tour of best practices for improving installability, engagement, distribution, reliability, maintainability, authentication - and UI/UX. It's Platforms & Practices week - next!
Want to read more content from Microsoft technologists? Don't forget to follow Azure right here on dev.to:

This content originally appeared on DEV Community and was authored by DEV Community
DEV Community | Sciencx (2022-03-07T02:39:16+00:00) #21 – Tools: Packaging your PWA. Retrieved from https://www.scien.cx/2022/03/07/21-tools-packaging-your-pwa/
Please log in to upload a file.
There are no updates yet.
Click the Upload button above to add an update.


