This content originally appeared on Level Up Coding - Medium and was authored by Jeffrey Wolberg
This is part one of a three part series explaining how to use dart:ffi, OpenCV, and Tensorflow to write a computer vision app in Flutter.
Part one discusses how to properly configure the OpenCV library and our custom C++ files to work within a Flutter app and how to access these C++ files from Dart via dart:ffi.
Part two discusses how to pass data between Dart and C++ using the dart:ffi library using pointers. This is especially important for transferring image data to C++ so that it can be manipulated by OpenCV and returned to Dart.
Part three discusses how to use tensorflow in a Flutter app using the tflite_flutter plug in. We will go through proper configuration, common bugs, and how to run inference on our device.
Note: This tutorial only covers configuration for iOS and has been tested with an M1 mac.

Configuring OpenCV in Xcode
In order to use OpenCV in our app, we must have an opencv ‘.framework’ file, which is a bundle containing the library’s header files as well as binary files for static linkage. That’s a lot of jargon there, but it just means that apple needs a way to access OpenCV resources while running the app.
You can read more about apple frameworks over here : https://developer.apple.com/library/archive/documentation/MacOSX/Conceptual/BPFrameworks/Concepts/WhatAreFrameworks.html
To get this ‘.framework’ file, head on over to https://opencv.org/releases/ and download the iOS Pack. Unzip it, and place the opencv2.framework folder in your PROJECT_DIR/ios folder.
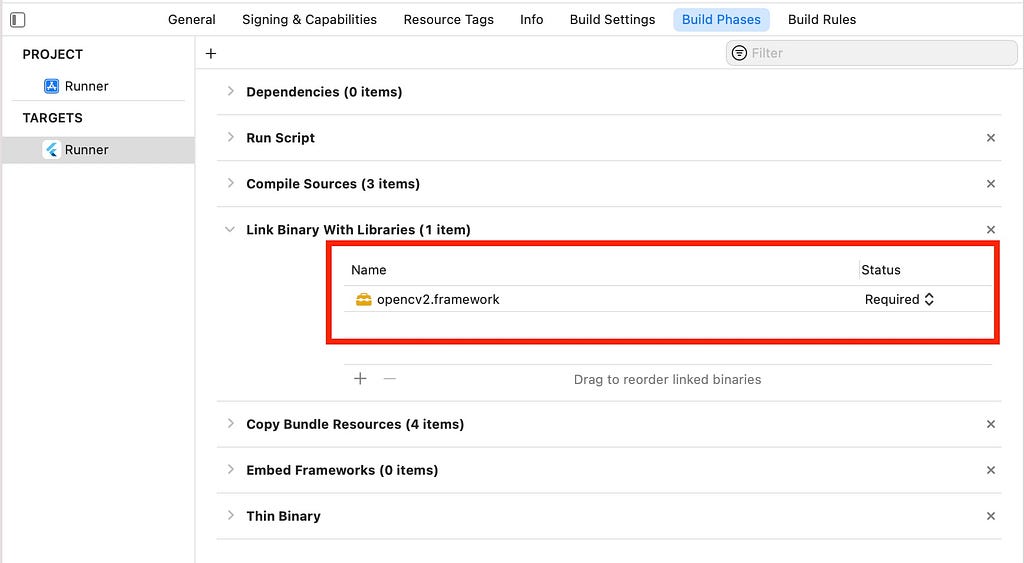
To get Xcode to link it to the app, head on over to the PROJECT_DIR/ios/Runner.xcodeproj and click on Build Phases. Then, under the Link Binary With Libraries tab, add the opencv2.framework folder that you added earlier. See the attached image below.

Writing and Linking Our C++ Code
Let’s test if our OpenCV libraries can be accessed by our app. To do this, we will write a simple C++ function that will be compiled when our app is built. We will then access our it from our flutter app using the dart:ffi package.
The best and most detailed source for understanding how to use dart:ffi is the official docs. I will show you the most important steps below:
Let’s write a small C++ function to test if we can access OpenCV successfully from our Flutter app:

On line 3, you might ask why these symbols are necessary. According to the official docs:
The FFI library can only bind against C symbols, so in C++ these symbols must be marked extern C. The other attributes that are added prevent the linker from discarding the symbols during link-time optimization.
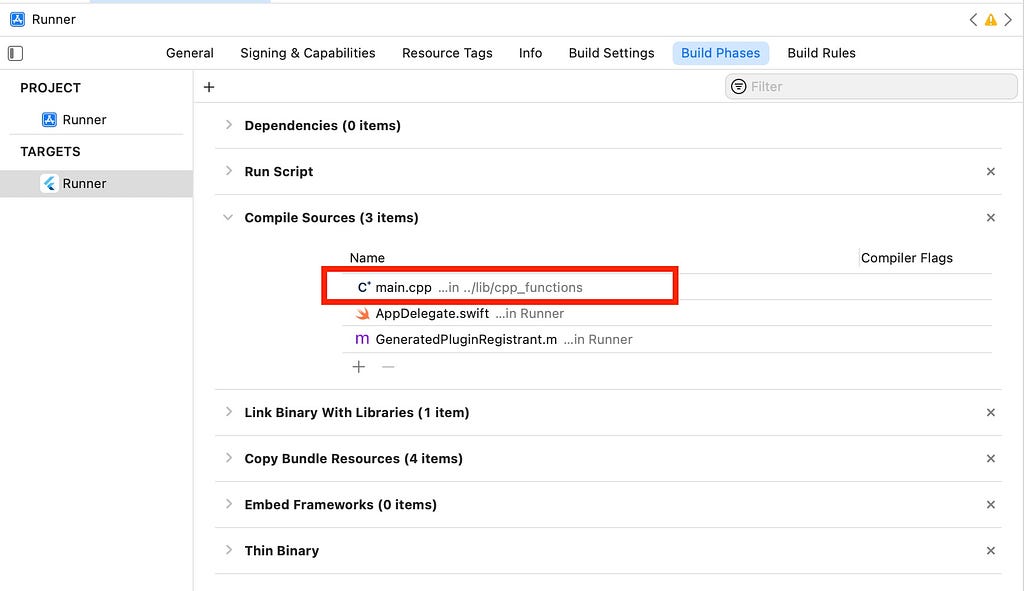
To make sure XCode compiles our C++ function upon build, head on over to the PROJECT_DIR/ios/Runner.xcodeproj and click on Build Phases. Then, under the Compile Sources tab, add the .cpp file that we just created. This is called static linking. See the attached image below.

We must change another configuration setting in Xcode for us to be able to access our C++ code later on.
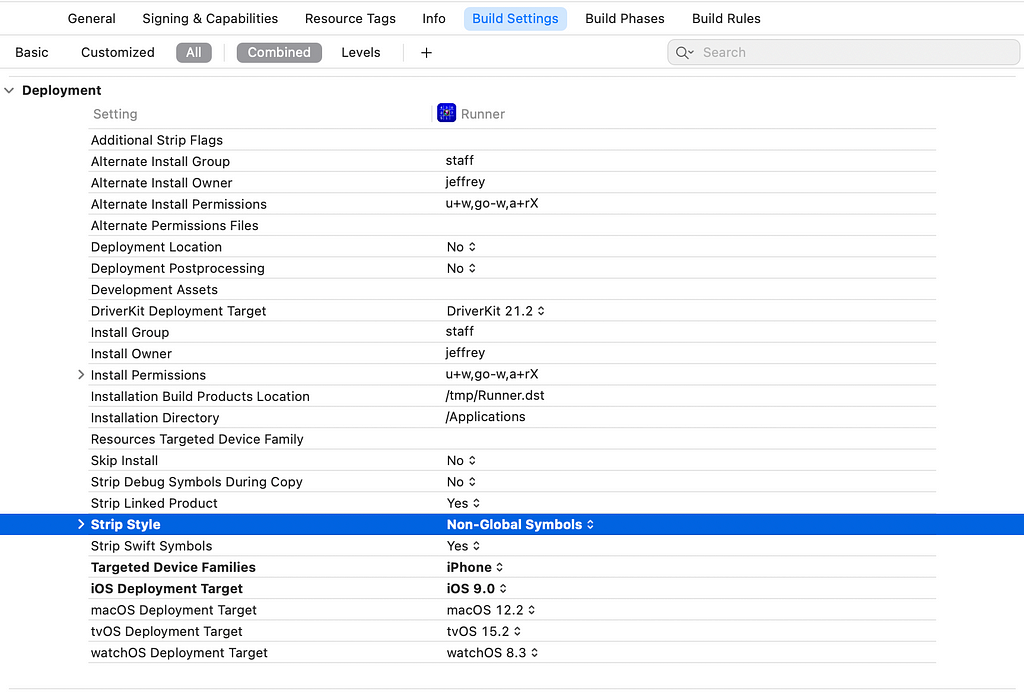
Go to PROJECT_DIR/ios/Runner.xcodeproj and click on Build Settings. Scroll to the Deployment section and change the Strip Style field from “All Symbols” to “Non-Global Symbols”. See this GitHub comment for more info about why this is necessary.

Accessing our C++ Code in Dart
Now we will move to writing in Dart.
Add the dart:ffi package to your pubspec.yaml by either running the following command in your project folder or by visiting https://pub.dev/packages/ffi/install and finding a custom version to place in your pubspec.yaml file
flutter pub add ffi
Great! In our Dart code, we must obtain the dynamic library from which we’ll access our custom C++ function.
import 'dart:ffi'; // For FFI
import 'dart:io'; // For Platform.isX

final DynamicLibrary nativeAddLib = Platform.isAndroid
    ? DynamicLibrary.open('libnative_add.so')
    : DynamicLibrary.process();
Then, load the function by writing:
final int Function(int x, int y) testFunction = nativeAddLib
    .lookup<NativeFunction<Int32 Function(Int32, Int32)>>('testFunction')
    .asFunction();
Then, you can call it!
int output = testFunction(100, 100);
You should be able to see the output in your Flutter app. Hooray! This means you are able to access the full suite of OpenCV functions from your Flutter app via C++.
In the next tutorial, we learn how to use dart:ffi to pass data to and from C++ using pointers. This is especially important for transferring image data to C++ so that it can be manipulated by OpenCV and returned to Dart.
Cheers!
Building a Flutter Computer Vision App Using Dart:ffi, OpenCV, and Tensorflow (Part 1) was originally published in Level Up Coding on Medium, where people are continuing the conversation by highlighting and responding to this story.
This content originally appeared on Level Up Coding - Medium and was authored by Jeffrey Wolberg
Jeffrey Wolberg | Sciencx (2022-03-09T02:31:17+00:00) Building a Flutter Computer Vision App Using Dart:ffi, OpenCV, and Tensorflow (Part 1). Retrieved from https://www.scien.cx/2022/03/09/building-a-flutter-computer-vision-app-using-dartffi-opencv-and-tensorflow-part-1/
Please log in to upload a file.
There are no updates yet.
Click the Upload button above to add an update.
