
This content originally appeared on Level Up Coding - Medium and was authored by Alejandro Pinola
Handling payments between two Ethereum accounts is just easy as sending a transaction from one account to another. But every transaction has a cost and if you aim to perform a lot of transactions to different accounts, you probably want to avoid paying the fee every single time.
The alternative? Let the receiver pay for getting its own money.
And how to do it? Well, the idea is to deliver payments orders with a signed message to whoever be the beneficiary in a complete off-chain operation, and when they are ready, can claim their funds by interacting with the smart contract that holds it.
A Micropayments channel approach is available in the official solidity documentation. I started from here and made some modifications so the contract fits with my intended solution.
Here I’ll describe how I managed to develop this solution, without focusing on the CI/CD and engineering fundamentals. You can find details on that in my last article.
The Solution
A Web application that allows a “company” to manage several Micropayments contracts using a Factory contract. From the UI, the account that owns the factory can create and delete Micropayments instances with a specified amount of Ether on its initial balance. Also, from the UI the owner can generate signed messages to allow any address to claim funds of the contract.
The other part of the UI is the simpler one and allows any user to make a claim to collect their funds by using the signed message as input.
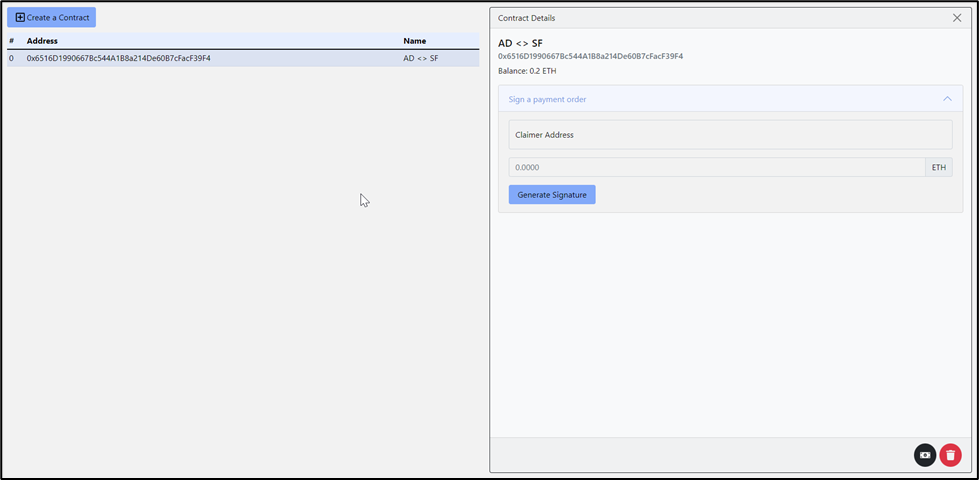
To allow an account to get funds from the contract, the user needs to indicate the claimer’s address and the amount in ETH that is allowed to receive. With this information and additional data that I will describe later, a signature is generated using MetaMask.
Generating the signature
constructMessage(recipient, amount, nonce) {
   return soliditySHA3(
      ['address', 'uint256', 'uint256', 'address'],
      [recipient, amount, nonce, this._contractAddress]);
}
The previous method takes the recipient's address, the contract’s address, the amount, and a nonce and generates a fixed-length hash of 32 bytes. This is done to limit the length of the base message before signing.
- recipient: We indicate the one that is allowed to claim the funds. When the claimer interacts with the smart contract, the msg.sender value should match with the recipient.
- amount: The amount to claim should match the allowed.
- nonce: A unique identifier to ensure that the same signature can’t be used twice. This value is saved in the contract and will reject the claim if it has been used.
- contractAddress: This is to be sure that the claimer will be interacting with just the contract that is intended. Without this, the same signature could be used in several contracts created by the same signer account.
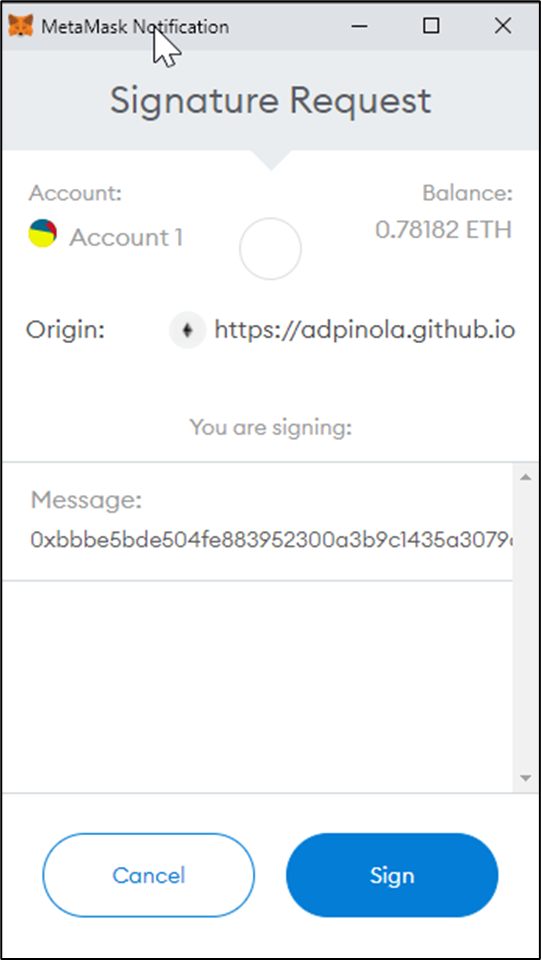
After generating the hash, let’s sign it using the following method.
web3.eth.personal.sign(hash, signerAddress, '');
Please note that the third parameter corresponds to a password. I left it blank, and there is no need of setting any value here. I tried it using several different values and always got the same signature. When calling this method, MetaMask will prompt and ask you to confirm the signature.
The UI shows nicely the necessary values to perform a claim that should be shared with the claimer.
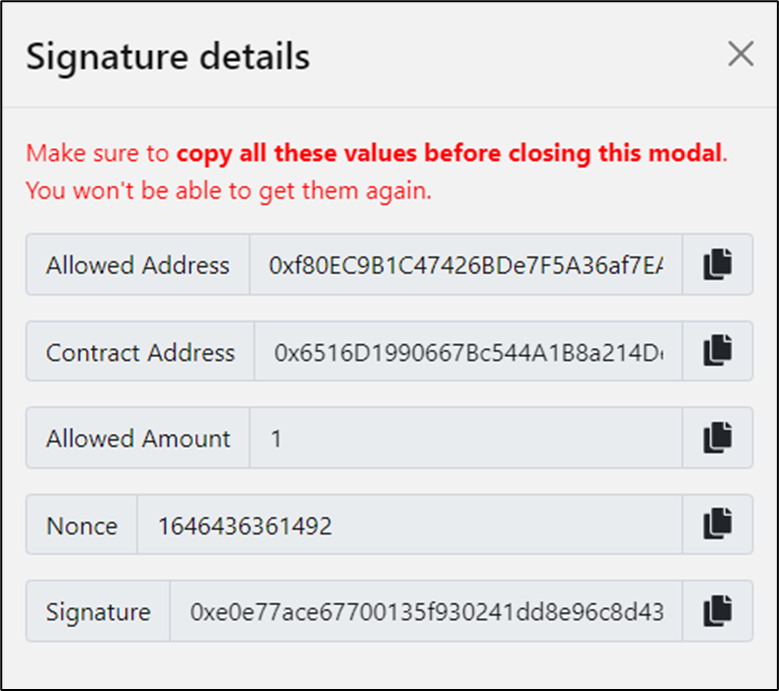
So far, we didn’t interact with the smart contract yet, so all of this was for free. Let’s copy this information and share it with the target user.
Claim a payment
Now, the target user wants to claim their funds so let’s go there and make a claim
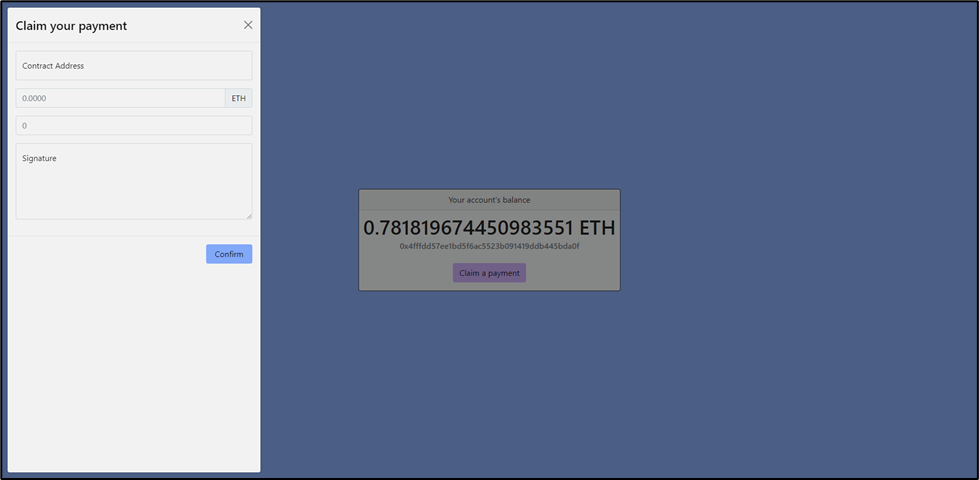
Here is where the actual interaction with the smart contract begins, and where someone is paying a fee.
To claim a payment, we just need to know the contract address to make the request to, the amount to claim, the nonce, and of course, the signature.
function claimPayment(uint256 amount, uint256 nonce, bytes memory signature) external {
   require(!usedNonces[nonce], "Claim already done");
   usedNonces[nonce] = true;

   bytes32 message = keccak256(abi.encodePacked(_msgSender(), amount, nonce, this)).prefixed();

   require(message.recoverSigner(signature) == owner(), "Signature is invalid [owner]");
payable(_msgSender()).transfer(amount);
emit PaymentClaimed(_msgSender(), name, block.timestamp);
}
Let’s analyze this. The first “require” is checking that the nonce was never used to make a claim. Then the second line is generating the exact same message that should be generated by web3.eth.personal.sign . Then the “recoverSigner” method takes the message and the signature and retrieves the owner that supposedly signed it. If it matches with the contract’s owner, then it is a valid signature, and funds are transferred.
The method prefixed() prepends \x19Ethereum Signed Message:\32 to the message hash. This is the unique mark to distinguish for a signed message. Notice that the last 32 is the length of the original message hash.
The method recoverSigner() calls ecrecover which is a very useful method used to get the signer from a given message and its signature.
Notice that this call keccak256(abi.encodePacked(_msgSender(), amount, nonce, this)) does the same as constructMessage. It hashes the input data. As you can see the claimer is taken from the msg.sender and the contract’s address from the actual contract.
The Factory
There are some factory implementations on the web, and you can check the code in the repo I’ll share with you by the end of this article. So I just want to address the most important problems I had to tackle.
First of all, the easy one. I wanted that the ownership of the created contract was the account that creates the instance and not the Factory. Thank god we have OpenZeppelin and we do not need to write code, I just inherit my Micropayments contract from Ownable. So I just call transferOwnership() and make the msg.sender the new owner.
Micropayments micropaymentContract = (new Micropayments){value: msg.value}(name);micropaymentContract.transferOwnership(_msgSender());
The second problem comes when deleting a Micropayments instance. Since the factory is keeping track of the created instances, If we just one of them, the factory doesn’t notice. So, what I did was create a shutdown() method in the Micropayments contract that can only be called from the factory that created it, and store that address in a new variable. So, the owner of the instance is the one who created it. But it can only be deleted from the factory. Also, the factory method that performs deletions can only be called by the factory owner.
function deleteContract(address location) external onlyOwner {
   uint256 contractIndex = addressToIndex[location];

   Micropayments toDelete = Micropayments(contracts[contractIndex]);
   toDelete.shutdown();
contracts[contractIndex] = contracts[contracts.length - 1];
contracts.pop();
   emit MicropaymentsDeleted(_msgSender(), location);
}
Hint: check out in the deleteContract() method how the contracts array is updated. if you attempt to do delete contracts[index] that position won’t be removed from the array and the length will be the same. It just will set that position with the default value the array has.
Last but not least, here you have the repo and site. The contracts are deployed on Rinkeby.
https://github.com/adpinola/Micropayments
Since you are not the owner of the Factory you won't be able to interact with it. If you want to get some ETH, please share your address and I will sign a message for you!!
Of course, you can deploy it yourself, own the factory and start creating payment orders.
Thanks for reading, I hope it helps in your developing adventure.
A Micropayments Channel Factory with Solidity was originally published in Level Up Coding on Medium, where people are continuing the conversation by highlighting and responding to this story.
This content originally appeared on Level Up Coding - Medium and was authored by Alejandro Pinola
Alejandro Pinola | Sciencx (2022-03-11T21:16:43+00:00) A Micropayments Channel Factory with Solidity. Retrieved from https://www.scien.cx/2022/03/11/a-micropayments-channel-factory-with-solidity/
Please log in to upload a file.
There are no updates yet.
Click the Upload button above to add an update.