
This content originally appeared on DEV Community and was authored by Jeffrey Yu
Nearly every web project needs user authentication. In this article I will share how I implement auth flow in my MERN stack projects. This implementation can be applied in every project that registers users with email and password.
How it works
First of all, JSON Web Token is a popular library that provides functions to create a unique, encrypted token for a user's current login status, and verify if a token is invalid and not expired.
The app's authentication flow is demonstrated below:
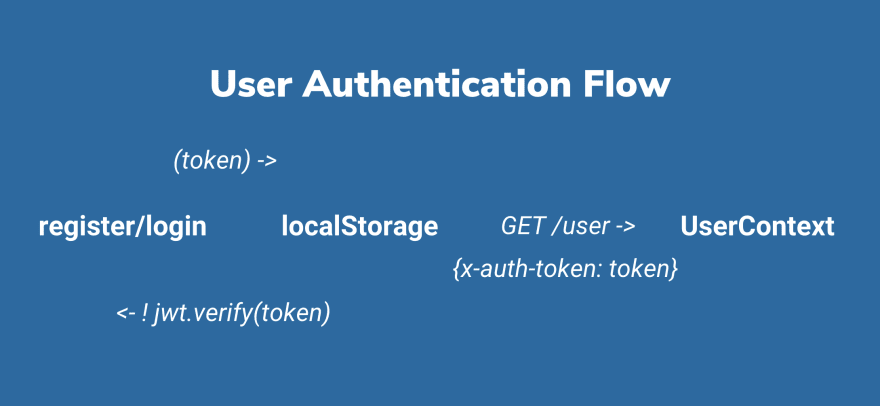
When a user clicks register or login, the correponding Express route returns a jwt token. The token gets stored in the browser localStorage so that a user can come back three days later without login again.
Every protected route in Express (that needs user's login status) has an auth middleware. React puts the localStorage token in the x-auth-token header when calling these protected routes.
In the middleware, jwt verifies if the token in the header is valid and hasn't expired. If so, it processes to the route; if not, Express returns 403 and React prompts the user back to the login page.
Express register route
The register route receives email and password in the request body. If the user with the email doesn't exist, it creates a new user with the password hashed by bcrypt, and stores it into the Mongoose User model. Finally it returns a signed jwt token.
const express = require('express');
const router = express.Router();
const jwt = require('jsonwebtoken');
const bcrypt = require('bcryptjs');
const User = require('../models/User');

router.post('/user', async (req, res) => {
    const { email, password } = req.body;

    try {
      // check if the user already exists
      user = await User.findOne({ email });
      if (user) {
        return res.status(400).json({ msg: 'Email already exists' });
      }

      // create new user
      user = new User({
        email,
        password,
      });

      // hash user password
      const salt = await bcrypt.genSalt(10);
      user.password = await bcrypt.hash(password, salt);
      await user.save();

      // return jwt
      const payload = {
        user: {
          id: user.id,
        },
      };

      jwt.sign(
        payload,
        process.env.JWT_SECRET,
        { expiresIn: '7 days' },
        (err, token) => {
          if (err) throw err;
          res.json({ token });
        }
      );
    } catch (err) {
      console.error(err.message);
      res.status(500).send('Server error');
    }
  }
);
Express login route
The login route also receives email and password. If the user with the email exists, it compares the hash password and returns a signed token if succeeds.
router.post('/user/login', async (req, res) => {
    const { email, password } = req.body;

    try {
      // check if the user exists
      let user = await User.findOne({ email });
      if (!user) {
        return res.status(400).json({ msg: 'Email or password incorrect' });
      }

      // check is the encrypted password matches
      const isMatch = await bcrypt.compare(password, user.password);
      if (!isMatch) {
        return res.status(400).json({ msg: 'Email or password incorrect' });
      }

      // return jwt
      const payload = {
        user: {
          id: user.id,
        },
      };

      jwt.sign(
        payload,
        process.env.JWT_SECRET,
        { expiresIn: '30 days' },
        (err, token) => {
          if (err) throw err;
          res.json({ token });
        }
      );
    } catch (err) {
      console.error(err.message);
      res.status(500).send('Server error');
    }
  }
);
Express get user info route
Since login and register only returns a token, this route returns the user info given the token.
router.get('/user/info', async (req, res) => {
  try {
    const user = await UserModel.findById(req.user.id).select('-password');
    res.status(200).json({ user });
  } catch (error) {
    res.status(500).json(error);
  }
};
Express auth middleware
The auth middleware verifies the token exists and is valid before preceeds to a protected route.
const jwt = require('jsonwebtoken');

module.exports = function (req, res, next) {
  // Get token from header
  const token = req.header('x-auth-token');

  // Check if no token
  if (!token) {
    return res.status(401).json({ msg: 'No token, authorization denied' });
  }

  // Verify token
  try {
    jwt.verify(token, process.env.JWT_SECRET, (error, decoded) => {
      if (error) {
        return res.status(401).json({ msg: 'Token is not valid' });
      } else {
        req.user = decoded.user;
        next();
      }
    });
  } catch (err) {
    console.error('something wrong with auth middleware');
    res.status(500).json({ msg: 'Server Error' });
  }
};
Then in every protected route, add the auth middleware like this:
const auth = require('../middleware/auth');
router.post('/post', auth, async (req, res) => { ... }
React auth context
I use useReducer to store auth status and user info, and use useContext to provide the reducer state and actions including login, register, and logout.
The login and register actions store the token returned from axios requests in localStorage and calls the user info route with the token.
On reducer state init or change, the user info route will be called to make sure the user info is in the reducer and the axios auth header is set if the user is logined.
import { createContext, useEffect, useReducer } from 'react';
import axios from 'axios';

const initialState = {
  isAuthenticated: false,
  user: null,
};

const authReducer = (state, { type, payload }) => {
  switch (type) {
    case 'LOGIN':
      return {
        ...state,
        isAuthenticated: true,
        user: payload.user,
      };
    case 'LOGOUT':
      return {
        ...state,
        isAuthenticated: false,
        user: null,
      };
  }
};

const AuthContext = createContext({
  ...initialState,
  logIn: () => Promise.resolve(),
  register: () => Promise.resolve(),
  logOut: () => Promise.resolve(),
});

export const AuthProvider = ({ children }) => {
  const [state, dispatch] = useReducer(authReducer, initialState);

  const getUserInfo = async () => {
    const token = localStorage.getItem('token');

    if (token) {
      try {
        const res = await axios.get(`/api/user/info`);
        axios.defaults.headers.common['x-auth-token'] = token;

        dispatch({
          type: 'LOGIN',
          payload: {
            user: res.data.user,
          },
        });
      } catch (err) {
        console.error(err);
      }
    } else {
      delete axios.defaults.headers.common['x-auth-token'];
    }
  };

  // verify user on reducer state init or changes
  useEffect(async () => {
    if (!state.user) {
        await getUserInfo();
    }
  }, [state]);

  const logIn = async (email, password) => {
    const config = {
      headers: { 'Content-Type': 'application/json' },
    };
    const body = JSON.stringify({ email, password });

    try {
      const res = await axios.post(`/api/user/login`, body, config);
      localStorage.setItem('token', res.data.token);
      await getUserInfo();
    } catch (err) {
      console.error(err);
    }
  };

  const register = async (email, password) => {
    const config = {
      headers: { 'Content-Type': 'application/json' },
    };
    const body = JSON.stringify({ email, password });

    try {
      const res = await axios.post(`/api/user/register`, body, config);
      localStorage.setItem('token', res.data.token);
      await getUserInfo();
    } catch (err) {
      console.error(err);
    }
  };

  const logOut = async (name, email, password) => {
    try {
      localStorage.removeItem('token');
      dispatch({
        type: 'LOGOUT',
      });
    } catch (err) {
      console.error(err);
    }
  };

  return (
    <AuthContext.Provider value={{ ...state, logIn, register, logOut }}>
      {children}
    </AuthContext.Provider>
  );
};

export default AuthContext;
I put useContext in customized hook - just a good practice to access to context easily.
import { useContext } from 'react';
import AuthContext from '../contexts/FirebaseAuthContext';

const useAuth = () => useContext(AuthContext);

export default useAuth;
React guest & user guard
Guard components are simple auth navigation components that wrap around other components. I use guard components so that the auth navigation logic is seperated from individual components.
Guest guard navigates unlogined user to login and is wrapped around protected pages.
import { Navigate } from 'react-router-dom';
import useAuth from '../hooks/useAuth';

const GuestGuard = ({ children }) => {
  const { isAuthenticated } = useAuth();

  if (!isAuthenticated) {
    return <Navigate to="/login" />;
  }
  return <>{children}</>;
};
<GuestGuard>
  <PostReview />
</GuestGuard>
User guard navigates logined user to home page and is wrapped around login and register pages.
const UserGuard = ({ children }) => {
  const { isAuthenticated } = useAuth();

  if (isAuthenticated) {
    return <Navigate to="/dashboard" />;
  }
  return <>{children}</>;
};
<UserGuard>
  <Login />
</UserGuard>
This is how to setup JWT auth in MERN from scratch. The user and email registration would work well for small-scale projects, and I would recommend implementing OAuth as the website scales.
This content originally appeared on DEV Community and was authored by Jeffrey Yu
Jeffrey Yu | Sciencx (2022-03-17T23:06:25+00:00) Setup JWT authentication in MERN from scratch. Retrieved from https://www.scien.cx/2022/03/17/setup-jwt-authentication-in-mern-from-scratch/
Please log in to upload a file.
There are no updates yet.
Click the Upload button above to add an update.