This content originally appeared on Level Up Coding - Medium and was authored by Taylor Keazirian
New to Vim? Here’s my recommended plugins and setup

In my last article, I told you about why I chose to learn Vim and my Vim experience thus far. Here I’ll walk you through my personal Vim environment and what makes it so great.
The Setup
- Download Vim (I used Homebrew — brew install vim)
- Download Vundle — this is what you’ll use to manage your plugins
- Follow the instructions on Vundle’s README to copy and paste the starter code into your ~/.vimrc file
Want more practice in Vim? Edit your dotfiles using Vim. I used to edit my dotfiles in Text Edit — can you imagine?! Why not go directly from your command line into the file? Type vim ~/.vimrc in your terminal prompt — the file opens directly in your Vim environment ready to edit. And now I’ve given you another reason to learn Vim and an easy way to practice!
~/.vimrc
Your ~/.vimrc file is where all your Vim configurations will live. This is where you’ll add your plugins, key-mapping, and setup. Once you have the starter code from Vundle, you can begin to customize this file to your needs.
Notable Plugins and Features
NERDTree

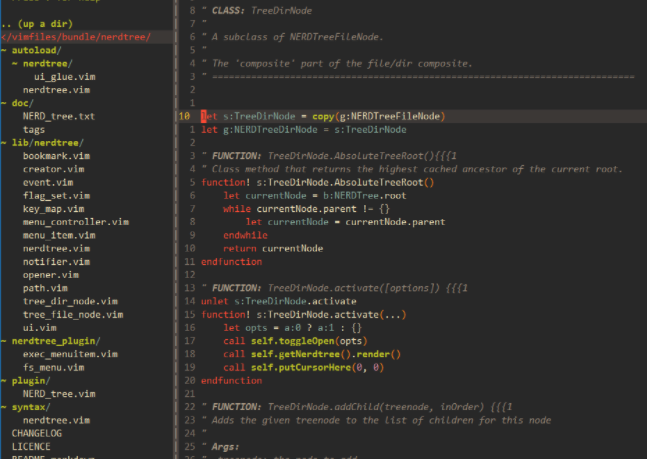
NERDTree displays all your files on the left of your editor, not unlike the file display in Visual Studio Code. Use it to easily navigate to and quickly open files to read or edit. For example — I split my editor and have the code I’m editing on the left and my testing file on the right (TDD — a topic for another time). Vim shortcut — ^W V splits your editor.
Lightline

Lightline inserts a status bar at the bottom of your editor. There are several themes to choose from depending on your color preference. This plugin allows you to easily see which mode you are currently operating in. There’s nothing more frustrating than thinking you’re in NORMAL mode and typing commands directly into your code because you were actually in INSERT mode. Save yourself the headache.
vim-gitbranch

Leverage your Lightline plugin — this plugin works in conjunction with Lightline and displays your current working branch in your status bar. It is especially helpful when you frequently switch branches and lose track of your current working branch.
ALE (Asynchronous Lint Engine)

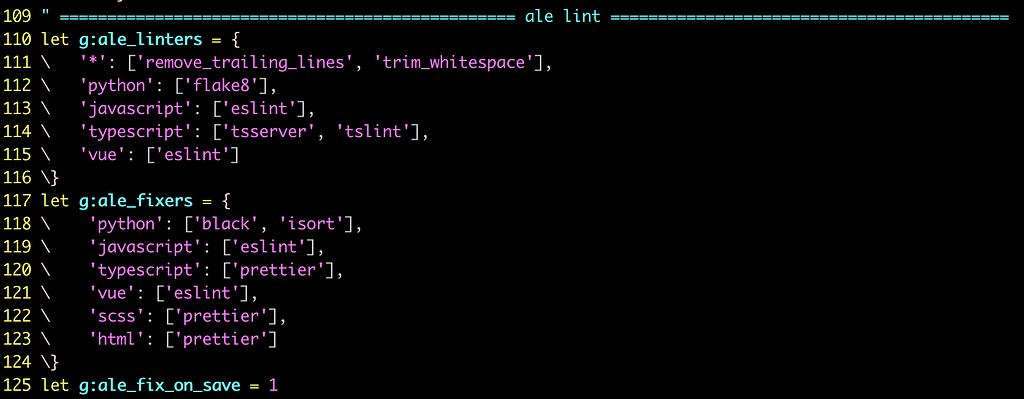
Your one-stop-shop for linting, syntax checking, and semantic error alerting while you edit your files. In other words, lint as you type. You can set up both linters and fixers. It’s customizable based on language and has several other features I haven’t even explored yet.
You Complete Me
From their GitHub, “YouCompleteMe is a fast, as-you-type, fuzzy-search code completion, comprehension and refactoring engine for Vim.” This plugin will upgrade your efficiency like mad. The install requires some configuring, but follow along carefully with their README and you’ll be set up in no time.
UI Configuration

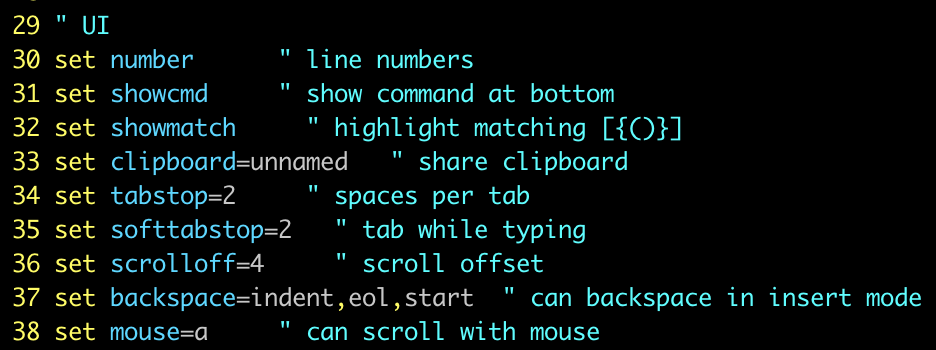
There are several ways to customize your Vim UI. For example, set number displays your line numbers. These are just a few examples — I encourage you to flex your Google Fu as you personalize your Vim environment.
This is by no means an exhausted list of Vim Plugins. Take what works for you, and use this as an opportunity for a little fun and exploration.
Helpful Commands for Plugins:
- Add the Plugin line to your ~/.vimrc file (it should look similar to the example below)

- To install plugins — launch vim and run :PluginInstall
- To remove plugins — remove the line from your ~/.vimrc file, launch vim, and run :PluginClean
A Key Mapping Game Changer
I’ll leave you with this last little trick taught to me recently…
If you’re using a Mac keyboard, the bottom left four keys are a little out of the way when your fingers are positioned nicely where they’re supposed to be if you paid attention in typing class. Call back to Mavis Beacon — anyone else take a class like this in grade school?
Coding in Vim is all about efficiency. We use the Control key quite frequently. Reaching your pinky down towards the Control button is not very efficient and takes your fingers out of line with the home keys.
When is the last time you used your Caps Lock? Upon the rare occurrence when I need to type several words in all-caps, I tend to hold down the Shift button and let it ride. The Caps Lock key could be put to much better use, don’t you think?
Enter — keyboard mapping. We will map our Caps Lock key to perform the action of our Control key instead.
Try it Out
- Open System Preferences
- Navigate to Keyboard
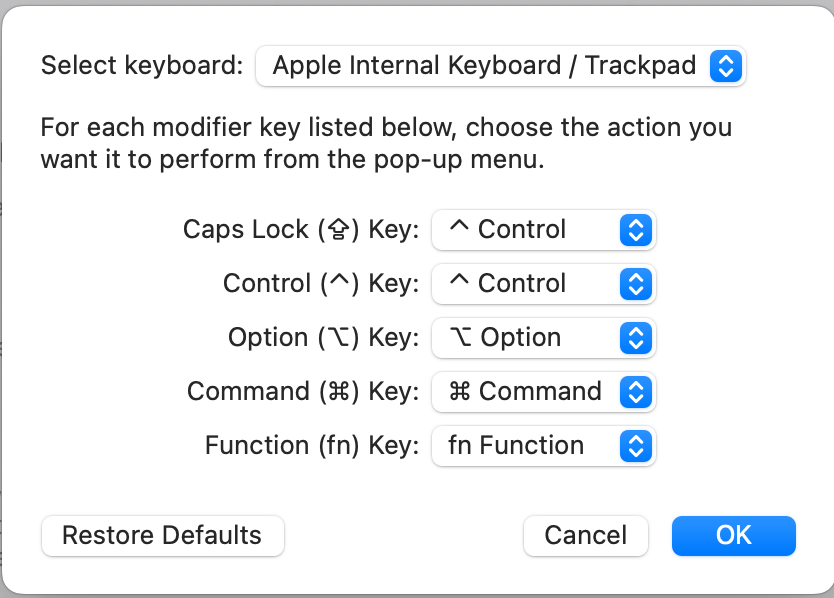
- Click on Modifier Keys
- You’ll see a pop up with a list of keys and the action they perform when you click them
- Change your Caps Lock key to Control
- Bam — now every time you hold down Caps Lock, you’ll trigger the Control action
Note: Option to leave the Control key as it is so that both keys are now effectively Control keys. If you would still like to have access to Caps Lock, I recommend mapping your Control to Caps Lock instead.

This article only scratches the surface of all you can do in Vim — and I’m just a beginner :) let your curiosity explore what else is possible!
If you want to see my ~/.vimrc file, check out my GitHub repo where my dotfiles live. I also suggest creating your own repo with your dotfiles.
Everyone will have a different ~/.vimrc setup — this is what works for me AND I’m always looking for ways to level it up. If you have any recommendations for awesome plugins or Vim configurations, I’d love to hear about it. Happy Coding!
Level Up Your Vim Experience was originally published in Level Up Coding on Medium, where people are continuing the conversation by highlighting and responding to this story.
This content originally appeared on Level Up Coding - Medium and was authored by Taylor Keazirian
Taylor Keazirian | Sciencx (2022-03-22T01:20:28+00:00) Level Up Your Vim Experience. Retrieved from https://www.scien.cx/2022/03/22/level-up-your-vim-experience/
Please log in to upload a file.
There are no updates yet.
Click the Upload button above to add an update.
