This content originally appeared on DEV Community and was authored by Luiza Avelino
TL;DR
In this article we'll learn how to implement a basic flatlist in React Native following some good practices.
What is FlatList ?
FlatList it's one of the react-native components that render a scrollable list, just like ScrollView, but it's way more performative.
Why can't I just use a .map method with a ScrollView ?
Well... you can, but your performance will suffer a lot with this bad practice.
The problem it's that using the map method with ScrollView will load your whole data at once, so every time your component re-render your data will be fully loaded and displayed again - even the data that is hidden by the scrollview.
The solution - FlatList
The FlatList came to resolve this performance issue and other problems like infinite scroll, lazy loading...
Displaying a simple list
When implementing a simple list in FlatList we just need to pass 3 props (properties):
data, key and renderItem
Let's start with some mocked data and use it in our flatlist with some basic styling:
const App = () => {
  const [users, setUsers] = useState([
    { name: "Annya" },
    { name: "Regina" },
    { name: "Maria" },
    { name: "Kate" },
    { name: "Angelica" },
    { name: "Taylor" },
    { name: "Karol" },
    { name: "Olivia" },
    { name: "Emma" },
    { name: "Ava" },
    { name: "Isabella" },
  ]);

  const handleDelete = (name) => {
    setUsers((prevState) => prevState.filter((user) => user.name !== name));
  };

  return (
    <FlatList
      data={users}
      renderItem={({ item }) => {
        return (
          <View
            style={{
              flexDirection: "row",
              alignItems: "center",
              margin: 20,
              justifyContent: "space-between",
            }}
          >
            <Text style={{ fontSize: 20 }}>{item.name}</Text>

            <Button
              title="Delete"
              onPress={() => handleDelete(item.name)}
            ></Button>
          </View>
        );
      }}
    />
  );
}
export default App;
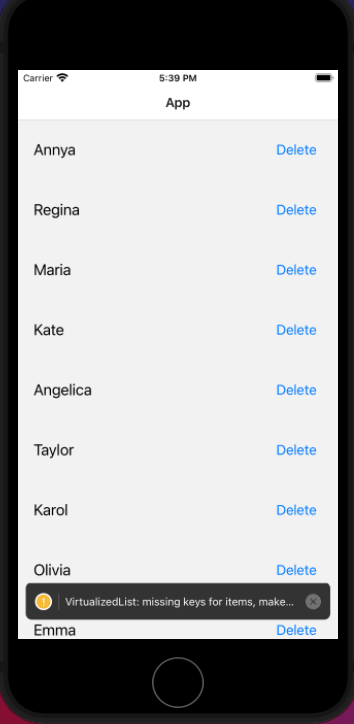
This will be the result (don't worry about the warning message right now):

In the code above we pass our friends array to the data prop and the list's layout on therenderItem.
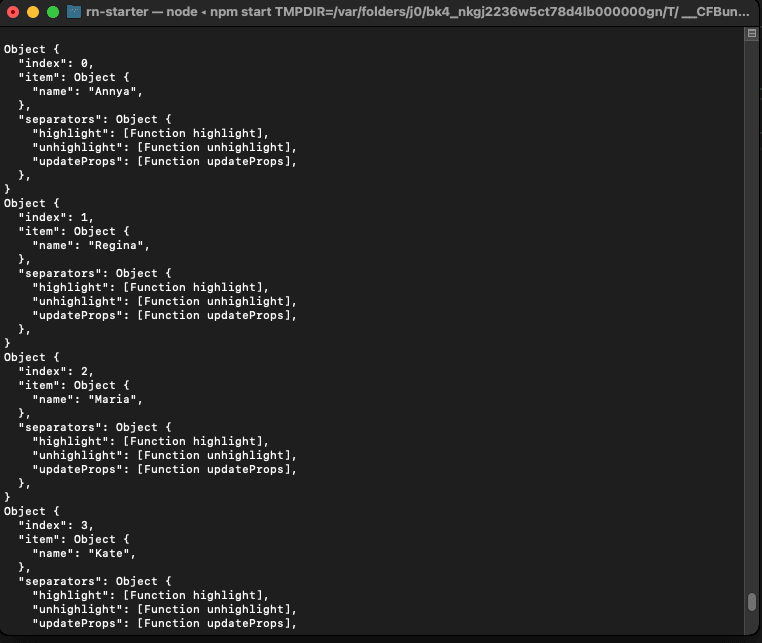
The renderItem method takes an item from the data and renders it into the list. If you notice, we are destructuring our object and accessing the item directly, and why we did like this?
Basically the renderItem add our current object into its own object, so we have to access our data via element.item.name - here you can replace element for whatever name you want - it's just easier to destructure and access via item.name.
If we put a console.log right before our return statement, this will be the output of out renderItem:

And if I press the delete button, it'll work ?
Yes! But not as you'd expect.
So, what's the expected behavior?
We want to press the button, keep the list intact and delete only the selected item.
And apparently, it's working how we expect... but it isn't.
... then how it's working?
Right now when we press the delete button the whole list it's being deleted and then re-rendered with new content. We don't want this for our app, right now the list only has 11 elements displaying a simple <Text>, but can you imagine this behavior happening in a list with more than 100 elements displaying images, videos, and some heavy content?!
The answer for this problem it's on the warning message.
The warning message and the key prop
If we take a look at the message, it's saying:
VirtualizedList: missing keys for items, make sure to specify a key or id property on each item or provide a custom
keyExtractor.
It's telling us that we need to pass some key or a keyExtractor, but what's the purpose of this key?
This key will be a unique reference for each element, so internally the FlatList can manage the content in an optimized way
We have to ways to solve this problem:
1. Adding the key(or id) directly in our object:
const [users, setUsers] = useState([
    { name: "Annya", key: '1' },
    { name: "Regina", key: '2' },
    { name: "Maria", key: '3' },
    { name: "Kate" , key: '4'},
    { name: "Angelica" , key: '5'},
    { name: "Taylor" , key: '6'},
    { name: "Karol" , key: '7'},
    { name: "Olivia" , key: '8'},
    { name: "Emma" , key: '9'},
    { name: "Ava", key: '10' },
    { name: "Isabella" , key: '11'},
  ]);
in this case, we don't even need to modify the FlatList itself.
2. Using the keyExtractor:
const App = () => {
  const [users, setUsers] = useState([
    { name: "Annya", uuid: '1' },
    { name: "Regina", uuid: '2' },
    { name: "Maria", uuid: '3' },
    { name: "Kate" , uuid: '4'},
    { name: "Angelica" , uuid: '5'},
    { name: "Taylor" , uuid: '6'},
    { name: "Karol" , uuid: '7'},
    { name: "Olivia" , uuid: '8'},
    { name: "Emma" , uuid: '9'},
    { name: "Ava", uuid: '10' },
    { name: "Isabella" , uuid: '11'},
  ]);

  const handleDelete = (name) => {
    setUsers((prevState) => prevState.filter((user) => user.name !== name));
  };

  return (
    <FlatList
      data={users}
      keyExtractor={(user) => user.uuid}
      renderItem={({ item }) => {
        return (
          <View
            style={{
              flexDirection: "row",
              alignItems: "center",
              margin: 20,
              justifyContent: "space-between",
            }}
          >
            <Text style={{ fontSize: 20 }}>{item.name}</Text>

            <Button
              title="Delete"
              onPress={() => handleDelete(item.name)}
            ></Button>
          </View>
        );
      }}
    />
  );
}
export default App;
When we have a custom unique key in our object, i.e uuid, we can use the keyExtractor, this prop expects a function that returns the unique value.
A last optimization
This sample app it's extremely simple so we don't need to do a lot of optimizations, but one of the things we have to be aware of it's the use of inline functions.
Inline functions are re-created on every re-render which can cause performance issues. So we adjust like this:
const App = () => {
  const [users, setUsers] = useState([
    { name: "Annya", uuid: '1' },
    { name: "Regina", uuid: '2' },
    { name: "Maria", uuid: '3' },
    { name: "Kate" , uuid: '4'},
    { name: "Angelica" , uuid: '5'},
    { name: "Taylor" , uuid: '6'},
    { name: "Karol" , uuid: '7'},
    { name: "Olivia" , uuid: '8'},
    { name: "Emma" , uuid: '9'},
    { name: "Ava", uuid: '10' },
    { name: "Isabella" , uuid: '11'},
  ]);

  const handleDelete = (name) => {
    setUsers((prevState) => prevState.filter((user) => user.name !== name));
  };

  const _renderItem  = ({item}) => {
    return (
        <View
          style={{
            flexDirection: "row",
            alignItems: "center",
            margin: 20,
            justifyContent: "space-between",
          }}
        >
          <Text style={{ fontSize: 20 }}>{item.name}</Text>

          <Button
            title="Delete"
            onPress={() => handleDelete(item.name)}
          ></Button>
        </View>
      );
  }

  const keyExtractor = (user) => user.uuid;

  return (
    <FlatList
      data={users}
      keyExtractor={keyExtractor}
      renderItem={_renderItem}
    />
  );
}
That's it for this article, I hope it has helped you somehow.
See ya! 😉
This content originally appeared on DEV Community and was authored by Luiza Avelino
Luiza Avelino | Sciencx (2022-03-31T14:37:06+00:00) The basics of FlatList. Retrieved from https://www.scien.cx/2022/03/31/the-basics-of-flatlist/
Please log in to upload a file.
There are no updates yet.
Click the Upload button above to add an update.

