
This content originally appeared on DEV Community and was authored by Ifeoma Imoh
For all that images are an essential communication medium, their background is just as important because a noisy background tends to draw attention away from images. To resolve that issue, replace the original background with an artificial one for various contexts, such as colored T-shirts, webpage headers, etc.
This tutorial describes how to remove the background of an image with Cloudinary and Pixelz. You start with building a React app that uploads an image and then proceeds to remove its background. Afterwards, hook into the process and build a mechanism that notifies you by email when the removal process is complete.
Keep in mind the following:
- You must be on a paid Cloudinary plan to access the features required, which are a premium Cloudinary offering. You must also subscribe to Cloudinary’s Pixelz add-on.
- Background removal is carried out asynchronously by a team of human experts, who could take up to 24 hours to complete the task.
A demo is on CodeSandbox.
Setting Up the Project
First, set up the project:
Create a React app with this command:
npx create-react-app image_background_remover
Add the project dependencies:
npm install antd @ant-design/icons axios
Import the CSS for antd by adding ~antd/dist/antd.css to the App.css file in your src directory:
@import "~antd/dist/antd.css";
Setting Up Cloudinary
First, sign up for a free Cloudinary account. Displayed on your account’s Management Console (aka Dashboard) are important details: your cloud name, API key, etc.
Since you’ll be sending images to Cloudinary through unsigned POST requests, create an unsigned upload preset, as follows:
On the Management Console, choose Settings > Upload for the page with upload settings.
Scroll to the Upload presets section and click Add upload preset at the bottom of the section.
On the page that’s displayed, choose Unsigned from the pull-down menu under Signing Mode.
-
Click Media analysis and AI in the left-navigation area and, on the page that’s displayed, choose Pixelz from the pull-down menu under Background removal. Click Save at the top.
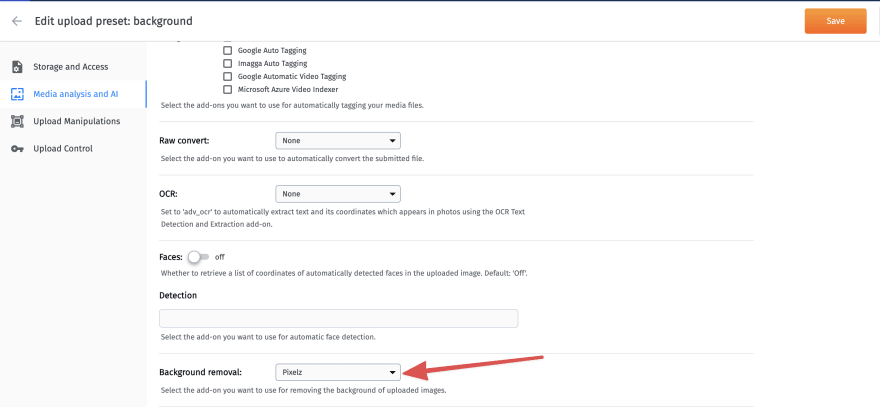
Copy the name of the upload preset you just created for later use.
Next, create environment variables to hold the details of your Cloudinary account. Follow these steps:
- Create a file called
.envat the root of the project with the content below. Be sure to replace the two variables after the=symbol with their values.
    REACT_APP_CLOUD_NAME = Your cloud name
    REACT_APP_UPLOAD_PRESET = Your unsigned upload-preset key
These two settings will serve as the default if you set up the project on another system. To update your local environment, create a copy of the .env file by running this command:
cp .env .env.local
By default, this local file resides in the .gitignore folder, mitigating the security risk of inadvertently exposing secret credentials to the public. You can update the .env.local file with your Cloudinary account’s cloud name and the upload preset you created earlier.
In the root directory of your project, create a folder named
utilityfor the helper classes for your components.In your
srcfolder, create a file namedcloudinaryConfig.jsfor accessing the environment variables and for preventing repeatedprocess.env.calls throughout the project.Add the code below to the
cloudinaryConfig.jsfile. Be sure to replace the two variables,React_app_cloud_nameandReact_app_upload_preset, with their values.
    export const cloudName = process.env.React_app_cloud_name;
    export const uploadPreset = process.env.React_app_upload_preset;
Creating a Helper Class for API Requests
Now write a helper function for uploading an image to Cloudinary before starting the background-removal process. In the utility folder, create a file named api.js with this code:
    import axios from 'axios';
    import { cloudName, uploadPreset } from './cloudinaryConfig';
    export const uploadImage = ({ file, successCallback }) => {
      const url = `https://api.cloudinary.com/v1_1/${cloudName}/image/upload`;
      const data = new FormData();
      data.append('file', file);
      data.append('upload_preset', uploadPreset);
      axios
        .post(url, data, {
          headers: {
            'Content-Type': 'multipart/form-data',
          },
        })
        .then((response) => successCallback(response.data));
    };
The uploadImage function uploads the file as specified to Cloudinary by making a POST request to Cloudinary along with the file name and the name of the upload preset you created earlier. On successful completion of the request, uploadImage executes the callback, passing the Cloudinary response as a function parameter.
Creating the Components
Next, create the components:
In your project's
srcfolder, create a folder calledcomponents.In the
src/componentsfolder, create a file calledImageSelector.jswith this code:
    import { Button, Upload } from 'antd';
    import { UploadOutlined } from '@ant-design/icons';
    const ImageSelector = ({ setImage }) => {
      const props = {
        name: 'file',
        onRemove: () => {
          setImage(null);
        },
        beforeUpload: (selectedImage) => {
          setImage(selectedImage);
          return false;
        },
        showUploadList: false,
        maxCount: 1,
      };
      return (
        <Upload {...props}>
          <Button icon={<UploadOutlined />}>Select Image</Button>
        </Upload>
      );
    };
    export default ImageSelector;
By way of explanation:
The
ImageSelectorcomponent takessetImage, a callback function that updates the app state with the latest image you uploaded.By returning
falsein thebeforeUploadkey ofprops, you’ve disabled the default behavior of the[Upload](https://ant.design/components/upload/)component, which uploads the selected file to the URL as specified. You’ve also restricted the maximum number of files to 1.
Putting It All Together
Replace the content of your src/App.js file with the following code:
    import './App.css';
    import { Button, Card, Col, Form, Input, message } from 'antd';
    import { useState } from 'react';
    import ImageSelector from './components/ImageSelector';
    import { uploadImage } from './util/api';
    function App() {
      const [image, setImage] = useState(null);
      const [isUploading, setIsUploading] = useState(false);
      const formItemLayout = {
        labelCol: {
          sm: { span: 4 },
        },
        wrapperCol: {
          sm: { span: 18 },
        },
      };
      const onFailedSubmission = (errorInfo) => {
        console.log('Failed:', errorInfo);
      };
      const onFinish = (values) => {
        if (image === null) {
          message.error('You need to upload an image first');
        } else {
          setIsUploading(true);
          uploadImage({
            file: image,
            successCallback: (data) => {
              setIsUploading(false);
              console.log(data);
              message.success('Image uploaded successfully.');
            },
          });
        }
      };
      return (
        <div style={{ margin: '1%' }}>
          <Card style={{ margin: 'auto', width: '50%' }}>
            <Form
              {...formItemLayout}
              onFinish={onFinish}
              onFinishFailed={onFailedSubmission}
              autoComplete="off"
            >
              <Col span={8} offset={9} style={{ marginBottom: '10px' }}>
                <ImageSelector setImage={setImage} />
              </Col>
              <Form.Item wrapperCol={{ offset: 10, span: 16 }}>
                <Button type="primary" htmlType="submit" loading={isUploading}>
                  Submit
                </Button>
              </Form.Item>
            </Form>
          </Card>
        </div>
      );
    }
    export default App;
By way of explanation:
You’ve declared two state variables: one for the uploaded image and the other as a depiction of whether the image is being uploaded.
The
formItemLayoutis an object that contains the size specifications for thelabelcolumns in the form to be created. Failure to validate the submitted form triggers theonFailedSubmissionfunction.You’ve logged errors to Cloudinary’s Management Console, which displays a warning message if errors are present.
If the data in the submitted form is valid, the
onFinishfunction is called. Absent a selection of an image,onFinishdisplays an error message. Otherwise, theuploadImagefunction declared inapi.jsuploads the image to Cloudinary .On a successful upload,
uploadImagedisplays a message to that effect in Cloudinary’s Management Console .You’ve rendered the
ImageSelectorcomponent so that you can select an image for upload. On such a selection and a click of the Submit button, theonFinishfunction uploads the image to Cloudinary.
Now run the app with this command:
npm start
By default, the app is at http://localhost:3000/. Upon successful selection and upload of an image, this response is displayed in the Management Console:
    "url":"http://res.cloudinary.com/<cloud_name>/image/upload/v1647108022/<public_id>.jpg",
    "secure_url":"https://res.cloudinary.com/<cloud_name>/image/upload/v1647108022/<public_id>.jpg",
    "info":{
          "background_removal":{
             "remove_the_background":{
                "status":"pending"
             }
          }
       },
As mentioned earlier, the background-removal process is asynchronous. Once it’s complete, the edited version replaces the original image and is accessible through Cloudinary’s Management console or content delivery network (CDN).
Adding Status Notifications
To keep checking the URL in the response for the updated image is an unproductive use of time. Instead, leverage the Cloudinary feature that notifies you by email when an editing process is a wrap. To that end, build an API that handles notifications from Cloudinary and that emails you the edited version of the uploaded image.
First, create a project folder named cloudinaryNotificationHandler for these two API files:
-
server.js, which handles the incoming requests and sends the appropriate response. -
helper.js, which performs such tasks as downloading images and sending emails.
Setting Up the Mailing Process
Perform these steps to establish the email-notification process:
- Install and add Nodemailer to your project:
npm install nodemailer
Note: Feel free to use another Simple Mail Transfer Protocol (SMTP) mail provider of your choice.
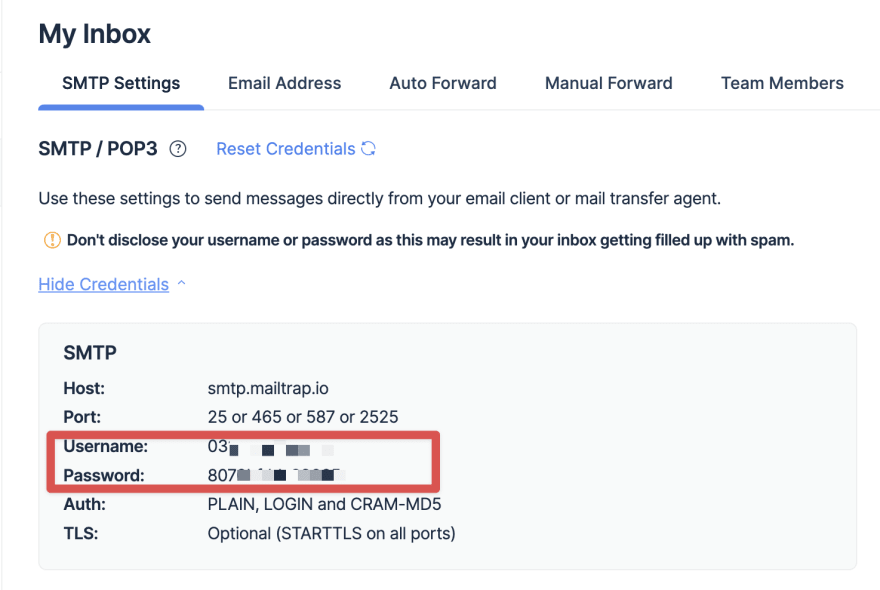
Set up Mailtrap by creating a Mailtrap account. If you already have one, log in.
Click the Show Credentials link in the SMTP Settings tab, copy your user name and password, and save them for a later step.
Setting Up the Helper Functions
Add the following to your helper.js file:
    const fs = require('fs');
    const client = require('https');
    const nodemailer = require('nodemailer');
    const buildCloudinaryUrl = (version, publicId) => {
      const cloudName = 'INSERT YOUR CLOUD NAME HERE';
      return `https://res.cloudinary.com/${cloudName}/image/upload/v${version}/${publicId}.jpg`;
    };
    const downloadImage = (url, filepath) =>
      new Promise((resolve, reject) => {
        client.get(url, (res) => {
          if (res.statusCode === 200) {
            res
              .pipe(fs.createWriteStream(filepath))
              .on('error', reject)
              .once('close', () => resolve(filepath));
          } else {
            res.resume();
            reject(
              new Error(`Request Failed With a Status Code: ${res.statusCode}`)
            );
          }
        });
      });
    const sendMail = (content, filepath) =>
      new Promise((resolve, reject) => {
        const transport = nodemailer.createTransport({
          host: 'smtp.mailtrap.io',
          port: 2525,
          auth: {
            user: 'INSERT YOUR MAILTRAP USER name HERE',
            pass: 'INSERT YOUR MAILTRAP PASSWORD HERE',
          },
        });
        const message = {
          from: 'from-example@email.com',
          to: 'to-example@email.com',
          subject: 'Image Background Removal Complete',
          html: `
          <p> Hi there!!!</p>
          <p>The image processing is complete, here are the notification details </p>
          <code>${JSON.stringify(content)}</code>
          `,
          attachments: [{ filename: filepath, path: filepath }],
        };
        transport.sendMail(message, (error, info) => {
          if (error) {
            reject(error);
          }
        });
      });
    module.exports = { downloadImage, sendMail, buildCloudinaryUrl };
By way of explanation:
Based on two parameters—the image URL and the file path in which to save the image—the
downloadImagefunction makes aGETrequest to the URL and writes the content of the response to that path.Also based on two parameters—
content, the information sent by Cloudinary; andfilepath, the path in which the edited image resides—thesendMailfunction sets up a Nodemailer transport and sends an email with the edited image as an attachment.
Add the following to your server.js file:
    const http = require('http');
    const { downloadImage, sendMail, buildCloudinaryUrl } = require('./helper');
    const host = 'localhost';
    const port = 8000;
    const requestListener = async (req, res) => {
      const buffers = [];
      console.log(123);
      for await (const chunk of req) {
        buffers.push(chunk);
      }
      const data = Buffer.concat(buffers).toString();
      const parsedData = JSON.parse(data);
      const { public_id, version, secure_url } = parsedData;
      const filepath = `${public_id}.jpg`;
      fileUrl = buildCloudinaryUrl(version, public_id);
      console.log(fileUrl);
      await downloadImage(fileUrl, filepath);
      sendMail(parsedData, filepath);
      res.setHeader('Content-Type', 'application/json');
      res.writeHead(204);
      res.end(null);
    };
    const server = http.createServer(requestListener);
    server.listen(port, host, () => {
      console.log(`Server is running on http://${host}:${port}`);
    });
Here:
You’ve declared a request listener for handling requests, i.e., extract their content and then retrieve the public ID and version specified there. The
buildCloudinaryUrlfunction builds the URL for the edited image so that it’s in JPEG format with a.jpgfile extension.The
downloadImagefunction downloads the image; thesendMailhelper function sends the image by email. Finally, a 204 response is returned, informing you that the response contains no content.
Now serve the app by running this command:
node server.js
Next, test the setup by sending the sample POST request generated by Cloudinary for your API.
    {
      "notification_type": "info",
      "info_kind": "pixelz",
      "info_status": "complete",
      "public_id": "wood_chair",
      "uploaded_at": "2014-10-26T11:35:22Z",
      "version": 1414316122,
      "url":
        "https://res.cloudinary.com/demo/image/upload/v1393688588/wood_chair.jpg",
      "secure_url":
        "https://res.cloudinary.com/demo/image/upload/v1393688588/wood_chair.jpg",
      "etag": "a56e9e88c2add15cac1775c1f687bf73"
    }

Everything looks good, except that your setup is local. The next section describes how to expose that local setup to Cloudinary.
Specifying the Port Number Through Ngrok
To expose your app, which is running, to the internet, leverage the cross-platform app Ngrok. Follow these steps:
Download the Ngrok executable file and unzip it.
Run the Ngrok
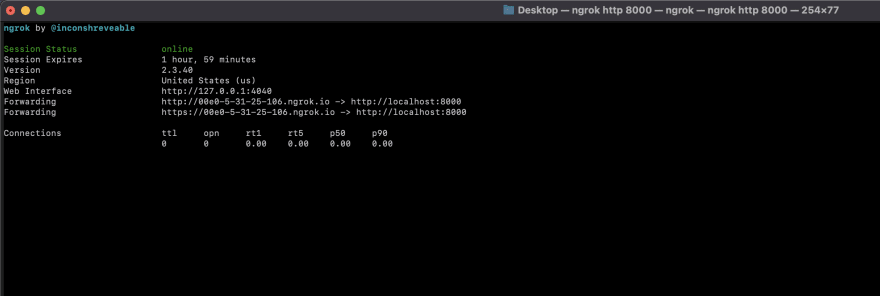
httpcommand to specify the port number you’d like to be exposed. Since your API runs on port 8000, type:
ngrok http 8000
Afterwards, start Ngrok, which will display in your terminal the public URL of your tunnel and the status and metrics that pertain to the connections made over your tunnel. See this example:
Specifying the Notification URL
Now that you’ve built the tunnel and your app is running, configure your upload preset in Cloudinary so that the preset will let you know when the image-removal process is complete. Here’s what to do:
On the Management Console, choose Settings > Upload and scroll to the Upload presets section.
Click Edit next to the upload preset you created earlier and then click Upload Manipulations in the left-navigation area.
In the Notification URL text field, paste the URL displayed on the Ngrok terminal and click Save at the top.
Here’s the complete code of this project on GitHub.
Summing Up
This tutorial walks you through the procedures for the following:
- Remove the background of an image with Cloudinary and Pixelz.
- Build a simple Node HTTP server to handle
POSTrequests and send notifications by email—no need to refresh pages or worry about when background removal will be complete. Pretty neat, right? - Link a localhost app to your Cloudinary account’s Management Console with Ngrok.
For further reference, see the documentation on Cloudinary’s Pixelz add-on, Mailtrap, and Ngrok.
This content originally appeared on DEV Community and was authored by Ifeoma Imoh
Ifeoma Imoh | Sciencx (2022-04-06T10:57:08+00:00) Remove Image Background With Cloudinary and Pixelz: A Tutorial. Retrieved from https://www.scien.cx/2022/04/06/remove-image-background-with-cloudinary-and-pixelz-a-tutorial/
Please log in to upload a file.
There are no updates yet.
Click the Upload button above to add an update.