Managing Micro-Stacks using Pulumi

How to Manage Micro-Stacks with Pulumi

Exploring micro-stacks, the advantages of using Micro-Stacks over monolithic stacks, implementing micro-stacks using Pulumi
Pulumi is an open-source Infrastructure as Code (IaC) tool that helps developers provision and manage cloud infrastructure with various providers. Many developers opt to use IaC tools due to their consistency. In other words, you can replicate infrastructure on different stages without writing complex scripts.

Currently, many developers use Pulumi to declare infrastructure by following a monolithic project structure. It means that all infrastructure gets managed on one Pulumi project.

However, Pulumi has introduced a new project structure called “Micro-Stacks.” micro-stacks are similar to micro-services. They split the single project into multiple smaller projects.

This article will explore micro-stacks, highlight the critical advantages of using Micro-Stacks over monolithic stacks, and demonstrate implementing micro-stacks using Pulumi to give you a better understanding.

Exploring Micro-Stacks

In layman’s terms, micro-stacks are the equivalent of micro-services, in the form of projects/stacks. You divide your main project into multiple smaller projects and share resources between each project.

Micro-Stacks vs. Monolithic-Stacks

Monolithic Stacks

Let us look at the sample application managed using AWS resources shown below.

.
├── Pulumi.dev.yml
├── Pulumi.prod.yml
├── Pulumi.yml
├── api-gateway
│ ├── index.ts
│ ├── micro-service-01
│ │ └── index.ts
│ └── micro-service-02
│ └── index.ts
├── database
│ ├── table-01.ts
│ └── table-02.ts
├── index.ts
├── package-lock.json
├── package.json
├── ses
│ └── templates.ts
├── sns
│ └── topics.ts
└── sqs
└── queues.ts

The directory structure above represents one Pulumi project (monolithic stack) with an API-Gateway, DynamoDB tables, SNS Topics, Queues, and SES Templates.

At first glance, it does not seem to be problematic. But as the application grows, this project structure loses its capability to scale by introducing issues such as:

  • Lack of independence: You may have infrastructure such as Domain Verification, VPC Configurations that infrequently change, along with Lambda functions (in your API Gateway) to change frequently. Therefore, when using deployments, you will need to closely monitor your infrastructure to ensure that any unnecessary changes do not occur.
  • Lack of security on individual infrastructure: With a monolithic project structure, you cannot restrict deployments on resources for specific users. For example, you may require only your team lead to deploy core infrastructure. However, this cannot be done in monolithic stacks as permissions get created for the entire stack.

Micro-Stacks

Pulumi introduced Micro-Stacks to mitigate the above issues discussed. As discussed, micro-stacks aim to split the main project into several smaller projects for better maintenance and efficiency.

Let us take a look at the application shown below.

.
├── Pulumi.dev.yml
├── Pulumi.yml
├── api-gateway
│ ├── Pulumi.dev.yml
│ ├── Pulumi.yml
│ ├── index.ts
│ ├── micro-service-01
│ │ └── lambdas.ts
│ └── package.json
├── database
│ └── table.ts
├── index.ts
├── package.json
├── ses
│ └── templates.ts
├── sns
│ └── topics.ts
└── sqs
└── queues.ts

In this application, we can see two Pulumi projects. The main project manages SES resources, SNS Topics, Queues, DynamoDB Tables. The other Pulumi project manages the API Gateway. These are two micro-stacks, as we have successfully broken down the complex project into two smaller projects.

This approach has introduced a lot of benefits for developers:

  • Added Security: Users can provide permission for specific users to deploy specific resources by splitting them into separate stacks.
  • Improved Performance: With micro-stacks, each project contains fewer resources. Therefore, your deployment and build times are faster than deploying a monolithic structure project.
  • Improved Independence: You can separate your infrequently updated resources into a separate stack to ensure that no-unnecessary changes occur to them.

With these benefits, many developers are starting to migrate to a micro-stack-based structure when managing cloud resources via IaC tools.

How Do I Split My Project into Micro-Stacks?

When splitting up a monolithic project structure into a micro-stack, several best practices must be followed.

  1. You can split each micro-service in your application as a micro-stack.
  2. You can split your container and serverless-based functions into two stacks to deploy them independently.
  3. You can split your project based on infrastructure. For example, you could break your core infrastructure such as Routing, DNS, VPC to one stack, your Database Tables, SNS Topics, Queues to another stack, and finally, your API Gateway to another stack.

When using micro-stacks, you may wonder how you can access your resources across Pulumi projects. Again, this is an area in which Pulumi excels. With Pulumi, implementing micro-stacks and sharing resources across stacks is easier than ever!

Implementing Micro-Stacks with Pulumi

To understand how you can implement micro-stacks, let us look at a demonstration on implementing a micro-stack step-by-step.

I will be using AWS to provide cloud resources for this demonstration. However, this applies to any cloud provider.

Step 1: Pre-requisites

Before getting started, make sure you have:

  1. Pulumi CLI — Use brew install pulumi or choco install pulumi to install Pulumi.
  2. Pulumi Account — Create a free account on Pulumi and authenticate your CLI with your Pulumi Account to perform deployments.
  3. AWS CLI — Download and install the AWS CLI and configure your AWS Profile.

Step 2: Creating the First Pulumi Project

First, let us create a Pulumi project to provision a DynamoDB table.

To create the Pulumi project, execute the command below and follow the on-screen instructions.

pulumi new aws-typescript

I will name the project as “core-infrastructure” and create a default “dev” stack in the Virginia Region (us-east-1).
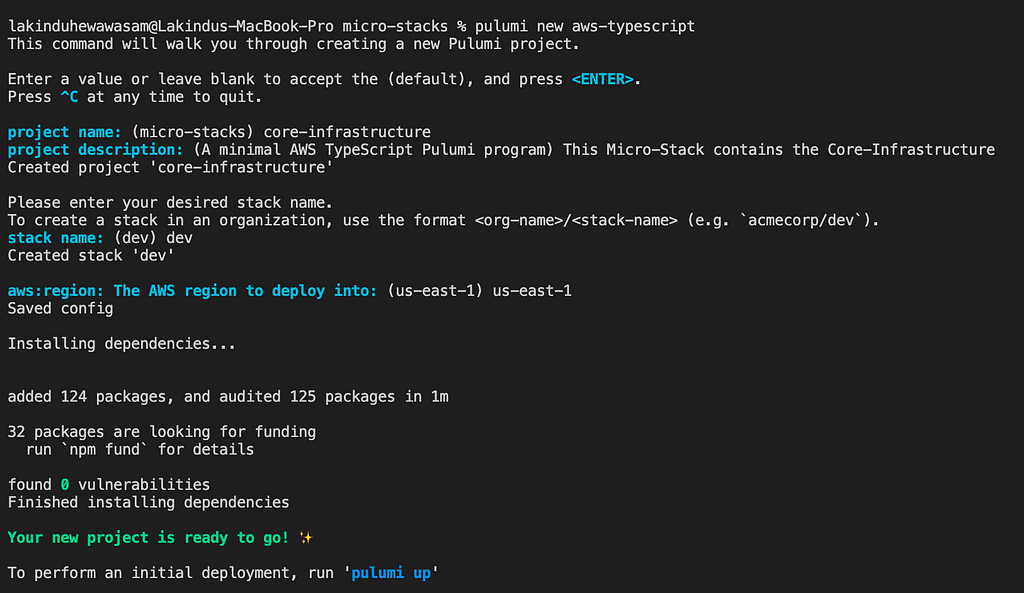
Figure 01 — Initializing the core-infrastructure project

Step 3: Configuring the First Project

Afterward, navigate to index.ts and remove all the default code.

Open your Pulumi.dev.yaml file and add the configurations below.

config:
aws:region: us-east-1
core-infrastructure:env: development

This will help refer to the stage variables across stacks.

Next, create a dynamodb directory with one typescript file named user-table.ts to define the database table in the root directory. Your directory should be as shown below.

.
├── Pulumi.dev.yaml
├── Pulumi.yaml
├── dynamodb
│ ├── note-table.ts
├── index.ts
├── package-lock.json
├── package.json
└── tsconfig.json

Open the note-table.ts file and add the code shown below.

import * as pulumi from "@pulumi/pulumi";
import * as aws from "@pulumi/aws";

const config = new pulumi.Config(); // retrive the config information stored in the pulumi.STACK-NAME.yaml file
const env = config.require('env'); // retrieve the env variable from the config file

export const notesTable = new aws.dynamodb.Table(${env}-notes-table , {
billingMode: 'PAY_PER_REQUEST',
attributes: [
{
name: 'id',
type: 'S'
}
],
hashKey: 'id',
});

The snippet above declares a DynamoDB table with on-demand throughput and a Hash key of id.

Earlier, I mentioned that your resources need to be shared across stacks. To do this, we must export resource ARNs and names from the current stack to be referred to in other stacks.

To do so, navigate to the entry file in your Pulumi project (index.ts), and add the snippet shown below.

import { notesTable } from './dynamodb/note-table';

export const notesTableName = notesTable.name;
export const notesTableArn = notesTable.arn;

It is important to note that when accessing these resources from different stacks, we must refer to the same variable names (notesTableName, notesTableArn) as the ones exported.

After this, we can provision the DynamoDB table by executing the command shown below.

// creates faster deployments by disabling previews.
pulumi up --skip-preview --stack stack-name --yes

After running the command, you should see your resources provisioned on AWS in the specified region.

Figure 02 — Provisioning resources on AWS

Step 4: Creating the Second Pulumi Project

This is where things start to get interesting. We can create another Pulumi project responsible for maintaining a frequently changed resource (API Gateway).

We can use the exported table names from the first project and refer them to the second project’s Lambda functions to perform CRUD operations against the table.

To create the second Pulumi project, execute the command below.

pulumi new aws-typescript

Name the project as api-gateway and create the project in the same region as your first project. For this, I will use us-east-1.

Step 5: Adding the Referrer Project Information to New Project

After creating the new project, open the Pulumi.dev.yaml file and add the configuration shown below.

config:
aws:region: us-east-1
api-gateway:env: development
api-gateway:core-org: <<YOUR-ORGANIZATION-NAME>>
api-gateway:core-stack: dev or <<REFERRER STACK for current dev>>
api-gateway:core-project-name: core-infrastructure or <<REFERRER PROJECT NAME>>

In this configuration, there are three new properties added. These three configurations help the newly created project refer to resources exported from the core-infrastructure project (the project we created earlier).

  1. core-org: This identifies that the organization in the referring project is present.
  2. core-stack: This specifies the stage name of the referring stack.
  3. core-project-name: This identifies the name of the referring Pulumi project.

Step 6: Creating a Stack Reference and Obtaining Exported Resources

After adding these configurations, navigate to index.ts and remove all generated code. Next, please create a new file named resources.ts in your root directory and add the code shown below to it.

import * as pulumi from "@pulumi/pulumi";
import * as aws from "@pulumi/aws";

const config = new pulumi.Config();
const env = config.require("env");

// obtain the declared configs for the dev stack in api-gateway
const referrerProjectName = config.require("core-project-name");
const referrerOrganizationName = config.require("core-org");
const referrerStageName = config.require("core-stack");

// create a stack reference to obtain resources from the referrer stack
const coreInfrastructureReference = new pulumi.StackReference(${referrerOrganizationName}/${referrerProjectName}/${referrerStageName} );

// notesTableName is the value exported from core-infrastructure
export const noteTable = coreInfrastructureReference.requireOutput("notesTableName");

In the snippet above, you can see a line — new Pulumi.StackReference() . It is responsible for establishing a connection with the referrer stack. For this constructor, it requires a string with the format organization/project/stack.

Please note that the project must be associated with your organization.

Afterward, the exported variables are imported by calling the method requireOutput(‘resourceNameExportedInReferrer’) .

Step 7: Declaring the Notes Micro-Service

In the root directory, create a new directory labeled notes, and inside that, create a file named lambda.ts. This file will declare the micro-service and its Lambda function by adding the below code to the lambda.ts file.

import * as pulumi from "@pulumi/pulumi";
import * as aws from "@pulumi/aws";
import * as awsx from "@pulumi/awsx";
import { noteTable } from "../resources"; // import the table
import { nanoid } from 'nanoid';

const config = new pulumi.Config();
const env = config.require("env");

export const createNote = new aws.lambda.CallbackFunction(${env}-create-note , {
callback: async (event: awsx.apigateway.Request, context): Promise<awsx.apigateway.Response> => {
const documentClient = new aws.sdk.DynamoDB.DocumentClient();
const { title, body } = JSON.parse(event.body as string);
const noteId = nanoid();
const note = {
// hashkey as "id" as defined in core-infrastructure table.id: noteId,
title,
body,
}

await documentClient.put({
TableName: noteTable.get(),
Item: note,
}).promise();

return {
statusCode: 200,
body: JSON.stringify(note),
}
}
})

export const deleteNote = new aws.lambda.CallbackFunction(${env}-delete-note , {
callback: async (event: awsx.apigateway.Request, context): Promise<awsx.apigateway.Response> => {
const documentClient = new aws.sdk.DynamoDB.DocumentClient();
const { id } = JSON.parse(event.body as string);

await documentClient.delete({
TableName: noteTable.get(),
Key: { id },
}).promise();

return {
statusCode: 200,
body: 'Note deleted',
}
}
})

export const getAllNotes = new aws.lambda.CallbackFunction(${env}-get-all-notes , {
callback: async (event: awsx.apigateway.Request, context): Promise<awsx.apigateway.Response> => {
const documentClient = new aws.sdk.DynamoDB.DocumentClient();
const { Items = [] } = await documentClient.scan({
TableName: noteTable.get(),
}).promise();

return {
statusCode: 200,
body: JSON.stringify(Items),
}
}
})

The three lambdas declared above provide create, update, and get operations on the Notes table.

You might observe that for TableName we specified – noteTable.get() . It is a method offered by Pulumi to get the table name when it gets executed in a post-deployment environment.

Step 8: Adding the API Gateway

Afterward, we can create an API Gateway to invoke the Lambda functions via HTTPS.

Navigate to your index.ts file and add the code shown below to add the API Gateway.

import * as pulumi from "@pulumi/pulumi";
import * as awsx from "@pulumi/awsx";
import * as notes from './notes/lambdas';

const config = new pulumi.Config();
const env = config.require("env");

// create the API Gateway by defining HTTP Methods, Routes, Handlers
const apiGateway = new awsx.apigateway.API(${env}-api-gateway , {
routes: [
{
path: '/notes/create',
method: 'POST',
eventHandler: notes.createNote,
},
{
path: '/notes/delete',
method: 'POST',
eventHandler: notes.deleteNote,
},
{
path: '/notes',
method: 'GET',
eventHandler: notes.getAllNotes,
}
],
restApiArgs: {
binaryMediaTypes: []
}
});

// export the URL used to invoke the API Gateway
export const { url } = apiGateway;

The snippet shown above will create an API Gateway with three endpoints that utilize the three Lambda functions declared earlier.

After configuring everything, we can deploy the second stack by executing the command shown below.

pulumi up --skip-preview --stack dev --yes

It will deploy the API Gateway and use the stack we created earlier to obtain references for the Notes table.
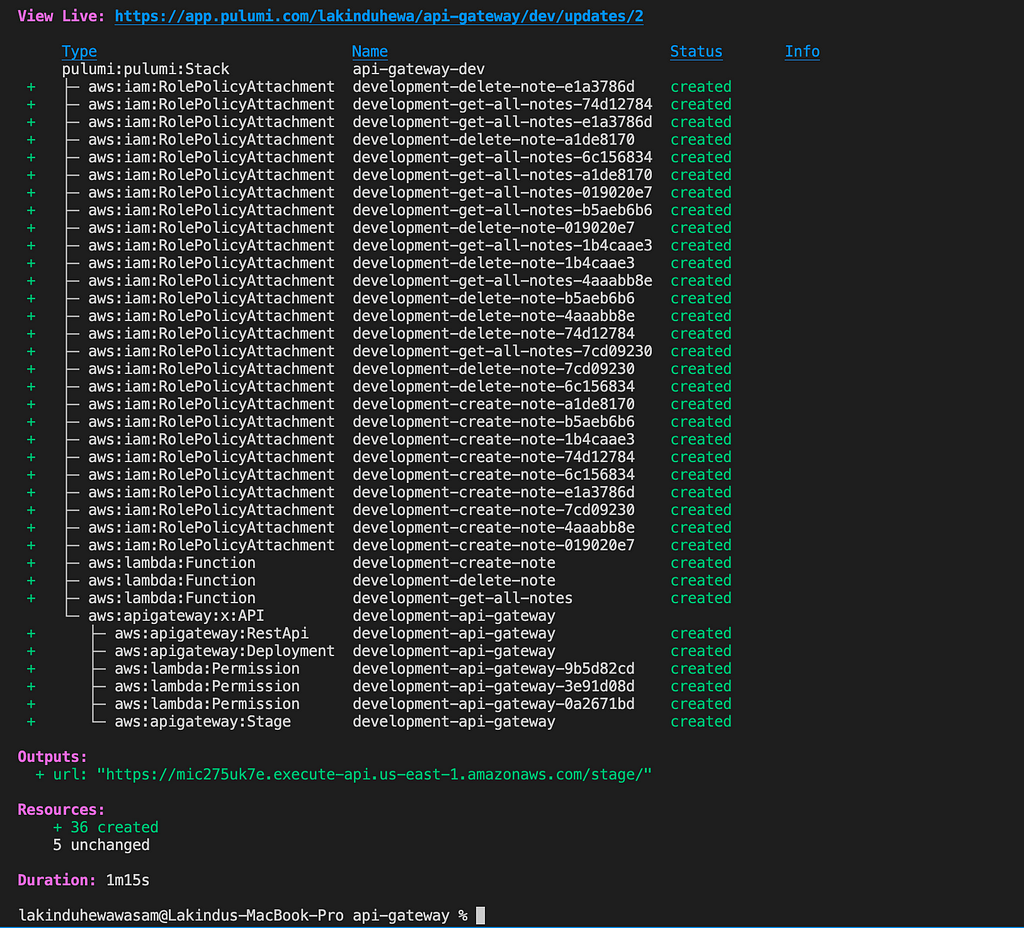
Figure 03 — Provisioning the API Gateway

Afterward, you can use the exported variable — url to call the declared routes to communicate with the API.
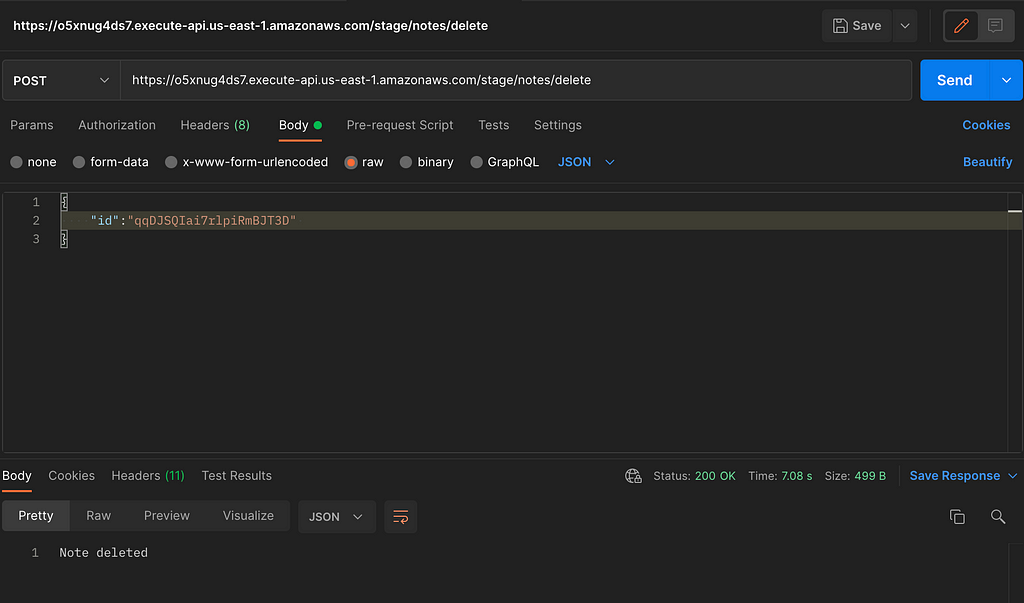
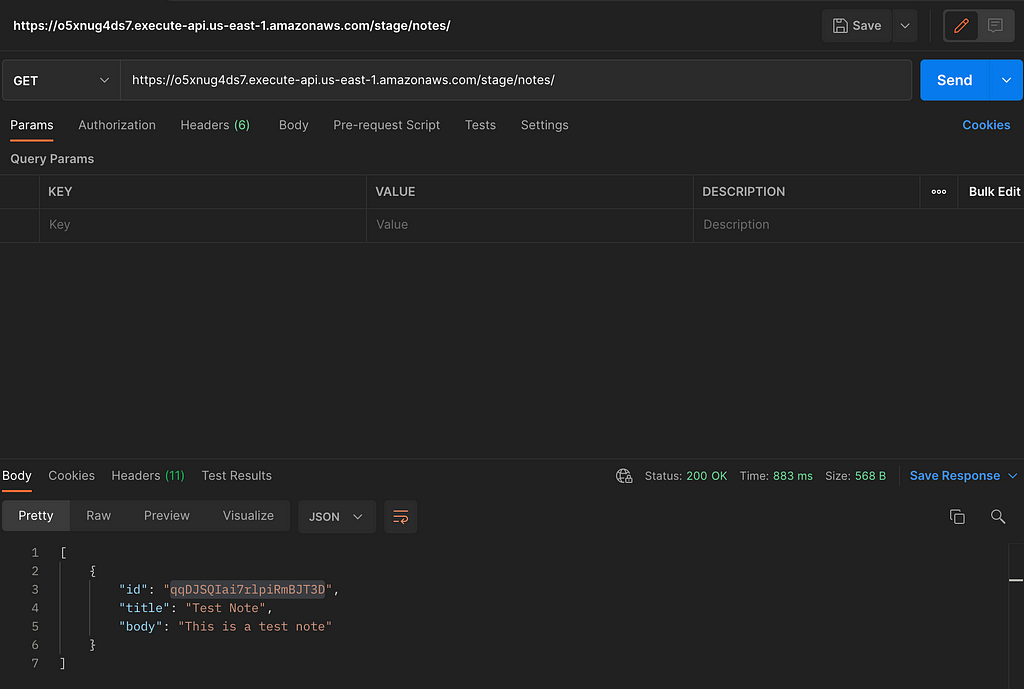
Figure 04 — Testing the Delete Endpoint
Figure 05 — Testing the Create Endpoint
Figure 06 — Testing the Get All Endpoint

And that’s how you implement micro-stacks in Pulumi!

When should you use Micro-Stacks?

After understanding how to implement micro-stacks, it’s essential to know when you should use a micro-stacks project structure. Use a micro-stack project structure if:

  1. Your monolithic project has a lot of resources where only limited resources are updated frequently.
  2. Your project has a component that takes a deployment time overhead. For example, I experienced an issue where one component of my Pulumi project caused around 15 to 30-minute updates. Isolating that component to a micro-stack helped decrease the deployment time to 6 minutes!

Before opting for micro-stacks, you should consider these points to determine if micro-stacks are what you need.

Conclusion

This article has explored micro-stacks and highlighted the advantages of using micro-stacks over a monolithic stack, along with a walkthrough on implementing micro-stacks in Pulumi.

The code implemented in this article is available in my GitHub repository.

I hope that you have found this article helpful.

Thank you for reading.

Build composable web applications

Don’t build web monoliths. Use Bit to create and compose decoupled software components — in your favorite frameworks like React or Node. Build scalable and modular applications with a powerful and enjoyable dev experience.

Bring your team to Bit Cloud to host and collaborate on components together, and speed up, scale, and standardize development as a team. Try composable frontends with a Design System or Micro Frontends, or explore the composable backend with serverside components.

Give it a try →

Learn More


Managing Micro-Stacks using Pulumi was originally published in Bits and Pieces on Medium, where people are continuing the conversation by highlighting and responding to this story.


This content originally appeared on Bits and Pieces - Medium and was authored by Lakindu Hewawasam

How to Manage Micro-Stacks with Pulumi

Exploring micro-stacks, the advantages of using Micro-Stacks over monolithic stacks, implementing micro-stacks using Pulumi

Pulumi is an open-source Infrastructure as Code (IaC) tool that helps developers provision and manage cloud infrastructure with various providers. Many developers opt to use IaC tools due to their consistency. In other words, you can replicate infrastructure on different stages without writing complex scripts.

Currently, many developers use Pulumi to declare infrastructure by following a monolithic project structure. It means that all infrastructure gets managed on one Pulumi project.

However, Pulumi has introduced a new project structure called “Micro-Stacks.” micro-stacks are similar to micro-services. They split the single project into multiple smaller projects.

This article will explore micro-stacks, highlight the critical advantages of using Micro-Stacks over monolithic stacks, and demonstrate implementing micro-stacks using Pulumi to give you a better understanding.

Exploring Micro-Stacks

In layman’s terms, micro-stacks are the equivalent of micro-services, in the form of projects/stacks. You divide your main project into multiple smaller projects and share resources between each project.

Micro-Stacks vs. Monolithic-Stacks

Monolithic Stacks

Let us look at the sample application managed using AWS resources shown below.

.
├── Pulumi.dev.yml
├── Pulumi.prod.yml
├── Pulumi.yml
├── api-gateway
│ ├── index.ts
│ ├── micro-service-01
│ │ └── index.ts
│ └── micro-service-02
│ └── index.ts
├── database
│ ├── table-01.ts
│ └── table-02.ts
├── index.ts
├── package-lock.json
├── package.json
├── ses
│ └── templates.ts
├── sns
│ └── topics.ts
└── sqs
└── queues.ts

The directory structure above represents one Pulumi project (monolithic stack) with an API-Gateway, DynamoDB tables, SNS Topics, Queues, and SES Templates.

At first glance, it does not seem to be problematic. But as the application grows, this project structure loses its capability to scale by introducing issues such as:

  • Lack of independence: You may have infrastructure such as Domain Verification, VPC Configurations that infrequently change, along with Lambda functions (in your API Gateway) to change frequently. Therefore, when using deployments, you will need to closely monitor your infrastructure to ensure that any unnecessary changes do not occur.
  • Lack of security on individual infrastructure: With a monolithic project structure, you cannot restrict deployments on resources for specific users. For example, you may require only your team lead to deploy core infrastructure. However, this cannot be done in monolithic stacks as permissions get created for the entire stack.

Micro-Stacks

Pulumi introduced Micro-Stacks to mitigate the above issues discussed. As discussed, micro-stacks aim to split the main project into several smaller projects for better maintenance and efficiency.

Let us take a look at the application shown below.

.
├── Pulumi.dev.yml
├── Pulumi.yml
├── api-gateway
│ ├── Pulumi.dev.yml
│ ├── Pulumi.yml
│ ├── index.ts
│ ├── micro-service-01
│ │ └── lambdas.ts
│ └── package.json
├── database
│ └── table.ts
├── index.ts
├── package.json
├── ses
│ └── templates.ts
├── sns
│ └── topics.ts
└── sqs
└── queues.ts

In this application, we can see two Pulumi projects. The main project manages SES resources, SNS Topics, Queues, DynamoDB Tables. The other Pulumi project manages the API Gateway. These are two micro-stacks, as we have successfully broken down the complex project into two smaller projects.

This approach has introduced a lot of benefits for developers:

  • Added Security: Users can provide permission for specific users to deploy specific resources by splitting them into separate stacks.
  • Improved Performance: With micro-stacks, each project contains fewer resources. Therefore, your deployment and build times are faster than deploying a monolithic structure project.
  • Improved Independence: You can separate your infrequently updated resources into a separate stack to ensure that no-unnecessary changes occur to them.

With these benefits, many developers are starting to migrate to a micro-stack-based structure when managing cloud resources via IaC tools.

How Do I Split My Project into Micro-Stacks?

When splitting up a monolithic project structure into a micro-stack, several best practices must be followed.

  1. You can split each micro-service in your application as a micro-stack.
  2. You can split your container and serverless-based functions into two stacks to deploy them independently.
  3. You can split your project based on infrastructure. For example, you could break your core infrastructure such as Routing, DNS, VPC to one stack, your Database Tables, SNS Topics, Queues to another stack, and finally, your API Gateway to another stack.

When using micro-stacks, you may wonder how you can access your resources across Pulumi projects. Again, this is an area in which Pulumi excels. With Pulumi, implementing micro-stacks and sharing resources across stacks is easier than ever!

Implementing Micro-Stacks with Pulumi

To understand how you can implement micro-stacks, let us look at a demonstration on implementing a micro-stack step-by-step.

I will be using AWS to provide cloud resources for this demonstration. However, this applies to any cloud provider.

Step 1: Pre-requisites

Before getting started, make sure you have:

  1. Pulumi CLI — Use brew install pulumi or choco install pulumi to install Pulumi.
  2. Pulumi Account — Create a free account on Pulumi and authenticate your CLI with your Pulumi Account to perform deployments.
  3. AWS CLI — Download and install the AWS CLI and configure your AWS Profile.

Step 2: Creating the First Pulumi Project

First, let us create a Pulumi project to provision a DynamoDB table.

To create the Pulumi project, execute the command below and follow the on-screen instructions.

pulumi new aws-typescript

I will name the project as “core-infrastructure” and create a default “dev” stack in the Virginia Region (us-east-1).

Figure 01 — Initializing the core-infrastructure project

Step 3: Configuring the First Project

Afterward, navigate to index.ts and remove all the default code.

Open your Pulumi.dev.yaml file and add the configurations below.

config:
aws:region: us-east-1
core-infrastructure:env: development

This will help refer to the stage variables across stacks.

Next, create a dynamodb directory with one typescript file named user-table.ts to define the database table in the root directory. Your directory should be as shown below.

.
├── Pulumi.dev.yaml
├── Pulumi.yaml
├── dynamodb
│ ├── note-table.ts
├── index.ts
├── package-lock.json
├── package.json
└── tsconfig.json

Open the note-table.ts file and add the code shown below.

import * as pulumi from "@pulumi/pulumi";
import * as aws from "@pulumi/aws";

const config = new pulumi.Config(); // retrive the config information stored in the pulumi.STACK-NAME.yaml file
const env = config.require('env'); // retrieve the env variable from the config file

export const notesTable = new aws.dynamodb.Table(${env}-notes-table , {
billingMode: 'PAY_PER_REQUEST',
attributes: [
{
name: 'id',
type: 'S'
}
],
hashKey: 'id',
});

The snippet above declares a DynamoDB table with on-demand throughput and a Hash key of id.

Earlier, I mentioned that your resources need to be shared across stacks. To do this, we must export resource ARNs and names from the current stack to be referred to in other stacks.

To do so, navigate to the entry file in your Pulumi project (index.ts), and add the snippet shown below.

import { notesTable } from './dynamodb/note-table';

export const notesTableName = notesTable.name;
export const notesTableArn = notesTable.arn;

It is important to note that when accessing these resources from different stacks, we must refer to the same variable names (notesTableName, notesTableArn) as the ones exported.

After this, we can provision the DynamoDB table by executing the command shown below.

// creates faster deployments by disabling previews.
pulumi up --skip-preview --stack stack-name --yes

After running the command, you should see your resources provisioned on AWS in the specified region.

Figure 02 — Provisioning resources on AWS

Step 4: Creating the Second Pulumi Project

This is where things start to get interesting. We can create another Pulumi project responsible for maintaining a frequently changed resource (API Gateway).

We can use the exported table names from the first project and refer them to the second project’s Lambda functions to perform CRUD operations against the table.

To create the second Pulumi project, execute the command below.

pulumi new aws-typescript

Name the project as api-gateway and create the project in the same region as your first project. For this, I will use us-east-1.

Step 5: Adding the Referrer Project Information to New Project

After creating the new project, open the Pulumi.dev.yaml file and add the configuration shown below.

config:
aws:region: us-east-1
api-gateway:env: development
api-gateway:core-org: <<YOUR-ORGANIZATION-NAME>>
api-gateway:core-stack: dev or <<REFERRER STACK for current dev>>
api-gateway:core-project-name: core-infrastructure or <<REFERRER PROJECT NAME>>

In this configuration, there are three new properties added. These three configurations help the newly created project refer to resources exported from the core-infrastructure project (the project we created earlier).

  1. core-org: This identifies that the organization in the referring project is present.
  2. core-stack: This specifies the stage name of the referring stack.
  3. core-project-name: This identifies the name of the referring Pulumi project.

Step 6: Creating a Stack Reference and Obtaining Exported Resources

After adding these configurations, navigate to index.ts and remove all generated code. Next, please create a new file named resources.ts in your root directory and add the code shown below to it.

import * as pulumi from "@pulumi/pulumi";
import * as aws from "@pulumi/aws";

const config = new pulumi.Config();
const env = config.require("env");

// obtain the declared configs for the dev stack in api-gateway
const referrerProjectName = config.require("core-project-name");
const referrerOrganizationName = config.require("core-org");
const referrerStageName = config.require("core-stack");

// create a stack reference to obtain resources from the referrer stack
const coreInfrastructureReference = new pulumi.StackReference(${referrerOrganizationName}/${referrerProjectName}/${referrerStageName} );

// notesTableName is the value exported from core-infrastructure
export const noteTable = coreInfrastructureReference.requireOutput("notesTableName");

In the snippet above, you can see a line — new Pulumi.StackReference() . It is responsible for establishing a connection with the referrer stack. For this constructor, it requires a string with the format organization/project/stack.

Please note that the project must be associated with your organization.

Afterward, the exported variables are imported by calling the method requireOutput('resourceNameExportedInReferrer') .

Step 7: Declaring the Notes Micro-Service

In the root directory, create a new directory labeled notes, and inside that, create a file named lambda.ts. This file will declare the micro-service and its Lambda function by adding the below code to the lambda.ts file.

import * as pulumi from "@pulumi/pulumi";
import * as aws from "@pulumi/aws";
import * as awsx from "@pulumi/awsx";
import { noteTable } from "../resources"; // import the table
import { nanoid } from 'nanoid';

const config = new pulumi.Config();
const env = config.require("env");

export const createNote = new aws.lambda.CallbackFunction(${env}-create-note , {
callback: async (event: awsx.apigateway.Request, context): Promise<awsx.apigateway.Response> => {
const documentClient = new aws.sdk.DynamoDB.DocumentClient();
const { title, body } = JSON.parse(event.body as string);
const noteId = nanoid();
const note = {
// hashkey as "id" as defined in core-infrastructure table.id: noteId,
title,
body,
}

await documentClient.put({
TableName: noteTable.get(),
Item: note,
}).promise();

return {
statusCode: 200,
body: JSON.stringify(note),
}
}
})

export const deleteNote = new aws.lambda.CallbackFunction(${env}-delete-note , {
callback: async (event: awsx.apigateway.Request, context): Promise<awsx.apigateway.Response> => {
const documentClient = new aws.sdk.DynamoDB.DocumentClient();
const { id } = JSON.parse(event.body as string);

await documentClient.delete({
TableName: noteTable.get(),
Key: { id },
}).promise();

return {
statusCode: 200,
body: 'Note deleted',
}
}
})

export const getAllNotes = new aws.lambda.CallbackFunction(${env}-get-all-notes , {
callback: async (event: awsx.apigateway.Request, context): Promise<awsx.apigateway.Response> => {
const documentClient = new aws.sdk.DynamoDB.DocumentClient();
const { Items = [] } = await documentClient.scan({
TableName: noteTable.get(),
}).promise();

return {
statusCode: 200,
body: JSON.stringify(Items),
}
}
})

The three lambdas declared above provide create, update, and get operations on the Notes table.

You might observe that for TableName we specified - noteTable.get() . It is a method offered by Pulumi to get the table name when it gets executed in a post-deployment environment.

Step 8: Adding the API Gateway

Afterward, we can create an API Gateway to invoke the Lambda functions via HTTPS.

Navigate to your index.ts file and add the code shown below to add the API Gateway.

import * as pulumi from "@pulumi/pulumi";
import * as awsx from "@pulumi/awsx";
import * as notes from './notes/lambdas';

const config = new pulumi.Config();
const env = config.require("env");

// create the API Gateway by defining HTTP Methods, Routes, Handlers
const apiGateway = new awsx.apigateway.API(${env}-api-gateway , {
routes: [
{
path: '/notes/create',
method: 'POST',
eventHandler: notes.createNote,
},
{
path: '/notes/delete',
method: 'POST',
eventHandler: notes.deleteNote,
},
{
path: '/notes',
method: 'GET',
eventHandler: notes.getAllNotes,
}
],
restApiArgs: {
binaryMediaTypes: []
}
});

// export the URL used to invoke the API Gateway
export const { url } = apiGateway;

The snippet shown above will create an API Gateway with three endpoints that utilize the three Lambda functions declared earlier.

After configuring everything, we can deploy the second stack by executing the command shown below.

pulumi up --skip-preview --stack dev --yes

It will deploy the API Gateway and use the stack we created earlier to obtain references for the Notes table.

Figure 03 — Provisioning the API Gateway

Afterward, you can use the exported variable — url to call the declared routes to communicate with the API.
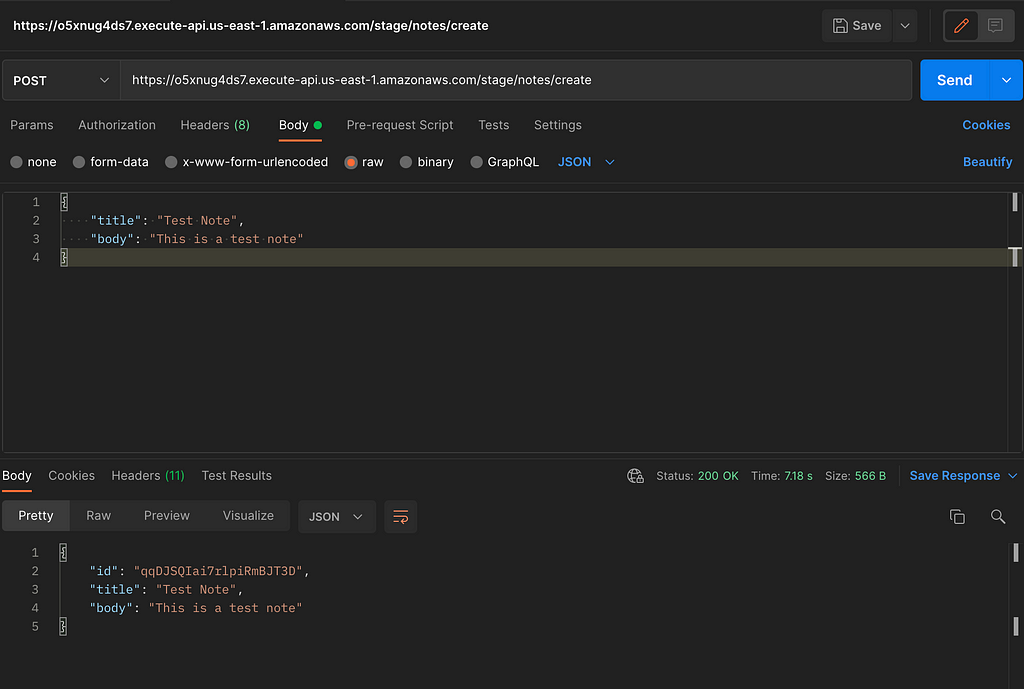
Figure 04 — Testing the Delete Endpoint
Figure 05 — Testing the Create Endpoint
Figure 06 — Testing the Get All Endpoint

And that’s how you implement micro-stacks in Pulumi!

When should you use Micro-Stacks?

After understanding how to implement micro-stacks, it’s essential to know when you should use a micro-stacks project structure. Use a micro-stack project structure if:

  1. Your monolithic project has a lot of resources where only limited resources are updated frequently.
  2. Your project has a component that takes a deployment time overhead. For example, I experienced an issue where one component of my Pulumi project caused around 15 to 30-minute updates. Isolating that component to a micro-stack helped decrease the deployment time to 6 minutes!

Before opting for micro-stacks, you should consider these points to determine if micro-stacks are what you need.

Conclusion

This article has explored micro-stacks and highlighted the advantages of using micro-stacks over a monolithic stack, along with a walkthrough on implementing micro-stacks in Pulumi.

The code implemented in this article is available in my GitHub repository.

I hope that you have found this article helpful.

Thank you for reading.

Build composable web applications

Don’t build web monoliths. Use Bit to create and compose decoupled software components — in your favorite frameworks like React or Node. Build scalable and modular applications with a powerful and enjoyable dev experience.

Bring your team to Bit Cloud to host and collaborate on components together, and speed up, scale, and standardize development as a team. Try composable frontends with a Design System or Micro Frontends, or explore the composable backend with serverside components.
Give it a try →

Learn More


Managing Micro-Stacks using Pulumi was originally published in Bits and Pieces on Medium, where people are continuing the conversation by highlighting and responding to this story.


This content originally appeared on Bits and Pieces - Medium and was authored by Lakindu Hewawasam


Print Share Comment Cite Upload Translate Updates
APA

Lakindu Hewawasam | Sciencx (2022-04-11T09:34:31+00:00) Managing Micro-Stacks using Pulumi. Retrieved from https://www.scien.cx/2022/04/11/managing-micro-stacks-using-pulumi/

MLA
" » Managing Micro-Stacks using Pulumi." Lakindu Hewawasam | Sciencx - Monday April 11, 2022, https://www.scien.cx/2022/04/11/managing-micro-stacks-using-pulumi/
HARVARD
Lakindu Hewawasam | Sciencx Monday April 11, 2022 » Managing Micro-Stacks using Pulumi., viewed ,<https://www.scien.cx/2022/04/11/managing-micro-stacks-using-pulumi/>
VANCOUVER
Lakindu Hewawasam | Sciencx - » Managing Micro-Stacks using Pulumi. [Internet]. [Accessed ]. Available from: https://www.scien.cx/2022/04/11/managing-micro-stacks-using-pulumi/
CHICAGO
" » Managing Micro-Stacks using Pulumi." Lakindu Hewawasam | Sciencx - Accessed . https://www.scien.cx/2022/04/11/managing-micro-stacks-using-pulumi/
IEEE
" » Managing Micro-Stacks using Pulumi." Lakindu Hewawasam | Sciencx [Online]. Available: https://www.scien.cx/2022/04/11/managing-micro-stacks-using-pulumi/. [Accessed: ]
rf:citation
» Managing Micro-Stacks using Pulumi | Lakindu Hewawasam | Sciencx | https://www.scien.cx/2022/04/11/managing-micro-stacks-using-pulumi/ |

Please log in to upload a file.


There are no updates yet.
Click the Upload button above to add an update.

You must be logged in to translate posts. Please log in or register.