
This content originally appeared on DEV Community and was authored by Aseem Wangoo
In case it helped :)
![]()
We will cover briefly:
- Current navigation in compose
- Using compose destinations
- (Optional) Modify existing test cases
Current navigation in compose
We get Compose Navigation from the Jetpack Compose. It provides a Navigation component that allows you to navigate between different composable.
Let’s see it in action using our code example.
 Navigation Component
- We have our
NavigationComponentwhich is composable. You can assume this file contains all the routes in our app. As we can see, there are 3 routes here namely :AuthHomeandAddTodo - The starting or the first route is the
Authand based on some logic(Sign in Google logic in our case) it redirects to theHomewhile passing an objectuser - All our routes need a Navigation Controller. The
NavControlleris the central API for the Navigation component. It keeps track of the back stack of the screens in your app and the state of each screen. - We create a
NavControllerby using therememberNavController()method and pass it in our Views
val navController = rememberNavController()
Creating NavHost
- Each
NavControllermust be associated with aNavHostcomposable. TheNavHostlinks theNavControllerwith a navigation graph that specifies the composable destinations that you should be able to navigate between. - In order to tie this everything, we place the above
NavigationComponentinside our main activity
 Main Activity
- For navigating a route, we use the
navigate()method.navigate()takes a singleStringparameter that represents the destination’s route.
// Navigate to some screen
navController.navigate("screen_route")
// Pop everything up to the "home" destination off the back stack before
// navigating to the "friendslist" destination
navController.navigate("friendslist") {
    popUpTo("home")
}

// Pop everything up to and including the "home" destination off
// the back stack before navigating to the "friendslist" destination
navController.navigate("friendslist") {
    popUpTo("home") { inclusive = true }
}
Passing custom arguments
- In order to do this, you add argument placeholders to your route, similar to how you add arguments to a deep link
navController.navigate(Destinations.Home.replace("{user}",userJson))By default, all arguments are parsed as strings. Next, you should extract the NavArguments from the NavBackStackEntry that is available in the lambda of the composable() function.
composable(Destinations.Home) { backStackEntry ->
    val userJson = backStackEntry.arguments?.getString("user")
    // DO YOUR PROCESSING AND CONVERT TO USER OBJECT
    HomeView(navController, userModel = userObject!!)
}
If you are still reading, you may have realized is it too much work? And I agree with you. There is some boilerplate code, especially in the case of passing the custom arguments. Well, can this be improved? Yes!!!
Using compose destinations
Forget about the previous section, and start afresh. Assume you need to implement navigation inside your app.
Introducing Compose Destinations. As per the documentation
Compose Destination: A KSP library that processes annotations and generates code that uses Official Jetpack Compose Navigation under the hood. It hides the complex, non-type-safe and boilerplate code you would have to write otherwise. Most APIs are either the same as with the Jetpack Components or inspired by them.
 Compose Destination
Setup
- Install the dependencies inside
build.gradleof your app
ksp 'io.github.raamcosta.compose-destinations:ksp:1.4.2-beta'
implementation 'io.github.raamcosta.compose-destinations:core:1.4.2-beta'
- Add the following inside the plugin of
build.gradle
plugins {
    id 'com.google.devtools.ksp' version '1.6.10-1.0.2'
}
Note: Compose Destinations takes advantage of annotation processing (using KSP) to improve the usability of Compose Navigation.
- Include a kotlin block that defines the
sourceSetsfor the generated code inside yourbuild.gradle
kotlin {
    sourceSets {
        debug {
            kotlin.srcDir("build/generated/ksp/debug/kotlin")
        }
        release {
            kotlin.srcDir("build/generated/ksp/release/kotlin")
        }
    }
}
Implement Navigation
So you still have the routes : Auth Home and AddTodo Now let’s see how to implement navigation. You have your existing composables. Let’s annotate them
 Compose Destination Annotation
- We use the
Destinationannotation which comes from the Compose Destinations - We mark our AuthScreen with
start = Truewhich implies this destination is the start destination of the navigation graph - Next, we change the type of our
navControllertoDestinationsNavigator
DestinationsNavigator is a wrapper interface to NavController.
- For the other screens, let’s say AddTodo, we simply annotate it
@Destination
@Composable
fun AddTodoView(navController: DestinationsNavigator) {}
- Let’s run the command below which generates all the Destinations
./gradlew clean build
If the result is a success, you should see the generated code inside the build/generated/ksp/debug/kotlin
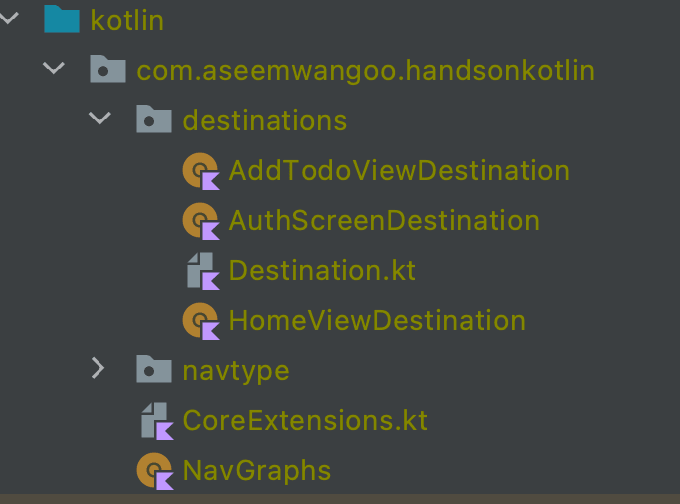 Generated Destinations using Compose Destinations
Using NavHost
In case you realized, we no longer need the NavigationComponent class.
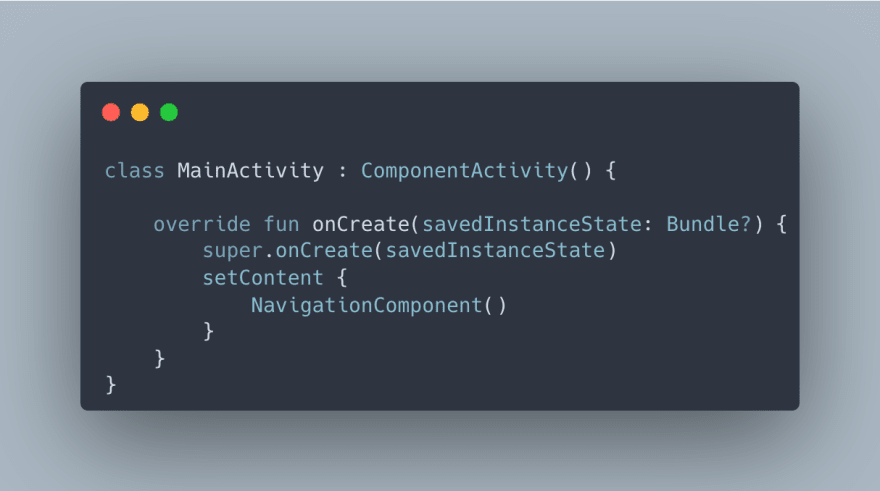
- One final thing remaining is to add the
NavHostinside ourMainActivity
class MainActivity : ComponentActivity() {
override fun onCreate(savedInstanceState: Bundle?) {
  super.onCreate(savedInstanceState)
  setContent {
      AppTheme {
          DestinationsNavHost(navGraph = NavGraphs.root)
      }
  }
 }
}
- Our
DestinationsNavHostincludes the destinations of navGraph. It includes all the composables annotated withDestinationinside NavGraphs generated file. -
NavGraphsis a generated file that describes your navigation graphs and their destinations. By default, all destinations belong to theNavGraphs.root - Finally, for navigating to screens we still follow the same convention, but now we have the Destinations (like
AddTodoViewDestinationetc) mapped to each of the views.
// Navigate to add view screen
navController.navigate(AddTodoViewDestination)

// Pop everything up to and including the "auth" destination off
// the back stack before navigating to the "Home" destination
navController.navigate(HomeViewDestination) {
    popUpTo(AuthScreenDestination.routeId) { inclusive = true }
}
Passing custom arguments
Here’s why this gets interesting. Let’s see a case, for example, we have an Auth screen and we need to pass the user object to our Home screen.
- Let’s create a Parcelable class
GoogleUserModelThis class basically contains the username and the email of the person once they signed in from google
@Parcelize
data class GoogleUserModel(
    val name: String?,
    val email: String?
) : Parcelable
- We modify our
Homecomposable as below
@Destination
@Composable
fun HomeView(
    navController: DestinationsNavigator,
    userModel: GoogleUserModel,
) {}
We add the parcelable classGoogleUserModel to the parameters and next, we again need to run our build command which updates the generated destination for the HomeView
- Inside our
AuthViewonce we get the required data from the API, we create theGoogleUserModeland pass it to theHomeViewDestination
navController.navigate(
    HomeViewDestination(
        GoogleUserModel(
            email = user.email,
            name = user.name,
        )
    )
) {
    popUpTo(route = AuthScreenDestination.routeId) {
        inclusive = true
    }
}
After we navigate to HomeView we pop the routes, including AuthView by specifying the AuthScreenDestination inside the popUpTo.
Modify existing test cases
We created some tests based on the NavigationComponent (when we were using it) but since we longer have it with us, we make use of the DestinationsNavigator
- Since
DestinationsNavigatoris an interface, we create our ownDestinationsNavigatorImplthe class. - Our DestinationsNavigatorImpl simply extends from the DestinationsNavigator class and we override all the methods from the
DestinationsNavigator
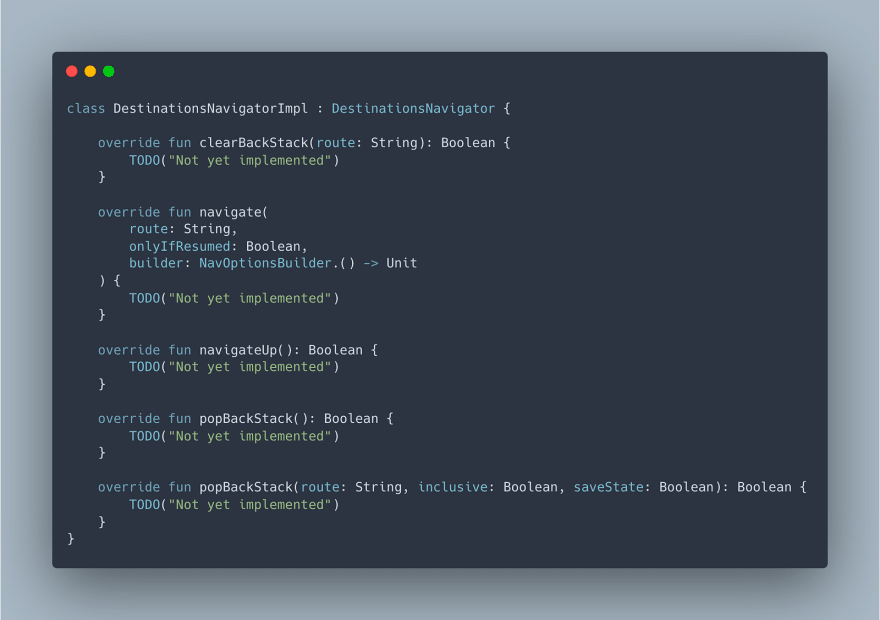 DestinationsNavigatorImpl
- Next, we simply replace the
TestNavHostControllerwith theDestinationsNavigatorImplinside our existing tests,
// PREVIOUS
private lateinit var navController: TestNavHostController
// NOW
private var navController = DestinationsNavigatorImpl()
We replace NavigationComponentwith DestinationsNavHost inside our tests
composeTestRule.setContent {

     // PREVIOUS
     NavigationComponent()

     // NOW
     DestinationsNavHost(navGraph = NavGraphs.root)
 }
In case it helped :)
![]()
This content originally appeared on DEV Community and was authored by Aseem Wangoo
Aseem Wangoo | Sciencx (2022-04-12T14:47:15+00:00) Using compose destinations. Retrieved from https://www.scien.cx/2022/04/12/using-compose-destinations-2/
Please log in to upload a file.
There are no updates yet.
Click the Upload button above to add an update.