This content originally appeared on DEV Community and was authored by Josue Bustos
Introduction
This tutorial will show you how to post messages to Slack apps using their Incoming Webhook API and the AWS Lambda Function URL.
What is an AWS Lambda Function URL?
A function URL is a dedicated HTTP(S) endpoint for your Lambda function. You can create and configure a function URL through the Lambda console or the Lambda API. Lambda automatically generates a unique URL endpoint for you when you make a function URL. -- AWS docs.
Learn more about AWS Function URLS here
What is a Slack Incoming Webhook?
Incoming Webhooks are a simple way to post messages from apps into Slack. Creating an Incoming Webhook gives you a unique URL to which you send a JSON payload with the message text and some options. You can use all the usual formatting and layout blocks with Incoming Webhooks to make the messages stand out. -- Slack API Docs
Learn more about Slack Incoming Webhooks here
Prerequisites
To follow along, you will need the following:
- A AWS account (create one here)
- AWS CLI installed and configured. Set up instructions here
- A Slack account (create one here)
- AWS Lambda Function (fundamentals)
- AWS IAM Roles, Policies (fundamentals).
- Comfortable executing terminal commands without GUI.
- Comfortable using and debugging Node.js and JavaScript.
Cool Idea 💡: In the future, you can use this example in an AWS SAM or AWS CDK project. Like this one AWS CDK Node.JS: Hello World
Okay, let's get started!
Create Slack App Channel
First, you want to predetermine which Slack app channel to use to receive incoming messages. For example, you can use an existing channel like #random or create a new channel. For this example, I will be using the #my-test-app naming convention. See the image below for reference.
Create a Slack App
To receive messages from external applications, say from your website or a mobile application, you must configure your Slack "API app" settings.
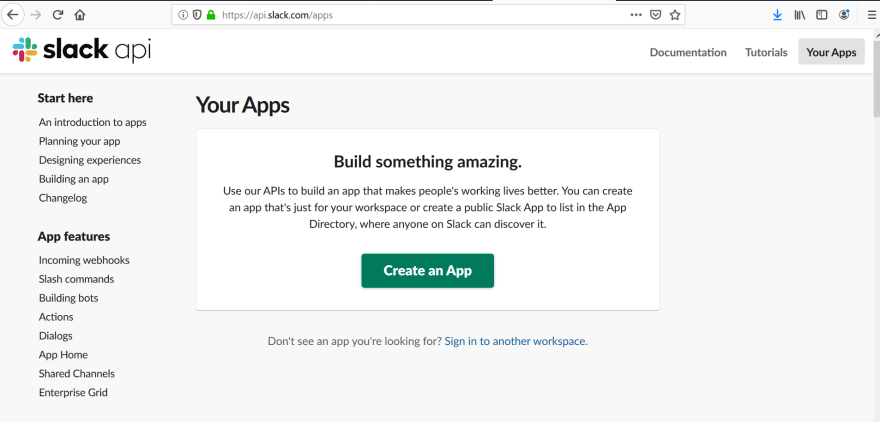
Sign in to your Slack account and navigate the Slack API portal "Your Apps" page. Copy-paste this link to jump there now: https://api.slack.com/apps.
If this is your first time creating a Slack account Your Apps list will be empty. Otherwise, you will see a list of your API apps.
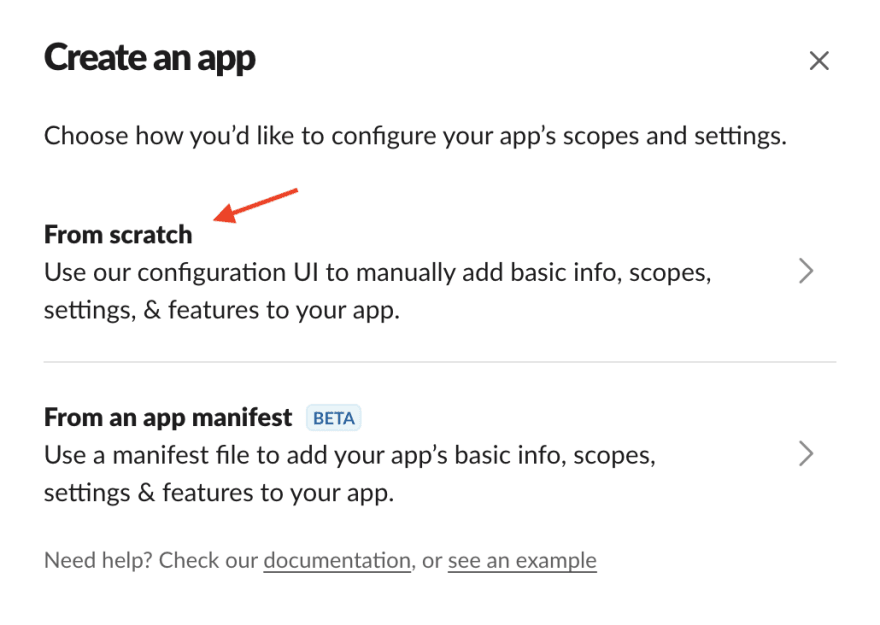
Next, click on the Create New App or Create an App green button to open the "Create an app" modal window.
Select the From scratch option.
In the App Name, type your app name. I use "Send Me Tacos" for this example, but you can choose anything you like. :)
Next, use the dropdown menu to locate the workspace where you want to send messages. The workspace is the name of the account you created. In this example, I named it "Taco Paradise".
Can you tell I'm thinking about yummy food?
When done, click on Create App. This last step will take you to a new page. See the image for reference.
After creating your new app, stay on the same page and scroll down to locate the Incoming Webhooks link on the left menu list. Click on the link to display the webhook configuration page. Notice how next to the words "Activate Incoming Webhooks" is set to off.
Click on that switch to enable it. It should turn green and display the text "On."
Well done!
Create a Webhook
Finally, click on the Add New Webhook to Workspace button to create a webhook URL. This step opens a new window.
In the new window, notice where it says, "Test App requires a channel to post to as an app" click on the dropdown menu and select the channel you want to send your messages.
Note: We referenced this step at the beginning of the tutorial. In this example, I chose #my-test-app.
You can now take your new webhook URL for a spin. Using your preferred terminal application or API client, Copy-paste YOUR sample curl request into the API client or terminal and execute the command/s.
Note: Replace the webhook URL with yours.
curl -X POST -H 'Content-type: application/json' --data '{"text":"Hello, World!"}' https://hooks.slack.com/services/5CKKM62NX5J/8G8XMGQ3RXM/aadCZ8act32sLJ7dgaC8HLrx
After executing the command, navigate back to the Slack app, web, or mobile and notice the new message; "Hello, World!".
Tada!
SO COOL!!!
You may not notice it right away, but two things happened. 1) Your incredible message was displayed in the Slack app, and 2) your Slack API app is now integrated into the Slack app.
Cool Idea 💡 : You can use Postman and Insomnia API clients to test and prototype your Slack webhooks and AWS Function URLs. ;)
You can stop here and call it a day, but continue the next section if you want to flex.
Create an AWS Lambda Function URL
Right then!
Let's take this tutorial to the next level. In this next section, I will show you how to create and configure an AWS Lambda Function URL so you can use the Slack Incoming Webhooks.😃
Also, we're going to use the AWS command-line interface to create AWS identity permission called roles and policies to allow the function URL to work.
If you need a refresher, visit the AWS IAM docs here.
Ready!? Let's go!
Create AWS IAM Role
First, we need to access your ARN, which is AWS specific formatted string. Similar to this one:
arn:aws:iam::123456789123:user/username
And to access that, we can execute the following AWS CLI command in the terminal like so:
Note: Change Paulo to your user name
$ aws iam get-user --user-name Paulo
The response should look similar to the JSON text below. Save your text somewhere to reference it later, or you can rerun the command.
$ {
    "User": {
        "UserName": "Paulo",
        "Path": "/",
        "CreateDate": "2019-09-21T23:03:13Z",
        "UserId": "AIDA123456789EXAMPLE",
        "Arn": "arn:aws:iam::123456789012:user/Paulo"
    }
}
Attach AWS Policy to IAM Role
Next, create a file called trust-policy.json
// trust-policy.json
{
  "Version": "2012-10-17",
  "Statement": [
    {
      "Effect": "Allow",
      "Principal": {
        "Service": "lambda.amazonaws.com"
      },
      "Action": "sts:AssumeRole"
    }
  ]
}
Pause here and change the role name function-url-role to something else or keep it until you create another one.
Once you're ready, open your terminal or command prompt, copy-paste the command below, and press enter.
$ aws iam create-role --role-name function-url-role --assume-role-policy-document file://trust-policy.json
A successful response will return some more JSON text.
This next step will attach an AWSLambdaBasicExecutionRole policy to your newly created IAM role. This policy gives you the basic user permissions to run your function.
Go ahead and copy-paste and execute the command below into your terminal app.
Remember to replace your function role name with yours. In this example its function-url-role.
$ aws iam attach-role-policy --role-name function-url-role --policy-arn arn:aws:iam::aws:policy/service-role/AWSLambdaBasicExecutionRole
Create AWS Function URL
In this section, you will create and configure your AWS Lambda Function and enable the new function URL feature with some basic settings.
First, we need access to the ARN role string. To do that, execute the AWS CLI command below.
$ aws iam get-role --role-name function-url-role
The response output should return some JSON similar to the text below.
Pause for a second and locate your the "Arn" string value which similar to this text arn:aws:iam::123456789012:role/my-function-url and save it somewhere for later.
// terminal JSON ouput
{
    "Role": {
        "Path": "/",
        "RoleName": "my-function-url",
        "RoleId": "AIDA123456789EXAMPLE",
        "Arn": "arn:aws:iam::123456789012:role/my-function-url",
        "CreateDate": "2022-04-16T22:32:36+00:00",
        "AssumeRolePolicyDocument": {
            "Version": "2012-10-17",
            "Statement": [
                {
                    "Effect": "Allow",
                    "Principal": {
                        "Service": "lambda.amazonaws.com"
                    },
                    "Action": "sts:AssumeRole"
                }
            ]
        },
        "Description": "Allows Lambda functions to call AWS services on your behalf.",
        "MaxSessionDuration": 3600,
        "RoleLastUsed": {
            "LastUsedDate": "2022-04-30T00:29:38+00:00",
            "Region": "us-west-2"
        }
    }
}
Prepare Your Files
Before creating an AWS Lambda Function, you need to prepare some code, execute a few AWS CLI commands and finally deploy your project for live testing. For this example, we're going to use JavaScript for Node.js.
First, create a file called index.js, then prepare the file for editing. Use the command below with your preferred terminal app, or you can manually modify it.
$ touch index.js && vim index.js
Next, copy-paste the following JavaScript code into the vim edit session in the terminal or use your preferred code editor. Make sure to replace the "string" where it says <-- YOUR WEBHOOK GOES HERE --> with your Slack API webhook URL.
For example, from this:
path: '<-- YOUR WEBHOOK GOES HERE -->'
To this
path: '/services/T02S60H1F0Q/B03DH5L14S1/CPHv2eu0ctGgB9g99DNZiNCi'
// index.js
const https = require('https');

const postRequest = (a) => {
    const payload = { "text": `${a}` };

    const data = JSON.stringify(payload);

    const options = {
        hostname: 'hooks.slack.com',
        path: '<-- YOUR WEBHOOK  GOES HERE -->',
        port: 443,
        method: 'POST',
        headers: {
            'Content-Type': 'application/x-www-form-urlencoded; charset=UTF-8',
            'Content-Length': data.length
        }
    };

    return new Promise((resolve, reject) => {
        const req = https.request(options, res => {
            let rawData = '';

            res.on('data', chunk => {
                rawData += chunk;
            });

            res.on('end', () => {
                resolve({
                    statusCode: 200,
                    body: `${rawData}`
                });
            });
        });

        req.on('error', err => {
            reject(new Error(err));
        });

        req.write(data);
        req.end();
    });
};

exports.handler = async (event) => {

    let body = JSON.parse(event.body);
    const result = await postRequest(body.text);

    const response = {
        statusCode: 200,
        body: result,
    };
    return response;
};
Finally, zip your files using the command below or manually.
$ zip function.zip index.js
You create an AWS Lambda Function using the AWS CLI in the following sections.
Create AWS Lambda Function
Pause for a second here. Think of a name for your new function. In this example, I'm using my-url-function.
Remember that ARN string you saved earlier? Replace the ARN string with yours.
For example, from this:
--role [YOUR ARN GOES HERE]
To this
--role arn:aws:iam::123456789012:role/my-function-url
When you're ready, copy-paste and execute the following command in the terminal:
$ aws lambda create-function \
    --function-name my-url-function \
    --runtime nodejs14.x \
    --zip-file fileb://function.zip \
    --handler index.handler \
    --role [YOUR ARN GOES HERE]
The output should return an extended JSON response with your AWS Lambda Function details.
You can verify if your lambda function was created by using the following command in the terminal.
$ awd lambda get-functionn --function-name my-url-function
Enable AWS Function URL
Traditionally, you would have to go through more than a dozen steps to create a simple endpoint using AWS Lambda, API Gateway, and rightfully so when creating secure endpoints, but now there's a better way.
Execute the following command, and remember to replace your function name with yours.
From this:
--function-name YOUR-FUNCTION-NAME \
To this:
--function-name my-url-function \
$ aws lambda create-function-url-config \
    --function-name YOUR-FUNCTION-NAME \
    --auth-type NONE \
    --cors '{"AllowOrigins": ["*"],"AllowCredentials": false}'
Note: For this demo, the link is public. You're responsible for securing your endpoints in all of your production environments.
Test Your AWS Function URL
Now for the moment you've been waiting for. Use the following command in your terminal and execute.
$ curl -X POST \
    '<YOUR FUNCTION URL GOES HERE>' \
    -H 'Content-Type: application/json' \
    -d '{"text": "Feed me Seymour!"}'
A successful response should return some JSON text similar to the one below.
$ {"body":"ok","statusCode":200}
If you are successful, you should see another message in the Slack app channel with the text "Feed me, Seymour!".
Conclusion
AND THAT'S IT!
I hope you leveled up some of your AWS Cloud Serverless skills and enjoyed this tutorial.
I appreciate you getting this far, and I hope to see you next time!
This content originally appeared on DEV Community and was authored by Josue Bustos
Josue Bustos | Sciencx (2022-05-01T00:12:25+00:00) Post Messages To Slack Using AWS Lambda Function URLs. Retrieved from https://www.scien.cx/2022/05/01/post-messages-to-slack-using-aws-lambda-function-urls/
Please log in to upload a file.
There are no updates yet.
Click the Upload button above to add an update.


