This content originally appeared on Bits and Pieces - Medium and was authored by Makesh Kumar

Directives are one of the most important concepts in Angular, In this section, we will see what is a directive and its types and how to create our own directives
What is meant by directives in Angular?
Directives are classes that add new behavior or modify the existing behavior to the elements in the template.
Basically directives are used to manipulate the DOM, for example adding/removing the element from DOM or changing the appearance of the DOM elements.
Types of directives
- Component directive
- Structural directive
- Attribute directive
Component directive
Components are special directives in Angular. They are the directive with a template
It might confuse you a bit, but if you see the definition of the directive, it says directives are used to manipulate the DOM, so now if you think what component is doing, it is actually showing something in DOM, hence we can say component is also a directive with a template (template or templateUrls).
Structural directive
Structural directives are used to change the DOM layout by adding and removing DOM elements. It basically changes the structure of the DOM
Examples of structural directives are ngIf, ngFor, ngSwitch.
*ngIf — adds or removes element from DOM.
*ngFor — renders list of elements on every iteration.
All structural Directives are preceded by Asterix (*)symbol.
Attribute directive
Attribute directives are used to change the appearance or behavior of an element.
Examples of attributes directives are ngStyle, ngClass, ngModel
ngStyle — used to apply styles that will change the appearance.
ngClass — used to apply CSS classes to change the appearance.
Creating our own Attribute directive
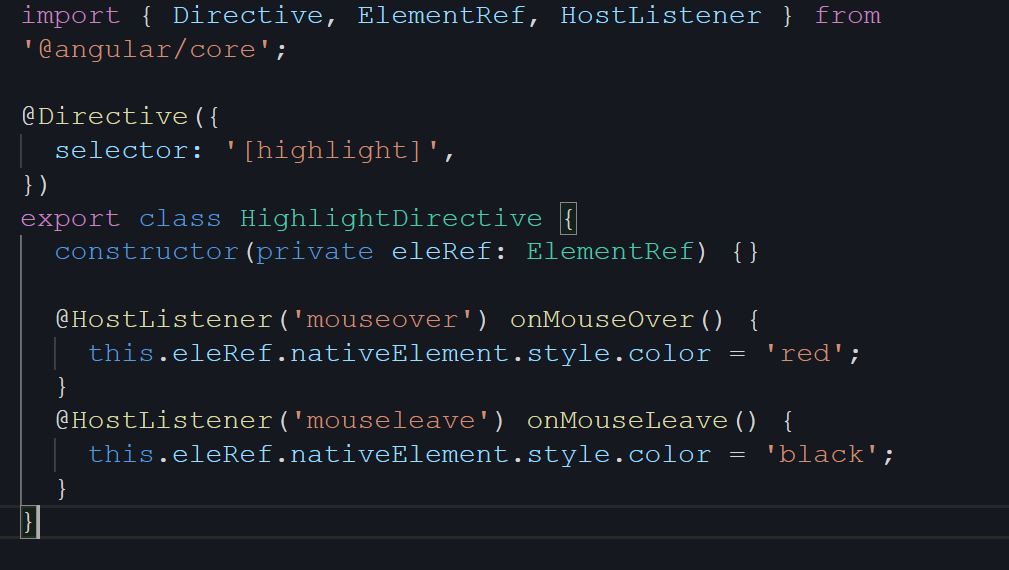
Follow the below steps to create our own Attribute directive which changes the color of the text when we hover over it.
Creating a custom directive is just like creating an Angular component. To create a custom directive we have to replace @Component decorator with @Directive decorator.
- Create a class and add @Directive decorator to it and pass the object which has selector property (name of the directive)
- To create an attribute directive we need to access the HTML element on which the directive is getting applied, for that we will inject ElementRefdependency using constructor in our class
- Now we have to listen for the hover event on the element, for that we can use HostListener
HostListener listens to the DOM event on the host element. It also provides a handler method to run when that event occurs.
Here the host element is the element where we are applying our directive. - On the handler method, access the element reference and change the color of the text

Passing input to directives
In our above example, we are hardcoding the color value as red, but there is a way to pass the color name as input for the directive
Way 1:
add @ Input() in directive class with the same name as the directive name (@Input() highlight; ) and pass the value like this
<p highlight=”blue”>Highlight Directive</p>
Way 2:
add a @ Input() in directive class with any variable name ( @Input() colorName;) and pass value like this <p highlight=”blue” colorName=”green”>Highlight Directive</p>
Creating our own Structural directive
Follow the below steps to create our own Structural directive which adds or removes the content based on the value provided (similar to *ngIf)
- Create a class and add @Directive decorator to it and pass the object which has selector property (name of the directive)
- In the case of the structural directive, we need two things here
- ViewContainerRef
- TemplateRef
ViewContainerRef —it holds the reference to the host element, that hosts the component (or directive).
TemplateRef — it holds the reference of the template defined by ng-template.
Inject these two dependencies in the constructor of our directive class - Create a @ Input() with a variable name similar to the directive name
it tells whether to add or remove the content - Now we have to show the content when the value is true and remove when the value is false , to do that create a ngOnChanges() lifecycle hook method
- In ngOnChanges, check for the value,
if it is true — add the templateRef into containerRef
if it is false — clear everything from containerRef
ngOnChanges() { if (this.toggle) {this.viewRef.createEmbeddedView(this.tempRef);
} else {this.viewRef.clear();
}
}
use the directive like this in our component template
<div *toggle="true">
  <p>Some text</p>
</div>
That’s all about directives in angular, I have explained very basics only, you can understand deeper by reading official docs
Click to see this code in stackblitz
Cheers, Happy Learning!
Build composable web applications
Don’t build web monoliths. Use Bit to create and compose decoupled software components — in your favourite frameworks like React or Node. Build scalable and modular applications with a powerful and enjoyable dev experience.
Bring your team to Bit Cloud to host and collaborate on components together, and speed up, scale, and standardize development as a team. Try composable frontends with a Design System or Micro Frontends, or explore the composable backend with serverside components.

Learn more
- How We Build Micro Frontends
- How we Build a Component Design System
- The Composable Enterprise: A Guide
- How to build a composable blog
- Extendable UI Components
What are Directives in Angular? was originally published in Bits and Pieces on Medium, where people are continuing the conversation by highlighting and responding to this story.
This content originally appeared on Bits and Pieces - Medium and was authored by Makesh Kumar
Makesh Kumar | Sciencx (2022-05-03T15:36:33+00:00) What are Directives in Angular?. Retrieved from https://www.scien.cx/2022/05/03/what-are-directives-in-angular/
Please log in to upload a file.
There are no updates yet.
Click the Upload button above to add an update.
