This content originally appeared on Level Up Coding - Medium and was authored by Ginelle D'souza
Require to execute data pipelines daily? Apache Airflow is what you need.
Creating production-ready projects with only a few basic and essential steps.

Every organization executes a set of activities daily. So, to carry out these activities, won’t it be frustrating to run the same script or an entire process every day? How about we automate this process or assign such tasks to a machine? It will surely save us so much effort and time, right? Thanks to the modern world, we have AIRFLOW!
Apache Airflow is an open-source tool to create, schedule, and monitor processes and tasks called workflows. In other words, Apache Airflow is a tool that orchestrates the life cycle of a data pipeline. It has a rich user interface that makes it easy to visualize workflows, monitor progress, and troubleshoot issues when needed. We can connect the data of these workflows with multiple data sources and send alerts through an email when a task completes or fails.
Airflow utilizes directed acyclic graphs (DAGs) to manage the orchestration of a workflow. DAG consists of tasks and task dependencies. They are concerned with task execution, the order to run them, and executing retries for tasks if timed out. A DAG can be triggered at a specific time or based on an external trigger. Airflow concepts are vast. Therefore, we will touch upon certain areas like
- Storing variables and connections
- Using multiple scripts
- DAG scheduler
- Generating email
Before we begin, feel free to visit my GitHub repository to find the source codes for the following article — Airflow!
Storing Variables and Connections
Several modules come together to nail down a specific task. Each of these modules requires configuration files to connect to databases and cloud services. Some modules may also require static variables to engineer and process their activities. So is this possible? Surely! We will now look into how we may store secure connection credentials and static variables into the airflow webserver.
Variables
Airflow allows a user to store and retrieve multiple types of variables like — integers, strings, lists, dictionaries, etc. Airflow stores variables as a simple key-value pair. Variables can be listed, created, updated, and deleted directly from the User Interface. However, there is a problem with this approach. We lose the stored variables with every new instance of the airflow webserver. However, we need not worry as there are several ways to create, update, and delete a variable. We will look into other ways to retain our variables permanently.
1. Airflow Webserver User Interface
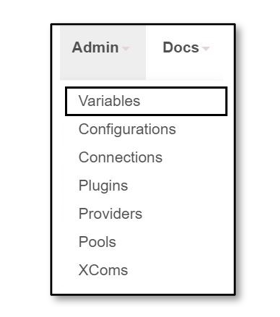
- Select Admin → Variables from the Airflow User Interface.

- Click on “Choose File” and locate your variable JSON from your computer.

- Click on “Import Variables”. Now, the variable is stored successfully.
2. Command Line Interface (CLI)
If you are using a Linux-based machine or have installed the same within your windows machine, it is possible to use the Command Line Interface to create variables. Through the Command Line Interface, we can import variables to the airflow web server using the following syntax.
airflow variables import <filepath>

Where, Variables.json is
{"zelle_columns_CLI" : {"data_columns": ["heard","change"]}}3. Python Code
The Airflow Models library provides two methods — Variable.set() and Variable.get(). As their names suggest, Variable.set() is used to create a variable onto airflow. Whereas the Variable.get() retrieves the values of the variables. Using the Variable.set() method from the airflow models module, we import the desired variables. Following the syntax, we can import variables
Variable.set(KEY,VALUE)
Example
from airflow.models import Variable
import json
f = open('Variables.json')data = json.load(f)
Variable.set('zelle_columns_CODE',data)Successful variable import

Connections
We can store values as variables within the airflow webserver. However, we must never choose to store sensitive information as variables. Airflow offers connections that we can use to store and maintain sensitive information. Connection values can be imported into the airflow web server as follows.
airflow connections add 'my_prod_db' \
    --conn-type 'my-conn-type' \
    --conn-login 'login' \
    --conn-password 'password' \
    --conn-host 'host' \
    --conn-port 'port' \
    --conn-schema 'schema'
Example
airflow connections add zelle_connection --conn-type postgresql
    --conn-login postgres --conn-password <password>
    --conn-host localhost --conn-port 5432 --conn-schema zelle

Using Multiple Scripts
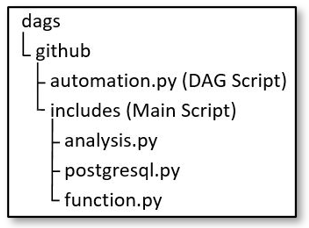
A DAG script imports and executes tasks from single or multiple files. For this purpose, we import a function from another script and align them as tasks based on their priority. When we use a function/method from another file, we must define the entire path to that function. The structure of my files is as follows.

The analysis.py script consists of three methods — record_analysis, table_analysis, and extract_database. We will now access record_analysis from the analysis.py through the following line of code.
from github.includes.analysis import record_analysis
Once we have imported the function/method, we assign it to a task.
with dag:
t1 = PythonOperator(task_id='t1',python_callable=record_analysis)
DAG Scheduler
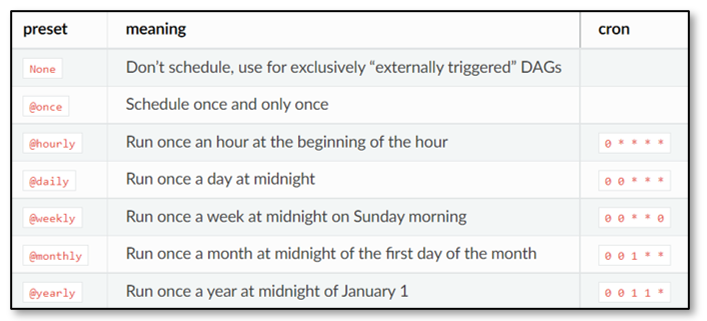
A DAG accepts a parameter schedule_interval that receives a CRON expression or a string as an input. This parameter is responsible for executing the tasks within the DAG at the specified time. schedule_interval accepts a string or a CRON expression as an input.
String Expression
Airflow provides ready-to-use scheduling expressions. We can use any of the following strings to schedule our DAG.

Example
dag = DAG('demoautomation', schedule_interval='@daily',
           default_args=default_args, catchup=False)
CRON expression
We can set the trigger time as and when we wish to with the help of a CRON expression. A CRON expression is a string of five-six fields separated by white space representing a set of times. The following example will run the DAG every day at 4:00 AM.
Example
dag = DAG('demoautomation', schedule_interval='0 4 * * *',
           default_args=default_args, catchup=False)
Generating Email
An Airflow data pipeline is responsible for carrying out several processes. There is a high chance we may run into a complication or an error. For such cases, it is advisable to enable SMTP services. A user can send alerts through an email when a task completes or fails using Airflows SMTP services. So, let us divide this into two steps:
1. Setting up an SMTP connection in airflow.cfg[Using a Gmail Agent]
Before we begin, we need to generate a 16-digit password. We will create a password using the App Passwords page within the Google account setting. Here, it is necessary to inform our Google account that an external device will need to access and use our Mail. The Google account will provide a 16-digit password used within the airflow.cfg.
- Login into your Gmail account and visit → App Passwords
- At the bottom, click Select App and choose Mail.
- Click Select Device and select your device.
- Select Generate.
- Copy and save the 16-digit password.
- Select Done.
We can now set up airflow.cfg
#airflow.cfg
[smtp]
smtp_host = smtp.gmail.com
smtp_starttls = True
smtp_ssl = False
smtp_user = <youremailaddress>
smtp_password = <16digitgeneratedpassword>
smtp_port = 587
smtp_mail_from = <youremailaddress>
Example
#airflow.cfg
[smtp]
smtp_host = smtp.gmail.com
smtp_starttls = True
smtp_ssl = False
smtp_user = dummysource@gmail.com
smtp_password = jfhdyetagsbfhtuf
smtp_port = 587
smtp_mail_from = dummysource@gmail.com
2. Setting email trigger in DAG script
Once we have generated and configured the SMTP service in airflow.cfg, we will use email and email_on_failure parameters. Here, the parameter email can be a single email address or a list of email addresses separated by a comma or semi-colon. email_on_failure indicates whether an email alert should be when a task failed
Example
default_args = {'owner': 'airflow', 'start_date': datetime(2021, 1, 1),'email': ['dummysource@gmail.com'],'email_on_failure': True}
Hooray! We have finally completed this exciting article.
Thank you for reading! :)
Orchestrate data pipelines with Apache Airflow! was originally published in Level Up Coding on Medium, where people are continuing the conversation by highlighting and responding to this story.
This content originally appeared on Level Up Coding - Medium and was authored by Ginelle D'souza
Ginelle D'souza | Sciencx (2022-05-04T11:44:28+00:00) Orchestrate data pipelines with Apache Airflow!. Retrieved from https://www.scien.cx/2022/05/04/orchestrate-data-pipelines-with-apache-airflow/
Please log in to upload a file.
There are no updates yet.
Click the Upload button above to add an update.
