
This content originally appeared on DEV Community and was authored by Charlie Gerard
Stripe is open-sourcing Markdoc, the Markdown-based authoring system that powers the Stripe documentation website. Whether it’s for a simple static site, authoring tooling, or a full-blown documentation website, Markdoc is designed to grow with you, so you can create engaging experiences no matter how large or complex your documentation becomes. Let’s have a look at how to get started.
The rest of this tutorial is implemented in Next.js, using create-next-app.
Installation
To start using Markdoc, you first need to install it with:
npm install @markdoc/markdoc --save
or
yarn add @markdoc/markdoc –-save
As this sample app is using Next.js, you also need to install the Next.js plugin:
npm install @markdoc/next.js --save
Finally, add the following lines to the next.config.js file:
const withMarkdoc = require("@markdoc/next.js");
module.exports = withMarkdoc()({
 pageExtensions: ["js", "md", "mdoc"],
});
These lines allow you to use .js, .md and .mdoc files.
These additions to the config file enable you to write your docs in either JavaScript or Markdown file formats. If you would like to use Markdown files with another framework than Next.js, a plugin will be required.
Now that you’re all set up, let’s write some content.
Using Markdoc
To get started, locate the pages folder that’s automatically generated when spinning up a Next.js app with create-next-app, and create a new index.md file inside it.
Markdoc syntax is a superset of Markdown, specifically the CommonMark specification, so, in this file, you can write content using this syntax.
# Some title
## A subtitle
This is a paragraph with a [link to your awesome website](https://your-awesome-website.com)
Markdoc is extensible so you can also use variables, functions, and create custom tags. For these, you have to define your content in JavaScript and use Markdoc.transform() and Markdoc.renderers.react() to render everything.
Let’s look into how to do that.
Variables
Variables are defined in a config object and can then be used in your content. Here’s what a complete code sample could look like before we break it down and explain the different pieces.
// config.js
export const config = {
 variables: {
   user: {
     name: "Justice Ketanji Brown Jackson",
   },
 },
};
// Page.js
import React from "react";
import Markdoc from "@markdoc/markdoc";
import { config } from "./config.js";

const Page = () => {
 const doc = `
 Hello {% $user.name %}
 `;

 const content= Markdoc.transform(doc, config);

 return <section>{Markdoc.renderers.react(content, React)}</section>;
};

export default Page;
For example, if you wanted to display a user’s name, you would declare a config object like this:
 const config = {
   variables: {
     user: {
       name: 'Justice Ketanji Brown Jackson'
     }
   }
 };
In Markdoc, to reference the variables in your config, prepend the variable name with a $dollarSign. For example, you would refer to the user’s name like this:
const content = `
Hello {% $user.name %}
`;
Don’t forget to prepend the variable with a $, otherwise it will be interpreted as a tag.
Then, you need to pass these two variables in Markdoc.transform() and render your content, using Markdoc.renderers.react().
const content= Markdoc.transform(doc, config);

return <section>{Markdoc.renderers.react(content, React)}</section>;
Using variables is a powerful feature, for instance, if you want to display dynamic data, such as a user’s API key. An example of such a feature can be found on the Stripe documentation website.
Customizing styles
Markdoc introduces the concept of annotations to allow you to style different nodes, which are elements Markdoc inherits from Markdown.
For example, you can add IDs and classes with the following syntax:
// index.md
# My title {% #custom-id %}
# Another title {% .custom-class-name-here %}
You can then refer to these in your CSS to apply styles.
// styles.css
#custom-id {
 color: purple;
}
.custom-class-name-here {
 color: darkblue;
}
This would generate the following HTML:
<h1 id="custom-id">My title </h1>
<h1 class="custom-class-name-here">Another title </h1>
And render the content shown below:

Some style-related attributes can also be applied using annotations:
Function {% width="25%" %}
Example  {% align="right" %}
Tags
Markdoc comes with four built-in tags and also lets you build your own. For example, you can try the if tag that lets you conditionally render content.
const config = {
 variables: {
   tags: {
     featureFlagEnabled: true,
   },
 },
};

const document = `
{% if $tags.featureFlagEnabled %}

Here's some secret content

{% /if %}
`;
You can build your own tags in three steps. Let’s go through an example with a custom banner component.
First, you need to start by creating the React component that you want to render. The code for a small banner component could look like this:
// Banner.js
const Banner = ({ type, children }) => {
 return (
   <section className={`banner ${type}`}>
     {children}
     <style jsx>{`
       .alert {
         border: 1px solid red;
       }
     `}</style>
   </section>
 );
};

export default Banner;
This component will accept a type prop to indicate if the banner should be styled as an alert, info, warning banner, etc. The children prop represents the content that will be passed inside that tag in the Markdown file later on.
To be able to use this component as a tag in a Markdown file, first create a “markdoc” folder at the root of your Next.js app, and a “tags.js” file inside it, that will contain all your custom tags.
This app’s architecture would end up looking like this:
components/
|-- Banner.js
markdoc/
|-- tags.js
pages/
   index.md
Inside your custom tag file (here tags.js), you need to import your React component and export a variable containing the component you want to display. You would also include any attributes you want to use. In this case, the type of banner.
When declaring the attributes, you need to specify their data type.
// markdoc/tags.js
import Banner from "../components/Banner";

export const banner = {
 Component: Banner,
 attributes: {
   type: {
     type: String,
   },
 },
};
The final step is to use this custom tag in your Markdown content, like this:
{% banner type="alert" %}
This is an alert banner
{% /banner %}
If you create a custom tag that does not accept any children, you can write it as a self-closing tag:
{% banner/ %}
Syntax validation
Additionally, Markdoc lets you validate the abstract syntax tree (AST) generated before rendering. If you consider the Banner component written above, you can use it as a tag when writing your content in JavaScript and check for any syntax error before rendering.
For example, if a banner tag is used without a type attribute that is required, you can implement some error handling to avoid rendering broken content.
This syntax validation can be implemented with a single line, using Markdoc.validate().
 const config = {
   tags: {
     banner,
   },
 };

 const content = `
 {% banner %}
 Example banner with a syntax error
 {% /banner %}
`;

 const ast = Markdoc.parse(content);
 const errors = Markdoc.validate(ast, config);
 // Handle errors
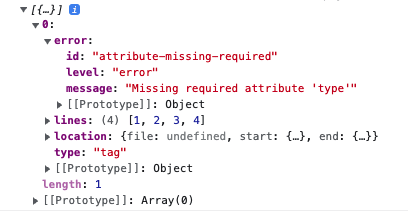
In this case, the error returned will look like this.
Functions
You can extend Markdoc with custom utilities by writing your own functions. For example, if you wanted to add a way to transform your content to uppercase, you would start by creating a file inside your markdoc folder, for example functions.js. In this file, add the following helper function:
// markdoc/functions.js

export const uppercase = {
 transform(parameters) {
   const string = parameters[0];
   return typeof string === 'string' ? string.toUpperCase() : string;
 }
};
Then import this function in the component that needs it, and pass it in your config object:
import { uppercase } from "../markdoc/functions";

const config = {
 functions: {
   uppercase
 }
};
Call it in your content within {% %} tags:
const document = `
 {% uppercase("Hello, World") %}
`
And finally, call Markdoc.transform() and use the React renderer to render everything.
const doc = Markdoc.transform(document, config);
Markdoc.renderers.react(doc, React);
So, the complete syntax for a small component would look like this:
// config.js
export const config = {
 functions: { uppercase },
};
// functions.js
export const uppercase = {
   transform(parameters) {
     const string = parameters[0];
     return typeof string === "string" ? string.toUpperCase() : string;
   },
 };
// Page.js
import Markdoc from "@markdoc/markdoc";
import { config } from "./config.js";
import { uppercase } from "./functions.js";

const Page = () => {
 const document = `
 {% uppercase("Hello, World") %}
 `;

 const doc = Markdoc.transform(document, config);

 return <section>{Markdoc.renderers.react(doc, React)}</section>;
};

export default Page;
Some built-in functions are available such as equals, to display some content if two variables are equal, not/and/or to use in an if statement to perform boolean operations, default that returns the second parameter passed if the first returns undefined, and debug that serializes the values as JSON to help you while debugging.
Resources
If you’re interested in learning more, here are some useful resources you can check out, and if you’re interested, we welcome your contributions to the repository! We can’t wait to see what you’re going to build with Markdoc and don’t hesitate to let us know what you think!
Official Markdoc documentation
Markdoc repository
Markdoc Next.js plugin repository
Markdoc playground
Next.js boilerplate demo
Stay connected
In addition, you can stay up to date with Stripe in a few ways:
📣 Follow us on Twitter
💬 Join the official Discord server
📺 Subscribe to our Youtube channel
📧 Sign up for the Dev Digest
This content originally appeared on DEV Community and was authored by Charlie Gerard
Charlie Gerard | Sciencx (2022-05-11T15:00:37+00:00) Getting started with Markdoc in Next.js. Retrieved from https://www.scien.cx/2022/05/11/getting-started-with-markdoc-in-next-js/
Please log in to upload a file.
There are no updates yet.
Click the Upload button above to add an update.