


This content originally appeared on Envato Tuts+ Tutorials and was authored by Laura Keung


This tutorial is a quick beginner guide on how to make a table in InDesign. We'll create a yearly calendar that you can update easily.

How to make a table in InDesign is a big topic. In this beginner's guide, I'll show you how to insert a table in InDesign to make a yearly calendar. This handy organizer can be updated with different colors for different years.
And if you prefer video tutorials, don't forget to visit the Envato Tuts+ channel. There you'll find loads of useful resources, like this new video on how to create a table in InDesign:
Find High-Quality Fonts and Resources at Envato Elements


Are you looking for calendar templates that are ready to use? Envato Elements is an awesome platform with amazing assets. For a small monthly fee, you have access to high-quality assets and unlimited downloads. You can find anything from fonts to photos, graphic templates, and much more!
What You'll Learn in This InDesign Tutorial
In this tutorial on how to create a table in InDesign, you'll learn:
- How to properly set up an InDesign document
- How to insert a table in InDesign
- How to create table styles
- How to edit strokes and cell colors in a table
What You'll Need
For this tutorial, you'll need access to Adobe InDesign and the Constructio font. Install the font on your system and you're ready to begin!
1. How to Set Up an InDesign File
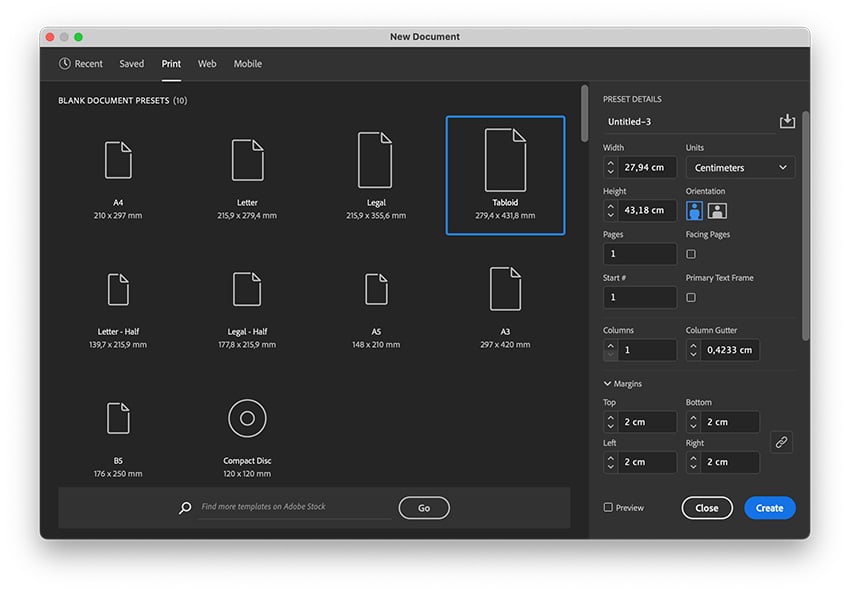
Open InDesign and create a New Document.
In the popup window, select Print from the top menu. Select the Tabloid blank document preset. Under Preset Details, set the Units to Centimeters. Set the Margin to 2 cm.
Click Create.


2. How to Create a Table in InDesign
Step 1
First, we'll add the year to the calendar by using Tables.
To create a table in InDesign, select the Text Tool (T) from the toolbar. Create a text box that runs through the height of the document, margin to margin. Set the Width to 5.1 cm on the Control panel.


Step 2
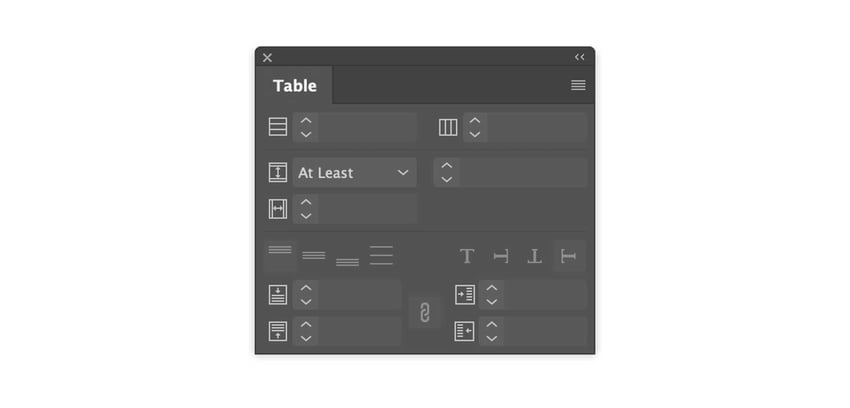
Go to Window > Table to open the Table panel.


Step 3
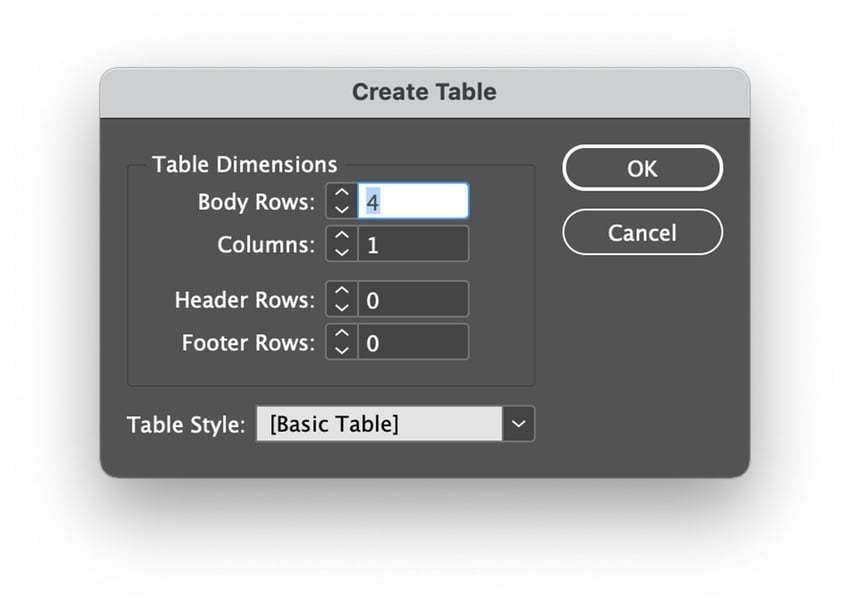
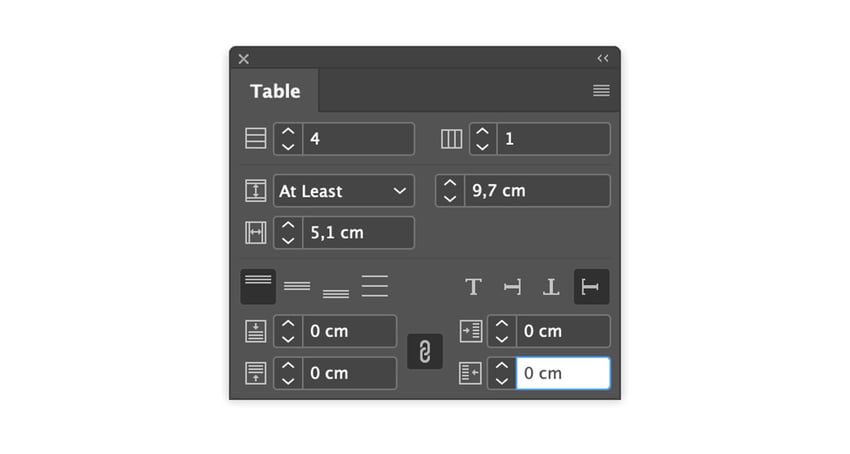
Double-click within the text frame we created. Go to Table > Create Table. In the popup window, set the Body Rows to 4 and the Columns to 1. Click OK.

Step 4
To select the table, double-click on the first cell and extend your mouse to the other cells.
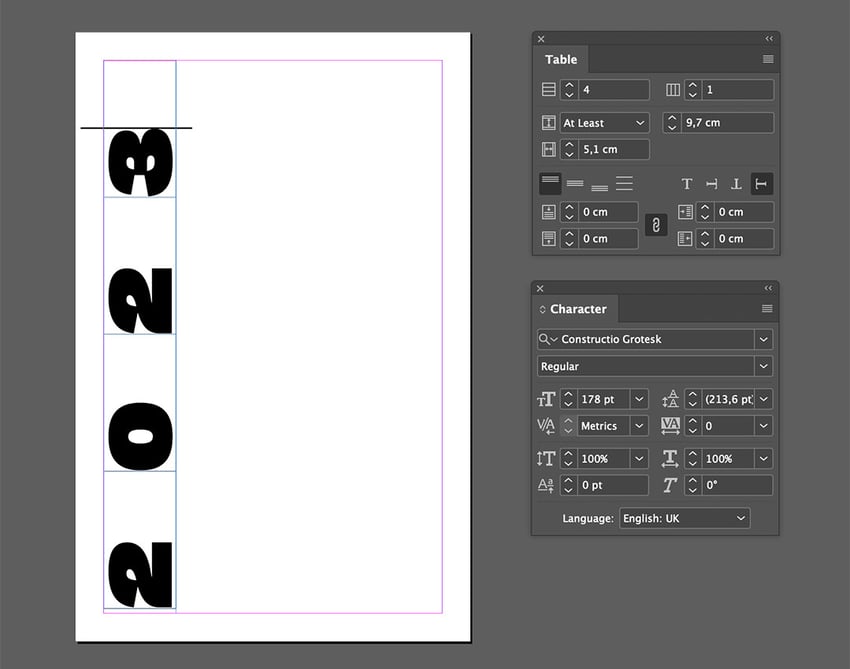
In the Table panel, set the Row Height to At Least and 9.7 cm. Select the Align to Top button and the Rotate Text 270° button. Set all the Inset values to 0.


Step 5
Go to Window > Type > Characters to open the Characters panel.
With all of the cells still selected, go to the Character panel. Set the Font to Constructio Grotesk, and set the Size to 178 pt.


Step 6
Click on the bottom cell of the table and add the number "2". Click on the subsequent cells to add the rest of the year "023."


Step 7
Select all of the cells and select the Align Center option on the Control panel.


Step 8
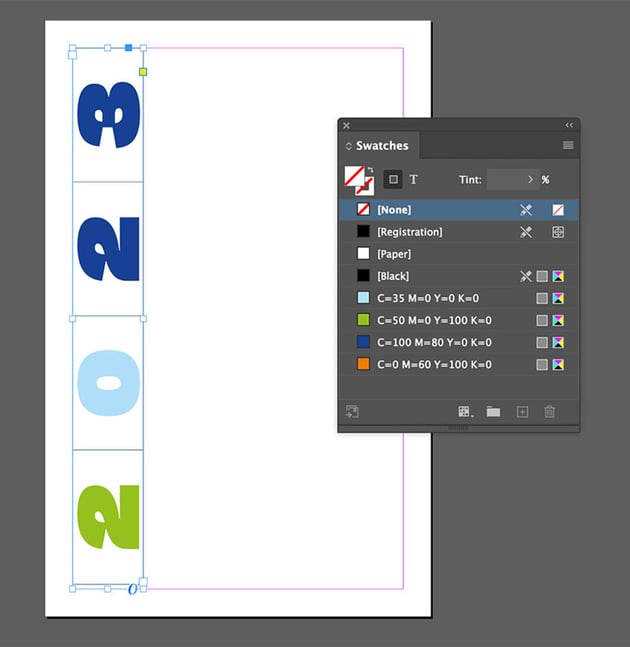
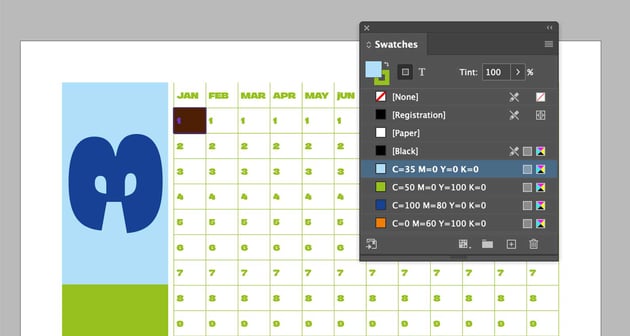
Go to Window > Swatches. Here we'll add a few color swatches to use on the calendar. Click on the Add New Swatch button. The first color is Light Blue; set the Cyan to 35 and leave the rest of the colors on 0.


Step 9
Repeat the previous step and add the following colors:
- Green: C=50, M=0, Y=100, K=0.
- Dark Blue: C=100, M=80, Y=0, K=0.
- Orange: C=0, M=60, Y=100, K=0.


Step 10
Select the first "2" of the year. Using the Swatches panel, set the color to Green. Be sure you're only selecting the text and not the whole cell.
Set the next number to Light Blue and the last two to Dark Blue.


Step 11
To color the cells, select the cell as if you were selecting the text, but extend the mouse a little more. Color the cells with Light Blue, Dark Blue, Green, and the last cell with Light Blue.


Step 12
The rest of the space we'll use for the calendar.
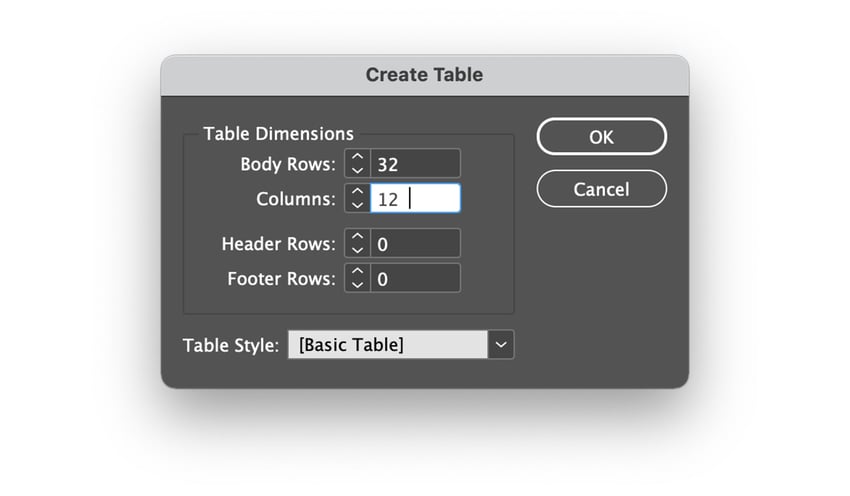
Another way to insert tables in InDesign is by going to Table > Create Table. In the popup window, set the Body Rows to 32 and Columns to 12.


Step 13
Place the table a few millimetres from the year and extend it to the rest of the margins.


Step 14
Select all of the cells.
Go to Table > Cell Options > Strokes and Fills. Under Cell Stroke, select all of the strokes. They'll change to blue when selected. Set the Weight to 0.5 pt and the Color to Green. Click OK.

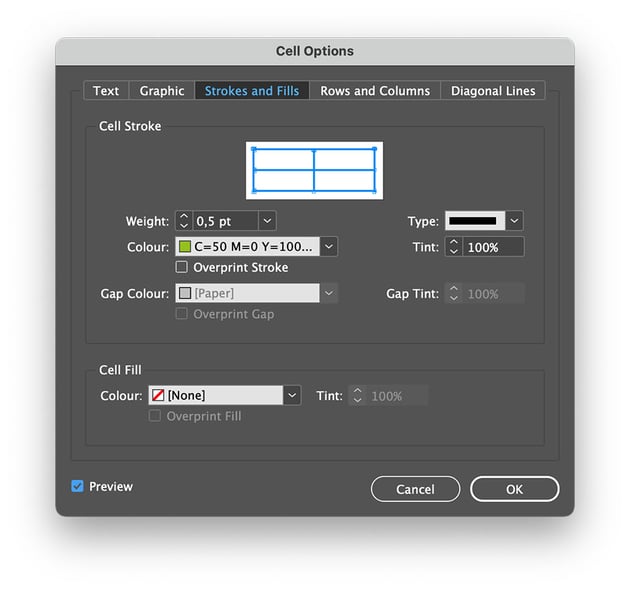

Step 15
Select the whole of the top row. Another way to edit the table is to go to the Control bar. In the cell window, select only the top stroke.
Set the Stroke Color to None.


Step 16
Select all of the cells.
On the Characters panel, set the Font to Constructio Grotesk and the Size to 12 pt.
On the Swatches panel, press J on your keyboard—this will allow you to change the color of the text. Set the Swatch to Green.


Step 17
Click on the very first cell from the first row and start adding the months in short form and all caps.
Select all of the cells, and in the Table panel, select the Align Center button.
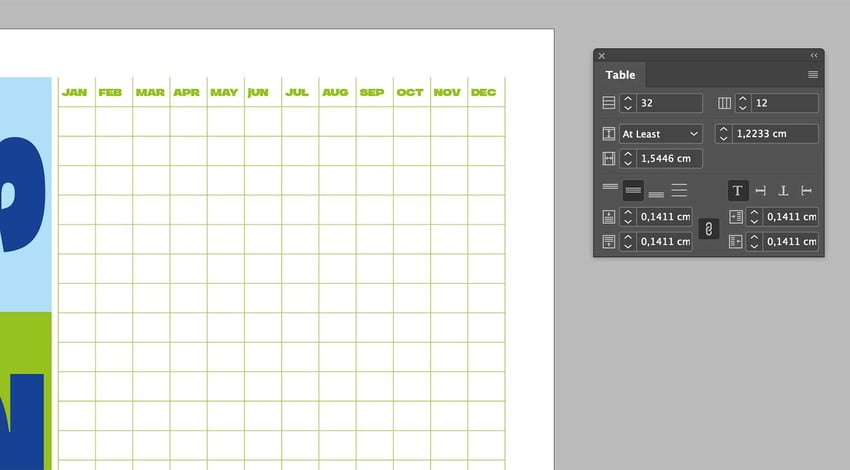


Step 18
Under the cell containing JAN, start with the dates. Add 1, and continue with the rest of the column until you get to 31.


Step 19
Select all of the cells containing the dates, making sure to exclude the month. Press Command-C to Copy.
Select the cells from the other columns, making sure to exclude the cells with the months. Press Command-V to Paste. InDesign allows you to paste on several cells at the same time.
Delete the extra dates for the months that have only 28 and 30 days.


3. How to Create Cell Styles in InDesign
Step 1
Before creating table styles in InDesign, we have to learn how to create cell styles.
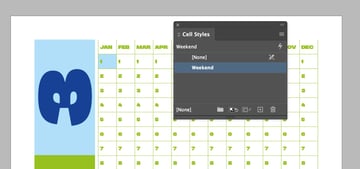
All our calendar is missing is the weekends. For this, we'll add a cell style that will look distinctive from the other regular days.
Select the cell containing January 1st. Go to the Swatches panel, and set the fill color to Light Blue.


Step 2
Go to Window > Styles > Cell Styles.
Be sure you still have the January 1st cell selected. On the Cell Styles panel, click on the Create New Style button.
Double-click on the new Cell Style and Rename it to Weekend.


Step 3
Check on your computer's calendar which dates fall on a weekend. Select the dates and click on the Weekend cell style to style it.


Step 4
Now to add the bank holidays. Use an asterisk next to the date to represent a bank holiday. Set the color to Orange on the Swatches panel.


4. How to Export a PDF File in InDesign
Step 1
To export your calendar, go to File > Export.
In the popup window, set the Format to PDF (Print).
Click Save.


Step 2
In the Export Adobe PDF window, set the Preset to High Quality Print.
Click Export.


That's It!
In this tutorial, you learned how to make a table in InDesign by designing a yearly calendar. You learned how to insert tables in InDesign with different directions and styles. This type of calendar can be updated every year with your own colors. Tables are an essential part of InDesign and often underused, but they can be useful for extensive editorial design.
If you're looking for amazing assets, be sure to check out Envato Elements. For a small monthly fee, you have access to high-quality assets and unlimited downloads. You can find anything from fonts, photos, graphic elements, and much more!
If you liked this tutorial, you might like:
This content originally appeared on Envato Tuts+ Tutorials and was authored by Laura Keung
Laura Keung | Sciencx (2022-05-22T15:55:44+00:00) How to Create a Table in InDesign. Retrieved from https://www.scien.cx/2022/05/22/how-to-create-a-table-in-indesign/
Please log in to upload a file.
There are no updates yet.
Click the Upload button above to add an update.