This content originally appeared on DEV Community and was authored by victory
Summary
Since the year 2020 when the JAMStack architecture became mainstream and widely used by giant tech companies, the amount of frontend developers building applications with the JAMStack architecture has skyrocketed.
Following this widespread adoption, this article has put together a tutorial that will guide you through the process of building a JAMStack application for documenting traveling experiences. By using the Redis enterprise cloud, a few clicks can set up a RedisJSON database with RediSearch support.
What do you need?
This tutorial contains several hands-on steps that will guide you through the process of building the JAMstack application. To follow along, it is assumed that you have the following;
- A Redis enterprise cloud account.
- Node.js installed on your computer.
- Familiarity with JavaScript and the Vue or NuxtJS frontend frameworks.
Table Of Contents
To make the tutorial easy to follow, it has been broken down into small sections. Feel free to follow through in the order they appear below, or skip to whatever section interests you the most!
- Creating your Redis resources
- Building the Netlify functions
- Building the NuxtJS Application Frontend
Creating Your Redis Resources
The quickest way to using Redis is through the Redis Enterprise Cloud as it provides the Redis Stack which comprises of RedisJSON and RediSearch. Alternatively, you can setup your own Redis instance using Docker.
The next section will guide you through the steps of using the Redis Cloud to provision a free Redis instance with a database.
Creating A Redis Database
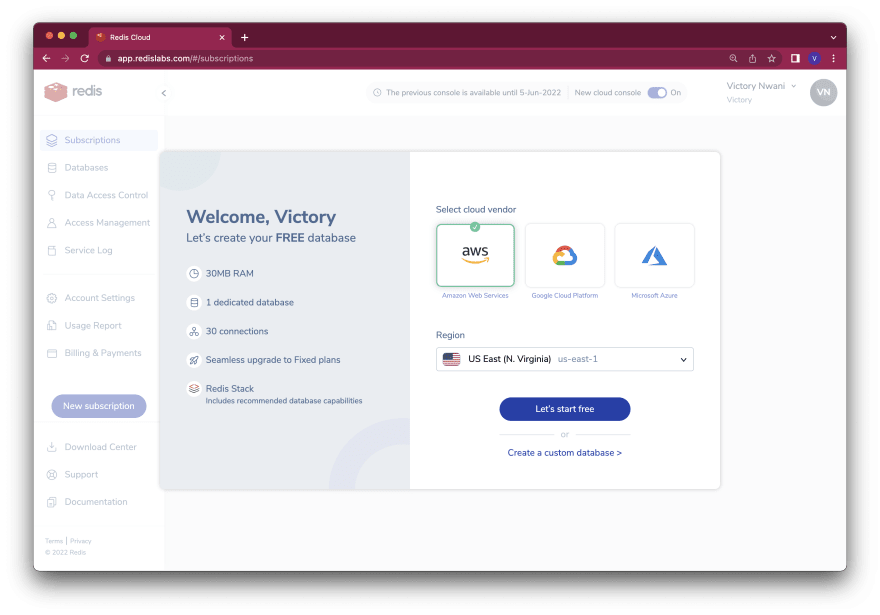
Using your web browser, navigate to the Redis Cloud console. With a free subscription, you are allowed to create one free database.
Click the Let’s start free button to proceed with creating a database.
Within seconds of clicking the button, a RedisJSON database will be created on AWS within the us-east-1 region.
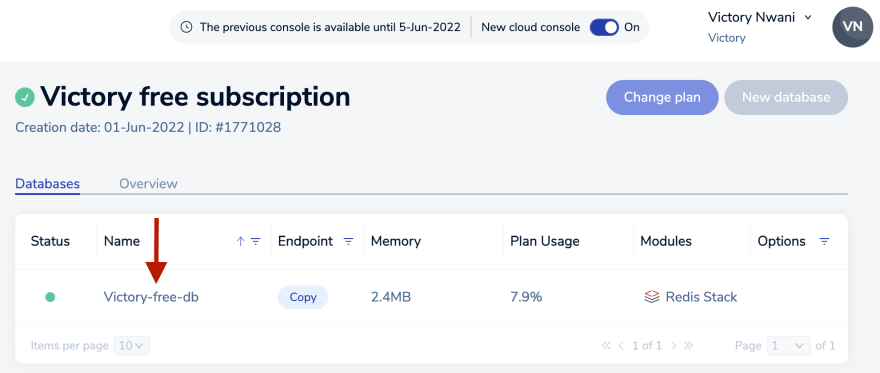
Click the provisioned database to navigate to the database details page and copy it’s connection credentials.
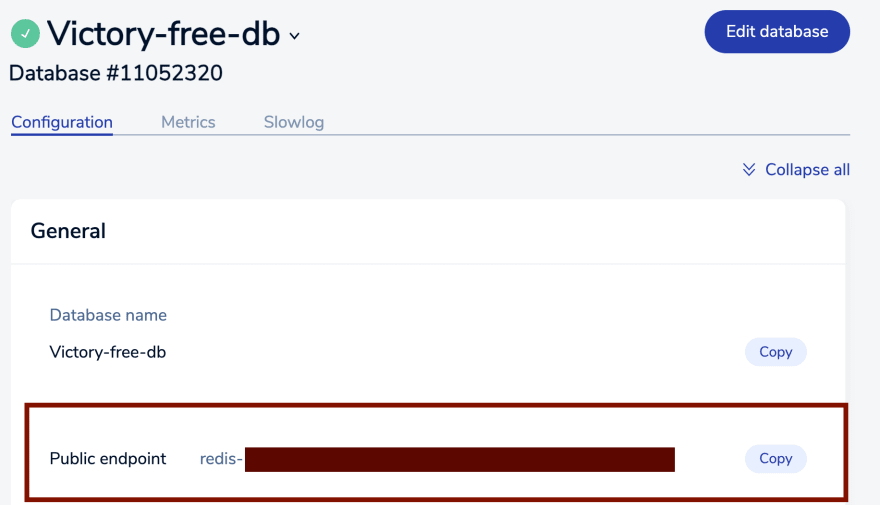
Within the General section at the Configuration tab in the next page, note down the Public endpoint value in a secure notepad. The public endpoint will be used to access the database from the JAMStack application.
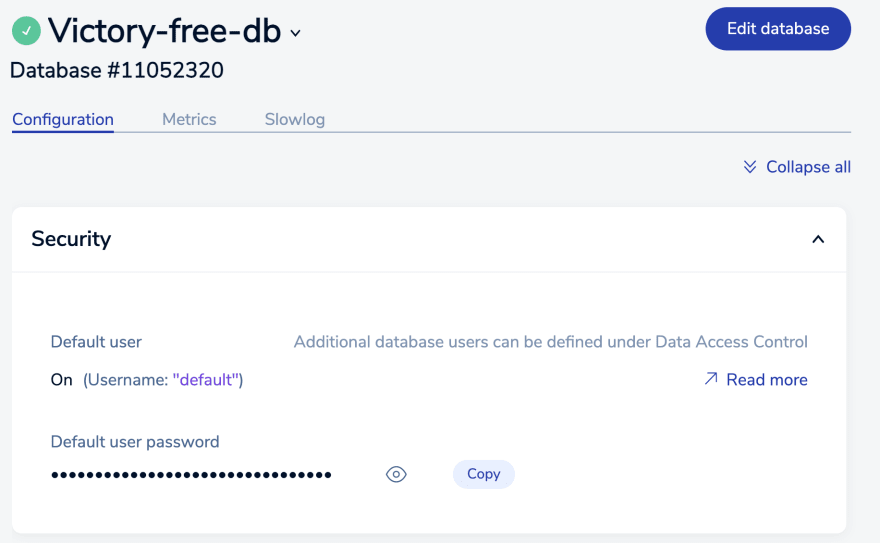
Scroll down to the Security section to view the authentication credentials for your database.
Click the Copy button to copy the Default user password value to clipboard. These values will be used to authenticate connections from your JAMstack application to the database.
With the database fully setup, let’s proceed to generate a NuxtJS project that will store data in Redis database you created.
Generating A NuxtJS Project
NuxtJS is one of the optimized frontend frameworks for building Vue.js applications. Search Engine Optimization (SEO) and Server Side Rendering (SSR) are two notables features which NuxtJS offers to developers.
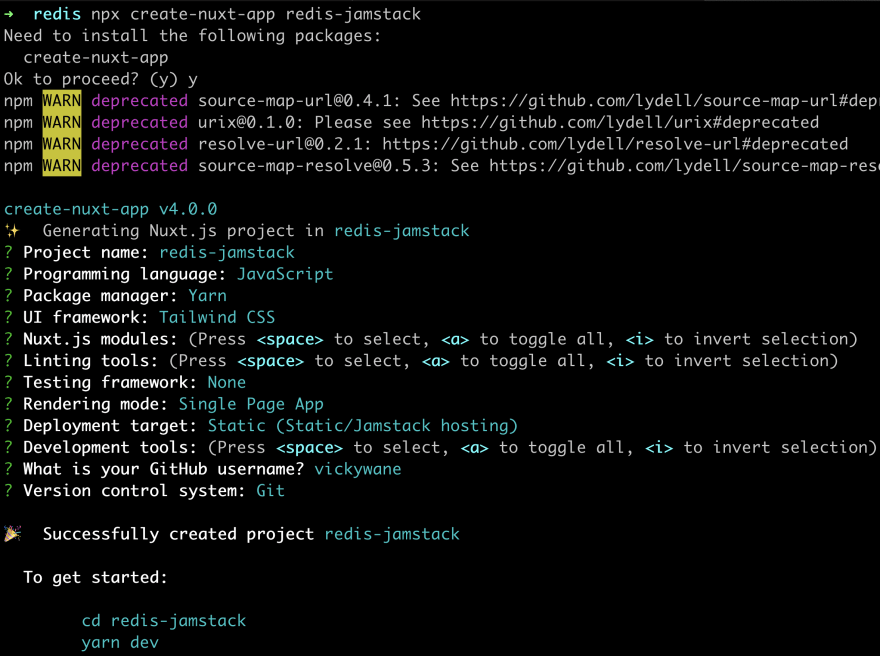
To begin with NuxtJS, launch the terminal or command prompt on your computer. You will scaffold a NuxtJS project from your terminal.
- Execute the npx command below to create a NuxtJS application named redis-jamstack using the interactive installer;
npx create-nuxt-app redis-jamstack
During the installation process, make sure to select JavaScript as the programming language and TailwindCSS as the styling framework.
After the NuxtJS project has been generated, execute the command below to move into the redis-jamstack directory.
cd redis-jamstack
At the next section, you will install two dependencies that are needed for building the application.
Installing The Application Dependencies
Execute the npm command below to install the dependencies.
You will use the dotenv package to securely retrieve your redis credentials and establish a connection to your database through the redis-om package.
npm install dotenv redis-om
Initializing A Netlify Site
Netlify is one of the most used platforms for developing and deploying JAMStack applications due to the numerous features and developer experience it provides. Each application deployed on Netliy is contained within a site. You will also create a site for the redis-jamstack application.
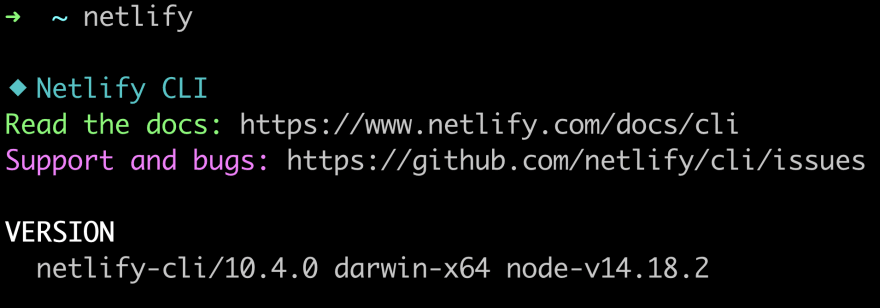
Ensure the Netlify-CLI tool is properly installed on your computer by running the netlify command.
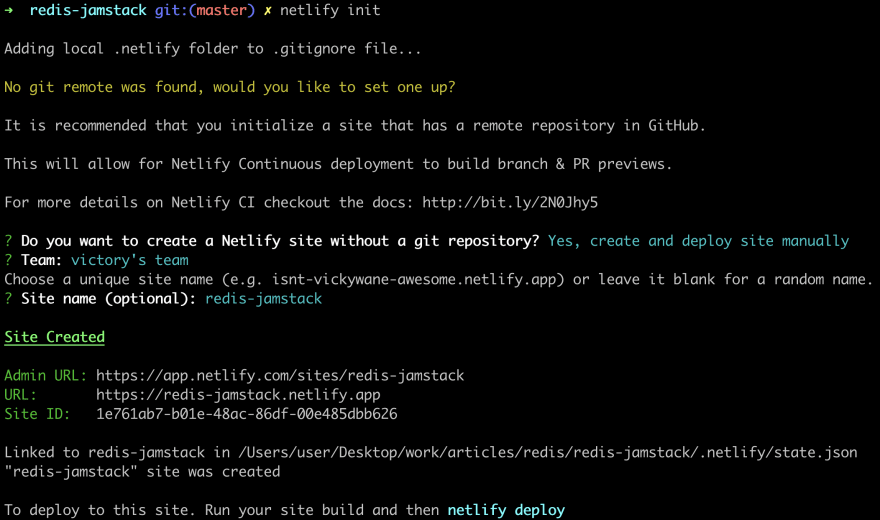
Next, execute the command below to initialize a local Netlify site within the redis-jamstack project. After development, you can decide to deploy the local site globally to Netlify.
netlify init
The next step is securely store your Redis credentials as environment variables within the created site. Netlify provides developers with the option of storing environment variables either through the web-based Netlify dashboard or Netlify-CLI.
Execute the three commands below to store the public endpoint, username and password credentials for your Redis database on Netlify.
Note: Replace the placeholders below with the public endpoint, username and password credentials located within the Configuration tab of the database details page on Redis Cloud.
    # store database username
    netlify env:set REDIS_USERNAME DATABASE_USER

    # store database password
    netlify env:set REDIS_PASSWORD DATABASE_PASSWORD

    # store database endpoint
    netlify env:set REDIS_ENDPOINT DATABSE_PUBLIC_ENDPOINT
bash
Building The Netlify Functions
At the previous section, you used the Netlify-CLI tool to initialize a local Netlify site and stored credentials for your Redis database as environment variables. Within this section, you will focus on using Netlify-functions to build the API layer of the JAMStack application.
Netlify Functions are event-driven functions written in either JavaScript, TypeScript or Go. Netlify-functions are deployed together with the site, and each netlify function is executed when a HTTP request is made to the function’s endpoint which comprises of the function’s filename and the site URL.
Within the redis-jamstack application, you will create three Netlify functions for inserting, reading and searching the Redis database for a travel experience. By default, the file for each netlify-function is located within a nested netlify/functions directory.
Before you proceed further, let’s specify some configurations for the Netlify-CLI which will be used to run the netlify functions locally before they are deployed to Netlify.
Using your preferred code editor, create a file named netlify.toml in the redis-jamstack directory and add the content of the code block below.
The fields within the dev block will configure the Netlify dev server to run on your localhost at port 5050 and also prevent auto-launching the NuxtJS app in your browser. The wildcard (*) within the headers field will cause the Netlify functions all HTTP accept requests.
    // ./redis-jamstack/netlify.toml

    [dev]
    autoLaunch=false
    port=5050

    [[headers]]
    for = "/*"
    [headers.values]
    Access-Control-Allow-Origin = "*"
Next, you need to create the nested netlify/functions directory that will store the JavaScript files for your Netlify functions.
Execute the command below to create a nested directory and change directory into it.
Note: If you are using the command prompt on a Windows OS, you will need to manually create the nested directory using the File Explorer.
    # create nested directories
    mkdir -p netlify/functions

    # move into functions directory
    cd netlify/functions
Creating A Redis Client and Entity
The Redis Object Mapping (Redis-om) package provides you with the ability to model the data for your Node.js applications through the use of custom classes. Rather than using low-level Redis commands such as HSET and HGET, you get to use more of JavaScript while interacting with Redis.
For the redis-jamstack application, you will need to define an entity and a schema that defines username, travelYear, travelCountry, travelState, and travelExperience fields contained in a travel experience.
Create an entities.js file to store the entity for each travel experience. Add the code below to define the travel experience entity in the entities.js file you created.
One thing to note about the schema below is how the username, travelExperience and travelState fields have a string type while the travelCountry field has a text type. Although these fields are similar, the text type provides the ability to perform a partial search using RediSearch without matching the entire value, unlike the string type.
    // ./redis-jamstack/netlify/functions/entities.js
    const { Entity, Schema } = require('redis-om');
    class TravelExperience extends Entity { }

    const travelExperienceSchema = new Schema(TravelExperience, {
        username: { type: 'string' },
        travelDuration: { type: 'string' },
        travelCountry: { type: 'text' },
        travelDestination: { type: 'string' },
        travelExperience: { type: 'string' },

        dateCreated: {type: 'date'},
        dateUpdated: { type: 'date' }
    })

    module.exports =  {
        travelExperienceSchema
    }
Before the entity above is used, you need to establish a connection with your Redis database. As Netlify-functions are stateless, the connection to Redis will be created when a request is sent.
Create another JavaScript file named client.js to contain the reusable code for establishing a connection with Redis.
Add the code below to create an asynchronous function that will establish a connection to Redis and return the Redis instance. To reach your database, the function uses a URL that comprises of the Redis credentials that were stored using the Netlify-CLI.
To further test the connection, a PING command will also be executed to test the connection to your Redis database.
    // ./redis-jamstack/netlify/functions/client.js
    require('dotenv').config()
    const { Client } = require('redis-om');
    const USERNAME = process.env.REDIS_USERNAME
    const PASSWORD = process.env.REDIS_PASSWORD
    const REDIS_ENDPOINT = process.env.REDIS_ENDPOINT

    if (!USERNAME || !PASSWORD || !REDIS_ENDPOINT) throw new Error("Your REDIS_USERNAME, REDIS_PASSWORD, and REDIS_ENDPOINT credentials are not defined!")

    const createRedisClient = async () => {
      try {
        const client = new Client()
        const instance = await client.open(`redis://${USERNAME}:${PASSWORD}@${REDIS_ENDPOINT}`)
        await instance.execute(['PING'])
        return instance
      } catch (e) {
        console.log(e)
      }
    }

    module.exports = { createRedisClient }
At this point, you now have a Redis client instance to interact with your database. Let’s proceed further to write the Netlify functions to insert, delete and search data within the database.
Inserting JSON Data Into The Database
Create a JavaScript file named create-experience.js. The create-experience.js file will will produce a Netlify function accessible at /.netlify/functions/create-experience.
Add the code below into the create-experience.js file to build the logic of the netlify function. The function will parse the stringified object of a user’s travel experience and save it directly using the createAndSave method. on a repository.
    // ./redis-jamstack/netlify/functions/create-experience.js
    const { createRedisClient } = require("./client");
    const { travelExperienceSchema } = require("./entities");

    exports.handler = async ({ body }, ctx, cb) => {
      const Redis = await createRedisClient();

      try {

    const { username, travelDestination, travelCountry, travelDuration, travelExperience } = JSON.parse(body)
        const travelRepository = Redis.fetchRepository(travelExperienceSchema)
        const createExperience = await travelRepository.createAndSave({
          username,
          travelDuration,
          travelCountry,
          travelDestination,
          travelExperience,
          dateCreated: new Date(),
          dateUpdated: new Date(),
        })

        const data = createExperience.toJSON()
        if (data.entityId) {
          return {
            statusCode: 200,
            body: JSON.stringify({
              message: `Entity ${data.entityId} saved.`,
              data
            })
          }
        }

      } catch (error) {

        return {
          statusCode: 500,
          body: JSON.stringify({
            message: "An internal server error occurred",
            error
          }),
        };
      } finally {
        await Redis.close()
      }
    };
Reading and Deleting JSON Data From The Database
Create a JavaScript file named experiences.js to create another Netlify function for storing and deleting a user’s travel experience based on the request method.
Add the content of the code block below to build the logic of the experiences function. The following steps are performed:
A conditional statement is used with the request’s HTTP method to determine when to either delete or retrieve all experience objects.
For a
DELETErequest, the function retrieves the ID of the experience about to be deleted from the request’s query parameter and uses remove method to delete the data.For the other request methods, all travel experiences stored are indexed and a search operation without a target is performed. Searching without a target ensures that all objects within the database are retrieved and they are returned using the returnAll method.
The amount of data being returned from the returnAll method is paginated through the pageSize option with a default of 50 or a limit value passed in the request parameter.
Note: For small applications, executing the createIndex method at each request execution poses no risk as Redis OM will only rebuild the index only when a schema change is detected. However, re-indexing the data for larger applications will take a while and increase the request latency.
    // ./redis-jamstack/netlify/functions/experiences.js
    const { createRedisClient } = require("./client");
    const { travelExperienceSchema } = require("./entities");

    exports.handler = async ({ queryStringParameters, httpMethod}, ctx, cb) => {
        const Redis = await createRedisClient();

       try {
            const travelRepository = Redis.fetchRepository(travelExperienceSchema)
            const { limit, id } = queryStringParameters

           if (httpMethod === "DELETE") {
                await travelRepository.remove(id)
                return {
                    statusCode: 204,
                    body: JSON.stringify({
                        message: `Entity ${id} removed successfully!`
                    }),
                };
            }

            await travelRepository.createIndex();
      const fetch = await travelRepository.search().returnAll({ pageSize: limit || 50 });
            const data = []
            fetch.map(item => data.push(item.toJSON()))

            return {
                statusCode: 200,
                body: JSON.stringify({ data })
            };

        } catch (error) {

            return {
                statusCode: 500,
                body: JSON.stringify({
                    message: "An internal server error occurred",
                    error
                }),
            };
        } finally {
            await Redis.close()
        }
    };
Testing The Netlify Functions
With the Netlify functions built, it is recommended that you make HTTP requests to test the functions before proceeding to consume the endpoints from the NuxtJS application.
Within this section you will use the cURL CLI tool which is installed by default in most operating systems. Alternatively, you can use a preferred API client tool such as Postman or Insomnia.
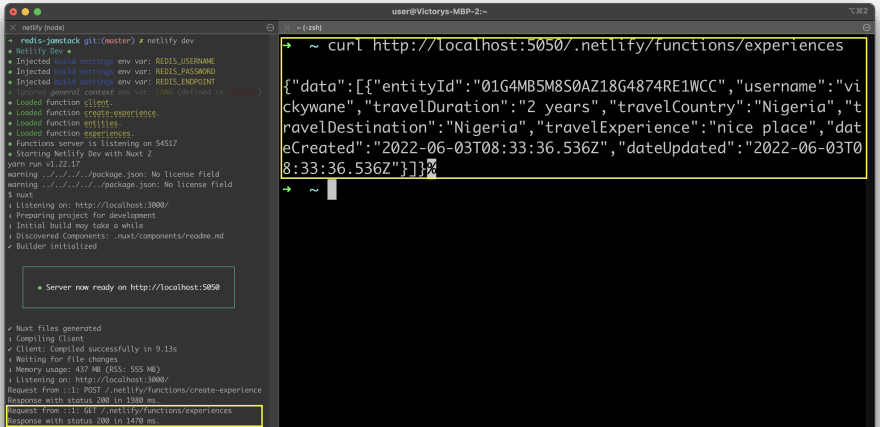
To begin, execute the command below to move back to the redis-jamstack directory and start the Netlify development server. The Netlify dev server will run both the Netlify functions and NuxtJS application locally for you to test before deploying to Netlify.
    cd ../../

    netlify dev
- Execute the command below to make a POST request to the create-experience function with a JSON object containing fields that describe a travel experience.
curl -X POST http://localhost:5050/.netlify/functions/create-experience -d '{ "username" : "vickywane", "travelDuration" : "2 years", "travelDestination" : "Nigeria", "travelExperience": "nice place", "travelCountry":"Nigeria" }' -H "Content-Type: application/json"
At the right side of the image below, you will see the request sent and the response returned. The outlined Netlify logs at the left shows the POST request received and the time taken to process it.
- Execute the command below to make a GET request to the experiences function to retrieve all objects within the Redis database.
curl http://localhost:5050/.netlify/functions/experiences
Looking at the result below, you will observe a data field containing an array with a single object holding your previous request. More objects will be returned if you execute the POST requests in step 1 multiple times.
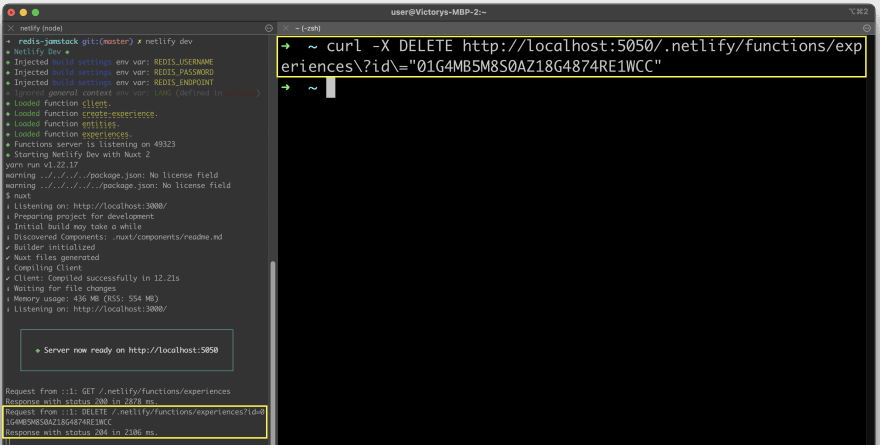
- Execute the command below to make a DELETE request to the experiences function with a JSON object containing fields that describe a travel experience.
curl http://localhost:5050/.netlify/functions/experiences
That’s it!
You can now assume that the two Netlify functions are working as expected and proceed to consume them while building the frontend part of the NextJS application.
Building The Application Frontend
The NuxtJS application will contain two pages; one to display all travel experiences, and the other to create a new travel experience.
Creating The Application Components
Using your code editor, create a file named Header.vue within the src/component directory. The Header.vue file will contain the Header displayed across the two pages within the application.
Add the content of the code block below into the Header.vue file;
    <!-- ./redis-jamstack/components/Header.vue -->
    <template>
      <header>
        <nav class="w-full h-14 flex items-center">
          <div class="px-4 flex w-full justify-between">
            <nuxt-link to="/">
              <h1 class="text-xl font-semibold">Redis Travel JAMStack</h1>
            </nuxt-link>
            <div>
              <nuxt-link to="/create-experience" class="mr-4 hover:cursor-pointer"
                >+ Add Travel Experience</nuxt-link>
            </div>
          </div>
        </nav>
      </header>
    </template>

    <script>
    export default {
      name: "Header"
    };
    </script>
Next, create another file named ExperienceCard.vue within the same src/component directory. The Vue component within theExperienceCard.vue` file will be used at the default page to travel experiences.
Add the code below into ExperienceCard.vue file to build the component. The code below uses props passed in from the Index.vue component to display a user’s travel experience. The code also contains a click handler that will make a DELETE request to delete the current experience.
`javascript
<!-- ./redis-jamstack/components/ExperienceCard.vue -->
Written by
{{ username }}
on a
{{ duration }}
visit to
{{ country }}
at
{{ destination }}
@click="deleteExperience(itemId)"
class="
flex
justify-center
hover:text-white
cursor-pointer
rounded
p-1
hover:bg-gray-100
h-8
w-8
hover:bg-red-800
"
>
xmlns="http://www.w3.org/2000/svg"
class="h-5 w-5"
viewBox="0 0 20 20"
fill="currentColor"
>
fill-rule="evenodd"
d="M9 2a1 1 0 00-.894.553L7.382 4H4a1 1 0 000 2v10a2 2 0 002 2h8a2 2 0 002-2V6a1 1 0 100-2h-3.382l-.724-1.447A1 1 0 0011 2H9zM7 8a1 1 0 012 0v6a1 1 0 11-2 0V8zm5-1a1 1 0 00-1 1v6a1 1 0 102 0V8a1 1 0 00-1-1z"
clip-rule="evenodd"
/>
{{ description }}
Created on
{{ new Date(dateCreated).toDateString() }}
export default {
  name: "ExperienceCard",
  data: () => ({
    isEmpty: false,
  }),
  props: {
    itemId: "",
    username: "",
    dateCreated: "",
    description: "",
    country: "",
    destination: "",
    duration: "",
  },
  methods: {
    deleteExperience: async function (id) {
      try {
        if (!id) {
          console.error("EntityID for travel experience is missing!!");
          return;
        }

        const { status } = await fetch(
          `/.netlify/functions/experiences?id=${id}`,
          {  method: "DELETE" }
        );

        if (status === 204) {
          this.isEmpty = true;
          console.log("IS EMPTY", this.isEmpty);
        }
      } catch (error) {
        console.log("Error deleting item:", error);
      }
    },
  },
};
</script>
`
With the Header and ExperienceCard components built out, let’s move on to use these components within the two pages in the NuxtJS application.
Creating The Application Pages
Next, replace the code within the index.vue file with the code below to fetch all experiences immediately the page is loaded, and display them using the ExperienceCard component.
The Index component also handles the loading state of the application and scenarios where the are no existing experiences.
`javascript
<!-- ./redis-jamstack/pages/Index.vue -->
class="
mt-1
h-96
bg-gradient-to-tr
from-green-300
via-blue-500
to-purple-600
flex
justify-center
items-center
"
>
Live, Love, and Document
Your Travel Experiences!
class="h-64 flex justify-center items-center"
v-if="isLoadingExperiences"
>
Fetching travel experiences...
class="
rounded-xl
shadow-lg
h-20
w-4/5
bg-white
flex
px-8
justify-between
items-center
"
>
{{ experiences.length }} Experiences Available
class="
bg-blue-500
hover:bg-blue-700
text-white
font-bold
py-2
px-4
rounded
"
>
Create Experience
class="h-96 flex justify-center items-center"
v-if="experiences.length <= 0"
>
Travel experiences have not yet been created.
Be the first to tell a travel story!
Tell Our First Travel Experience ->
- :itemId="item.entityId" :duration="item.travelDuration" :username="item.username" :dateCreated="item.dateCreated" :country="item.travelCountry" :description="item.travelExperience" :destination="item.travelDestination" />
<script>
import Header from "../components/Header.vue";
import ExperienceCard from "../components/ExperienceCard.vue";

export default {
  name: "IndexPage",
  mounted() {
    try {
      this.isLoadingExperiences = true;
      (async () => {
        const req = await fetch("/.netlify/functions/experiences");
        const { data } = await req.json();
        this.experiences = data;
      })();
    } catch (e) {
      console.log(e);
    } finally {
      this.isLoadingExperiences = false;
    }
  },
  components: {
    Header,
    ExperienceCard,
  },
  data: () => ({
    isLoadingExperiences: false,
    experiences: [],
  }),
};
</script>
`
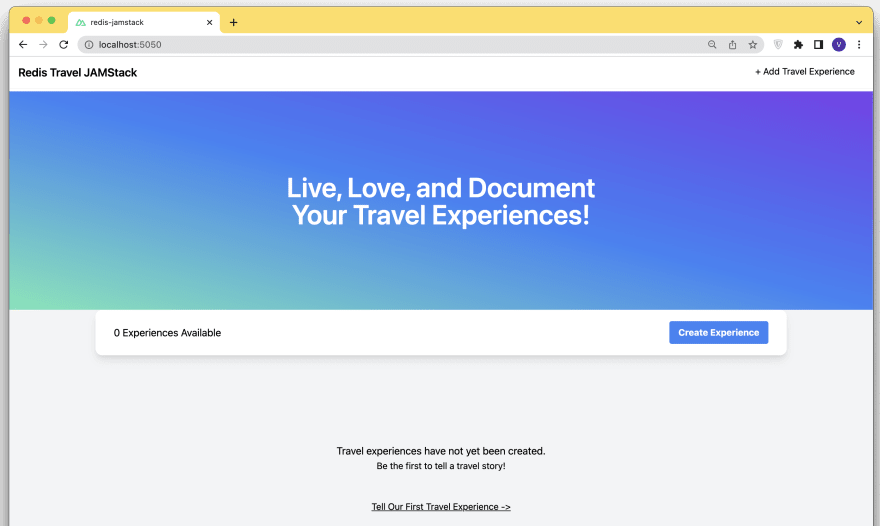
Using your web browser, navigate to the default page of the redis-jamstack application at http://localhost:5050. The default page will be displayed without an experience as your redis-database is pretty empty.
Next, you will create a page containing a form that users will use to to input the details of a travel experience.
Within the pages directory, create a file named create-experience.vue.
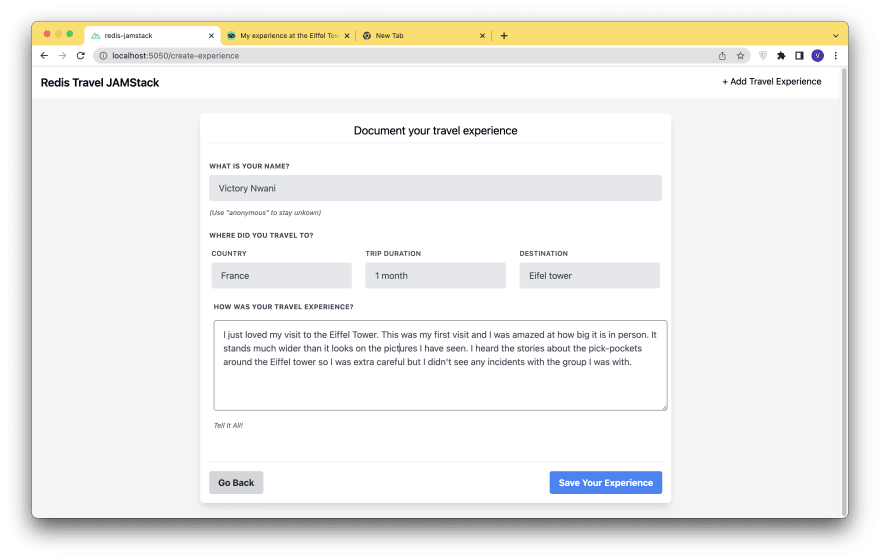
Add the code below into the create-experience.vue file to create a form with several input fields for collecting the username, country, experience, and destination details of a user’s trip.
At the click of the Save Your Experience button, a POST request will be executed to submit the values within the form.
`javascript
<!-- ./redis-jamstack/pages/create-experience.vue -->
    <div
      style="height: 93vh"
      class="h-full bg-gray-100 flex justify-center items-center w-full"
    >
      <div class="bg-white rounded-lg w-7/12 shadow-lg p-4">
        <div class="mb-8">
          <h1 class="text-center text-xl mb-2">
            Document your travel experience
          </h1>
          <hr />
        </div>
        <form class="w-full">
          <div class="flex flex-wrap -mx-3 mb-6">
            <div class="w-full px-3">
              <label
                class="
                  block
                  uppercase
                  tracking-wide
                  text-gray-700 text-xs
                  font-bold
                  mb-2
                "
                for="username"
              >
                What is your name?
              </label>
              <input
                v-model="username"
                class="
                  appearance-none
                  block
                  w-full
                  bg-gray-200
                  text-gray-700
                  border border-gray-200
                  rounded
                  py-3
                  px-4
                  mb-3
                  leading-tight
                  focus:outline-none focus:bg-white focus:border-gray-500
                "
                id="username"
                type="text"
                placeholder="John Doe"
              />
              <p class="text-gray-600 text-xs italic">
                (Use "anonymous" to stay unkown)
              </p>
            </div>
          </div>
          <p
            class="
              block
              uppercase
              tracking-wide
              text-gray-700 text-xs
              font-bold
              mb-4
            "
          >
            Where Did You Travel To?
          </p>
          <div class="flex flex-wrap -mx-2 mb-2">
            <div class="w-full md:w-1/3 px-3 mb-6 md:mb-0">
              <label
                class="
                  block
                  uppercase
                  tracking-wide
                  text-gray-700 text-xs
                  font-semibold
                  mb-2
                "
                for="country"
              >
                Country
              </label>
              <input
                v-model="travelCountry"
                class="
                  appearance-none
                  block
                  w-full
                  bg-gray-200
                  text-gray-700
                  border border-gray-200
                  rounded
                  py-3
                  px-4
                  leading-tight
                  focus:outline-none focus:bg-white focus:border-gray-500
                "
                id="country"
                type="text"
                placeholder="Country Visited."
              />
            </div>
            <div class="w-full md:w-1/3 px-3 mb-6 md:mb-0">
              <label
                class="
                  block
                  uppercase
                  tracking-wide
                  text-gray-700 text-xs
                  font-semibold
                  mb-2
                "
                for="duration"
              >
                Trip duration
              </label>
              <input
                v-model="travelDuration"
                class="
                  appearance-none
                  block
                  w-full
                  bg-gray-200
                  text-gray-700
                  border border-gray-200
                  rounded
                  py-3
                  px-4
                  leading-tight
                  focus:outline-none focus:bg-white focus:border-gray-500
                "
                id="duration"
                type="text"
                placeholder="Time spent"
              />
            </div>
            <div class="w-full md:w-1/3 px-3 mb-6 md:mb-0">
              <label
                class="
                  block
                  uppercase
                  tracking-wide
                  text-gray-700 text-xs
                  font-semibold
                  mb-2
                "
                for="destination"
              >
                Destination
              </label>
              <input
                class="
                  appearance-none
                  block
                  w-full
                  bg-gray-200
                  text-gray-700
                  border border-gray-200
                  rounded
                  py-3
                  px-4
                  leading-tight
                  focus:outline-none focus:bg-white focus:border-gray-500
                "
                v-model="travelDestination"
                id="destination"
                type="text"
                placeholder="Place visited. E.g Rio De Janeiro"
              />
            </div>
            <div class="flex flex-wrap mx-1 mb-6 mt-6">
              <div class="w-full px-3">
                <label
                  class="
                    block
                    uppercase
                    tracking-wide
                    text-gray-700 text-xs
                    font-bold
                    mb-4
                  "
                  for="experience"
                >
                  How was your travel experience?
                </label>
                <textarea
                  v-model="travelExperience"
                  style="height: 20vh; width: 50rem ; flex: 1; box-sizing: border-box"
                  class="
                    appearance-none
                    w-full
                    bg-gray-200
                    text-gray-700
                    border border-gray-200
                    rounded
                    py-3
                    px-4
                    mb-3
                    focus:outline-none focus:bg-white focus:border-gray-500
                  "
                  id="experience"
                  type="text"
                  placeholder="How did traveling make you feel?"
                />
                <p class="text-gray-600 text-xs italic">Tell It All!</p>
              </div>
            </div>
          </div>
          <hr class="mt-8" />
          <div class="flex justify-between mt-4">
            <button
              class="
                bg-gray-300
                hover:bg-gray-400
                text-gray-800
                font-bold
                py-2
                px-4
                rounded
                inline-flex
                mr-4
                items-center
              "
            >
              <nuxt-link to="/"> Go Back </nuxt-link>
            </button>
            <button
              :disabled="isSubmitting"
              @click="submitExperience"
              type="submit"
              class="
                bg-blue-500
                hover:bg-blue-700
                text-white
                font-bold
                py-2
                px-4
                rounded
              "
            >
              {{ !isSubmitting ? "Save" : "Saving" }} Your Experience
            </button>
          </div>
        </form>
      </div>
    </div>
  </div>
</template>

<script>
import Header from "../components/Header.vue";

export default {
  name: "create-experience",
  components: { Header },
  data: () => ({
    username: "",
    travelCountry: "",
    travelDestination: "",
    travelDuration: "",
    travelExperience: "",
    isSubmitting: false
  }),
  methods: {
    submitExperience: async function (event) {
      event.preventDefault();
      const postReq = await fetch(`/.netlify/functions/create-experience`, {
        method: "POST",
        body: JSON.stringify({
          username: this.username,
          travelCountry: this.travelCountry,
          travelDestination: this.travelDestination,
          travelExperience: this.travelExperience,
          travelDuration: this.travelDuration
        }),
      });
      if (postReq.status === 200) {
        await postReq.json();
        this.$router.push({
          path: "/"
        })
      }
    },
  },
};
</script>
`
From the default page, click the Create Experience button to navigate to the create-experience page at http://localhost:5050/create-experience.
At the create-experience page, type in the details of your last trip or a trip at the name, country, duration and destination fields.
Click the Save Your Experience button to save the travel details you typed.
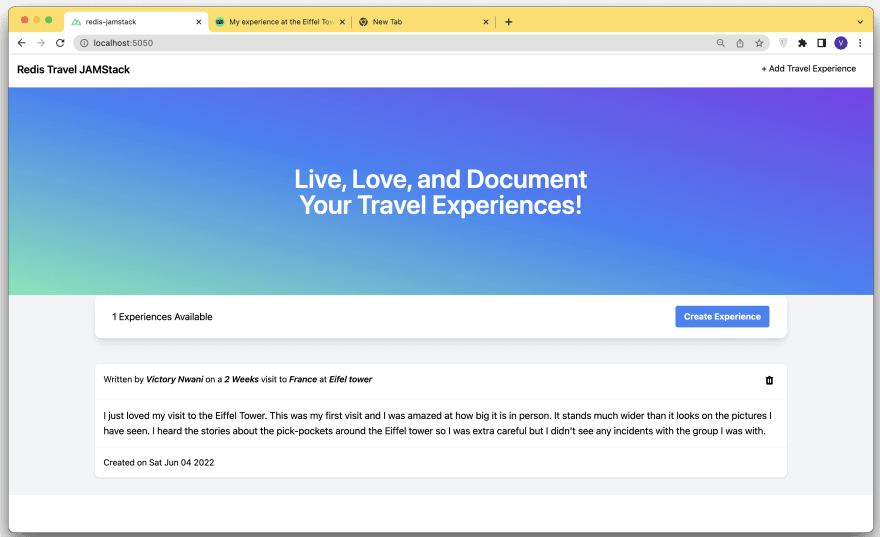
After a successful save, the application will redirect you to the default page to view your travel experience.
That’s it!
Your minimal JAMstack application powered by a RedisJSON database provisioned within the Redis cloud is now complete.
This content originally appeared on DEV Community and was authored by victory
victory | Sciencx (2022-06-28T12:24:02+00:00) Building An Application Using NuxtJS, Netlify-Functions and RedisJSON. Retrieved from https://www.scien.cx/2022/06/28/building-an-application-using-nuxtjs-netlify-functions-and-redisjson/
Please log in to upload a file.
There are no updates yet.
Click the Upload button above to add an update.

