This content originally appeared on Level Up Coding - Medium and was authored by Kris
Designing a nice looking website is hard, but learning how to use Figma is easy!

This is a really basic introduction to Figma, and as such I have left off lots of information that is not strictly necessary to get started. The most significant aspect of Figma that this tutorial does not include is how to turn your design file into an interactive prototype. The focus of this tutorial is for you to be able to design static pages (or in the Figma nomenclature, “frames”), because that is the minimal utility of Figma. Also, this tutorial assumes you have some familiarity with common digital illustrator tools like the pen tools, text tools, and drawing tools. It’s not that I don’t think those are important, this tutorial is just already getting to be too long, so I’m cutting myself off at what I think are the essentials that are unique to Figma.
Create a new file
- In the primary user dashboard, click “New design file” button.
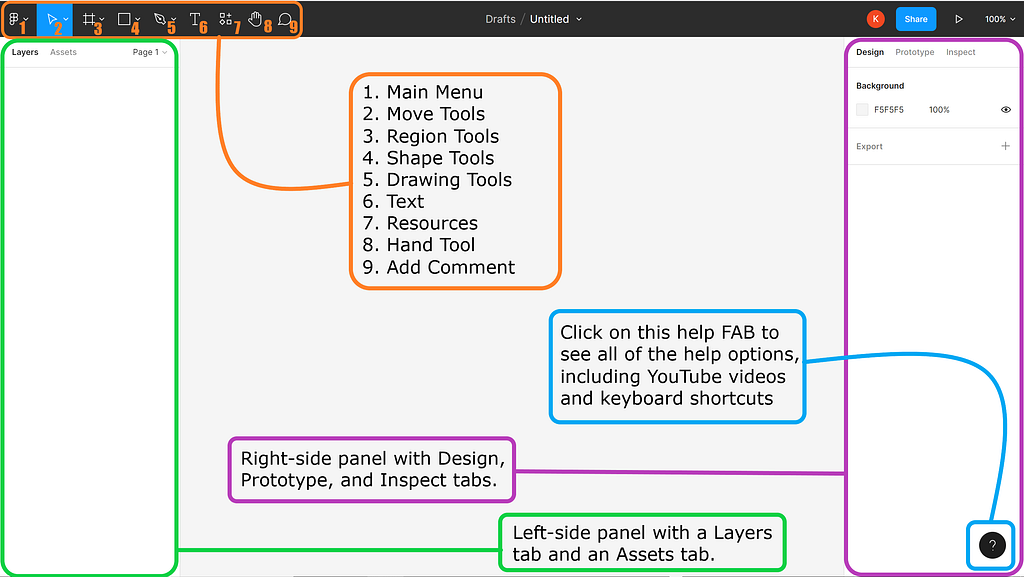
- Figma will redirect you to the file editor view. Below is an overview of the tools in the editor.
Give your file a name
- In the center of the top toolbar, click the down-carrot just to the right of where it says, “Drafts/Untitled”
- In the menu that appears, find and click “Rename,” then give your file a name and hit enter

Add desktop and mobile frames to your file
- In the toolbar, click the Region Tools option, which is the third option from the left and looks like a tic-tac-toe game or like a wide hashtag.
- If you select this option without clicking on the down-carrot to its right, it defaults to the Frame tool. The Frame tool is what we want, and what you will use most of the time, so if you accidently click the down-carrot and see the Frame and Slice tools, select the Frame tool.
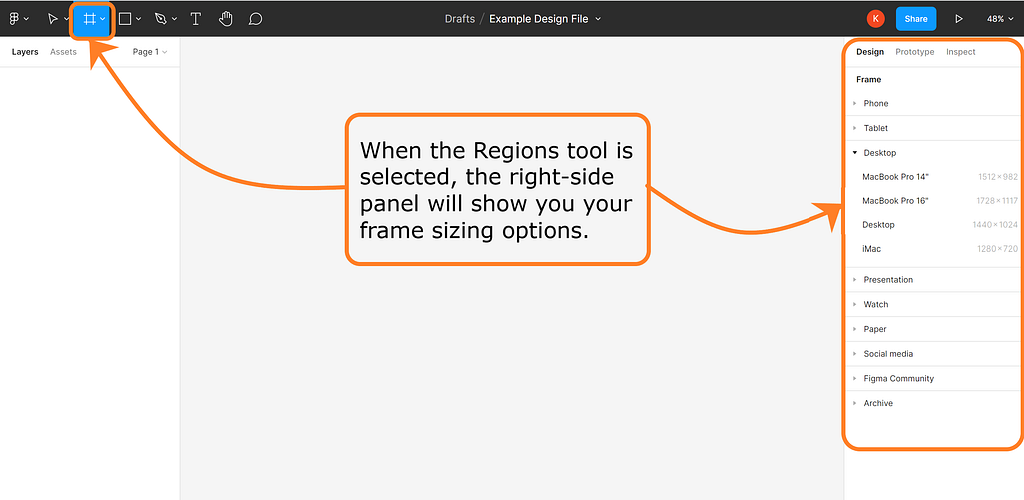
- Once you’ve selected the Frame tool, the panel on the right side of the editor gives you a whole bunch of options for the kind of screen size you want to work with. Look through these and decide which you want to use.
- For this tutorial, we are going to add two frames: one for mobile screens and one for desktop screens. I will be working with the iPhone SE frame and the generic Desktop frame, because those two together will cover the vast majority of cases, but you can choose whichever frames you would like.
Editing a frame
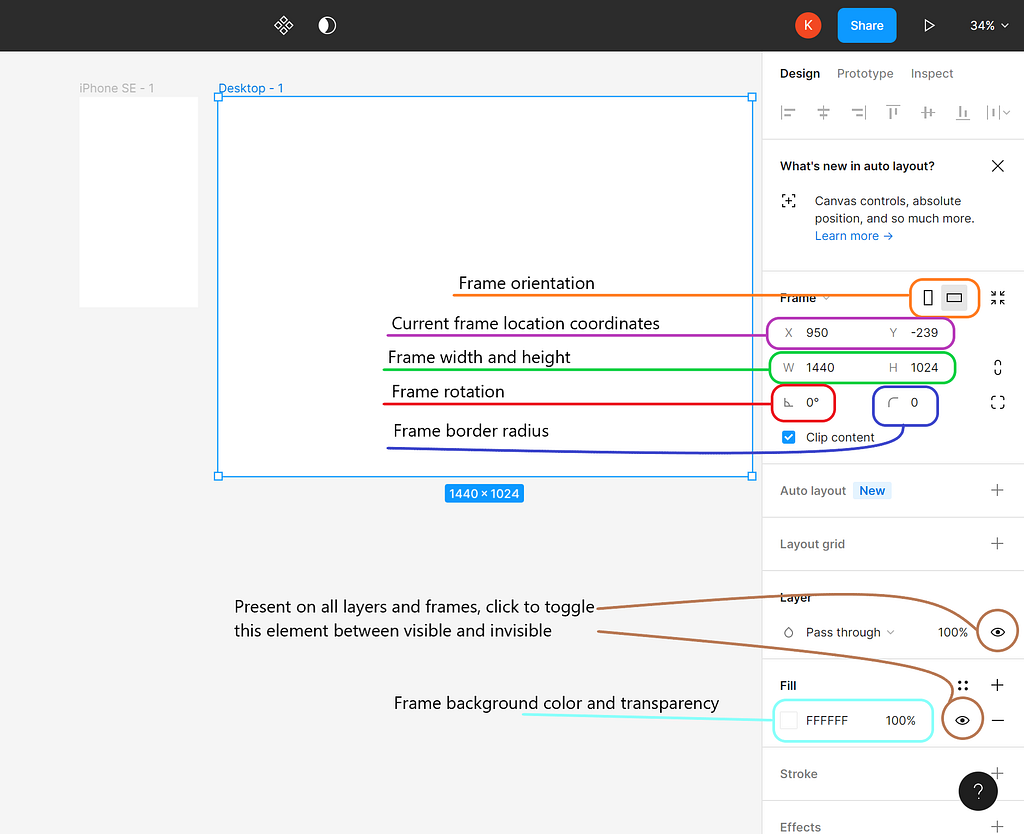
- Once you have selected a frame, Figma will add the frame to your editing canvas and the right-side panel will now show all of the properties of the frame you can edit
Renaming a frame
- Double-click the default name Figma gives the frame to edit the name of the frame. When you start a new design file, it’s good practice to just name your elements and frames as you go. This will make it easier to keep your frames and other elements organized as your design gets more complex.

Adding elements to a frame
- To add a shape, straight line, arrow, or image, select the Shape tool options
- Shape tool works the same as in other digital illustration software (clicking and dragging)
Grouping elements together
- To select all elements to be in a group, do one of the following: with the Move tool selected, click and drag to encircle all intended elements OR while holding down the shift button, select each of the intended elements OR while holding down the control button, select each of the intended elements in the Layers panel on the left side of the editing canvas.
- The Layers list on the left side will highlight every element that is currently selected. Use this to confirm you have selected all of the intended elements.
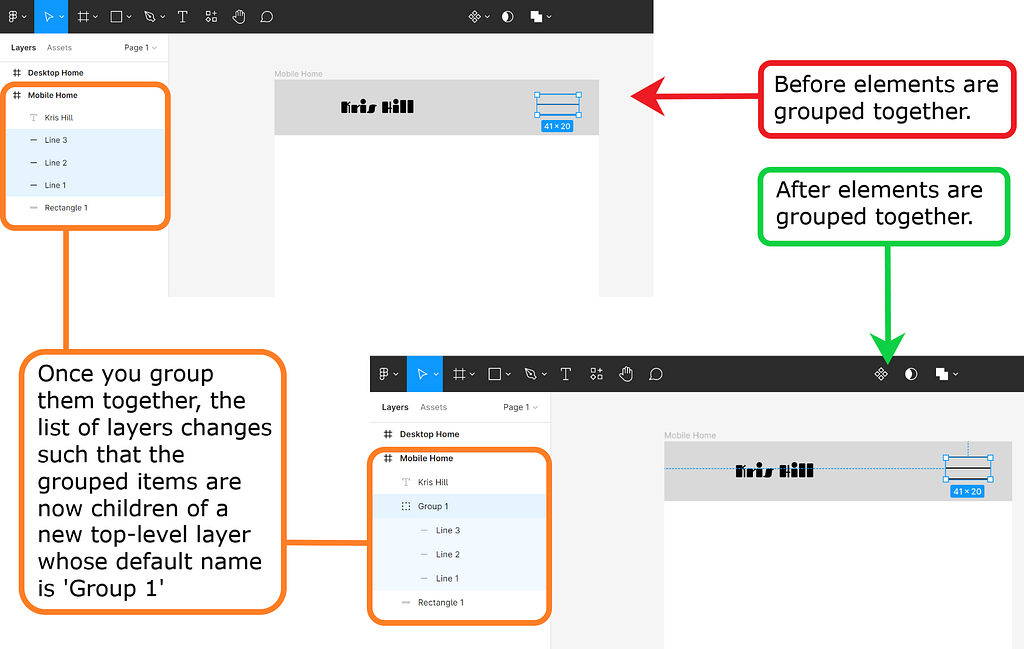
- Once all elements you want in a group are selected, right-click either one of the selected elements in the editing canvas or one of the selected elements in the Layers list, and from the dropdown menu, find and select “Group selection”.
- Notice that in the Layers list, a single element, “Group 1” has replaced all of the elements you grouped together. Now would be a good time to give it a name.
- Notice also that when your cursor hovers over the Layers list, you should see a rightward pointing arrow/triangle/menu indicator next to the new group you just made. Click the triangle and Figma will show you all of the individual elements in the group.
Aligning Elements
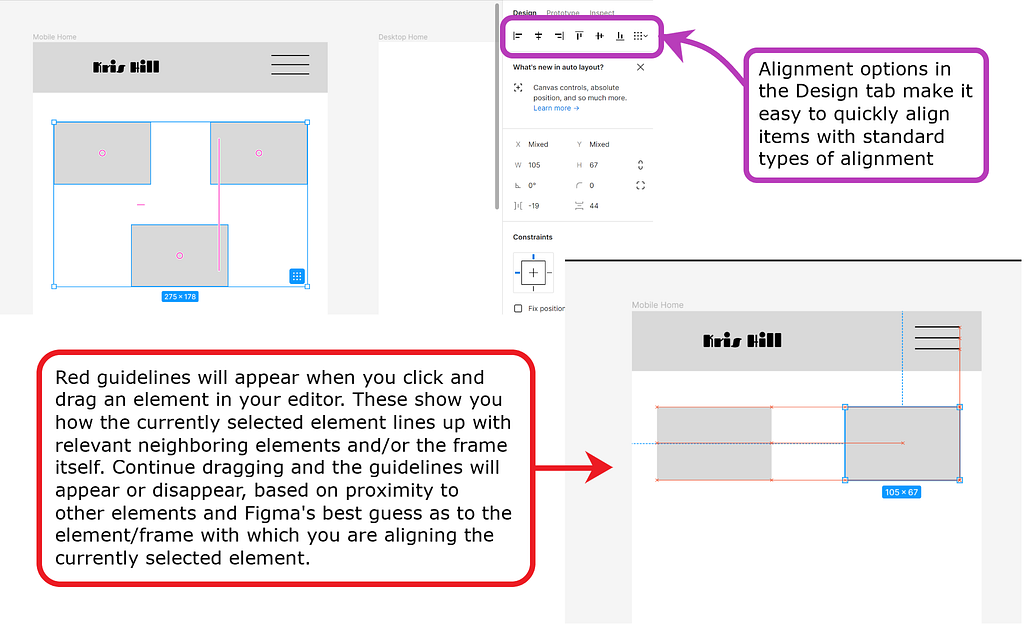
- There are two main ways of lining up or aligning the elements you’ve added to a frame: (a) by selecting or grouping elements together and then using one of the alignment options at the top of the Design panel on the right side of the editor, or (b) by selecting one or more elements and dragging them to the desired place in the frame/editor.
- Option (a) is good when you have a group of elements that have a certain alignment relative to each other and independent of the rest of the elements in the frame.
- Option (b) benefits from some default Figma features like red guidelines that emanate from the frame and other nearby elements while dragging an element around (from their edges and their centers), and snapping to the guidelines when the selected element or group gets near one of them.
Ordering Elements/Layers
- Order of layers works the same way it does in other digital illustration software.
- There are two main ways of reordering elements and groups: right-clicking the element you want to move, then select either “Bring to front” or “Move to back”, OR in the Layers list, click and drag the element/layer you wish to move either up the list (which is the same as “bringing it to the front”) or down the list (which is the same as “moving it to the back”).
Final Thoughts
As I was writing this, I had the intention of designing a new version of my website, which hasn’t been updated in at least a year, but then I realized I just am not interested in the design stage anymore. So hopefully this will help those interested in learning design to get creative with Figma and design some awesome websites so us engineers don’t have to.
Level Up Coding
Thanks for being a part of our community! More content in the Level Up Coding publication.
Follow: Twitter, LinkedIn, Newsletter
Level Up is transforming tech recruiting ➡️ Join our talent collective
Getting Started with Figma was originally published in Level Up Coding on Medium, where people are continuing the conversation by highlighting and responding to this story.
This content originally appeared on Level Up Coding - Medium and was authored by Kris
Kris | Sciencx (2022-07-01T00:56:49+00:00) Getting Started with Figma. Retrieved from https://www.scien.cx/2022/07/01/getting-started-with-figma/
Please log in to upload a file.
There are no updates yet.
Click the Upload button above to add an update.
