This content originally appeared on DEV Community and was authored by Harun R Rayhan
As part of my job, I create AWS accounts frequently. I do lots of things depending on account needs before starting to use it. I found 3 common things I do with all of the new AWS accounts. I made a checklist. Nowadays I do these 3 things first and then everything else.
Let's make your account more secure and more protected than ever. 🔐
1. Budget with Alerts
One of the common issues with AWS is bills. People gets surprising bills because of misconfiguration or keep expensive services running unknowingly. Although, budget and alerts can NOT fix these issues but help keep bills tidy. And gives alerts if crosses the budget almost instantly.
Let's set a budget and a couple of alerts.
- Go to Budget Console
- Click on the "Create Budget" button.
- Choose the first option, "Cost budget - Recommended" from the next page.
- From the next page:
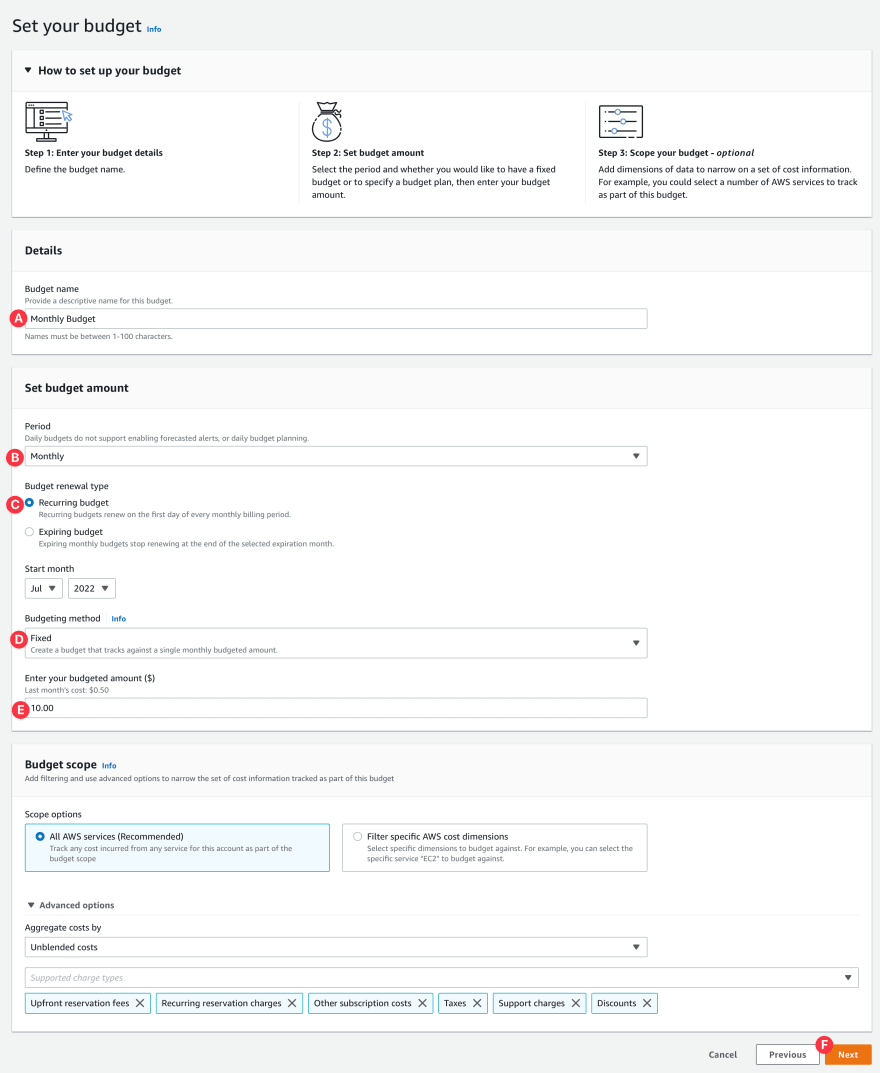
- A. Give it a name.
- B. Set the Period as Month for this demo, but you can choose any other period.
- C. Set Budget renewal type as Recurring budget
- D. Choose Fixed from the Budgeting method.
- E. Give a real budget amount to your need, mine is a demo account so $10 is fine for me. Let me iterate again, choose a real amount.
- F. From the bottom-right of the page click "Next"
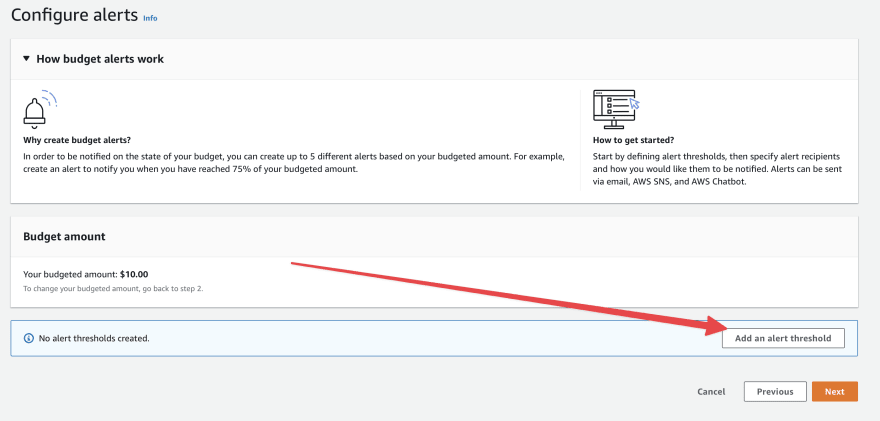
- From the next page, click on the "Add an alert threshold. Going to set a couple of alerts.
- Let's set an actual budget alert:
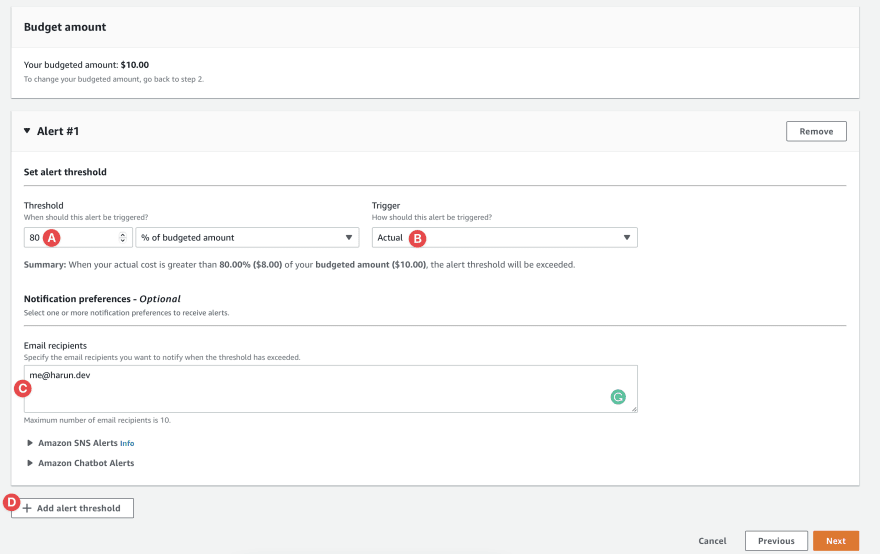
- A. Choose 80 from the threshold.
- B. Select Actual from the trigger
- C. Put as many real and active emails as necessary. (⚠️ please add active email to save yourself from disaster).
- D. Let's add another one. Actual budget alert only sends notifications when you spent threshold amount. For example, it will send an email to me after spending $8 (80% of 10$). So, we need something else together with it.
Now set a forecasted budget alert:
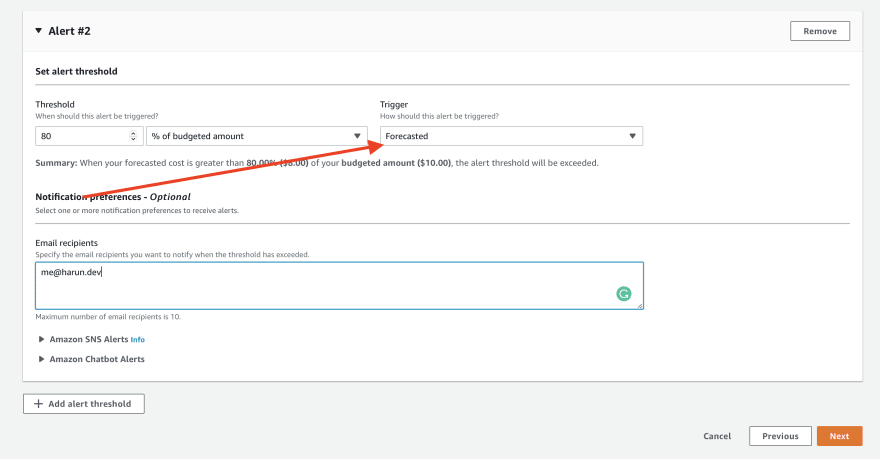
Everything is the same as the first alert, only change Trigger to Forecasted. So, it will send you an alert if AWS forecast that you will spend more than your threshold. After configuring it, click the Next button from the bottom of the page.Click the Next again from the next page. And then click the Create Budget button from the final page.
And you are done with, you probably going to be saved from a disaster by email notifications.
...
2. Add Multi-Factor Authentication (MFA)
You should use MFA for all IAM accounts including the root account. If not possible, at least apply it to root and privileged accounts. Login to the account (root or IAM) and let's protect it.
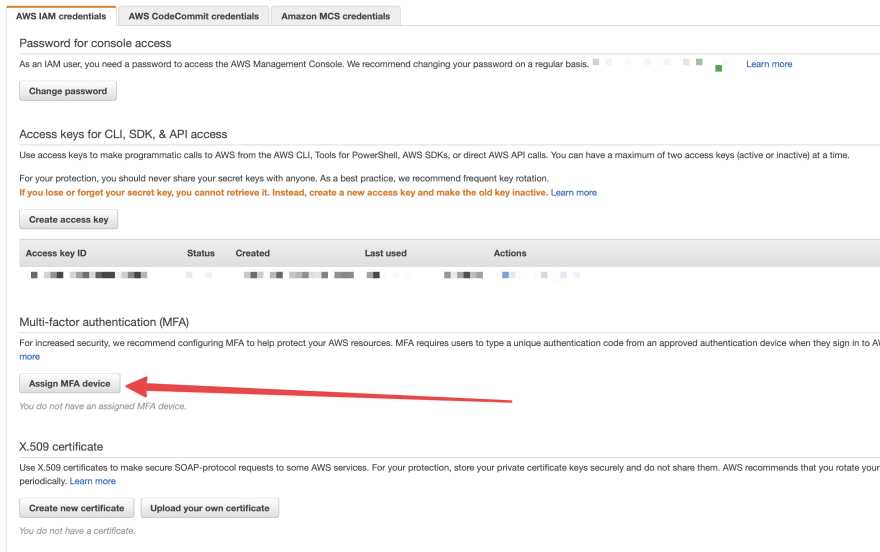
- Go to Security Credentials of IAM Console
- Click on the "Assign MFA device"
- Choose Virtual MFA device from the popup
- You can choose either of these apps: Authy, Duo Mobile, LastPass Authenticator, Microsoft Authenticator, Google Authenticator, Symantec VIP. My personal choice is Authy.
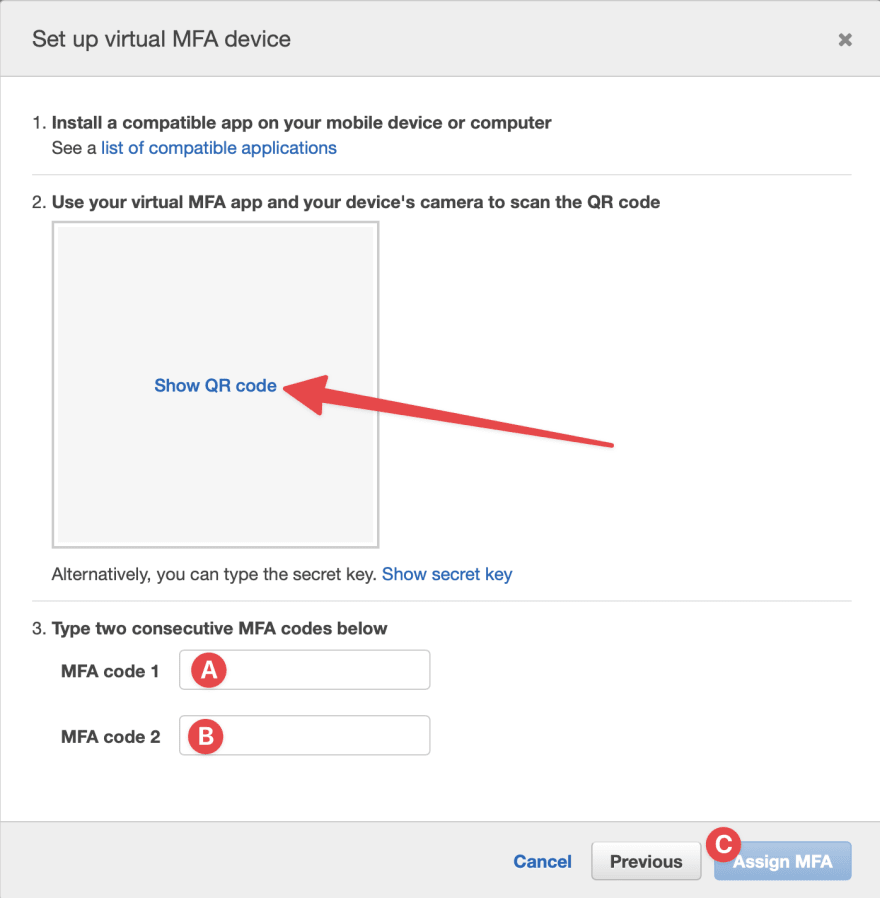
- Click on the "Show QR code" from the next popup and scan it from your MFA app. Then enter two codes (one after another). And then click the "Assign MFA" button.
...
(bonus) Set Alias for the Account
Account ID or Alias is required to log in IAM account. Account ID is a long number. Humans are bad with a long number. A meaningful alias can save you from the trouble of remembering the account ID. Let's set an alias for your account:
- Go to IAM Console after login into the root account.
- You will see a Create button in the right sidebar under the account alias.
- Choose a unique and memorable alias for your account and click "Save changes".
Use the alias instead of account ID next time you are logging into an IAM account.
...
3. Create IAM account(s) for Day-to-Day tasks
You need the root account for a few tasks. Other than that you should not use the Root account. Perhaps, not for day-to-day tasks, lunching, and provisioning services.
I always create an IAM account with admin permission. I do all of the tasks from this account except those tasks that require the root account. So, let's create an admin IAM account.
- Go to Users page of IAM Console.
- Click on the Add users button from top-right corner.
- You will be in this page:
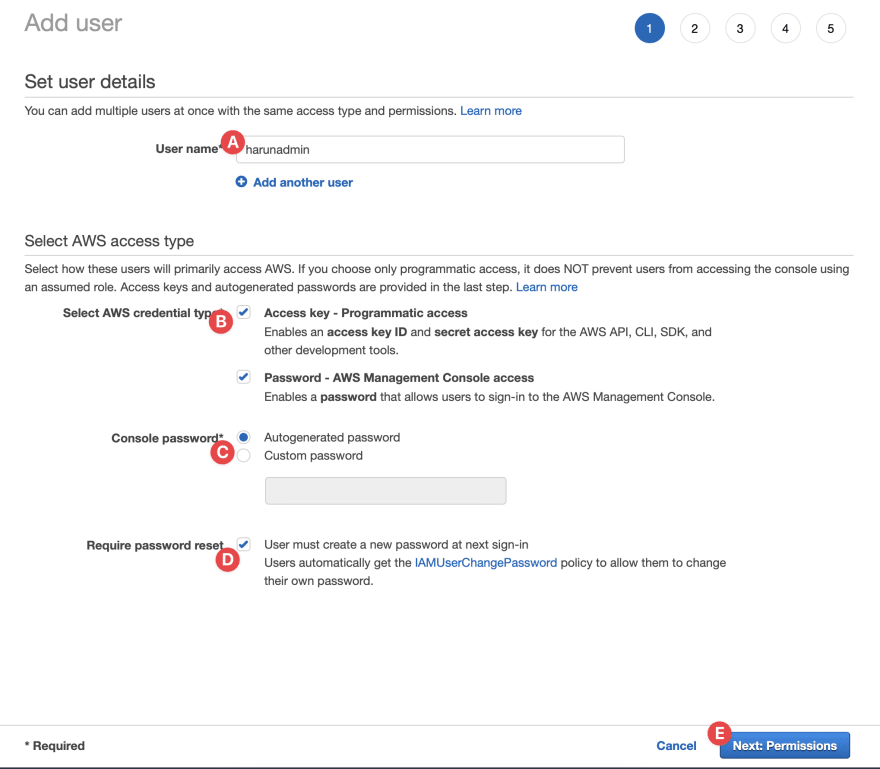
- A. Choose an username
- B. Chosse access type. I need both CLI and AWS Console access
- C. You can enter your custom password or choose auto generated.
- D. It's better to require reset password to choose it's own.
- E. Click on the Next: Permission button from the bottom-right
- You are in the permission page:
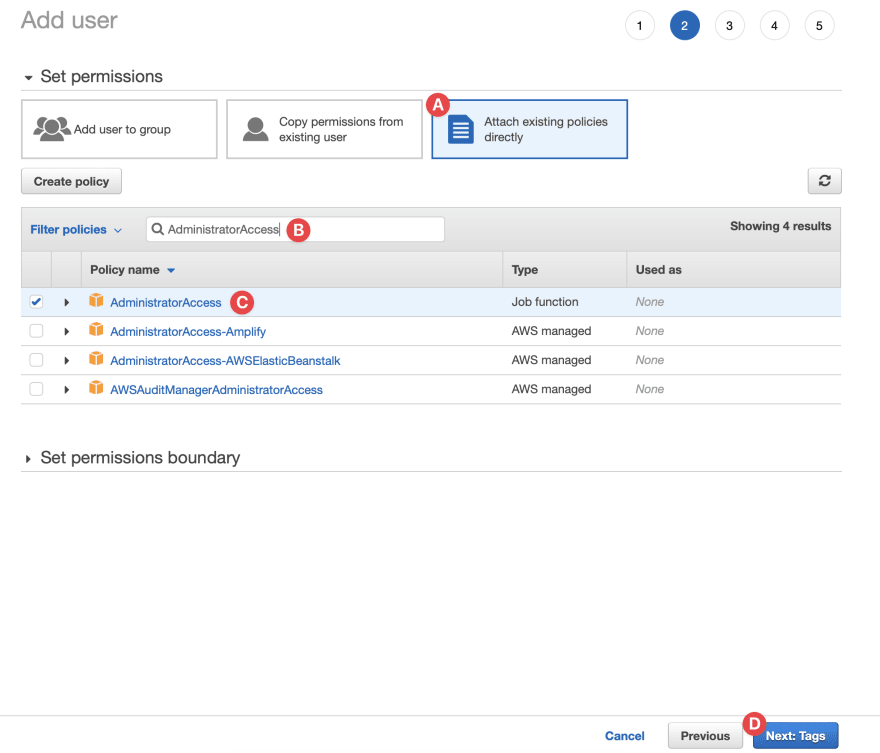
- A. Choose Attach existing policies directly from the top options
- B. Search for the AdministratorAccess role
- C. Choose the AdministratorAccess role
- D. Click on the Next: Tags button
- You are in the tags page. You can add you tag(s) if you want but it's optional. Click in the Next: Review button.
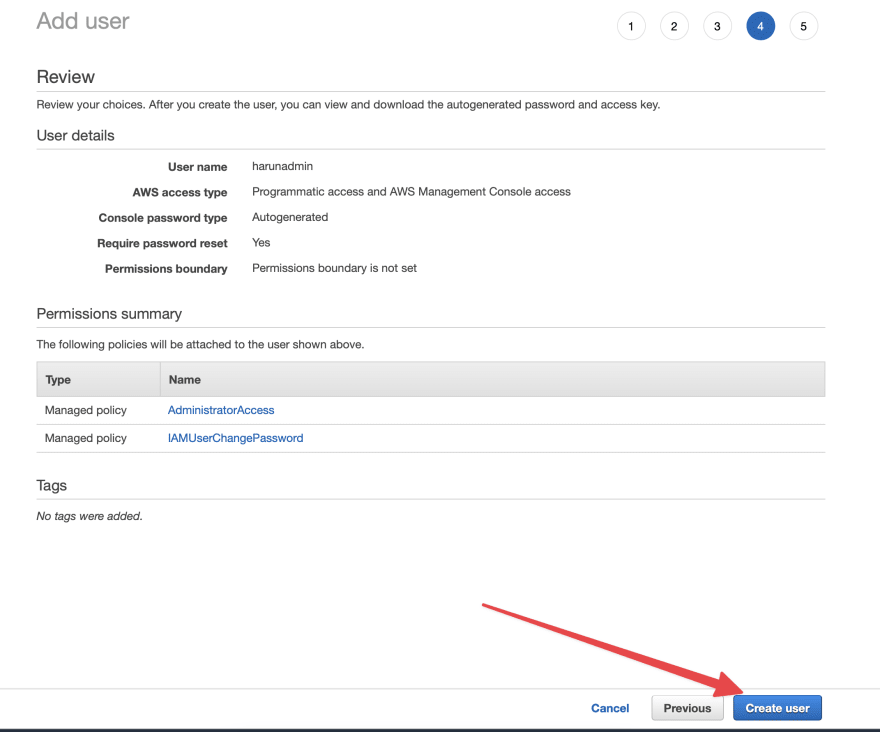
- Take a look on everything and check if it's matches to mine. And then click on the Create user button.
- Now we are in the final page:
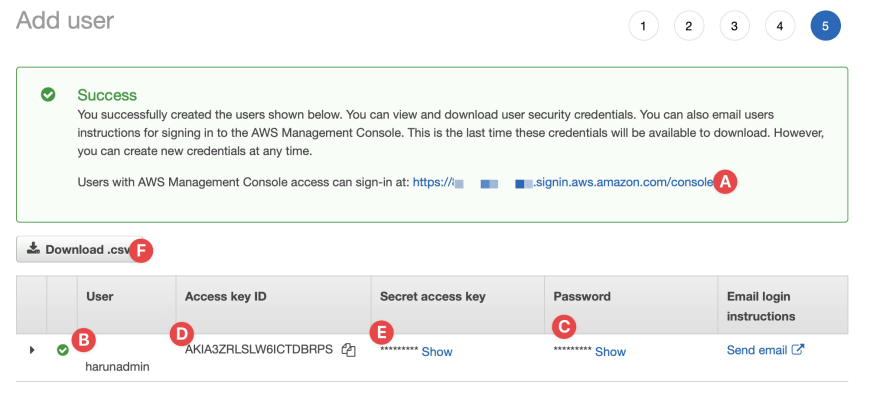
- A. The link to login to the console
- B & C. Username & Password to login to the console
- D & E. Access key & secret to login via CLI or App
- F. You can download the .csv file with credentails. You can save it in safer place for later use.
...
Conclusion
There are more things to do to save bills and tighten security of your account. But these are the first 3 things I do and doesn't require much technical knowledge.
You can subscribe to my newsletter in my blog. Follow me on Twitter, Dev.to, and Hashnode for regular updates. Don't hesitate to show your love by clicking Like 👍 button.
This content originally appeared on DEV Community and was authored by Harun R Rayhan
Harun R Rayhan | Sciencx (2022-07-06T14:24:50+00:00) First 3 things I always do after creating a new AWS account. Retrieved from https://www.scien.cx/2022/07/06/first-3-things-i-always-do-after-creating-a-new-aws-account/
Please log in to upload a file.
There are no updates yet.
Click the Upload button above to add an update.
