This content originally appeared on DEV Community and was authored by Michael Owolabi
You’re probably thinking, wait, did I read the title right? Build an event manager in Node.js and backed by Redis as the database? Just follow along and let me take you on a journey that will provide answers to as many questions as are probably going through your head right now.
In this article, we are going to build a fully functional event management platform on Redis but first, why will anyone want to use Redis as the only database in an application? One obvious reason will be that Redis is super fast, and fast database will have a direct impact on the performance of your application which will in turn impact the experience of the users of your application. So having said that, let’s get to it.
Prerequisites
To be able to follow along with this tutorial, you need to have the following installed on your computer:
Node.js
npm
Code Editor (VSCode)
Web browser/Postman
RedisInsight - Get one installed on your computer here if you don’t already have one.
Finally, you’ll need to have a Redis Enterprise account for your Redis cloud database. If you don’t already have that just head on to their website to create a free account.
Getting started
To get started, we are going to install dependencies needed for the application so open up your terminal (Command prompt on Windows) and enter the following command
cd desktop && mkdir event-manager && cd event-manager
Initialize the directory to create a package.json file by running
npm init -y
Install dependencies
Let’s install the various packages that we’ll be using for the development of this application by running the command below:
npm install express dotenv redis-om ulid jsonwebtoken bcrypt
Lastly, let’s install nodemon as a dev dependency to aid our development flow by running the command below:
npm install -D nodemon
Open the newly created app event-manager directory in your code editor of choice (I will be using VSCode here) and it should be similar to what we have below.
Open the generated "package.json" file and enter a key "type" with the value "module" in the top-level object because we will be writing our development code using the es module option.
Now let’s create a simple express server to be sure that everything is properly set up. To do this, create a new directory at the root of your project named “src” and inside it create a new file called app.js and paste the code below into the file.
In the scripts section of your package.json file setup the start scripts for your server by adding the following keys and values
“start”: “node src/app.js”,
“dev”: nodemon src/app.js”
Now start your node.js server by running the following command in the terminal:
npm run dev
You should see the following logged to your terminal:
Everytime you make changes to your application code, the server should automatically restart to pick the new changes.
Now that we are sure that our server is properly setup, the next thing we need to do is setup our Redis database to handle the storage of our events data.
Redis Enterprise Database Setup
To setup your Redis database, login to your Redis enterprise account here. If you haven’t created an account yet just head on to the Redis website and create a free account. You should use the free credit coupon on the signup page to explore Redis beyond the free tier offerings.
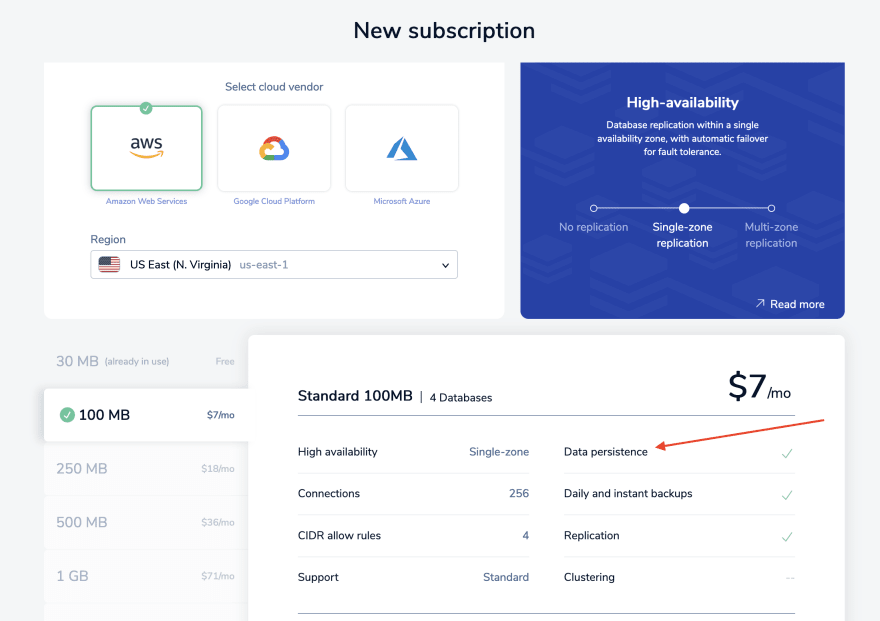
On your Redis enterprise dashboard click the “New subscription” button, select “Fixed plans” and then choose the 100MB storage space option. You can choose any cloud provider of your choice but for the sake of this tutorial, let’s use the default (AWS) then make sure your settings are a replica of the screenshot below.
Do not worry, you will not get charged for the plan you chose since you applied a $200 coupon so you can safely add your card. We needed this plan to activate data persistence for our Redis DB because it will be odd to have an event management platform where every time you come back to it, it’s always empty 😀.
But just if you’re still skeptical you can choose the free (30MB) option only that your data will not be persisted but you would still be able to follow along with this tutorial using that option.
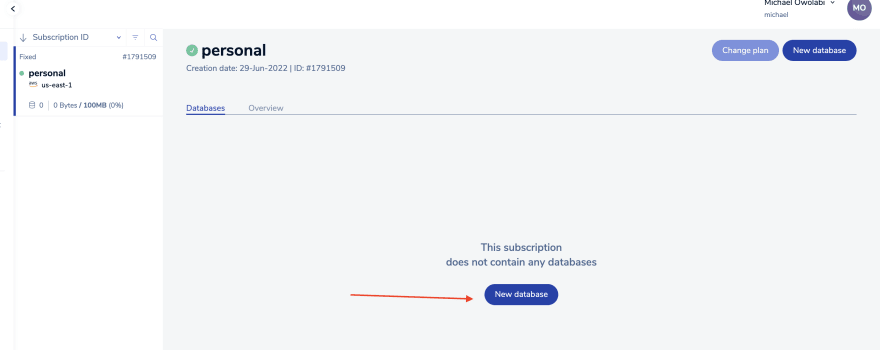
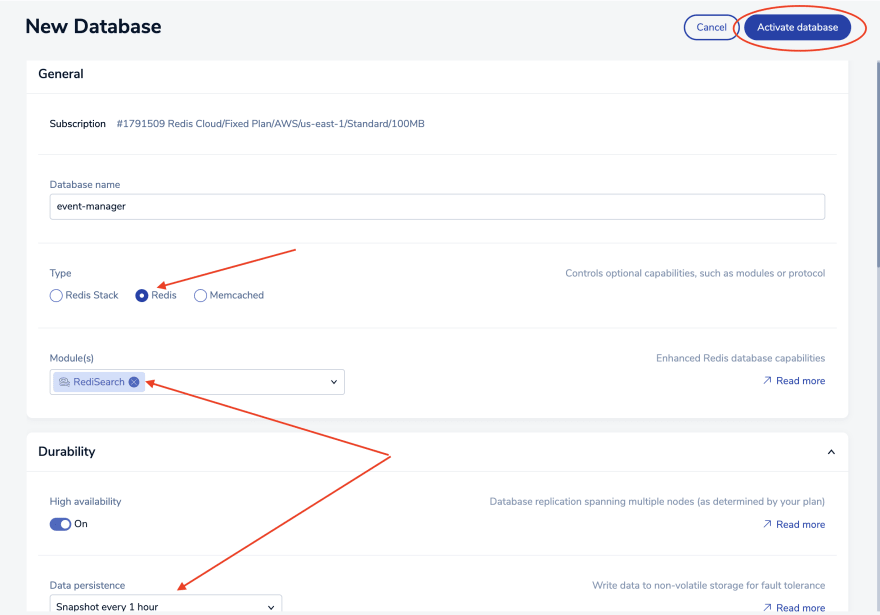
Now on your subscription dashboard, click on the “New Database button”. Give your database a name and choose the Redis option under the “Type section” to specifically select the Redis module of choice which in our case is RediSearch. Make sure you also select the data persistence option of choice but in this case, we’ll be using the snapshot option that runs every hour. Click the “Activate database” button when you’re done to provision your database. After that, you should see the database configuration screen similar to the one below.
Visualizing your data
Now that we have set up our database properly, we need something to visualize our data stored in the Redis DB and this is where RedisInsight comes in. Now launch your RedisInsight and click the “Add Redis Database” button then copy and paste in your Redis enterprise DB connection string.
It is called “public endpoint” on your Redis enterprise DB configuration page. Then on the same DB configuration page, you would see your default username and password, copy those and paste them into your RedisInsght connection dialog after which you click the “Add Redis Database” button to connect to your Redis enterprise DB. You should see the DB summary on the next page which will be empty since there’s currently no data in your Redis database.
Connecting your Redis DB from the App
The next thing to do is to set up a connection to our Redis database from within the event manager app. To do this, create a new directory inside “src” called db and create a new file named index.js in the newly created db directory. Copy and paste the following code into the file.
Building user authentication into our event manager app
Even though we want the general public to be able to view events on our platform, we only want registered users to be able to create events. So let’s build some authentication into the system. In the src directory create four folders namely routes, controller, utils, and lastly middleware. We are doing this to keep things simple and clean to some extent.
Now, in the controller directory, create a new file called “auth.js” and paste the following code into it.
In the createAccount() function part of the codebase, we are saving the user account information in a Redis hash data structure and using the user’s email as the key since it will be unique across the entire database. We are generating a user ID for the user with the help of the ulid package which is a great alternative to uuid. We are interfacing with our Redis enterprise DB with the help of the "redis-om" client via the DB connection that we setup earlier.
The last thing that we need to do is create the jwt helper file that was imported here so create a new file under the utils directory called "jwtHelper.js" and then copy and paste the following code into the file.
The next thing to do is to connect our controller to a route. In the routes directory, create a file named “authRouter.js” then copy and paste the following code into it.
Now let’s ultimately connect our router to our express server. In the app.js file import the “authRouter” module and adding it to the server middleware stack by passing it to the use() function as below.
app.use('/api/v1/auth', authRouter);
Lastly, let’s create a new file at the root of the project directory called .env so that we can add all our secrets to it. Remember we’ve been using them across the project so copy and paste the following environment variables to your .env file and fill it accordingly. You will get all the Redis related variables values from your Redis enterprise DB configuration page.
PORT=
REDIS_DB_URL=
REDIS_DB_USER=
REDIS_DB_PASS=
TOKENEXPIRATIONTIME=
JWTSECRET=
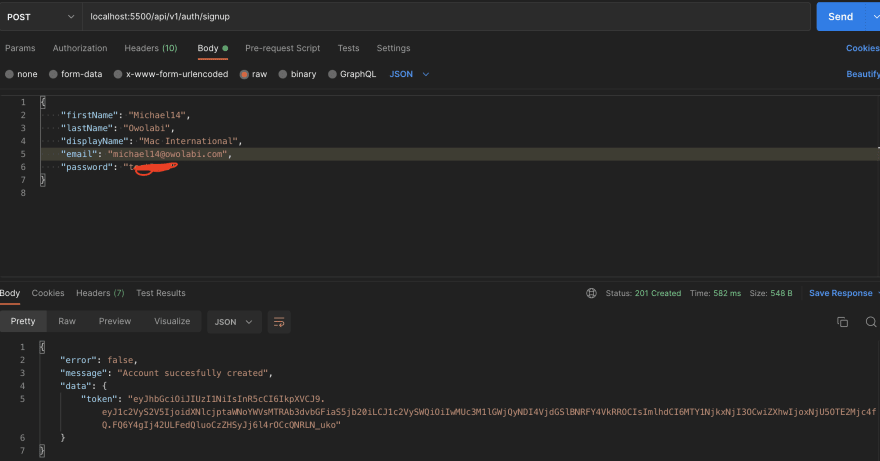
Now, start the server and then test your newly created authentication flow via Postman or any HTTP client of your choice. Create a few users and log in with your credentials.
Building the event module
The event module is the heart of this application and where the full power of the Redis database comes to bear. Before now, it’s really a big hassle trying to perform the equivalent of an SQL-like queries in Redis. One has to follow or device many unconventional approaches to search saved data beyond just searching by the key.
The RediSearch module since its development has been a game changer in this regard. It’s now much easier to perform various searches e.g. fulltext search, aggregate search results, sort and so much more.
This is why we added the RediSearch module to our database while setting it up to be able to search events by various parameters so let’s get to it.
The first thing to do is model the data that we will be performing search on and creating an index out of it. The better your index, the more performant your search will be.
Modeling the data and creating the index
Create a new directory under "src" called repository and in it, create a new file named event.js the paste the following code into that file.
In the code above, again, we imported the redis connection that was created in the db directory since that is our gateway to the Redis enterprise database. Now let’s talk about the different “redis-om” data types assigned to various fields. Here, there are four major data types we are working with which are string, text, date, and point.
- String: The string data type normally should be assigned to any field that we want to perform exact match search on e.g fields with definite list of values for example category, genre, type, etc. This type maps to TAG in the underlying RediSearch type
- Text: The major difference between the string and text field is that you can perform full text search on the text field which is not possible on a field designated as string.
- Point: This field is used for storing location value in terms of longitude and latitude so if you intend to perform location based search, then you should use the point type on such field. This type maps to GEO in the underlying RediSearch type
- Date field is exactly what it means, working with dates.
Sometimes, we want to see the most recent entries first and vice-versa, to do that, we need to mark the field as “sortable” which will help us sort our search results based on various conditions.
You can read more about how schema/entities are created in redis-om here
Notice that there is one field in the schema "dataStructure" with the value "HASH", this is telling Redis that we want to use the hash data structure for the schema. This is necessary because by default redis-om uses the RedisJSON data structure and because we did not add that to our database while setting it up, it will throw an error.
RedisJSON is another Redis module which could be better suited for storing JSON-like data like the one we have here but I’ve decided to use the HASH data structure just to focus more on the RediSearch module in this article. More on that here
Finally, to create the index, you’ll call the createIndex() method on the schema repository.
Now that we have every bit of the puzzle needed to complete this amazing app, let’s bring them together.
Building the event management platform on Redis
In the controllers directory, create a file and name it "event.js" and paste the following code in the file.
Not much is going on in the "createEvent()" controller function, we are just calling the "createAndSave()" method on our exported event schema repository after passing the user event object into it.
The real power of the RediSearch module started becoming evident from the "getAllEvents()" controller function. Here, we are able to use some of the handy methods exposed by the redis-om library to fetch all events, sort them to ensure that the most recent event show up first and also paginate. Now, isn’t that sleek? 😉.
In an SQL based database, this query will look something like the following
SELECT * FROM table_name ORDER BY field DESC LIMIT limit OFFSET offset;
All of these aren’t an easy feat to do in Redis before the advent of the Redisearch module. Notice that we called the “sortDescending” method on the createdAt field which was why we marked it as sortable while defining our schema.
This is why I say that how performant your search will be will dependent on good your index is.
Another interesting controller function here is the "getEventsNearMe()" function. This uses the location given by the user and the distance they set or search within a 10 Kilometer radius if distance isn’t provided. We are able to do this because we marked the "locationPoint" field as "point" while creating our schema.
Lastly there is the "searchEvents" controller function that searches events based on two conditions, the category of the event and title. Of course if we are searching events by the categories it is easier to search the category as a whole e.g conference, concert etc. But if we intend to search events by their title, it wouldn’t make sense to expect our users to memorize the exact title of events.
This is the reason why we designated the title field with the "text" data type so that we can perform full text search on it which means that, if users remember a particular phrase in the title of the event they are looking for, they can search by that phrase and the various events with similar phrase will get returned to them.
Ok, enough of that and let’s complete the other parts of the application. You would have noticed that we had some dependencies used in the event controller file that doesn’t currently exist, so let’s plug in the missing pieces.
Create a new file called "pagination.js" in the utils directory and copy and paste the following code into it. This is just to handle our result pagination.
Remember the middleware directory that was created earlier? now create a new file in that directory called index.js and paste the following code into the file. This is what will ensure that only the right users have access to various parts of the application.
Let’s now plug our controller to appropriate routes so that users request will be handled in the correct manner. Create a new file in the routes directory called event.js and paste the following code into it.
Finally, let us make the presence of the event route known to our server by importing the event route module in the app.js file. By now, your app.js file should look like the one below:
Now that we are done, let’s test out the various endpoints for the event management application. So, fire up your Postman or any other HTTP client that you’re using and create some events, fetch all events, and search events using various parameters. Below are a few of the screenshot of my personal tests.
I suggest that you open up your RedisInsight to visualize some of the data that you’ve been saving all the while.
Building the frontend of our event management app using React.
The frontend code for the event manager application can be found here, just clone the repository, follow the setup guide and start both the server and the frontend app. You should be able to see some of the events that you’ve created. Perform some searches using various parameters.
There’s still so much that can be done to improve this app as listed below:
- Search events by date range
- Search events by country (I know we don’t have a country field and you can just update the schema with that. Don’t worry about your index, it will be rebuilt when you restart your server)
- Modify event information e.g. the date of the event
- Delete event...
Congratulations for getting this far. You have just built your event management application fully on the Redis database 👏🏼.
Do let me know what you feel in the comment section.
Below are some helpful links if you’re looking to explore Redis beyond what is in the context of this article:
Caveat
Redis-om is still in the preview stage and it’s not stable enough to be used in production at the time of writing this article. You can use other Redis clients if you intend to use Redis in production you can choose from other recommended clients here
This content originally appeared on DEV Community and was authored by Michael Owolabi
Michael Owolabi | Sciencx (2022-07-06T18:12:37+00:00) How to build an event management application in Node.js + React on Redis. Retrieved from https://www.scien.cx/2022/07/06/how-to-build-an-event-management-application-in-node-js-react-on-redis/
Please log in to upload a file.
There are no updates yet.
Click the Upload button above to add an update.


