This content originally appeared on Level Up Coding - Medium and was authored by Prithivee Ramalingam
Let’s say you have collected data, performed feature engineering, and built a model for your cool side project. When it comes to sharing the model with your friends and community, you expose the model as an API. Without a clear documentation and a UI, the users would probably be puzzled regarding the functionality and parameters of the API. We can use Flasgger to solve this specific problem.
In this article, we will be creating 2 Machine Learning APIs, with Flask as the backend. Then we will be using Flasgger to standardize and interact with the API. Finally, we will dockerize the setup and run it as a container. In this article, Iris Dataset has been used for demonstration purposes.

Model Building
The IRIS dataset has Id, SepalLengthCm, SepalWidthCm, PetalLengthCm, PetalWidthCm and Species as features. The problem statement is to identify whether the flower belongs to Setosa, Virginica or Versicolor species. The ID column can be dropped as that is not relevant to the problem. As the species Feature has categorical variables we perform label encoding to convert them into numbers.
After this, we perform the usual train test split and train the model with a classifier. In this case, I have used Random Forest. After we train the model we package it into a pickle file and save it. Since this article is a demonstration for Flasgger, we are not going to get into the nitty gritty of Feature Selection, Model selection, and Accuracy. You can find the full code here.
Model Inference
After we have trained the model the next step would be to expose it as an API. For this purpose, we create a Flask application with 2 APIs. One would be a GET method which takes in the features as parameters and the other would be a POST method which accepts a CSV file as the input. These methods would process the data and return the inference from the model as response.
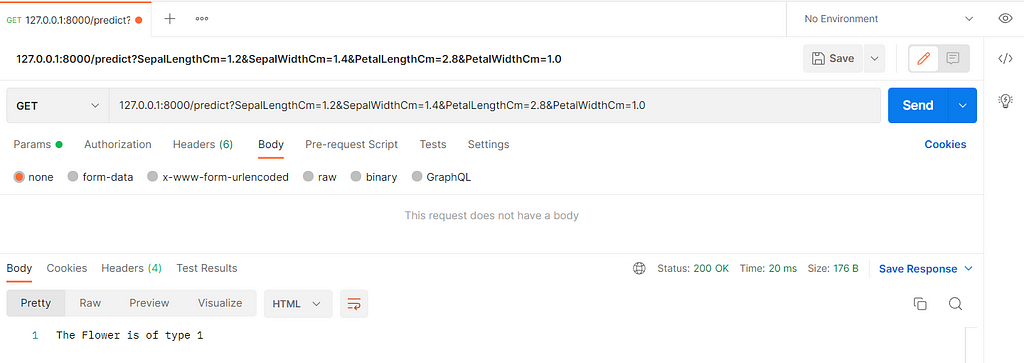
As of now, the logic for our Machine Learning application doesn’t contain any UI. We simply send the request through Postman and get a response. This is fine for testing purposes but we wouldn’t want the users of our ML application to keep using Postman for inference. No offense to Postman here, I am simply making a point against the absence of a simple UI.

Due to the absence of a simple UI, we are losing on 2 fronts. The first one is the absence of a prompt when we enter non-acceptable values. The second one is the lack of documentation of the APIs available. Prompting would be a good feature to warn us when there is a mismatch of a datatype or an absence of a particular feature. Similarly, the user needs to know the APIs available and the function of each API to make an informed request. So, as mentioned in the beginning, we will create a frontend with Flasgger and link it with our Flask powered ML application.
Flasgger is a Flask extension to extract OpenAPI-Specification from all Flask views registered in your API. Flasgger also comes with SwaggerUI embedded so you can access http://localhost:5000/apidocs and visualize and interact with your API resources.
Although there are multiple uses to Flasgger, in this case we are using it as Frontend to our ML application. Flasgger has 3 main components Description, parameters and responses.
Description
As the name suggests this section contains the description of the API. We can include details like the expected input parameters and the function of that particular API in this section.
Parameters
This section contains the name, in, type, and required labels. The name will be the name of the parameter used. ‘In’ can be a query that we enter in the UI or it could be formData which is the file we upload. The ‘type’ label can be used to standardize the datatype of the parameter. It can be number, file and so on. Finally, we have the ‘required’ label which denotes whether it is mandatory to provide a value for the specific parameter or not.
Responses
This section deals with the response codes and the description we like to display along with the response code.
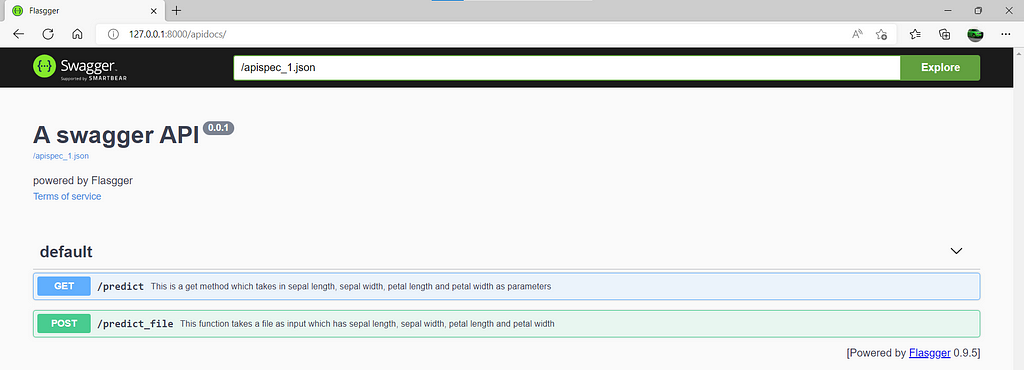
It takes just 2 simple steps to see the UI in action. The first step would be to run the Flask application. The second step would be to go to the browser and type 127.0.0.1:8000/apidocs. The 8000 is the port number we have specified in the Flask application and apidocs will take us to the swagger section. As we can see Flasgger provides information regarding the methods available in the Flask application along with their description.

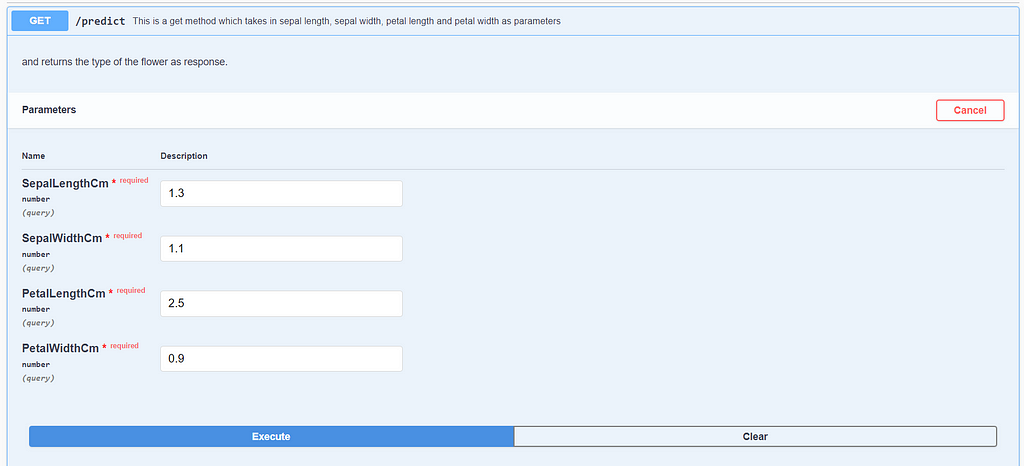
In the API section, the “required” flag for every parameter is present. If the value is unfilled or a non acceptable datatype is entered, a prompt would be shown with a detailed error message. Since all the parameters are readily available in the UI, we don’t have to worry about giving the wrong parameter in the request.

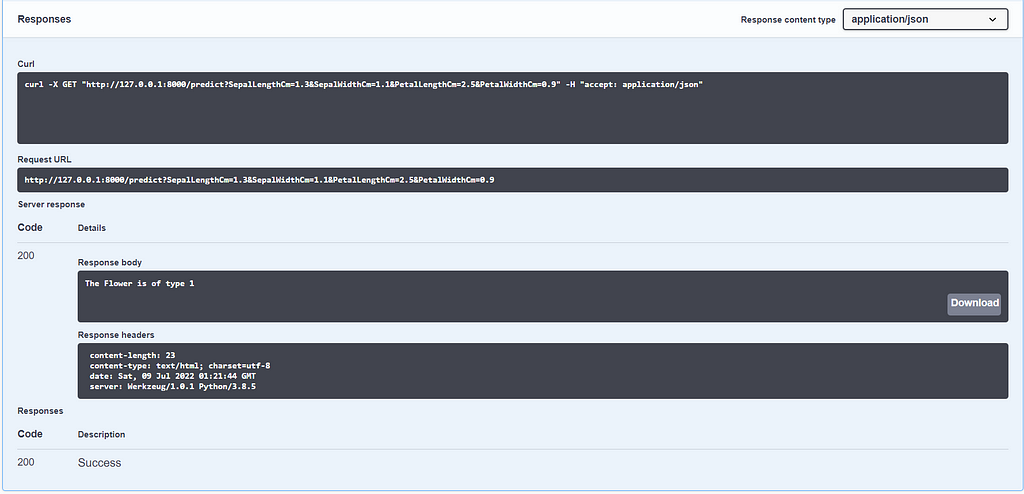
After executing the GET method we reach the response section. Here we have the requested URL, Curl, and response body along with the response code. We will get the same UI for our POST method where we can upload a CSV file for batch prediction.

Let’s Recap
We have
Downloaded the Iris dataset from Kaggle.
Performed feature engineering and model training.
Saved the trained model as a pickle file.
Created a Flask application to expose our model as an API
Integrated Flasgger with our Flask application.
Let’s Dockerize
Congratulations, now you have a more than a machine learning model at your disposal. Now it’s time to share it with your friends and colleagues. You can package the code, dependency files and data files and create a docker image. This docker image can be shared and ran on any machine without any dependency issues.
For learning about docker installation and deployment, you can have a look at this amazing resource. The first step in creating the docker image will be the creation of the Dockerfile. This file has all the necessary information to run our application as a container. It contains information about the base image, port number and dependencies. After the installation is complete, you can run the below command to start your container.
docker build -t iris_image .
docker run — name iris_container -p 8000:8000 iris_image
Conclusion
Flasgger can be used to standardize Machine Learning APIs, which helps the developers and end users to be on the same page. Flasgger also provides validation for the incoming data by comparing it with the underlying schema. Additionally, it can also be used a simple frontend for our ML applications.
Resources
- Docker Tutorial 1- Why and What is Docker, Dockers Containers, Virtualization In Machine Learning — YouTube
- (7079) Docker Tutorial for Beginners — What is Docker? Introduction to Containers — YouTube
Want to Connect?
If you enjoyed this article, please follow me here on Medium for more stories about machine learning and computer science.
Linked In — Prithivee Ramalingam | LinkedIn
Level Up Coding
Thanks for being a part of our community! More content in the Level Up Coding publication.
Follow: Twitter, LinkedIn, Newsletter
Level Up is transforming tech recruiting ➡️ Join our talent collective
Create a simple frontend for your Machine Learning application with Flasgger was originally published in Level Up Coding on Medium, where people are continuing the conversation by highlighting and responding to this story.
This content originally appeared on Level Up Coding - Medium and was authored by Prithivee Ramalingam
Prithivee Ramalingam | Sciencx (2022-07-11T00:14:41+00:00) Create a simple frontend for your Machine Learning application with Flasgger. Retrieved from https://www.scien.cx/2022/07/11/create-a-simple-frontend-for-your-machine-learning-application-with-flasgger/
Please log in to upload a file.
There are no updates yet.
Click the Upload button above to add an update.
