This content originally appeared on DEV Community 👩💻👨💻 and was authored by Leonard Püttmann
In this article, we want to show you how you can use our refinery Python SDK to quickly extract data from refinery itself, build a NLP model with it and then deploy it to the cloud with the help of Truss, a free-to-use and open-source tool developed by Baseten. We are going to deploy our models on Baseten's own site as well as on Microsoft Azure as a serverless container instance.
To follow along with this tutorial and deploy your own model in the cloud, you can make use of machine learning frameworks such as Sklearn, XGBoost, LightGBM, Tensorflow or PyTorch. For this tutorial, we are going to use the simple but beloved Logistic Regression model from Sklearn. Although, the following steps should be similar to all the other frameworks.
Deploying on Baseten
First, we are going to take a look at how we can deploy our model with Truss and Baseten. Truss is an open-source library made by Baseten, so their tools are very interconnected and easy to use. Before we can think about building or even deploying a model, we need some data. That’s where refinery comes into play!
Getting the data from refinery
As you may know, refinery is our data-centric IDE for NLP, which makes it really easy to kick-start your NLP projects in no time! To enable you to quickly get your data out of refinery and into your custom Python code, we built a handy SDK to make your workflow as seamingless as possible.
You can install our Python SDK with a simple 'pip install refinery-python-sdk'. To avoid dependency errors, we recommend doing this in a virtual environment! The SDK works for both the local version as well as the hosted one on app.kern.ai!
After the SDK is installed, you can use the Client module to get access to your project! Simply import the Client from refinery, enter your credentials and you are good to go.
With the Client, you can now access your data from refinery. We are going to get the data from the clickbait dataset, which is one of our sample projects that are already provided to you after the installation! Using our SDK, you can automatically build a dataset with different adapters for Sklearn models, for finetuning transformer models or to create data for Rasa NLU, as shown in the example here!
After we’ve got access to the refinery Client, we are going to pull some data out of it. To get the right data in this case, we need to specify the columns to extract. You can find the names of the columns on the overview page. Please note that the label column is marked with two underscores “__”. Last but not least, we specify the HuggingFace model with which we would like to pre-process the textual data into embeddings. We are going to use the distilbert-base-uncased model here.
Creating a simple machine learning model
Now that we got the preprocessed data, we can use it to build a machine learning model. Today we are going to build a simple Logistic Regression. Logistic Regressions can be really powerful, and with really great data you can do a lot, even with simple models! Of course, you can feel free to take some time to build more sophisticated models with all the freed-up time you’ll soon have by using refinery, our SDK as well as Baseten.
Creating a Truss
After the model is created, we pack it up into a Truss. The word truss literally means something like a frame that is supporting a structure, and we find the name to be really fitting. Also, creating a Truss is really easy! Run the following code to create a truss in your current directory. That’s it!

Pushing and deploying the model
After you have created a Truss, you can push it to Baseten’s own hosting platform to deploy and use your machine learning model. Baseten’s library makes this as easy as a walk in the park! Simply log in with your API key, which you’ll get in the web application of Baseten, and deploy your model.
Using the model from Baseten
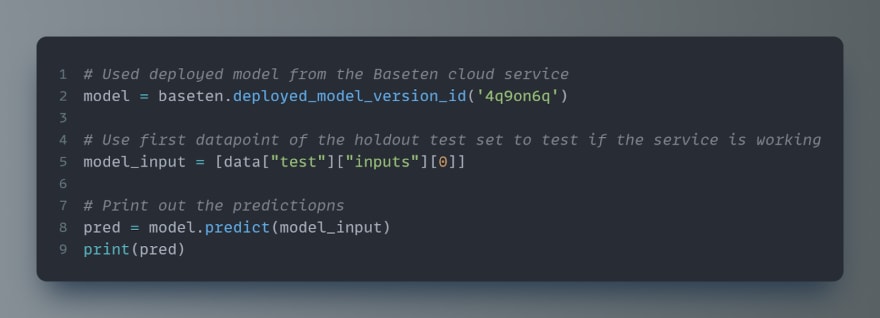
The model will now be hosted in the cloud via the services from Baseten. Their free tier offers 1 CPU core and 1 GB of memory, which is well enough for our use case. Using deployed models is super easy. You can just access the model via the model version id and then use the model like you would with a normal trained Sklearn model. This is pretty awesome, as you can now easily embed the model into other apps and services.
Building a UI with Baseten
As if hosting machine learning models wasn't awesome enough by itself, Baseten also allows you to build amazing user interfaces on their platform! The interface can be deployed on a website and with one click you can share it with colleagues or clients. For our clickbait example, we are using our machine learning model on a website that looks like this:
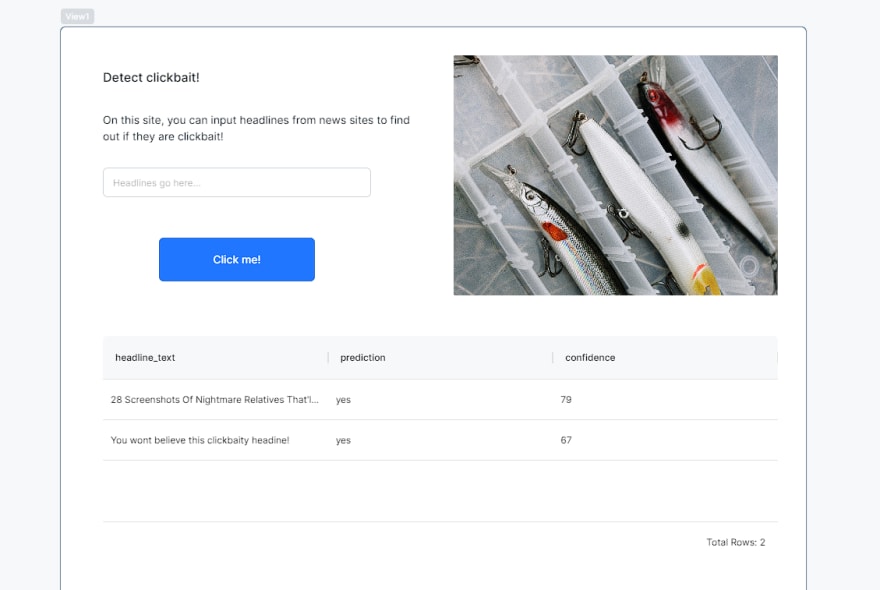
Each web application on Baseten consists of three parts: the Views, which is a drag-and-drop editor allowing you to put together the actual user interface, the Files section to write custom Python code, as well as the Worklets, which bring all the components together. In order to run, our application only needs three blocks in the Worklet. In the first block, we take some user input from the frontend and process it with some custom Python code. After that, we send the pre-processed data to the model we deployed to Baseten earlier. The output of our model is then saved to an SQL database with the store block.
Down below you can find all the code that was used to process and store the data. It's pretty mindblowing that this is all the code we need for our application! The two functions you see are used in the first and third code block of our Worklet. Because we are using our embedders library to pre-process the data, please make sure to install the library and put it in your requirements.txt file.

We are almost done now. Before we can use the app, we also need to set up a database with the columns headline_text, prediction and confidence. To be able to access the database, we add the following query in the data section of Baseten.

Back in the application, we can connect the database to a table in the frontend by typing in scored headlines in two curly brackets! This show us the contents of the SQL database, which stores the predictions of our model.
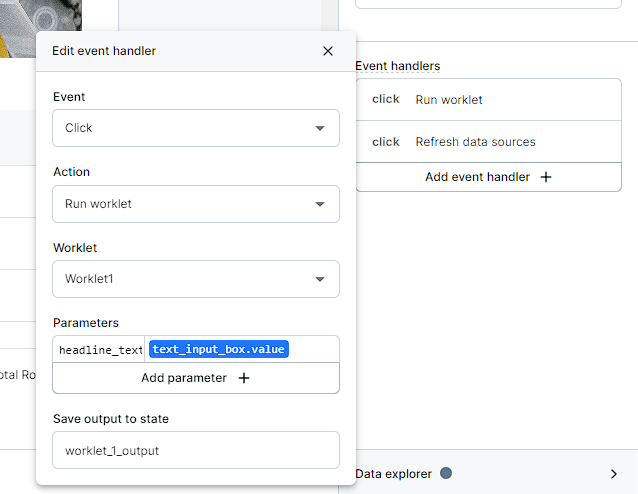
Finally, we configure our button to initialize the Worklet once it is clicked and to refresh the table to show us the results.
We can then click on share and deploy our app!

As you just saw, deploying a machine learning application with Baseten is super easy! Baseten gives us everything we need to deploy a website with our machine learning model in bare minutes instead of days.
But, what if you can't deploy on Basetens own cloud service? Truss, the library we used earlier, gives us the freedom to deploy our machine learning model on any major cloud platform. As a alternative to Baseten, we are also showing you how to deploy the model on Microsofts Azure Cloud with the help of serverless container instances!
Deploying on Azure Cloud
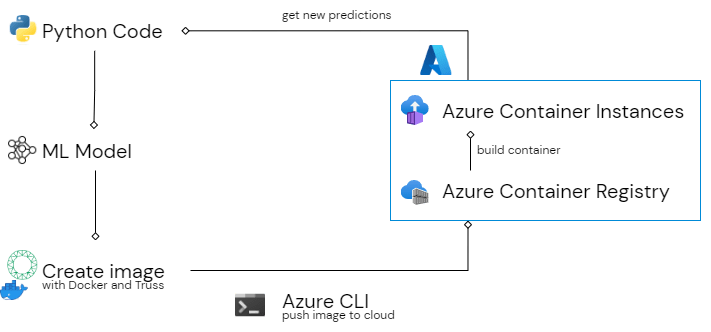
You can also deploy the truss on any other major cloud platform of your choice. We are going to choose Microsoft's Azure cloud for this because we find it to be very user-friendly and accessible. Creating an account is free, and Azure usually offers free credits to get going. If you don’t want to use Azure, Baseten also offers tutorials on how to deploy on AWS and GCP.
Deploying the model on Azure requires a little bit more effort than just pushing it to Baseten, but it’s still very easy. To follow along, you need the following requisites:
- An active Azure Subscription.
- Installed the Azure CLI (works on all systems).
- Installed Docker Desktop. Important note: Please delete unused resources in Azure after you are done using them to avoid unnecessary costs! To do so, you’ll find some handy commands at the end of this blog post! ## Creating a resource group Let’s head over to the Azure portal to get started. First, we are going to create a new resource group. You can also use an existing resource group if you like. If you don’t have one or want to create a new one, click on Resource Group in the Azure Portal.
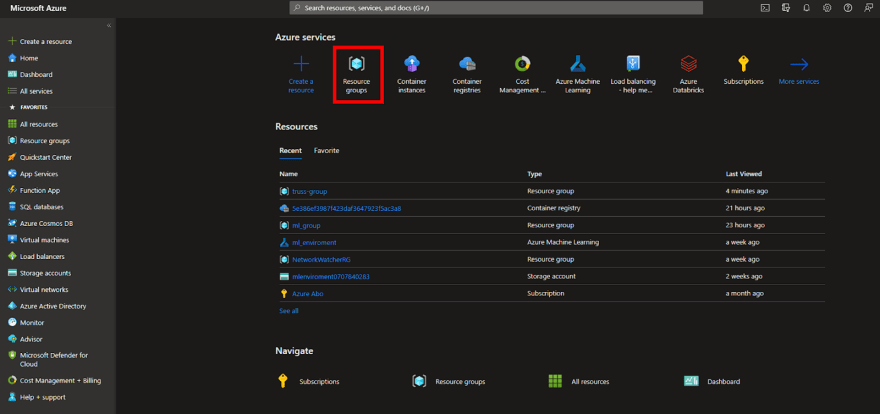
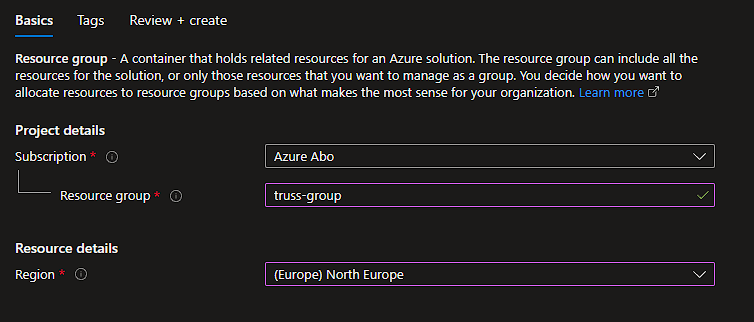
Click on create to create a new resource group.

We are going to call our Resource Group truss-group and provision it in North Europe. Feel free to deploy this and all the following resources in a different location which is closer to you or which offers the lowest prices to minimize costs.
Creating a container registry
Next up, we need to create a container registry, which stores our docker image. Azure Container Registry (ACR) is similar to Docker Hub, in that you can push images there to create containers.
To create a new ACR, simply head back to the home page of the portal or search for the container registry in the search bar. We are going to call our registry the trussregistry and provision it under the truss-group.
For this demo, we are choosing a Basic SKU (Stock Keeping Unit). If you need more power and scalability, you can opt for a Standard or Performance SKU.
Creating and pushing the docker image
After the creation of the registry, we can push a Docker image to Azure. To do that, we need a docker image first (obviously)! Truss makes this very easy. We can jump into the terminal and run the following command to create a Docker image from a Truss:
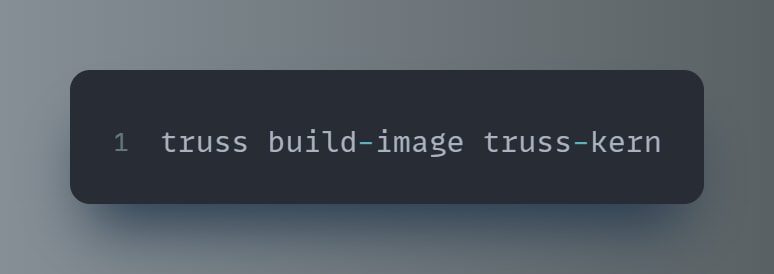
Make sure you are in the correct directory when running this command. After the image is built, we can push it to the Azure Container Registry, which is where the Azure CLI comes into play. There are probably other ways to do this as well, but we find this to be the most convenient way. If you are planning to work more with Azure in the future, we recommend learning more about the Azure CLI in general, as it is a handy tool.
Running the first command you see down below will open a browser window and you can log into Azure. After that, type in the second command to connect to your container registry!
After that, we need to tag the image. Our image is called sklearn-model, and we are tagging it with the domain of our registry + the name we want the image to have in the ACR. Once we’ve done that, we can push it with the tagged name. This might take some time, as the image is about 1.5 GB large.
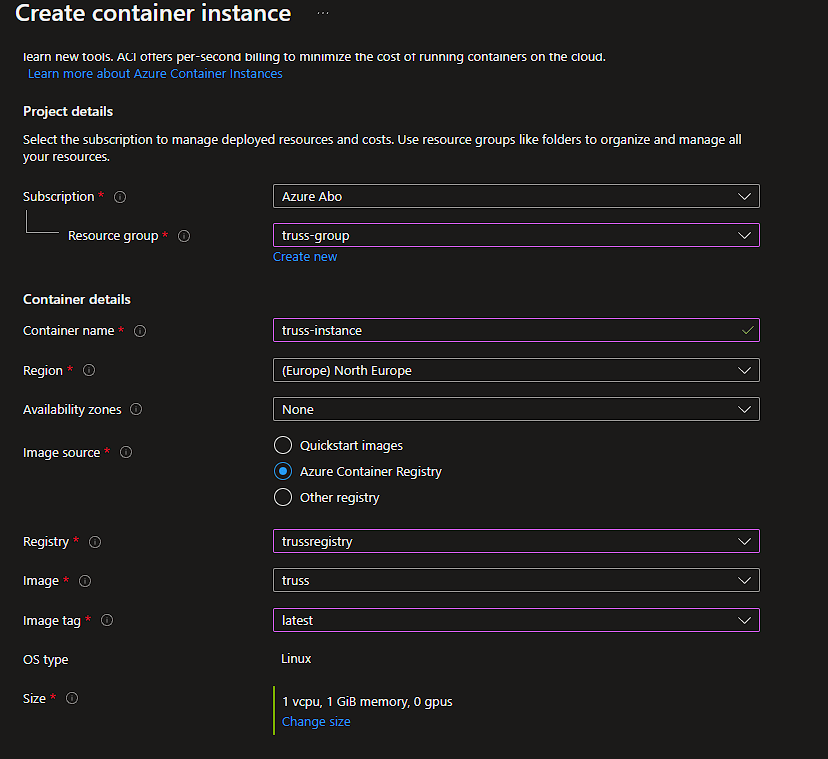
Back in the Azure Portal, we can now create a container instance. We can select the newly pushed image from the container registry now as well as set the size of the container. Because this is just a demo, we select the smallest size, which is 1 CPU core and 1 GB of memory. If needed, you could also get up to 4 CPU cores, 16 GB of memory as well as a dedicated GPU. So, power shouldn’t be an issue when creating Container Instances!
In the networking tab, we also set the default port to the value 8080.
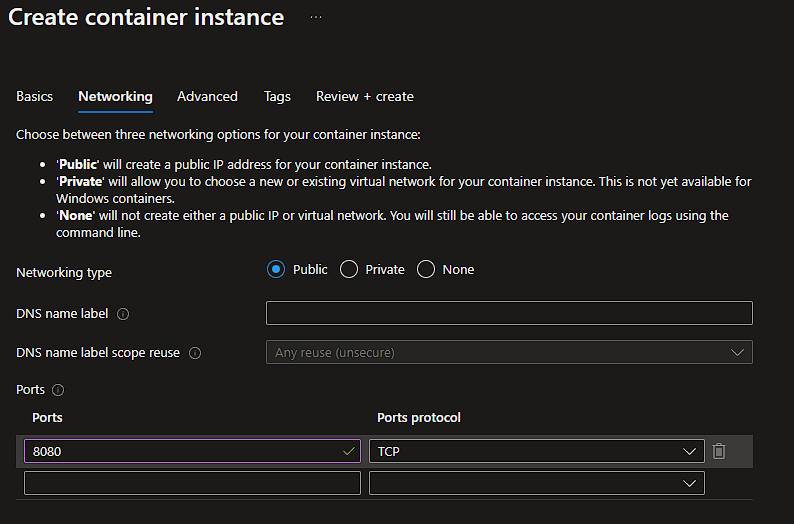
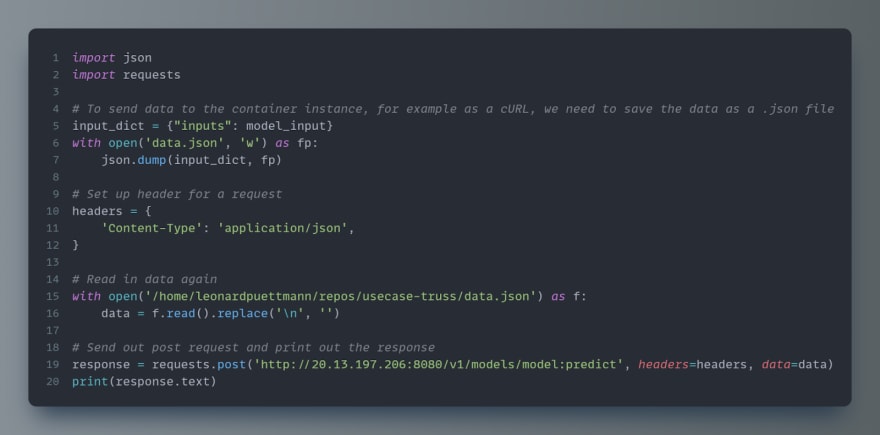
After that, we can provision the Container Instance and use it! All we need is the IP address of the container instance, which we can pluck into the code down below. We can send the data via a JSON file in a cURL or via a request in Python.
The text of the response from the container instance should contain the class prediction as well as the confidence of the prediction. And that’s all we need, now we can use the Container Instance to get predictions for our data!
Conclusion
With the refinery SDK and Truss we were able to deploy a model in a ridiculously short amount of time. Whether it’s on Baseten’s own site or a cloud platform of your choice, getting the data and deploying machine learning models does not need to be a hassle. This enables you to focus on what really matters: making sure that the data is of high quality and building good machine learning models.
Commands to clean up in Azure
Delete a whole resource group:
az group delete --name ExampleResourceGroup
Delete container instance:
az container delete –name ExampleContainerName
Delete a connected Container Registry:
az acr connected-registry delete
This content originally appeared on DEV Community 👩💻👨💻 and was authored by Leonard Püttmann
Leonard Püttmann | Sciencx (2022-09-23T11:59:21+00:00) Deploying NLP Models to the cloud with our Python SDK, Truss and Baseten!. Retrieved from https://www.scien.cx/2022/09/23/deploying-nlp-models-to-the-cloud-with-our-python-sdk-truss-and-baseten/
Please log in to upload a file.
There are no updates yet.
Click the Upload button above to add an update.


