How to Build a React Table Component

In this tutorial, I will be walking you through the various steps involved in building a React table component with Bit and you will later use that table component in a React application. This tutorial assumes NOTHING regarding your knowledge of Bit and how it works, so if this is your first time hearing about Bit you can comfortably follow along. However, you should be familiar with TypeScript and React.

Links to scope and components used in this article

What will you be learning in this tutorial?

  • How to Create, Export, Install, and Version components
  • Compose components
  • You will also be learning how to collaborate on components with Bit snap and lane.
  • How to use components inside an application and a lot more…

We have a lot to learn from this article, and I will be covering every step so there will be no skips (pun intended). The essence is so that you can follow along on your local machine.

If this is your first contact with Bit binary, before creating your workspace, you first need to install Bit on your local machine.

npx @teambit/bvm install

Personally, I first like to create my remote scope before proceeding further. It’s not compulsory that you do this first, but I just like to get it out of the way. And to do that, you will need to create an account on Bit.cloud. Go there and do it now, and while at it, create your Bit scope. Fortunately, Bit Docs has a guide on how to do that here.

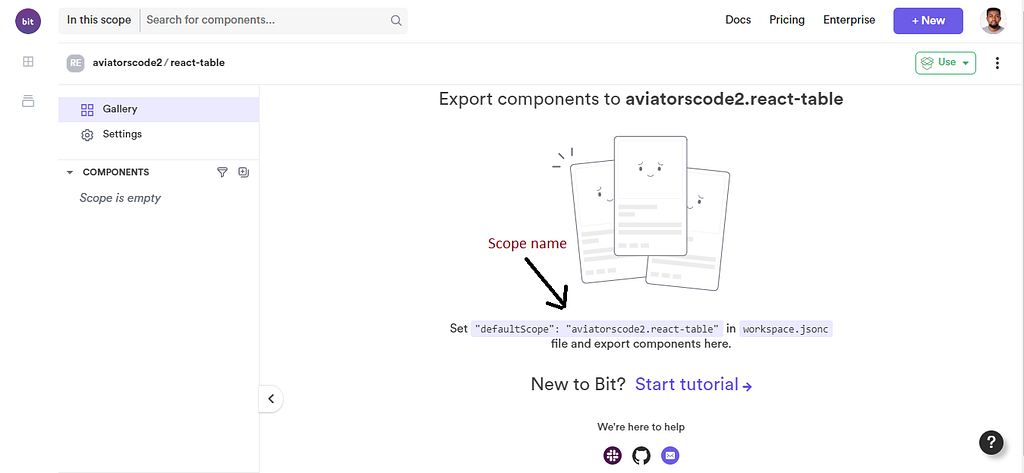
A new Bit Scope that is empty

After creating your remote scope, you should also see a page like the one above. aviatorscode2.react-table is my [bit cloud username.[scope_name]. The workspace can be started with the default scope, which we will do later.

I am running through these preliminary steps for those who are new to Bit, if you already know how to do all of these, you can skip these steps.

So, the next thing you will need to do is to create a workspace on your local machine. The workspace serves as a staging area for your components.

Chapter 1: Creating the React Table Component

In this chapter, you will also learn about bit components, how to compose components, and how to tag and export components, so seat tightly as we go on this journey together. hope you are excited.

Create a Bit workspace

These are the steps to follow; please keep in mind that this is not the only way to create Bit workspace as I started earlier.

  • Create a new folder with any name of choice, I used react-table for mine
  • Open that folder in your command line or using a code editor and run this code to initialize a Bit workspace
bit new react my-react-table --empty --skip-git --default-scope [your-cloud-user-name].react-table
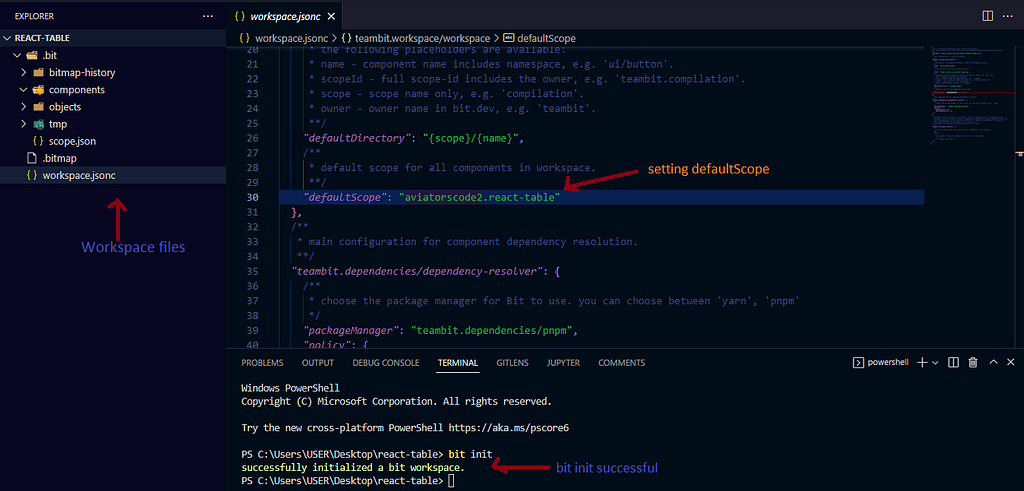
  • Once the above code is successful, it means Bit has generated a workspace with the necessary files. One of those files will include workspace.jsonc.
  • Inside the workspace.jsonc file, you will notice that the “defaultScope” is now your [bit.cloud user-name].react-table. Mine will be

Creating Bit Components

In this part, you will be creating new components, the main table component, table elements components, and some function components we will be using for the React table. All of which will be in the same scope.

Creating the util-function component

The table elements component and the main table components will require the function component to work properly, so in that case, you will be creating the function components first. You will be creating two components, one for sort-array and the other for types.

Since the tutorial will cover a number of things, I will go over the process of creating the sort-array function component, and you will have to follow the same process to create the types component, however, the code will be available to you. cool right? we can now proceed.

creating the sort array function component

To create a function component, you will be using the node template, you can also create component scaffolders see the documentation below

Create a component scaffolder | Bit

Inside the workspace, you initially created, run this command

bit create node charts/sort-array

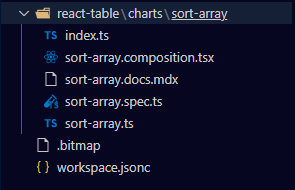
If the command runs successfully, you will notice a new folder called sort-array.

Inside sort-array.ts, you will write the function that will sort the table content, you can either sort it by number, by date or by string. Below is the implementation of the function

https://medium.com/media/03fc04867a4f583702f11efac1e8af03/href

the next thing is to export the sort-array component to bit.cloud. But before you do that, you can view the component on your browser, this also helps you to know if there is any error in your component before your export it.

bit start

before exporting a component, you will have to run the following command

bit status

bit status checks to see if there is any issue with your component.

When bit status runs successfully, your component is now ready to be tagged and exported. When you tag a component, Bit compiles, build test and versions that component.

bit tag charts/sort-array

Here is the expected output

new components
(first version for components)
> aviatorscode2.charts/sort-array@0.0.1

After Bit successfully tags your component, it is then ready to be exported. To export, run

bit export

That component is now available on your remote scope and it can be used by anybody.

Creating the types function component

You will also be needing a types component, you can learn more about the types component here, this component will contain the table-data.ts, link.ts and cell-data.ts. follow the same procedure outlined when creating the sort-array function component to create the types function component.

bit create node charts/types

Just like in the previous function, a types folder will be created, inside the types folder, create a file for table-data.ts, link.ts, and cell-data.ts. You can delete the other files leaving only the files you just create and the index.ts.

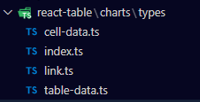
Now your types folder should look like this.

https://medium.com/media/34b3fe2f3cab9fa026172fc3e9ef7997/hrefhttps://medium.com/media/a9abd88f411c4e43836b3381b18331bf/hrefhttps://medium.com/media/ed9f6584df5940f7a036a1aeaeb951ad/hrefhttps://medium.com/media/c5859b55354d1d8a23183015dcd1ae9b/href

Use the bit commands highlighted in the previous function to check the status, compile, tag, and export the types component.

Creating the chart-data React component

The chart-data function component is responsible for converting data in CSV and Matrix format into chart data that can be represented on the React table.

You will be placing the chart-data component inside a different folder, if you notice from your file structure, both sort-array and types components are inside the charts folder. But for chart-data, it will be in a different folder. To create the chart data function component in a new folder, run this command.

bit create react entity/chart-data

this command will create an entity folder and place the chart data component folder inside it. You will also need to create a parse-csv.ts file inside the chart-data folder.

The code to the entire components you will be creating in this tutorial is on my bit.cloud here. you can checkout the code and how the files are structired there.

https://bit.cloud/aviatorscode2/react-table/entity/chart-data/~code

Here are the implementation of the chart-data component: index.ts

https://medium.com/media/94992fe4abce4aadf4d9bc3622d708c3/href

chart-data.tsx

https://medium.com/media/b5022340c2c8e65749df612f90a49816/href

chart-data.spec.tsx to write your test

https://medium.com/media/57c7a562656f04b2ce38ea0bfd3c99f1/href

In addition to the files inside the chart-data folder, create a new file called parse-csv.ts.

https://medium.com/media/1425629fc1c2a11192f15d64c7c5d704/href

Now, follow the processes outlined in the previous component to export the chart-data component to your remote scope.

Creating the table element components

For the table elements components, you will create six table elements components one after the other. These components will later be composed to form the actual table component, they include the th, td, tr, thead, tbody, and tfoot.

Creating the th React component

I will work you through the process of creating and exporting this component, with the hope that you will be able to follow the same process to create the other table element components. Remember that all source codes are made available to you on my bit.cloud. You can always go there to check out the code and confirm if you’re on the right track.

Okay, let’s begin, in the same scope as the previous components, create a new component using this command

bit create react charts/elements/th

Inside the th folder, create a new file for the styling, name it th.module.scss. In the th.tsx file, Implement the code for the th.tsx component. Instead of typing out the code, you can either copy and paste the code into your file or fork this component using the command below.

If you are forking the component, you don’t need to run the previous command to create the th component, as forking a component creates a copy of that component into your default scope.

bit fork aviatorscode2.react-table/charts/elements/th

https://medium.com/media/a8804c79b06453283b1fbfac776c2b9e/href

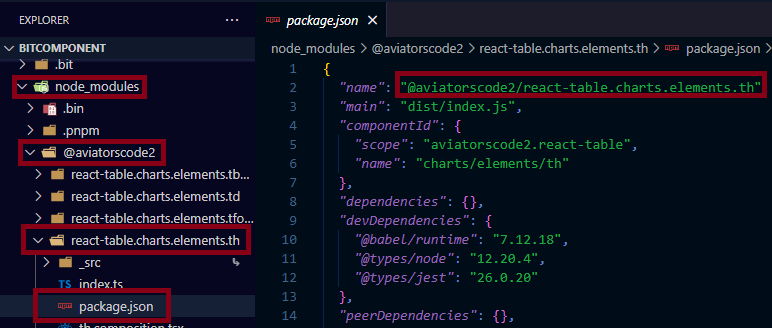
In line 3 of the above code, you will notice that I imported { CellData } from a node package module which is carrying my bit.cloud ID “aviatorscode2/react-table.charts.types”. This is because every component in Bit is independent of another, which is why that component can be isolated from your local workspace and exported to your remote. So every component you create or import in Bit has its own node package module.

So how do you locate each component’s package name? you can do that by following the convention.

  • Go to your node_modules folder
  • Inside the folder, you will see another folder carrying your bit.cloud ID
  • Open that folder, you will also see others folders, each carrying the name of every component present in your workspace.
  • Open the folder of the component you want to import into another component
  • Click on the package.son file of that component folder

Inside the th.module.scss, write the styling for the component.

https://medium.com/media/536ea4e3d3f175954dcd0c44221712fd/href

If after writing your scss code, you see this error in th.tsx.

what you need to do is create a declaration.d.ts file in your root directory and write this code.

https://medium.com/media/df70db03d7b38d91816549a6ff2733c4/href

Also if you notice an error where classNames is imported, it means you have to install the classNames package as a dependency. To that, run this command

bit install classnames

After this, save your changes and export the component to the remote scope. You can do that by running these commands in the order listed below.

bit compile
bit status // run this command first to check the status of the component
bit tag charts/elements/th // this is the component ID
bit export // to export the component to your remote scope

Creating the td React component

You can fork this component into your workspace using the command below.

bit fork aviatorscode2.react-table/charts/elements/td

But if you want to go through the process of creating the component, use the command below

bit create react charts/elements/td

After creating the component, you can copy and paste to code into td.tsx.

https://medium.com/media/8d7950e9ef4bd8fd0c4c15d4e9d9aae6/href

And in the td.module.scss

https://medium.com/media/a2b8bebb6db27bbf5f8d9f24fe2fe0e9/href

You can also get the source code of this component on Bit cloud here

https://bit.cloud/aviatorscode2/react-table/charts/elements/td/~code

Creating the tr React component

To fork the tr component, use the command below.

bit fork aviatorscode2.react-table/charts/elements/tr

If you also prefer to create the component yourself, use bit create

bit create react charts/elements/tr

After your component has been created, implement the code for the component in tr.tsx.

https://medium.com/media/46127bdfd3202a92bcce04235ef90684/href

In line 3 and 4, you will have to import td, th component as a dependency, just as I explained intilally under creating the th component. So replace the dependency address with the one carrying your bit cloud user name.

Also create a tr.module.scss file for the styling

https://medium.com/media/ec33c09cbbfcc83c98a9b95ac9fdefbb/href

Finally, tag and export the tr component to your remote scope

Creating the thead React component

Fork the thead component using the command below

bit fork aviatorscode2.react-table/charts/elements/thead

To create the component yourself, run the command below

bit create react charts/elements/thead

In the thead.tsx implement the following code

https://medium.com/media/6017223e8840e7c96de372dd64734687/href

This component doesn’t have styling, but you can always add one yourself. After that, export the component to bit.cloud.

Creating the tbody React component

bit fork aviatorscode2.react-table/charts/elements/tbody

To create the component yourself, use the command below

bit create react charts/elements/tbody

Inside the tbody.tsx, implement the code below

https://medium.com/media/5b5b677b0d2991fae60879f80625c0f9/href

Create a tbody.module.scss to handle the styling

https://medium.com/media/56d81270282faa1a0c5e908fc073ce8f/href

As always, save and export your tbody component to your remote scope on bit.cloud

Creating the tfoot React component

This is the final component you will be creating for the table element. you can fork the component using this command

bit fork aviatorscode2.react-table/charts/elements/tfoot

OR create the command using the command below

bit create react charts/elements/tfoot

The source code for this component is available here if you want to check it out.

https://bit.cloud/aviatorscode2/react-table/charts/elements/tfoot/~code

But if not, here is the implementation of the tfoot in the tfoot.tsx

https://medium.com/media/550ea531d94dbb87c4ee60ae276972db/href

In the tfoot folder, create a new file called tfoot.module.scss to handle styling

https://medium.com/media/3e0282875a8f0100464ccc7d4c76284e/href

Once you’re done, you can now proceed to creating the main table component.

Composing the table elements into the Table component

Now that you have successfully created the various components that are needed to create the main table components, it’s time to compose those components into the table component. After doing that, you will pass data into the table component to see if it will render its user interface correctly.

But what does compose mean? In simple terms it means to install a component as a dependency in another component, it’s that simple. And you have done that already, remember when you had to go to the node_modules and inside the package.json of a particular component, you got the name of that package and included it in the component that wants to make use of it.

So instead of importing a component like this

import {tbody} from "../elements/tbody"

It will be like this

import {tbody} from "@aviatorscode2/react-table.charts.elements.tbody"

If the component you want to compose is not in your workspace, you first need to install that component, when you install it, it will then be found in your node modules and from there you can import it into any component within your workspace.

In order to create the React table component, you will need to bring in other components that you created earlier into the table component, here is how the dependency graph will look afterwards, showing all the dependency components.

You can view it here. You can also fork this table component using this command below

bit fork aviatorscode2.react-table/charts/table

Let’s dive right in, before you proceed to write codes and composing the various components, what is the first thing you need to do? you guessed right, create a table component. by now you should know how to do that already.

bit create react charts/table

In your table component, in the index.ts file. implement the following code, you will have to compose the types component into this file.

https://medium.com/media/81d83b942dcc3126dd72b93d6744c9b7/href

For the table.tsx implement the code below

https://medium.com/media/4293c81fec72c7fc9def748de5ea1f2e/href

You will need to write some styling for the component, so create a table.module.scss file.

https://medium.com/media/ea8807e9386d74823f201b1fba5bef58/href

You will need to write a composition for this file, the composition file gives other users an idea of how the table component will render when CSV or matrix data is passed to it. You will write the composition in the table.composition.tsx file

https://medium.com/media/e9a730efc8a62e737579698e87627ca0/href

Finally, you will need to write a simple test for your component in the table.spec.ts file.

https://medium.com/media/3c121ac78fd7cc28d2fe1ed627a81f11/href

Chapter 2: Rendering the table component in a React App

If you have gotten to this part of the tutorial, well done. I want you to spice things up a Bit (pun intended). Instead of just creating the React table component and stopping there, I want you to also render the table component in a React app we will be building together so as to see how the table component will be displayed in a typical use case.

So let’s say you are creating a dashboard that requires you to display user data using a table, and then you saw a table component that suits your need. How do you use it in your application? that is what we will be covering in this chapter and a lot more.

Setting up your Bit workspace

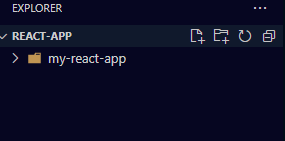
The first thing as usual is setting up a Bit workspace, Bit provides you with a React-App workplace template, that you will be using you demonstrate this. so the React-App template will serve as the application you will use to render the table component. Here are the steps to achieve this:

  • Create a folder in any directory of your choice
  • Open that folder in your code editor
  • Run this command
bit new react-app my-react-app --default-scope [bit.cloud-user-name].[scope-name]

Replace [bit.cloud-user-name].[scope-name] with your bit cloud user and remote scope. You will have to create a new scope different from the one you used in the first chapter of this tutorial.

  • cd into the React-App folder cd my-react-app
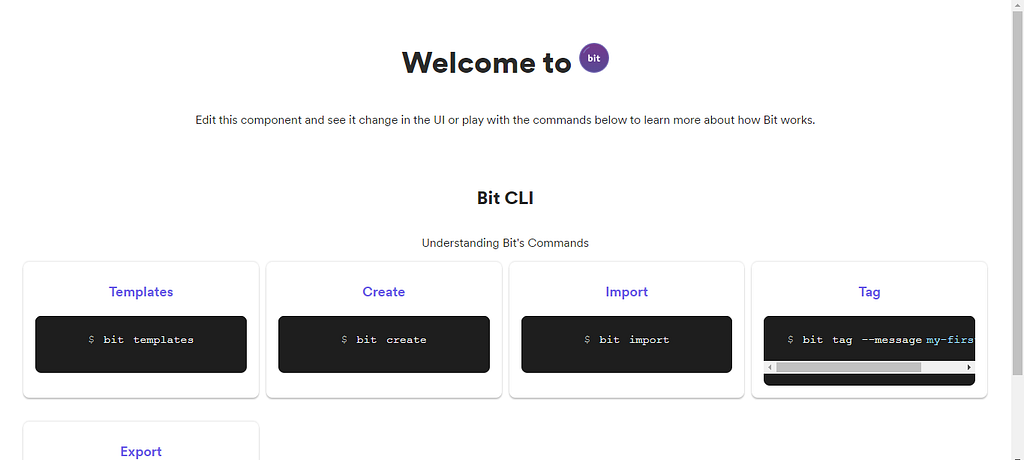
  • run this command to spin up the react-app on your browser bit run my-app

Import the table component

After setting up your workspace and having bit running on your browser, the next step is to import the table component into your workspace so that you can use it.

So your task here is to import the table component, pass data into it, and have that component render somewhere in your React-App currently running on your browser. So how do you achieve this?

  • Go to the table component you created in the first chapter of this tutorial, and copy the installed command. ( when you want to modify a component and suggest changes on a lane, you import it, but in this case, you are not modifying the table component so you install) .
  • paste and run that import command on your workspace terminal
  • If it runs successfully you will notice that the table component is now present in your workspace.
  • Import the table component into the app.tsx file.
  • After doing that, created a matrix data, or alternatively a csv file and pass it into the table component, here is the code for my implementation below.

https://medium.com/media/d16351c633539be90e779cb74411619c/href

  • Save, and go back to the tab where you are running Bit to see how it renders

Let’s move to the next section

Import one of the composing table elements

Let’s add some flavour to this, in this section, you will also import one of the components used in composing the table component. The essence is so that you can see how changing or adding some line of code will affect the table that is currently rendered on the browser.

  • Go to your remote scope and locate the tbody component.
  • Copy the import command for the tbody component.
  • Paste and run the command on your React-App workspace
  • You now have the tbody component on your workspace, inside the tbody.tsx, make some changes to it and see how it changes reflects on the browser.

In this case, I only added a background color to the tbody container.

Lane and Snap

Remember you are assuming that, it was someone else that created the table component and created the tbody. So it means that you can’t update that component since it’s not yours. But what if you make a valuable update to that component and you want the owner of that component to be able to see it and decide if they want to merge it with the original component or not?

All that was described above can be achieved with Bit, after making your changes, all you have to do is create a lane and snap it. you can read more about this feature on Bit Docs.

So to do that, first create a lane. you can create and automatically checkout to that lane using this command

bit lane create tbody

After that runs successfully, you can now snap it

bit snap --message "Added a background color"

The snap command will create a hashed version of the tbody component.

This hashed version of the component cannot be consumed by other developers when they try to import it into their workspace. If they try to, they will get an error similar to this.

You can now export the lane to your remote scope after snapping

bit export

After exporting, you can now review the lane with the component compare feature to see the changes that were made to the original component.

Conclusion

Wow, you have finally come to the end of this tutorial, where you have created a React table component and also rendered that component in a React-App.

You have also been able to cover setting up a bit workspace, creating components, composing components, bit snap and lane, and using components within an application.

This tutorial was mainly to give you a glimpse of what is possible with Bit, and how these processes will be relevant to you when building a personal project and also to your team also.

Try it out and share your experience or any question you might have as you use Bit. Join the Bit community Slack channel and also head to the Documentation to learn

Recommended Posts

  1. How to Create a Composable React App with Bit
  2. Sharing Javascript Code Between Applications with Bit
  3. Creating a Cross-Platform Design System for React and React Native with Bit


How to Build a React Table Component was originally published in Bits and Pieces on Medium, where people are continuing the conversation by highlighting and responding to this story.


This content originally appeared on Bits and Pieces - Medium and was authored by Victor Yakubu
In this tutorial, I will be walking you through the various steps involved in building a React table component with Bit and you will later use that table component in a React application. This tutorial assumes NOTHING regarding your knowledge of Bit and how it works, so if this is your first time hearing about Bit you can comfortably follow along. However, you should be familiar with TypeScript and React.

Links to scope and components used in this article

What will you be learning in this tutorial?

  • How to Create, Export, Install, and Version components
  • Compose components
  • You will also be learning how to collaborate on components with Bit snap and lane.
  • How to use components inside an application and a lot more…

We have a lot to learn from this article, and I will be covering every step so there will be no skips (pun intended). The essence is so that you can follow along on your local machine.

If this is your first contact with Bit binary, before creating your workspace, you first need to install Bit on your local machine.

npx @teambit/bvm install

Personally, I first like to create my remote scope before proceeding further. It’s not compulsory that you do this first, but I just like to get it out of the way. And to do that, you will need to create an account on Bit.cloud. Go there and do it now, and while at it, create your Bit scope. Fortunately, Bit Docs has a guide on how to do that here.
A new Bit Scope that is empty

After creating your remote scope, you should also see a page like the one above. aviatorscode2.react-table is my [bit cloud username.[scope_name]. The workspace can be started with the default scope, which we will do later.

I am running through these preliminary steps for those who are new to Bit, if you already know how to do all of these, you can skip these steps.

So, the next thing you will need to do is to create a workspace on your local machine. The workspace serves as a staging area for your components.

Chapter 1: Creating the React Table Component

In this chapter, you will also learn about bit components, how to compose components, and how to tag and export components, so seat tightly as we go on this journey together. hope you are excited.

Create a Bit workspace

These are the steps to follow; please keep in mind that this is not the only way to create Bit workspace as I started earlier.

  • Create a new folder with any name of choice, I used react-table for mine
  • Open that folder in your command line or using a code editor and run this code to initialize a Bit workspace
bit new react my-react-table --empty --skip-git --default-scope [your-cloud-user-name].react-table
  • Once the above code is successful, it means Bit has generated a workspace with the necessary files. One of those files will include workspace.jsonc.
  • Inside the workspace.jsonc file, you will notice that the “defaultScope” is now your [bit.cloud user-name].react-table. Mine will be
Creating Bit Components

In this part, you will be creating new components, the main table component, table elements components, and some function components we will be using for the React table. All of which will be in the same scope.

Creating the util-function component

The table elements component and the main table components will require the function component to work properly, so in that case, you will be creating the function components first. You will be creating two components, one for sort-array and the other for types.

Since the tutorial will cover a number of things, I will go over the process of creating the sort-array function component, and you will have to follow the same process to create the types component, however, the code will be available to you. cool right? we can now proceed.

creating the sort array function component

To create a function component, you will be using the node template, you can also create component scaffolders see the documentation below

Create a component scaffolder | Bit

Inside the workspace, you initially created, run this command

bit create node charts/sort-array

If the command runs successfully, you will notice a new folder called sort-array.
Inside sort-array.ts, you will write the function that will sort the table content, you can either sort it by number, by date or by string. Below is the implementation of the function

the next thing is to export the sort-array component to bit.cloud. But before you do that, you can view the component on your browser, this also helps you to know if there is any error in your component before your export it.

bit start

before exporting a component, you will have to run the following command

bit status

bit status checks to see if there is any issue with your component.

When bit status runs successfully, your component is now ready to be tagged and exported. When you tag a component, Bit compiles, build test and versions that component.

bit tag charts/sort-array

Here is the expected output

new components
(first version for components)
> aviatorscode2.charts/sort-array@0.0.1

After Bit successfully tags your component, it is then ready to be exported. To export, run

bit export

That component is now available on your remote scope and it can be used by anybody.

Creating the types function component

You will also be needing a types component, you can learn more about the types component here, this component will contain the table-data.ts, link.ts and cell-data.ts. follow the same procedure outlined when creating the sort-array function component to create the types function component.

bit create node charts/types

Just like in the previous function, a types folder will be created, inside the types folder, create a file for table-data.ts, link.ts, and cell-data.ts. You can delete the other files leaving only the files you just create and the index.ts.

Now your types folder should look like this.
Use the bit commands highlighted in the previous function to check the status, compile, tag, and export the types component.

Creating the chart-data React component

The chart-data function component is responsible for converting data in CSV and Matrix format into chart data that can be represented on the React table.

You will be placing the chart-data component inside a different folder, if you notice from your file structure, both sort-array and types components are inside the charts folder. But for chart-data, it will be in a different folder. To create the chart data function component in a new folder, run this command.

bit create react entity/chart-data

this command will create an entity folder and place the chart data component folder inside it. You will also need to create a parse-csv.ts file inside the chart-data folder.

The code to the entire components you will be creating in this tutorial is on my bit.cloud here. you can checkout the code and how the files are structired there.
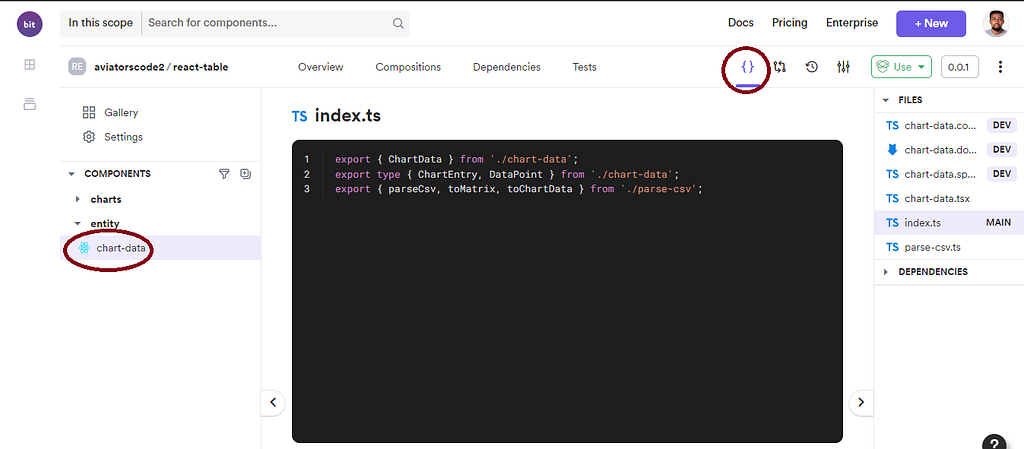
https://bit.cloud/aviatorscode2/react-table/entity/chart-data/~code

Here are the implementation of the chart-data component: index.ts

chart-data.tsx

chart-data.spec.tsx to write your test

In addition to the files inside the chart-data folder, create a new file called parse-csv.ts.

Now, follow the processes outlined in the previous component to export the chart-data component to your remote scope.

Creating the table element components

For the table elements components, you will create six table elements components one after the other. These components will later be composed to form the actual table component, they include the th, td, tr, thead, tbody, and tfoot.

Creating the th React component

I will work you through the process of creating and exporting this component, with the hope that you will be able to follow the same process to create the other table element components. Remember that all source codes are made available to you on my bit.cloud. You can always go there to check out the code and confirm if you’re on the right track.

Okay, let’s begin, in the same scope as the previous components, create a new component using this command

bit create react charts/elements/th

Inside the th folder, create a new file for the styling, name it th.module.scss. In the th.tsx file, Implement the code for the th.tsx component. Instead of typing out the code, you can either copy and paste the code into your file or fork this component using the command below.

If you are forking the component, you don't need to run the previous command to create the th component, as forking a component creates a copy of that component into your default scope.

bit fork aviatorscode2.react-table/charts/elements/th

In line 3 of the above code, you will notice that I imported { CellData } from a node package module which is carrying my bit.cloud ID “aviatorscode2/react-table.charts.types”. This is because every component in Bit is independent of another, which is why that component can be isolated from your local workspace and exported to your remote. So every component you create or import in Bit has its own node package module.

So how do you locate each component's package name? you can do that by following the convention.

  • Go to your node_modules folder
  • Inside the folder, you will see another folder carrying your bit.cloud ID
  • Open that folder, you will also see others folders, each carrying the name of every component present in your workspace.
  • Open the folder of the component you want to import into another component
  • Click on the package.son file of that component folder
Inside the th.module.scss, write the styling for the component.

If after writing your scss code, you see this error in th.tsx.

what you need to do is create a declaration.d.ts file in your root directory and write this code.

Also if you notice an error where classNames is imported, it means you have to install the classNames package as a dependency. To that, run this command

bit install classnames

After this, save your changes and export the component to the remote scope. You can do that by running these commands in the order listed below.

bit compile
bit status // run this command first to check the status of the component
bit tag charts/elements/th // this is the component ID
bit export // to export the component to your remote scope

Creating the td React component

You can fork this component into your workspace using the command below.

bit fork aviatorscode2.react-table/charts/elements/td

But if you want to go through the process of creating the component, use the command below

bit create react charts/elements/td

After creating the component, you can copy and paste to code into td.tsx.

And in the td.module.scss

You can also get the source code of this component on Bit cloud here

https://bit.cloud/aviatorscode2/react-table/charts/elements/td/~code

Creating the tr React component

To fork the tr component, use the command below.

bit fork aviatorscode2.react-table/charts/elements/tr

If you also prefer to create the component yourself, use bit create

bit create react charts/elements/tr

After your component has been created, implement the code for the component in tr.tsx.

In line 3 and 4, you will have to import td, th component as a dependency, just as I explained intilally under creating the th component. So replace the dependency address with the one carrying your bit cloud user name.

Also create a tr.module.scss file for the styling

Finally, tag and export the tr component to your remote scope

Creating the thead React component

Fork the thead component using the command below

bit fork aviatorscode2.react-table/charts/elements/thead

To create the component yourself, run the command below

bit create react charts/elements/thead

In the thead.tsx implement the following code

This component doesn’t have styling, but you can always add one yourself. After that, export the component to bit.cloud.

Creating the tbody React component

bit fork aviatorscode2.react-table/charts/elements/tbody

To create the component yourself, use the command below

bit create react charts/elements/tbody

Inside the tbody.tsx, implement the code below

Create a tbody.module.scss to handle the styling

As always, save and export your tbody component to your remote scope on bit.cloud

Creating the tfoot React component

This is the final component you will be creating for the table element. you can fork the component using this command

bit fork aviatorscode2.react-table/charts/elements/tfoot

OR create the command using the command below

bit create react charts/elements/tfoot

The source code for this component is available here if you want to check it out.

https://bit.cloud/aviatorscode2/react-table/charts/elements/tfoot/~code

But if not, here is the implementation of the tfoot in the tfoot.tsx

In the tfoot folder, create a new file called tfoot.module.scss to handle styling

Once you’re done, you can now proceed to creating the main table component.

Composing the table elements into the Table component

Now that you have successfully created the various components that are needed to create the main table components, it’s time to compose those components into the table component. After doing that, you will pass data into the table component to see if it will render its user interface correctly.

But what does compose mean? In simple terms it means to install a component as a dependency in another component, it’s that simple. And you have done that already, remember when you had to go to the node_modules and inside the package.json of a particular component, you got the name of that package and included it in the component that wants to make use of it.

So instead of importing a component like this

import {tbody} from "../elements/tbody"

It will be like this

import {tbody} from "@aviatorscode2/react-table.charts.elements.tbody"

If the component you want to compose is not in your workspace, you first need to install that component, when you install it, it will then be found in your node modules and from there you can import it into any component within your workspace.

In order to create the React table component, you will need to bring in other components that you created earlier into the table component, here is how the dependency graph will look afterwards, showing all the dependency components.
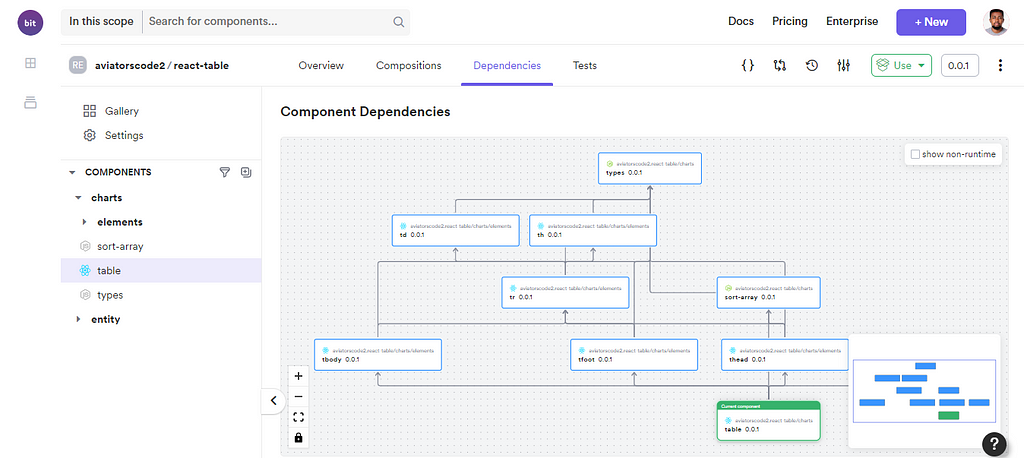
You can view it here. You can also fork this table component using this command below

bit fork aviatorscode2.react-table/charts/table

Let's dive right in, before you proceed to write codes and composing the various components, what is the first thing you need to do? you guessed right, create a table component. by now you should know how to do that already.

bit create react charts/table

In your table component, in the index.ts file. implement the following code, you will have to compose the types component into this file.

For the table.tsx implement the code below

You will need to write some styling for the component, so create a table.module.scss file.

You will need to write a composition for this file, the composition file gives other users an idea of how the table component will render when CSV or matrix data is passed to it. You will write the composition in the table.composition.tsx file

Finally, you will need to write a simple test for your component in the table.spec.ts file.

Chapter 2: Rendering the table component in a React App

If you have gotten to this part of the tutorial, well done. I want you to spice things up a Bit (pun intended). Instead of just creating the React table component and stopping there, I want you to also render the table component in a React app we will be building together so as to see how the table component will be displayed in a typical use case.

So let’s say you are creating a dashboard that requires you to display user data using a table, and then you saw a table component that suits your need. How do you use it in your application? that is what we will be covering in this chapter and a lot more.

Setting up your Bit workspace

The first thing as usual is setting up a Bit workspace, Bit provides you with a React-App workplace template, that you will be using you demonstrate this. so the React-App template will serve as the application you will use to render the table component. Here are the steps to achieve this:

  • Create a folder in any directory of your choice
  • Open that folder in your code editor
  • Run this command
bit new react-app my-react-app --default-scope [bit.cloud-user-name].[scope-name]

Replace [bit.cloud-user-name].[scope-name] with your bit cloud user and remote scope. You will have to create a new scope different from the one you used in the first chapter of this tutorial.
  • cd into the React-App folder cd my-react-app
  • run this command to spin up the react-app on your browser bit run my-app
Import the table component

After setting up your workspace and having bit running on your browser, the next step is to import the table component into your workspace so that you can use it.

So your task here is to import the table component, pass data into it, and have that component render somewhere in your React-App currently running on your browser. So how do you achieve this?

  • Go to the table component you created in the first chapter of this tutorial, and copy the installed command. ( when you want to modify a component and suggest changes on a lane, you import it, but in this case, you are not modifying the table component so you install) .
  • paste and run that import command on your workspace terminal
  • If it runs successfully you will notice that the table component is now present in your workspace.
  • Import the table component into the app.tsx file.
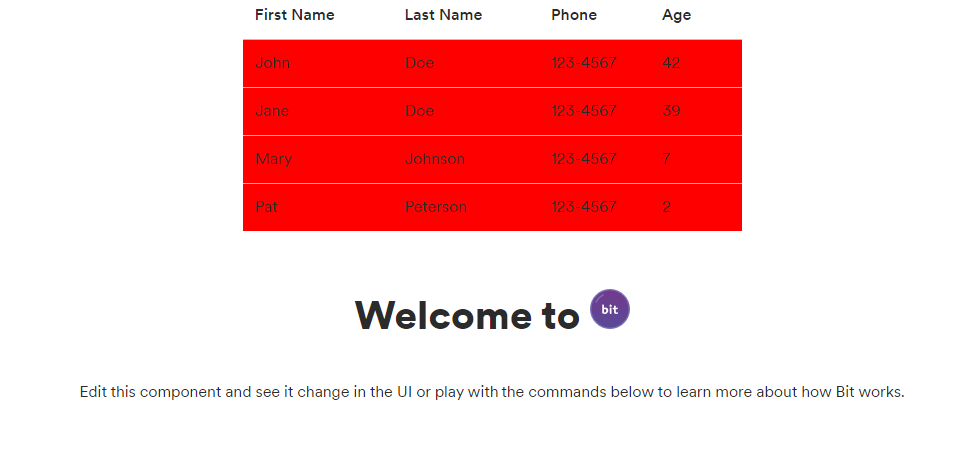
  • After doing that, created a matrix data, or alternatively a csv file and pass it into the table component, here is the code for my implementation below.
  • Save, and go back to the tab where you are running Bit to see how it renders

Let’s move to the next section

Import one of the composing table elements

Let’s add some flavour to this, in this section, you will also import one of the components used in composing the table component. The essence is so that you can see how changing or adding some line of code will affect the table that is currently rendered on the browser.

  • Go to your remote scope and locate the tbody component.
  • Copy the import command for the tbody component.
  • Paste and run the command on your React-App workspace
  • You now have the tbody component on your workspace, inside the tbody.tsx, make some changes to it and see how it changes reflects on the browser.

In this case, I only added a background color to the tbody container.
Lane and Snap

Remember you are assuming that, it was someone else that created the table component and created the tbody. So it means that you can’t update that component since it’s not yours. But what if you make a valuable update to that component and you want the owner of that component to be able to see it and decide if they want to merge it with the original component or not?

All that was described above can be achieved with Bit, after making your changes, all you have to do is create a lane and snap it. you can read more about this feature on Bit Docs.

So to do that, first create a lane. you can create and automatically checkout to that lane using this command

bit lane create tbody

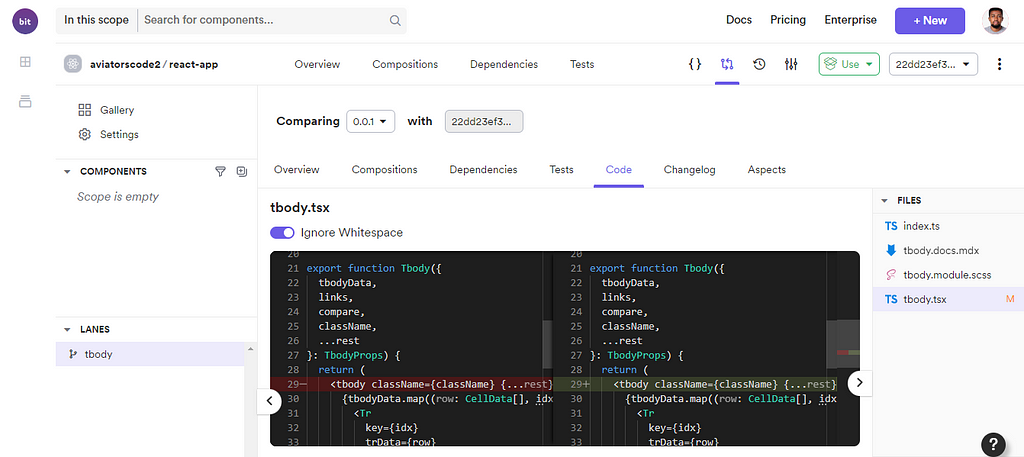
After that runs successfully, you can now snap it

bit snap --message "Added a background color"

The snap command will create a hashed version of the tbody component.

This hashed version of the component cannot be consumed by other developers when they try to import it into their workspace. If they try to, they will get an error similar to this.

You can now export the lane to your remote scope after snapping

bit export

After exporting, you can now review the lane with the component compare feature to see the changes that were made to the original component.
Conclusion

Wow, you have finally come to the end of this tutorial, where you have created a React table component and also rendered that component in a React-App.

You have also been able to cover setting up a bit workspace, creating components, composing components, bit snap and lane, and using components within an application.

This tutorial was mainly to give you a glimpse of what is possible with Bit, and how these processes will be relevant to you when building a personal project and also to your team also.

Try it out and share your experience or any question you might have as you use Bit. Join the Bit community Slack channel and also head to the Documentation to learn

Recommended Posts

  1. How to Create a Composable React App with Bit
  2. Sharing Javascript Code Between Applications with Bit
  3. Creating a Cross-Platform Design System for React and React Native with Bit

How to Build a React Table Component was originally published in Bits and Pieces on Medium, where people are continuing the conversation by highlighting and responding to this story.


This content originally appeared on Bits and Pieces - Medium and was authored by Victor Yakubu


Print Share Comment Cite Upload Translate Updates
APA

Victor Yakubu | Sciencx (2022-09-26T07:02:27+00:00) How to Build a React Table Component. Retrieved from https://www.scien.cx/2022/09/26/how-to-build-a-react-table-component/

MLA
" » How to Build a React Table Component." Victor Yakubu | Sciencx - Monday September 26, 2022, https://www.scien.cx/2022/09/26/how-to-build-a-react-table-component/
HARVARD
Victor Yakubu | Sciencx Monday September 26, 2022 » How to Build a React Table Component., viewed ,<https://www.scien.cx/2022/09/26/how-to-build-a-react-table-component/>
VANCOUVER
Victor Yakubu | Sciencx - » How to Build a React Table Component. [Internet]. [Accessed ]. Available from: https://www.scien.cx/2022/09/26/how-to-build-a-react-table-component/
CHICAGO
" » How to Build a React Table Component." Victor Yakubu | Sciencx - Accessed . https://www.scien.cx/2022/09/26/how-to-build-a-react-table-component/
IEEE
" » How to Build a React Table Component." Victor Yakubu | Sciencx [Online]. Available: https://www.scien.cx/2022/09/26/how-to-build-a-react-table-component/. [Accessed: ]
rf:citation
» How to Build a React Table Component | Victor Yakubu | Sciencx | https://www.scien.cx/2022/09/26/how-to-build-a-react-table-component/ |

Please log in to upload a file.


There are no updates yet.
Click the Upload button above to add an update.

You must be logged in to translate posts. Please log in or register.