
This content originally appeared on DEV Community 👩💻👨💻 and was authored by Nicholas Mendez
The Fall of Heroku
Heroku recently announced they are discontinuing some of their free plan options starting November 28. Free plans widely popularized Heroku as a go-to platform as a service (PaaS) for developers to deploy their applications and APIs. Consequently, many hobbyists, programming courses, and existing Heroku projects are looking to migrate to a comparable alternative. After spending time weighing out the available options , I decided that Render.com was my best option.
Render.com
Render.com provides free plans for deploying static sites , web services with HTTP/2 and full TLS, PostgreSQL databases, and Redis integration. The deployment process is beginner-friendly and the documentation is easy to follow. Upgrading to a starter plan costs less than a monthly Spotify account. Setup an AWS S3 bucket for file storage, and you have yourself a great starting point for any application for no cost.
If you're starting from a ground zero, follow these instructions to setup your environment to ensure the deployment goes smoothly. If not , skip down to "Configuring Your App for Render"
create a Rails API in a new project folder
rails new app-name --api --minimal --database=postgresqlcd into the app and run the following command in terminal
bundle lock --add-platform x86_64-linux --add-platform rubyBuild out an MVP with routes , controllers, models , migrations, and create a database
create a new React application in a client folder inside the root directory
npx create-react-app client --use-npmAdd a request proxy inside the client/package.json file
"proxy": "http://localhost:3000"Update the start script in client/package.json file
"scripts": {

"start": "PORT=4000 react-scripts start"

}
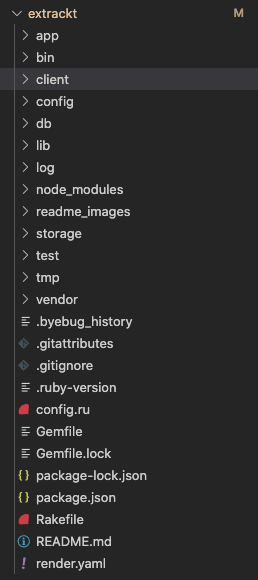
At this point , your file structure should resemble something like this, minus a few optional folders and config files, which we will soon add.
Configuring Your App for Render
Now you're ready to configure your app to deploy it to Render.
Follow the following steps to configure your application for deployment.
1) Sign up for Render.com.
2) Open config/database.yml file and find the production section.
- Modify it to gather the database configuration from the DATABASE_URL environment variable.
- This should be located at the bottom of the file.
production:
  <<: *default
  url: <%= ENV['DATABASE_URL'] %>
3) Open config/puma.rb and make sure the following lines are uncommented.
- Feel free to clear out the file and copy/paste the code block below.
max_threads_count = ENV.fetch("RAILS_MAX_THREADS") { 5 }
min_threads_count = ENV.fetch("RAILS_MIN_THREADS") { max_threads_count }
threads min_threads_count, max_threads_count

port        ENV.fetch("PORT") { 3000 }

environment ENV.fetch("RAILS_ENV") { "development" }

pidfile ENV.fetch("PIDFILE") { "tmp/pids/server.pid" }
workers ENV.fetch("WEB_CONCURRENCY") { 4 }
preload_app!
plugin :tmp_restart
4) Open config/environments/production.rb and enable the public file server when the RENDER environment variable is present.
- This is an existing line of code in the file , which we are modifying.
config.public_file_server.enabled = ENV['RAILS_SERVE_STATIC_FILES'].present? || ENV['RENDER'].present?
5) Create a build script to build out your app when you deploy it.
- This script will automate the build process and update your application every time it is deployed.
- inside your app-name/bin folder , create a file called render-build.sh
- copy/paste the following code into the render-build.sh file
#!/usr/bin/env bash
# exit on error
set -o errexit

bundle install
# clean
rm -rf public
# build
npm install --prefix client && npm run build --prefix client
# migrate
bundle exec rake db:migrate
# postbuild
cp -a client/build/. public/
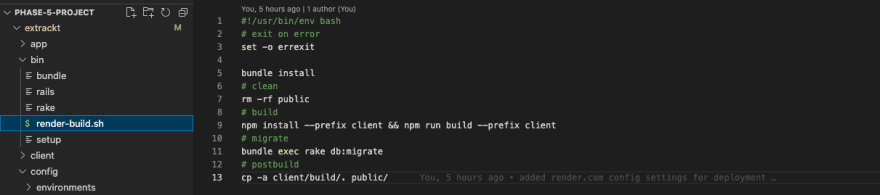
- your file should look like this when you're done
6) Make sure the script executes by running the following command in terminal.
chmod a+x bin/render-build.sh
7) Commit and push these changes to your GitHub Repository
Deploying To Render
8) Inside the root directory , create a file name render.yaml. Copy/paste the following code into the file. Replace app_name with your application's name
databases:
  - name: app_name
    databaseName: app_name
    user: app_name

services:
  - type: web
    name: app_name
    env: ruby
    buildCommand: "./bin/render-build.sh"
    startCommand: "bundle exec puma -C config/puma.rb"
    envVars:
      - key: DATABASE_URL
        fromDatabase:
          name: app_name
          property: connectionString
      - key: RAILS_MASTER_KEY
        sync: false
The file should look like this when you're done.

9) Commit and push these changes to your GitHub Repository
10) Navigate to the Render website and make sure you're logged in. On the Render Dashboard, go to the Blueprint page and click the New Blueprint Instance button. Select your repository (after giving Render the permission to access it, if you haven’t already).
11) Your repository branch should already be set to "main", or select whichever branch you want to deploy. I used my "main" branch.
12) In the deploy window, set the value of the RAILS_MASTER_KEY to the contents of your config/master.key file. Then click Approve.
13) Navigate to your Dashboard and click on the web service you just created.
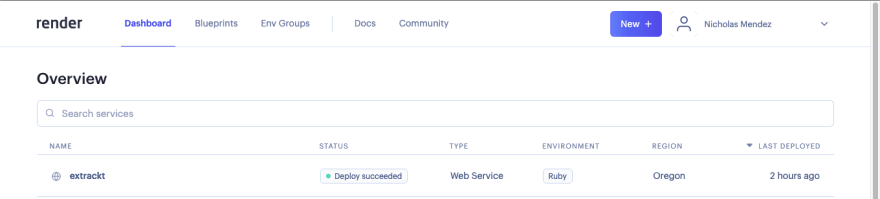
14) Click on the blue Manually Deploy button on the top right hand side and select "clear build cache and deploy"

15) Wait for your app to successfully deploy and click on the generated URL your_app_name.onrender.com at the top.
And that's how you deploy a full-stack React/Rails API application to Render. If you have any questions , feel free to drop a comment below. If you're a Flatiron Student, drop a comment below if this has helped you.
Resources
This content originally appeared on DEV Community 👩💻👨💻 and was authored by Nicholas Mendez
Nicholas Mendez | Sciencx (2022-09-28T01:06:15+00:00) Heroku Alternative: How to Deploy A ReactJS Rails API App to Render. Retrieved from https://www.scien.cx/2022/09/28/heroku-alternative-how-to-deploy-a-reactjs-rails-api-app-to-render/
Please log in to upload a file.
There are no updates yet.
Click the Upload button above to add an update.