This content originally appeared on DEV Community 👩💻👨💻 and was authored by Thodoris Velmachos
Hello, I would like to share the steps you need to follow in order to be able to have a Teleport Access Management deployed on top of Kubernetes, also I would show you how you can authorize users to access your Postgres DB is also deployed as a Statefulset.
Lets Dive In...
- Deploy Teleport with Helm
helm install teleport-cluster teleport/teleport-cluster --create-namespace --namespace=teleport-cluster \
  --set clusterName="<subdomain>.ngcloudops.net" \
  --set acme=true \
  --set acmeEmail="admin@someone.com" --wait
# Verify the pod is running
PROXY_POD=$(kubectl -n teleport-cluster get pod -l app=teleport-cluster -o jsonpath='{.items[0].metadata.name}')

kubectl wait --for=condition=ready pod/$PROXY_POD
- Deploy a test Postgres DB with Helm
 helm upgrade --install test-postgres bitnami/postgresql \
 --values ./values.yaml --wait

# The Values as follows bellow:
---
architecture: standalone
auth:
  postgresPassword: "< VE(RYSecurePAss^1@ >" ## Use a secure pass!
  enablePostgresUser: true
  database: testdb
metrics:
  enabled: true
resources:
  requests:
    cpu: 256m
    memory: 512Mi

# Verify the Database is running
kubectl wait --for=condition=ready pods -l app.kubernetes.io/name=postgresql
Some useful information after the installation has finished
** Please be patient while the chart is being deployed **

PostgreSQL can be accessed via port 5432 on the following DNS names from within your cluster:

    test-postgres-postgresql.default.svc.cluster.local - Read/Write connection

To get the password for "postgres" run:

    export POSTGRES_PASSWORD=$(kubectl get secret --namespace default test-postgres-postgresql -o jsonpath="{.data.postgres-password}" | base64 -d)

To connect to your database run the following command:

    kubectl run test-postgres-postgresql-client --rm --tty -i --restart='Never' --namespace default --image docker.io/bitnami/postgresql:14.5.0-debian-11-r14 --env="PGPASSWORD=$POSTGRES_PASSWORD" \
      --command -- psql --host test-postgres-postgresql -U postgres -d testdb -p 5432

    > NOTE: If you access the container using bash, make sure that you execute "/opt/bitnami/scripts/postgresql/entrypoint.sh /bin/bash" in order to avoid the error "psql: local user with ID 1001} does not exist"

To connect to your database from outside the cluster execute the following commands:

    kubectl port-forward --namespace default svc/test-postgres-postgresql 5432:5432 &
    PGPASSWORD="$POSTGRES_PASSWORD" psql --host 127.0.0.1 -U postgres -d testdb -p 5432
Now we have both deployments up and running, lets configure Teleport.
- Create a admin user in order to login to the console
kubectl -n teleport-cluster exec $PROXY_POD -- tctl users add --roles=editor,access <username>
The above command will provide you with endpoint to setup the password and to enable 2Factor Authentication.
After you login to the console, navigate to Roles(Teams/Roles ) in order to create an access Role for Databases and then assign it to your User.
kind: role
metadata:
  id: 1664541502781088332
  name: dbaccess
spec:
  allow:
    db_labels:
      '*': '*'
    db_names:
    - '*'
    db_users:
    - '*'
  deny:
    logins:
    - guest
  options:
    cert_format: standard
    create_host_user: false
    desktop_clipboard: true
    desktop_directory_sharing: true
    enhanced_recording:
    - command
    - network
    forward_agent: false
    max_session_ttl: 8h0m0s
    pin_source_ip: false
    port_forwarding: true
    record_session:
      default: best_effort
      desktop: true
    ssh_file_copy: true
version: v5
- Next step is to generate the TLS Certificates used to authenticate on the database
kubectl --namespace=teleport-cluster exec -i ${PROXY_POD?} --  tctl auth sign --format=db --host=test-postgres-postgresql.default.svc.cluster.local --out=server --ttl=2190h
# Download the certificates in order to create a secret
kubectl cp teleport-cluster/<pod-name>:server.crt server.crt
kubectl cp teleport-cluster/<pod-name>:server.key server.key
kubectl cp teleport-cluster/<pod-name>:server.cas server.cas

# Create the kubernetes secret
 kubectl create secret generic test-postgres-tls-secret --from-file=./server.crt --from-file=./server.key --from-file=./server.cas

# Ensure the secret contains the correct values (more importantly the keys of the balue pairs)
kubectl get secret/test-postgres-tls-secret -o json | jq '.data | map_values(@base64d)'

# Update Helm Values and Upgrade Postgres Statefulset to be able to enable TLS.

---
architecture: standalone
auth:
  postgresPassword: "< VE(RYSecurePAss^1@ >" ## Use a secure pass!
  enablePostgresUser: true
  database: testdb
metrics:
  enabled: true
resources:
  requests:
    cpu: 256m
    memory: 512Mi

tls:
  ## @param tls.enabled Enable TLS traffic support
  ##
  enabled: true
  ## @param tls.autoGenerated Generate automatically self-signed TLS certificates
  ##
  autoGenerated: false
  ## @param tls.preferServerCiphers Whether to use the server's TLS cipher preferences rather than the client's
  ##
  preferServerCiphers: false
  ## @param tls.certificatesSecret Name of an existing secret that contains the certificates
  ##
  certificatesSecret: "test-postgres-tls-secret"

  certFilename: "server.crt"
  ## @param tls.certKeyFilename Certificate key filename
  ##
  certKeyFilename: "server.key"
  ## @param tls.certCAFilename CA Certificate filename
  ## If provided, PostgreSQL will authenticate TLS/SSL clients by requesting them a certificate
  ## ref: https://www.postgresql.org/docs/9.6/auth-methods.html
  ##

  certCAFilename: "server.cas"
# Verify the Database is running
kubectl wait --for=condition=ready pods -l app.kubernetes.io/name=postgresql
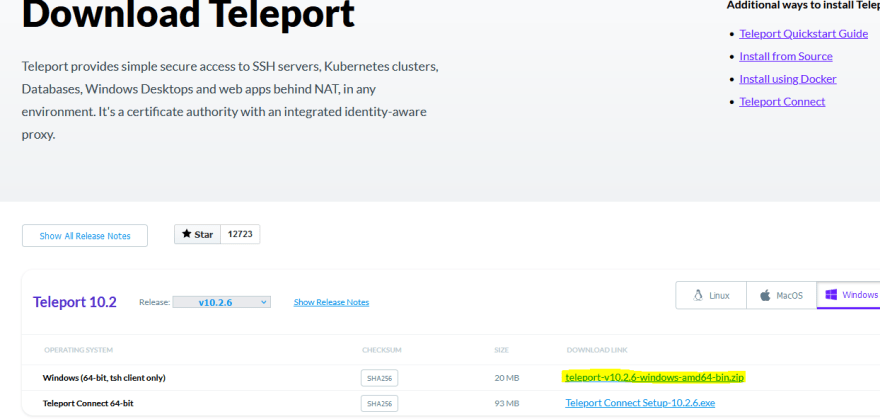
Finally you have to setup / configure the tsh in your computer which it is easy process (Download it from the site: https://goteleport.com/download/)
Connect to your Database via Teleport
tsh login --proxy=<subdomaidn>.ngcloudops.net:443 --auth=local --user=<selected-user>
tsh db login --db-user=postgres --db-name=postgres  test-postgres
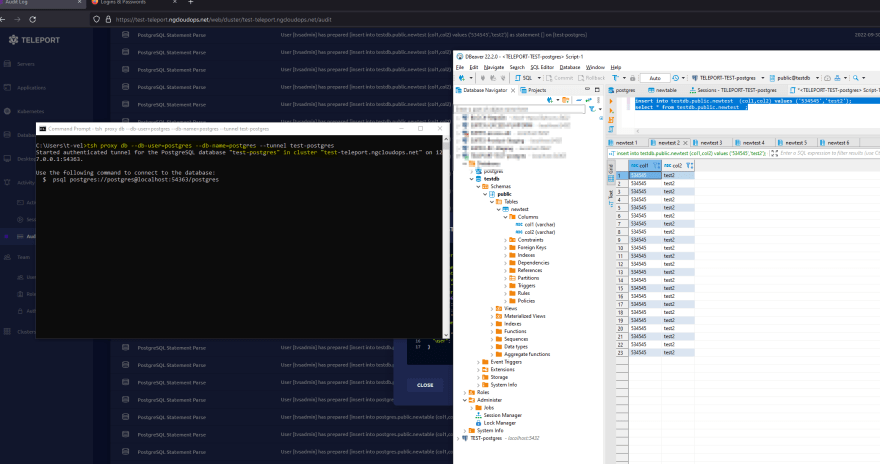
tsh proxy db --db-user=postgres --db-name=postgres --tunnel test-postgres
Voila the Magic Happens!!!
If you are an DevOps you will be very happy when you see that you can go to Audit and search for specific Events
I hope you like the tutorial Happy Teleporting, Cheers!!!
This content originally appeared on DEV Community 👩💻👨💻 and was authored by Thodoris Velmachos
Thodoris Velmachos | Sciencx (2022-09-30T14:55:04+00:00) Teleport Database Access Management.. Retrieved from https://www.scien.cx/2022/09/30/teleport-database-access-management/
Please log in to upload a file.
There are no updates yet.
Click the Upload button above to add an update.


