Generate a GraphQL API For Amazon RDS PostgreSQL With StepZen

Generate a GraphQL API for Amazon RDS PostgreSQL With StepZen

Generate a GraphQL API For Amazon RDS PostgreSQL With StepZen

StepZen is a GraphQL-as-a-Service cloud infrastructure that helps you to build and deploy scalable, secured, and performant GraphQL APIs from different data sources. With StepZen, you can get your GraphQL API up and running from a database (MySQL, PostgreSQL, NoSQL) or an existing REST or GraphQL API.

In this post, you’ll learn how to use StepZen with an Amazon RDS database based on PostgreSQL.

About Amazon (AWS) RDS databases

Amazon Web Services Relational Database System (or AWS RDS PostgreSQL) is a cloud-based relational database system that makes it easier to set up, operate, and scale a relational database in the cloud. Amazon RDS databases offer a high availability for PostgreSQL, making them a perfect fit for usage in high-traffic production environments. Next to high availability, you can easily deploy new databases, get backup and recovery options, plus enhanced security as opposed to running a PostgreSQL database on-premise.

There’s a huge benefit in using AWS RDS together with StepZen, as both services run in the cloud and are optimized for performance. GraphQL APIs created with StepZen are scaled automatically to meet the traffic demands of your API. So you don’t have to worry about your API’s traffic and security because StepZen has got you covered! On the other hand, AWS RDS makes sure your database won’t be a bottleneck when you experience increased traffic from your GraphQL API.

This post will show how to generate a GraphQL API for AWS RDS PostgreSQL using StepZen. Let’s get started!

Set up AWS RDS Setup: Creating and connecting a PostgreSQL database with Amazon’s Relational Database Service (RDS)

We will learn how to create and connect a PostgreSQL database to a cloud-based database management system. This was normally a daunting task, but it is now a straightforward thing to do, all thanks to AWS.

You can create and deploy six relational databases to Amazon Web Service through their RDS web products. The database engines supported by RDS include MariaDB, Oracle Database, MySQL, SQL Server, Amazon Aurora, and of course PostgreSQL.

  • Step 1: Sign up for an Amazon Web Services account
  • Creating an Amazon Web Service account is very easy. All you need to do is go to aws.amazon.com. The landing page of this website is generic, like other sites. All you have to do now is click on “Create AWS account.”
  • Step 2: Create an RDS instance
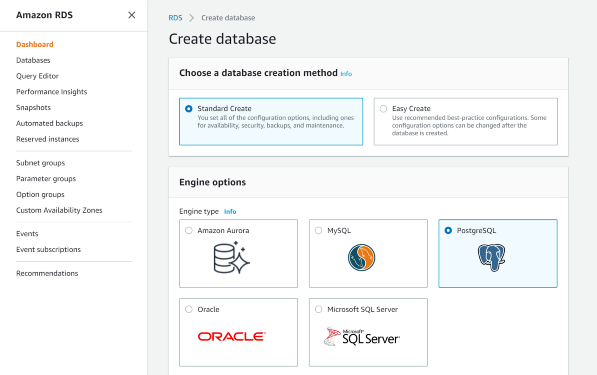
  • After creating your AWS account, go to services located in the upper left corner or footer. Click on it and select RDS. After selecting RDS, you’ll be prompted to select a relational database engine. In this case, we’ll be using the PostgreSQL database engine. You’ll also notice a drop-down menu where you can select the database version. Select the most recent version, or at least the second most recent.
  • Step 3: Configure your Database Instance
  • At this point, you’re expected to give your database instance a name and set a master username and password. The password and username you set here are used for local and cloud database interaction.
Amazon Web Services RDS create instance
  • After selecting “PostgreSQL” as the database engine, you need to configure the database instance size, availability, and storage. Though it’s always good to make personalized choices, you should leave everything in the default settings at this point in AWS database creation, and this is simply because the best choices have already been ticked by default. Finally, click on “Create Database.”
  • We will have to wait for some time so that AWS can finish setting up our newly created database. This process usually doesn’t take more than 10 minutes. And boom! Our database is ready!

We’re done creating our database. It is now time to connect our cloud database to our local PostgreSQL. We’ll be using pgAdmin 4 as our local PostgreSQL development environment.

Integration of pgAdmin and AWS PostgreSQL

Connecting PostgreSQL databases to AWS is straightforward. All you have to do is get the connection credentials readily available at “view connection details”. The only information you require from AWS is the port number, host endpoint, username, and some security group configurations.

  • Step 1: Copy Login Credentials from “Connection Details”.
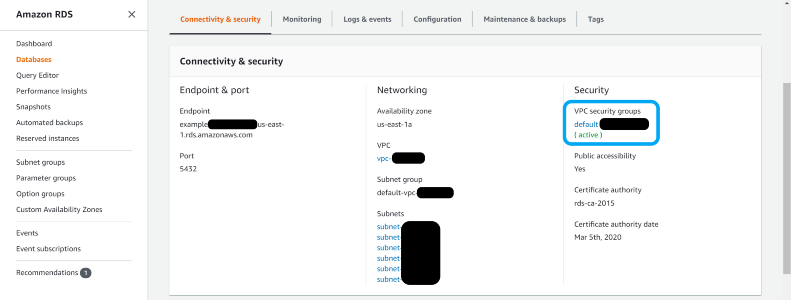
  • All the details you need to connect to the new AWS RDS PostgreSQL database are already available after database instance creation. The next thing to do is to click on the security group bar and look for inbound rules. To avoid disrupting the PostgreSQL-AWS connection, click on the Edit inbound rule and select “Anywhere.”
Amazon Web Services RDS copy credentials
  • Step 2: Download and install pgAdmin or the EDB PostgreSQL Suite
  • You can download pgAdmin from their official website. The same is true for PostgreSQL from EDB. The setup is basically straightforward, and just click on the installer and wait for the program to finish installing.
  • Step 3: Launch pgAdmin and connect to AWS database
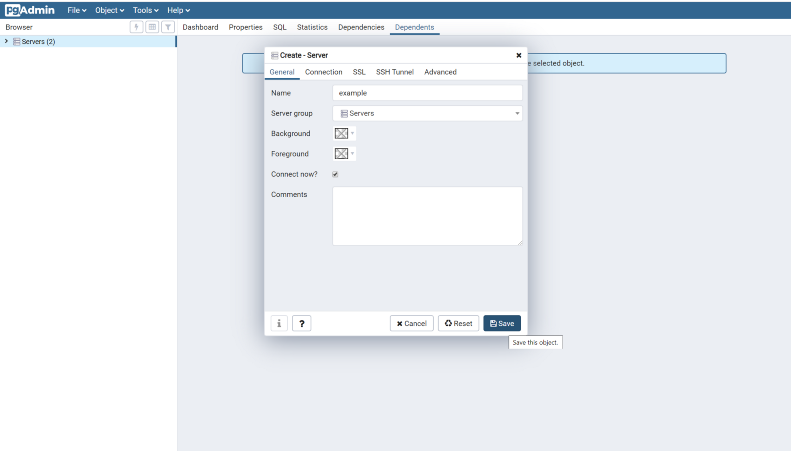
  • Launch the already installed pgAdmin like any application. Right-click on the server object in the pgAdmin and click on “create”.
  • Enter the name of your database instance and click on the connection tab. Enter the login credentials from the AWS RDS console and finally click on “save”.
Set up AWS RDS in pgAdmin
  • Your workspace should have some changes by now and include a schema for the PostgreSQL database.

Let’s continue by adding data to this database in the next section.

Adding Data to AWS RDS using pgAdmin

We’re almost done setting up the database. It’s time to add some data into our AWS RDS database, which we will use to create our GraphQL schema with StepZen. For this, we’ll again be using pgAdmin, which we’ve already set up in the previous section.

You can also use other tools to add data to a PostgreSQL database, for example directly from the command line with psql.

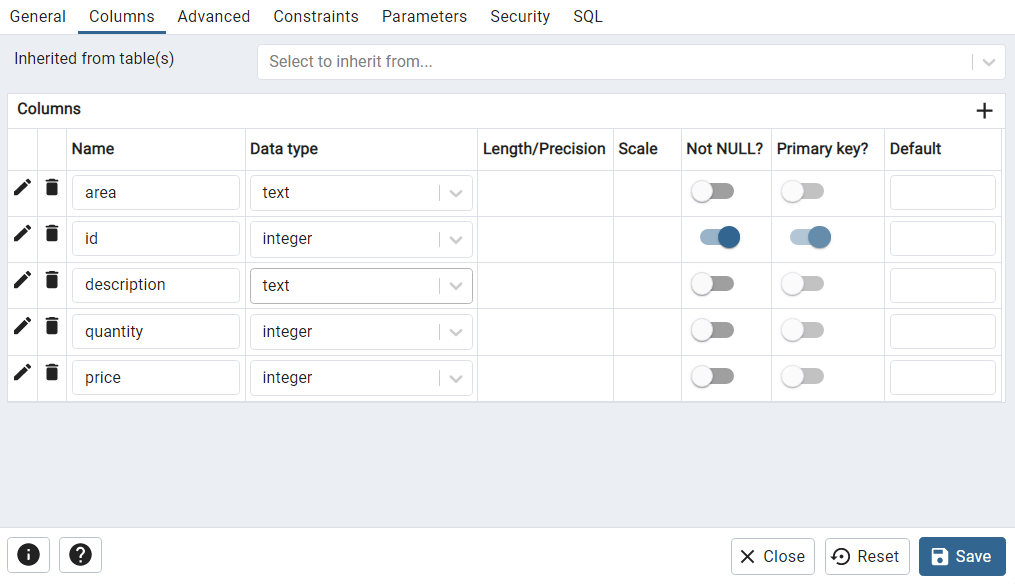
We will use a couple of products as data for our database. Each product has its description, price, quantity, and their unique IDs. To achieve this, we’ll create a table named Products`. With the following columns:

  • area: The area of our table is Products, since we will be storing product data.
  • id: This serves our primary key.
  • description: Which carries the name of our product.
  • quantity: Which shows the quantity of each product.
  • price: This column carries the price of each product.

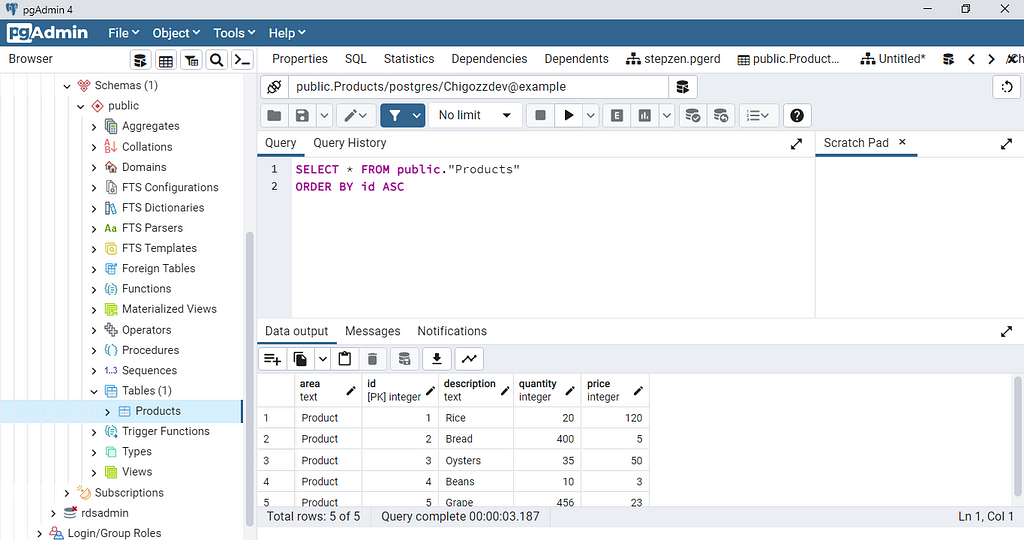
The CSV data below contains the data used in our database columns:

"area","id","description","quantity","price"
"Product",1,"Rice",20,120
"Product",2,"Bread",400,5
"Product",3,"Oysters",35,50
"Product",4,"Beans",10,3
"Product",5,"Grape",456,23

Adding data to our remote database is the same as with local databases, and all you have to do is to locate the “table” in your workspace.

Click on it and then click on “Create a new table”. Create a table name and then click on the column bar. You’re going to add your table columns here.

Set up AWS RDS in pgAdmin

To view and edit table data, just right-click on your table name and select “View and Edit Data.” The image below shows the column and row data we used in our Postgres.

View and edit data in pgAdmin

After creating the table data, click “refresh” to synchronize your primary database. This will ensure that all new changes are pushed to AWS.

Generating a GraphQL Schema from AWS RDS

Now that we have our database set up, it’s time to generate a GraphQL schema. We’ll be using StepZen to generate our GraphQL schema. StepZen is a GraphQL API service that allows you to connect to any data source and generate a GraphQL schema from it that you can deploy to the cloud.

To use StepZen, you need to install the CLI. The installation process of StepZen CLI is not a difficult one. All you have to do is to use the following npm commands:

npm install -g stepzen

Make sure to have Node.js installed on your machine, as it’s used as the runtime for the CLI. After installing the CLI, you can generate a GraphQL schema from your AWS RDS database.

  • Step 1: Create a StepZen account
  • To use StepZen CLI, you must create an account just like we did during the AWS setup. You can create an account here. Then go to your StepZen dashboard, where you can monitor the APIs you’ve deployed and access the login details you need for StepZen’s CLI.
  • You can get your username and API key from your My StepZen — Authentication tab. You’ll need these credentials to log in to the StepZen CLI.
  • Step 2: Login in the StepZen CLI
  • To login to the StepZen CLI, you need to use the following command:
  • stepzen login
  • This will prompt you to enter your username and API key. After entering the credentials, you’ll be logged in to the StepZen CLI.
  • Step 3: Use StepZen to import AWS RDS PostgreSQL
  • StepZen has made it simple to import databases from different sources; AWS RDS PostgreSQL is no exception. All you have to do is to use the commands below. The credentials for Amazon RDS PostgreSQL are the same as the ones we used to connect to pgAdmin.
  • $ stepzen import postgresql ? What would you like your endpoint to be called? (api/product-list) Downloading from StepZen…… done ? What is your host? <AWS_RDS_HOST> ? What is your database name? <PGADMIN_DB_NAME> ? What is the username? <AWS_RDS_DB_USERNAME> ? What is the password? [hidden] <AWS_RDS_DB_PASSWORD>

StepZen will automatically create a GraphQL schema for your PostgreSQL database with a set of sample queries and mutations if the process is successful.

If you open the directory created from the above StepZen commands, you’re going to see the following files:

  • postgresql/index.graphql: This file contains the GraphQL schema for your database.
  • index.graphql: This file contains the index of all GraphQL schemas in case you’re using multiple data sources.
  • config.yaml: This is where our database configuration files are located.
  • stepzen.config.json: This is where our StepZen endpoint is located. You can also see it on your StepZen dashboard.

Let’s deploy these files to the StepZen cloud in the next section.

Deploying the GraphQL Schema to StepZen

So far, we’ve set up a PostgreSQL database using AWS RDS, seeded it with data, and created a GraphQL schema for this database. This means we’re almost done. Deploying the GraphQL API is the last step, and all you have to do is to type the command below.

stepzen start

This will deploy our GraphQL schema to the endpoint in stepzen.config.json. A link will be generated for you at the terminal. The URL for local exploration of your GraphQL API using GraphiQL looks something like:

http://localhost:5001/api/product-list

You can then test your GraphQL API after the link opens. You can also monitor the number of queries and requests made through the endpoint in your StepZen dashboard, the data in the dashboard is updated every day.

The GraphQL schema that we generated from our database has the queries as seen below:

"""
These are some examples of queries generated from the schema. Feel free to modify them or add your own.
"""
type Query {
getProductsList: [Products]
@dbquery(
type: "postgresql"
schema: "public"
table: "Products"
configuration: "postgresql_config"
)
getProducts(id: Int!): Products
@dbquery(
type: "postgresql"
schema: "public"
table: "Products"
configuration: "postgresql_config"
)`
}

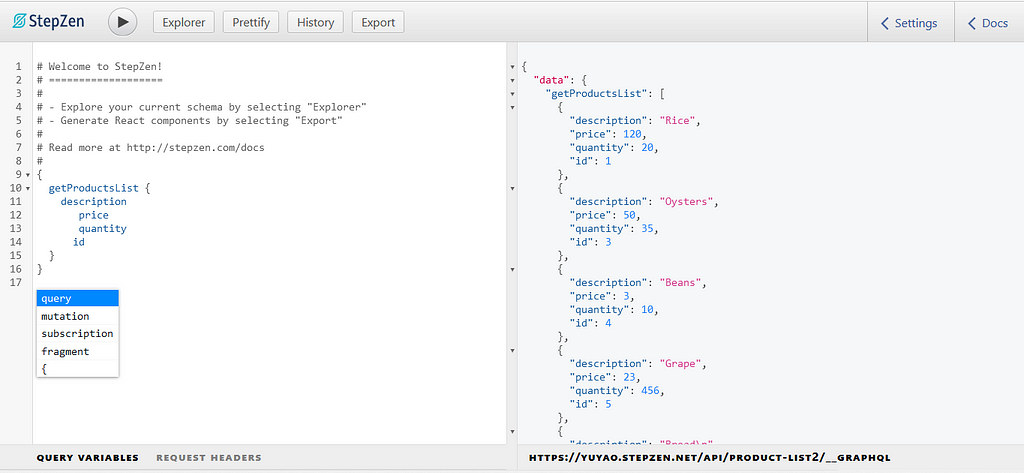
We can query our database using the getProductsList and getProducts queries. The getProductsList query returns all the data in the database, while the getProducts query returns a single row of data from the database.

This code below will query for the description of the products in our database:

{
getProductsList {
description
}
}

The response will be a JSON response that includes the description of the products in our database. You can also request fields like the price or quantity for every product. From GraphiQL, it will look like the following:

StepZen dashboard with your account data

From GraphiQL, you can also explore the GraphQL schema and test out the queries and mutations. You can also use the StepZen GraphQL API to build a frontend application.

Conclusion

This post taught you how to generate a GraphQL API for an AWS RDS PostgreSQL database. We have covered how to set up and connect pgAdmin to AWS RDS PostgreSQL, install StepZen, import data from AWS RDS, and deploy and query StepZen GraphQL API.

Want to learn more about StepZen? Try it out here or ask any question on the Discord here.


Generate a GraphQL API For Amazon RDS PostgreSQL With StepZen was originally published in Level Up Coding on Medium, where people are continuing the conversation by highlighting and responding to this story.


This content originally appeared on Level Up Coding - Medium and was authored by Roy Derks

Generate a GraphQL API for Amazon RDS PostgreSQL With StepZen
Generate a GraphQL API For Amazon RDS PostgreSQL With StepZen

StepZen is a GraphQL-as-a-Service cloud infrastructure that helps you to build and deploy scalable, secured, and performant GraphQL APIs from different data sources. With StepZen, you can get your GraphQL API up and running from a database (MySQL, PostgreSQL, NoSQL) or an existing REST or GraphQL API.

In this post, you’ll learn how to use StepZen with an Amazon RDS database based on PostgreSQL.

About Amazon (AWS) RDS databases

Amazon Web Services Relational Database System (or AWS RDS PostgreSQL) is a cloud-based relational database system that makes it easier to set up, operate, and scale a relational database in the cloud. Amazon RDS databases offer a high availability for PostgreSQL, making them a perfect fit for usage in high-traffic production environments. Next to high availability, you can easily deploy new databases, get backup and recovery options, plus enhanced security as opposed to running a PostgreSQL database on-premise.

There’s a huge benefit in using AWS RDS together with StepZen, as both services run in the cloud and are optimized for performance. GraphQL APIs created with StepZen are scaled automatically to meet the traffic demands of your API. So you don’t have to worry about your API’s traffic and security because StepZen has got you covered! On the other hand, AWS RDS makes sure your database won’t be a bottleneck when you experience increased traffic from your GraphQL API.

This post will show how to generate a GraphQL API for AWS RDS PostgreSQL using StepZen. Let’s get started!

Set up AWS RDS Setup: Creating and connecting a PostgreSQL database with Amazon’s Relational Database Service (RDS)

We will learn how to create and connect a PostgreSQL database to a cloud-based database management system. This was normally a daunting task, but it is now a straightforward thing to do, all thanks to AWS.

You can create and deploy six relational databases to Amazon Web Service through their RDS web products. The database engines supported by RDS include MariaDB, Oracle Database, MySQL, SQL Server, Amazon Aurora, and of course PostgreSQL.

  • Step 1: Sign up for an Amazon Web Services account
  • Creating an Amazon Web Service account is very easy. All you need to do is go to aws.amazon.com. The landing page of this website is generic, like other sites. All you have to do now is click on “Create AWS account.”
  • Step 2: Create an RDS instance
  • After creating your AWS account, go to services located in the upper left corner or footer. Click on it and select RDS. After selecting RDS, you’ll be prompted to select a relational database engine. In this case, we’ll be using the PostgreSQL database engine. You’ll also notice a drop-down menu where you can select the database version. Select the most recent version, or at least the second most recent.
  • Step 3: Configure your Database Instance
  • At this point, you’re expected to give your database instance a name and set a master username and password. The password and username you set here are used for local and cloud database interaction.
Amazon Web Services RDS create instance
  • After selecting “PostgreSQL” as the database engine, you need to configure the database instance size, availability, and storage. Though it’s always good to make personalized choices, you should leave everything in the default settings at this point in AWS database creation, and this is simply because the best choices have already been ticked by default. Finally, click on “Create Database.”
  • We will have to wait for some time so that AWS can finish setting up our newly created database. This process usually doesn’t take more than 10 minutes. And boom! Our database is ready!

We’re done creating our database. It is now time to connect our cloud database to our local PostgreSQL. We’ll be using pgAdmin 4 as our local PostgreSQL development environment.

Integration of pgAdmin and AWS PostgreSQL

Connecting PostgreSQL databases to AWS is straightforward. All you have to do is get the connection credentials readily available at “view connection details”. The only information you require from AWS is the port number, host endpoint, username, and some security group configurations.

  • Step 1: Copy Login Credentials from “Connection Details”.
  • All the details you need to connect to the new AWS RDS PostgreSQL database are already available after database instance creation. The next thing to do is to click on the security group bar and look for inbound rules. To avoid disrupting the PostgreSQL-AWS connection, click on the Edit inbound rule and select “Anywhere.”
Amazon Web Services RDS copy credentials
  • Step 2: Download and install pgAdmin or the EDB PostgreSQL Suite
  • You can download pgAdmin from their official website. The same is true for PostgreSQL from EDB. The setup is basically straightforward, and just click on the installer and wait for the program to finish installing.
  • Step 3: Launch pgAdmin and connect to AWS database
  • Launch the already installed pgAdmin like any application. Right-click on the server object in the pgAdmin and click on “create”.
  • Enter the name of your database instance and click on the connection tab. Enter the login credentials from the AWS RDS console and finally click on “save”.
Set up AWS RDS in pgAdmin
  • Your workspace should have some changes by now and include a schema for the PostgreSQL database.

Let’s continue by adding data to this database in the next section.

Adding Data to AWS RDS using pgAdmin

We’re almost done setting up the database. It’s time to add some data into our AWS RDS database, which we will use to create our GraphQL schema with StepZen. For this, we’ll again be using pgAdmin, which we’ve already set up in the previous section.

You can also use other tools to add data to a PostgreSQL database, for example directly from the command line with psql.

We will use a couple of products as data for our database. Each product has its description, price, quantity, and their unique IDs. To achieve this, we’ll create a table named Products`. With the following columns:

  • area: The area of our table is Products, since we will be storing product data.
  • id: This serves our primary key.
  • description: Which carries the name of our product.
  • quantity: Which shows the quantity of each product.
  • price: This column carries the price of each product.

The CSV data below contains the data used in our database columns:

"area","id","description","quantity","price"
"Product",1,"Rice",20,120
"Product",2,"Bread",400,5
"Product",3,"Oysters",35,50
"Product",4,"Beans",10,3
"Product",5,"Grape",456,23

Adding data to our remote database is the same as with local databases, and all you have to do is to locate the “table” in your workspace.

Click on it and then click on “Create a new table”. Create a table name and then click on the column bar. You’re going to add your table columns here.
Set up AWS RDS in pgAdmin

To view and edit table data, just right-click on your table name and select “View and Edit Data.” The image below shows the column and row data we used in our Postgres.
View and edit data in pgAdmin

After creating the table data, click “refresh” to synchronize your primary database. This will ensure that all new changes are pushed to AWS.

Generating a GraphQL Schema from AWS RDS

Now that we have our database set up, it’s time to generate a GraphQL schema. We’ll be using StepZen to generate our GraphQL schema. StepZen is a GraphQL API service that allows you to connect to any data source and generate a GraphQL schema from it that you can deploy to the cloud.

To use StepZen, you need to install the CLI. The installation process of StepZen CLI is not a difficult one. All you have to do is to use the following npm commands:

npm install -g stepzen

Make sure to have Node.js installed on your machine, as it’s used as the runtime for the CLI. After installing the CLI, you can generate a GraphQL schema from your AWS RDS database.

  • Step 1: Create a StepZen account
  • To use StepZen CLI, you must create an account just like we did during the AWS setup. You can create an account here. Then go to your StepZen dashboard, where you can monitor the APIs you’ve deployed and access the login details you need for StepZen’s CLI.
  • You can get your username and API key from your My StepZen — Authentication tab. You’ll need these credentials to log in to the StepZen CLI.
  • Step 2: Login in the StepZen CLI
  • To login to the StepZen CLI, you need to use the following command:
  • stepzen login
  • This will prompt you to enter your username and API key. After entering the credentials, you’ll be logged in to the StepZen CLI.
  • Step 3: Use StepZen to import AWS RDS PostgreSQL
  • StepZen has made it simple to import databases from different sources; AWS RDS PostgreSQL is no exception. All you have to do is to use the commands below. The credentials for Amazon RDS PostgreSQL are the same as the ones we used to connect to pgAdmin.
  • $ stepzen import postgresql ? What would you like your endpoint to be called? (api/product-list) Downloading from StepZen...... done ? What is your host? <AWS_RDS_HOST> ? What is your database name? <PGADMIN_DB_NAME> ? What is the username? <AWS_RDS_DB_USERNAME> ? What is the password? [hidden] <AWS_RDS_DB_PASSWORD>

StepZen will automatically create a GraphQL schema for your PostgreSQL database with a set of sample queries and mutations if the process is successful.

If you open the directory created from the above StepZen commands, you’re going to see the following files:

  • postgresql/index.graphql: This file contains the GraphQL schema for your database.
  • index.graphql: This file contains the index of all GraphQL schemas in case you're using multiple data sources.
  • config.yaml: This is where our database configuration files are located.
  • stepzen.config.json: This is where our StepZen endpoint is located. You can also see it on your StepZen dashboard.

Let’s deploy these files to the StepZen cloud in the next section.

Deploying the GraphQL Schema to StepZen

So far, we’ve set up a PostgreSQL database using AWS RDS, seeded it with data, and created a GraphQL schema for this database. This means we’re almost done. Deploying the GraphQL API is the last step, and all you have to do is to type the command below.

stepzen start

This will deploy our GraphQL schema to the endpoint in stepzen.config.json. A link will be generated for you at the terminal. The URL for local exploration of your GraphQL API using GraphiQL looks something like:

http://localhost:5001/api/product-list

You can then test your GraphQL API after the link opens. You can also monitor the number of queries and requests made through the endpoint in your StepZen dashboard, the data in the dashboard is updated every day.

The GraphQL schema that we generated from our database has the queries as seen below:

"""
These are some examples of queries generated from the schema. Feel free to modify them or add your own.
"""
type Query {
getProductsList: [Products]
@dbquery(
type: "postgresql"
schema: "public"
table: "Products"
configuration: "postgresql_config"
)
getProducts(id: Int!): Products
@dbquery(
type: "postgresql"
schema: "public"
table: "Products"
configuration: "postgresql_config"
)`
}

We can query our database using the getProductsList and getProducts queries. The getProductsList query returns all the data in the database, while the getProducts query returns a single row of data from the database.

This code below will query for the description of the products in our database:

{
getProductsList {
description
}
}

The response will be a JSON response that includes the description of the products in our database. You can also request fields like the price or quantity for every product. From GraphiQL, it will look like the following:
StepZen dashboard with your account data

From GraphiQL, you can also explore the GraphQL schema and test out the queries and mutations. You can also use the StepZen GraphQL API to build a frontend application.

Conclusion

This post taught you how to generate a GraphQL API for an AWS RDS PostgreSQL database. We have covered how to set up and connect pgAdmin to AWS RDS PostgreSQL, install StepZen, import data from AWS RDS, and deploy and query StepZen GraphQL API.

Want to learn more about StepZen? Try it out here or ask any question on the Discord here.


Generate a GraphQL API For Amazon RDS PostgreSQL With StepZen was originally published in Level Up Coding on Medium, where people are continuing the conversation by highlighting and responding to this story.


This content originally appeared on Level Up Coding - Medium and was authored by Roy Derks


Print Share Comment Cite Upload Translate Updates
APA

Roy Derks | Sciencx (2022-10-15T16:32:36+00:00) Generate a GraphQL API For Amazon RDS PostgreSQL With StepZen. Retrieved from https://www.scien.cx/2022/10/15/generate-a-graphql-api-for-amazon-rds-postgresql-with-stepzen/

MLA
" » Generate a GraphQL API For Amazon RDS PostgreSQL With StepZen." Roy Derks | Sciencx - Saturday October 15, 2022, https://www.scien.cx/2022/10/15/generate-a-graphql-api-for-amazon-rds-postgresql-with-stepzen/
HARVARD
Roy Derks | Sciencx Saturday October 15, 2022 » Generate a GraphQL API For Amazon RDS PostgreSQL With StepZen., viewed ,<https://www.scien.cx/2022/10/15/generate-a-graphql-api-for-amazon-rds-postgresql-with-stepzen/>
VANCOUVER
Roy Derks | Sciencx - » Generate a GraphQL API For Amazon RDS PostgreSQL With StepZen. [Internet]. [Accessed ]. Available from: https://www.scien.cx/2022/10/15/generate-a-graphql-api-for-amazon-rds-postgresql-with-stepzen/
CHICAGO
" » Generate a GraphQL API For Amazon RDS PostgreSQL With StepZen." Roy Derks | Sciencx - Accessed . https://www.scien.cx/2022/10/15/generate-a-graphql-api-for-amazon-rds-postgresql-with-stepzen/
IEEE
" » Generate a GraphQL API For Amazon RDS PostgreSQL With StepZen." Roy Derks | Sciencx [Online]. Available: https://www.scien.cx/2022/10/15/generate-a-graphql-api-for-amazon-rds-postgresql-with-stepzen/. [Accessed: ]
rf:citation
» Generate a GraphQL API For Amazon RDS PostgreSQL With StepZen | Roy Derks | Sciencx | https://www.scien.cx/2022/10/15/generate-a-graphql-api-for-amazon-rds-postgresql-with-stepzen/ |

Please log in to upload a file.


There are no updates yet.
Click the Upload button above to add an update.

You must be logged in to translate posts. Please log in or register.