This content originally appeared on Telerik Blogs and was authored by Assis Zang
Despite the critics of monoliths, they can be the best option when starting a new project. Check out in this post how to create a good monolith in ASP.NET Core using the Modular Monolith approach.
When working with large applications, it is very common to find monoliths that are difficult to maintain—perhaps due to the limitation of the time they were created or the way they were architected. In any case, this and other reasons have given monoliths a bad reputation, which has opened up a great opportunity for the popularization of microservices.
But even nowadays, the use of monoliths is still very much justifiable, mainly due to its low complexity. Read below how to create a quality monolith using the modular monolith approach.
The Bad Reputation of Monoliths
Currently, the word “monolith” has aroused different feelings among developers—some defend its use, others not so much. Usually, when we talk about monoliths, something bad and outdated comes to our mind, but the truth is that monoliths can sometimes be the best choice when building an application.
Much of the bad reputation of monoliths is due to the fact that they were one of the first organized ways to create software. They became popular at a time when programming languages were still in their infancy and many methodologies were not yet well established. The result of this is that keeping a monolith working correctly was a lot of work—after all, even in scenarios where its use was not ideal, it was necessary because there was no other alternative.
Monolith vs. Microservices
When the term “microservices” appeared for the first time (May 2011 in a workshop near Venice), it generated a great repercussion in the world of technology, as it was an alternative to the old monolith and promised to be the solution to all the problems that the monolith presented. So microservices became popular and monoliths were left out. But despite solving many problems, microservices have some disadvantages compared to monoliths.
For this and other reasons, Martin Fowler, one of the biggest promoters of the term “microservice,” created a manifesto called Monolith First—where he demonstrates that, after hearing several reports, he realized that successful microservices started with a monolith.
Martin claims that when we create an application we have a lot of uncertainties because we don’t know how useful it will be for users—so the best option is to start with the simplest and fastest way, which would be through a monolith.
Another problem pointed out by Martin is that it is difficult to establish good and stable boundaries between newly created microservices, so any necessary refactoring ends up being much more difficult than if it were done in a monolith.
Is Possible To Create Good Monoliths?
Certainly. We currently don’t have many of the restrictions that existed in the past. Programming languages and their frameworks have evolved and there is a lot of study and analysis around what really works and what should be avoided.
A widely used approach to creating good monoliths is the modular monolith.
The Modular Monolith
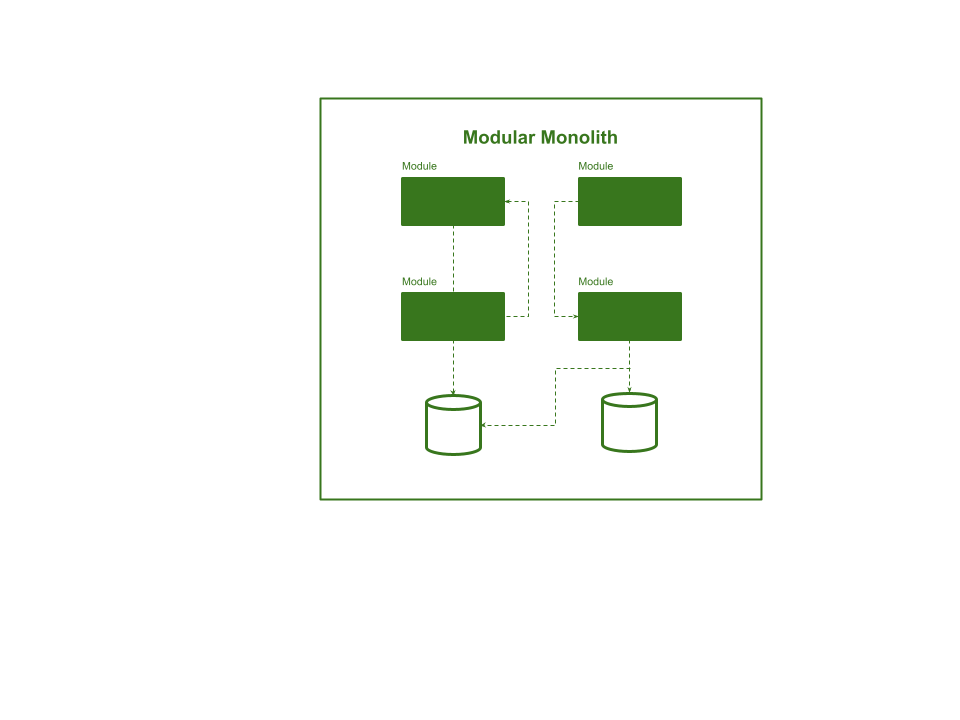
A modular monolith is a development approach where the focus is to create and deploy an application in a monolith format, but it is divided into independent modules. With this approach, the dependencies between modules are drastically reduced, allowing each module to be changed without affecting the others.
Some of the advantages of modular monoliths include the reuse of components, the organization of dependencies, agility to develop new modules, and low complexity compared to microservices.
Structure of a modular monolith:

Creating a Modular Monolith in .NET 6
In this article, I will demonstrate how to create a modular monolith. A point that must be considered is that there is no standard for the organization of folders. You can use the nomenclature and organization that you think is best—the important thing is that the modules are separated from each other.
You can access the complete source code of the project at this link.
About the Scenario
The scenario to build the application will be around an application that will confirm the payment of an invoice from a club member.
The first module (Payment Confirmation) will receive a request with the club member’s data and the code of the invoice. It will verify in a fake method that the payment was approved (in real scenarios this is done in a payment gateway; as this is not the focus of the article, this part will be done with a simple fake method). If the payment is approved, a record with the data received with the status of “paid” will be recorded in a table. Otherwise, the status “pending” will be recorded.
The second module (Resend Payment Confirmation) will search the database for invoices with “pending” status and will try to verify payment approval. If successful, it will update the record to “paid” status.
Creating the Solution
First, let’s create the Solution where the project structure will be. So, in Visual Studio:
- Choose “Create a new Project”
- Select “Blank Solution”
- Put the name “ClubMember”
- Click “Create”
Creating the First Module—Payment Confirmation
Implementing the Domain Layer
The first module will be responsible for containing the endpoints, business rules and access to the database.
So, in the Solution project, create a new folder called “Modules” and inside it a folder called “PaymentConfirmation.”
Inside the PaymentConfirmation folder, add the following project of type “Class Library”:
- ClubMember.PaymentConfirmation.Domain
In Visual Studio, just follow the steps below:
- Right-click on the PaymentConfirmation folder
- Add
- New Project…
- Choose “Class Library (C#)”
- Name
- Choose “.NET 6 LTS”
- Create
The domain layer will contain the classes that will reflect the database (i.e., the entities). So, inside the project “ClubMember.PaymentConfirmation.Domain” add a new folder called “Entities,” and inside it add the classes below:
- BaseEntity
namespace ClubMember.PaymentConfirmation.Domain.Entities;
public class BaseEntity
{
    public Guid Id { get; set; } = Guid.NewGuid();
    public DateTime CreatedDate { get; set; } = DateTime.Now;
}
- MemberInvoice
namespace ClubMember.PaymentConfirmation.Domain.Entities;
public class MemberInvoice : BaseEntity
{
    public MemberInvoice(string? userId, string? invoiceCode, string? status)
    {
        UserId = userId;
        InvoiceCode = invoiceCode;
        Status = status;
    }

    public string? UserId { get; set; }
    public string? InvoiceCode { get; set; }
    public string? Status { get; set; }
}
Implementing the Infrastructure Layer
The infrastructure layer will be responsible for containing the database access classes—that is, the context classes that implement the Entity Framework functions. This is where the migrations will be generated to create the database and tables creation scripts.
So, inside the PaymentConfirmation folder add the following project of type “Class Library”:
- ClubMember.PaymentConfirmation.Infrastructure
After creating the project, double-click on it and add the following dependencies:
<ItemGroup>
    <PackageReference Include="Microsoft.EntityFrameworkCore" Version="6.0.7" />
    <PackageReference Include="Microsoft.EntityFrameworkCore.Design" Version="6.0.7">
        <PrivateAssets>all</PrivateAssets>
        <IncludeAssets>runtime; build; native; contentfiles; analyzers; buildtransitive</IncludeAssets>
    </PackageReference>
    <PackageReference Include="Pomelo.EntityFrameworkCore.MySql" Version="6.0.1" />
</ItemGroup>
Then, inside the project “ClubMember.PaymentConfirmation.Infrastructure” add a new folder called “DBContext,” and inside it add the classes below:
- PaymentConfirmationDBContext
using ClubMember.PaymentConfirmation.Domain.Entities;
using Microsoft.EntityFrameworkCore;

namespace ClubMember.PaymentConfirmation.Infrastructure.DBContext;

public class PaymentConfirmationDBContext : DbContext
{
    protected override void OnConfiguring(DbContextOptionsBuilder optionsBuilder)
    {
        string connection = "server=localhost; database=clubMember; user=YOURUSER; password=YOURPASSWORD";

        optionsBuilder.UseMySql(connection, ServerVersion.AutoDetect(connection));
    }

    public DbSet<MemberInvoice>? MemberInvoices { get; set; }
}
Replace “YOURUSER” with your MySQL user and “YOURPASSWORD” with your MySQL password.
Running EF Core Commands
To run the EF Core commands, the .NET CLI tools must be installed. Otherwise, the commands will result in an error.
The first command will create a migration called InitialModel and the second will have EF create a database and schema from the migration.
More information about migrations is available in Microsoft’s official documentation.
You can run the commands below in a project root terminal.
dotnet ef migrations add InitialModeldotnet ef database update
Alternatively, run the following commands from the Package Manager Console in Visual Studio:
Add-Migration InitialModelUpdate-Database
If the credentials you entered in the connection string are correct, after running the EF commands, a folder called “Migrations” will be created and the scripts in it will be executed. Thus, the “clubmember” database and the “memberinvoice” table will be created.
Implementing the Application Layer
The application layer will contain the service classes, business rules and contracts that will be used by the API.
So, inside the PaymentConfirmation folder add the following project of type “Class Library”:
- ClubMember.PaymentConfirmation.Application
After creating the project, double-click on it and add the following dependencies:
  <ItemGroup>
    <PackageReference Include="Newtonsoft.Json" Version="13.0.1" />
  </ItemGroup>
Inside the project “ClubMember.PaymentConfirmation.Application” create a new folder called “Contracts,” and inside it create two new folders: “Request” and “Response.”
In the “Request” folder add the class below:
- PaymentConfirmationRequest
namespace ClubMember.PaymentConfirmation.Application.Contracts.Request;
public class PaymentConfirmationRequest
{
    public PaymentConfirmationRequest(string? userId, string? invoiceCode)
    {
        UserId = userId;
        InvoiceCode = invoiceCode;
    }

    public string? UserId { get; set; }
    public string? InvoiceCode { get; set; }
}
In the “Response” folder add the class below:
- PendingInvoiceResponse
namespace ClubMember.PaymentConfirmation.Application.Contracts.Response;
public class PendingInvoiceResponse
{
    public PendingInvoiceResponse(string? userId, string? invoiceCode)
    {
        UserId = userId;
        InvoiceCode = invoiceCode;
    }

    public string? UserId { get; set; }
    public string? InvoiceCode { get; set; }
}
Still in the “Contracts” folder create a new folder called “Shared,” and inside it a new folder called “Response.” Inside that, add the class below:
- GenericResponse
namespace ClubMember.PaymentConfirmation.Application.Contracts.Shared.Response;
public class GenericResponse
{
    public bool Success { get; set; }
    public string? ResultMessage { get; set; }

    public GenericResponse(bool success, string? resultMessage)
    {
        Success = success;
        ResultMessage = resultMessage;
    }

    public static GenericResponse Result(bool success, string resultMessage) =>
        new GenericResponse(success, resultMessage);
}
Then, still in the project “ClubMember.PaymentConfirmation.Application,” create a new folder called “Interfaces.” Inside it, create the following interface:
- IPaymentConfirmationService
using ClubMember.PaymentConfirmation.Application.Contracts.Request;
using ClubMember.PaymentConfirmation.Application.Contracts.Response;
using ClubMember.PaymentConfirmation.Application.Contracts.Shared.Response;

namespace ClubMember.PaymentConfirmation.Application.Interfaces;
public interface IPaymentConfirmationService
{
    public Task<GenericResponse> PaymentConfirmation(PaymentConfirmationRequest request);
    public Task<bool> PaymentConfirmationVerify();
    public Task<bool> RamdomPaymentVerify();
    public Task<GenericResponse> ResendPendingInvoices(PaymentConfirmationRequest request);
    public Task<List<PendingInvoiceResponse>> GetAllPendingInvoices();
}
Then, create a new folder called “Services,” and inside it create the following class:
- PaymentConfirmationService
using ClubMember.PaymentConfirmation.Application.Contracts.Request;
using ClubMember.PaymentConfirmation.Application.Contracts.Response;
using Microsoft.Extensions.Logging;
using Newtonsoft.Json;
using System.Text;

namespace ClubMember.ResendPaymentConfirmation.Application.Services;
public class ResendPaymentConfirmationService
{
    private readonly HttpClient _httpClient;
    private readonly ILogger<ResendPaymentConfirmationService> _logger;

    public ResendPaymentConfirmationService(HttpClient httpClient, ILogger<ResendPaymentConfirmationService> logger)
    {
        _httpClient = httpClient;
        _logger = logger;
    }

    public async Task<bool> ResendPaymentConfirmation()
    {
        try
        {
            const string uriPendingInvoices = "/PaymentConfirmation/pending-invoices";

            var responseString = await _httpClient.GetStringAsync(uriPendingInvoices);

            var pendingInvoices = JsonConvert.DeserializeObject<List<PendingInvoiceResponse>>(responseString);

            if (!pendingInvoices.Any())
            {
                _logger.LogInformation("No records to process");
                return true;
            }

            var requestList = pendingInvoices?.Select(p => new PaymentConfirmationRequest(p.UserId, p.InvoiceCode)).ToList();

            const string uriUpdateInvoices = "PaymentConfirmation/update-member-invoice";

            bool success = true;

            foreach (var invoice in pendingInvoices)
            {
                var requestItem = new PaymentConfirmationRequest(invoice.UserId, invoice.InvoiceCode);

                var dataAsString = JsonConvert.SerializeObject(requestItem);

                var content = new StringContent(dataAsString, Encoding.UTF8, "application/json");

                var result  = _httpClient.PutAsync(uriUpdateInvoices, content).Result;

                success = result.IsSuccessStatusCode;
            }
            return success;
        }
        catch (Exception ex)
        {
            _logger.LogError($"Error IN ResendPaymentConfirmation - {ex.Message}");
            return false;
        }
    }
}
The above methods randomly check whether a payment is pending or paid and then record it in the database.
Implementing the API Layer
The API layer will contain the endpoints responsible for executing the methods created in the service class in the application layer.
So, in the Application project (ClubMember) create a new folder called “API,” and inside it create a new “ASP.NET Core Web API” project in .NET 6 and name it “PaymentConfirmation.API.”
In the “Controllers” folder add the following controller:
- PaymentConfirmationController
using ClubMember.PaymentConfirmation.Application.Contracts.Request;
using ClubMember.PaymentConfirmation.Application.Interfaces;
using Microsoft.AspNetCore.Mvc;

namespace PaymentConfirmation.API.Controllers
{
    [ApiController]
    [Route("[controller]")]
    public class PaymentConfirmationController : ControllerBase
    {
        private readonly IPaymentConfirmationService _paymentConfService;

        public PaymentConfirmationController(IPaymentConfirmationService paymentConfService)
        {
            _paymentConfService = paymentConfService;
        }

        [HttpPost("resend-pending-invoices")]
        public async Task<ActionResult> PaymentConfirmation(PaymentConfirmationRequest request)
        {
            var result = await _paymentConfService.PaymentConfirmation(request);

            return result.Success == true ? Ok(result) : BadRequest(result);
        }

        [HttpPut("resend-pending-invoices")]
        public async Task<ActionResult> ResendPendingInvoices(PaymentConfirmationRequest request)
        {
            var result = await _paymentConfService.ResendPendingInvoices(request);

            return result is null ? Ok(result) : BadRequest(result);
        }

        [HttpGet("pending-invoices")]
        public async Task<ActionResult> GetAllPendingInvoices()
        {
            var result = await _paymentConfService.GetAllPendingInvoices();

            return result is not null ? Ok(result) : NotFound();
        }
    }
}
And in the Program.cs file, add the code below to make the dependency injection of the service and context classes:
builder.Services.AddDbContext<PaymentConfirmationDBContext>();
builder.Services.AddScoped<IPaymentConfirmationService, PaymentConfirmationService>();
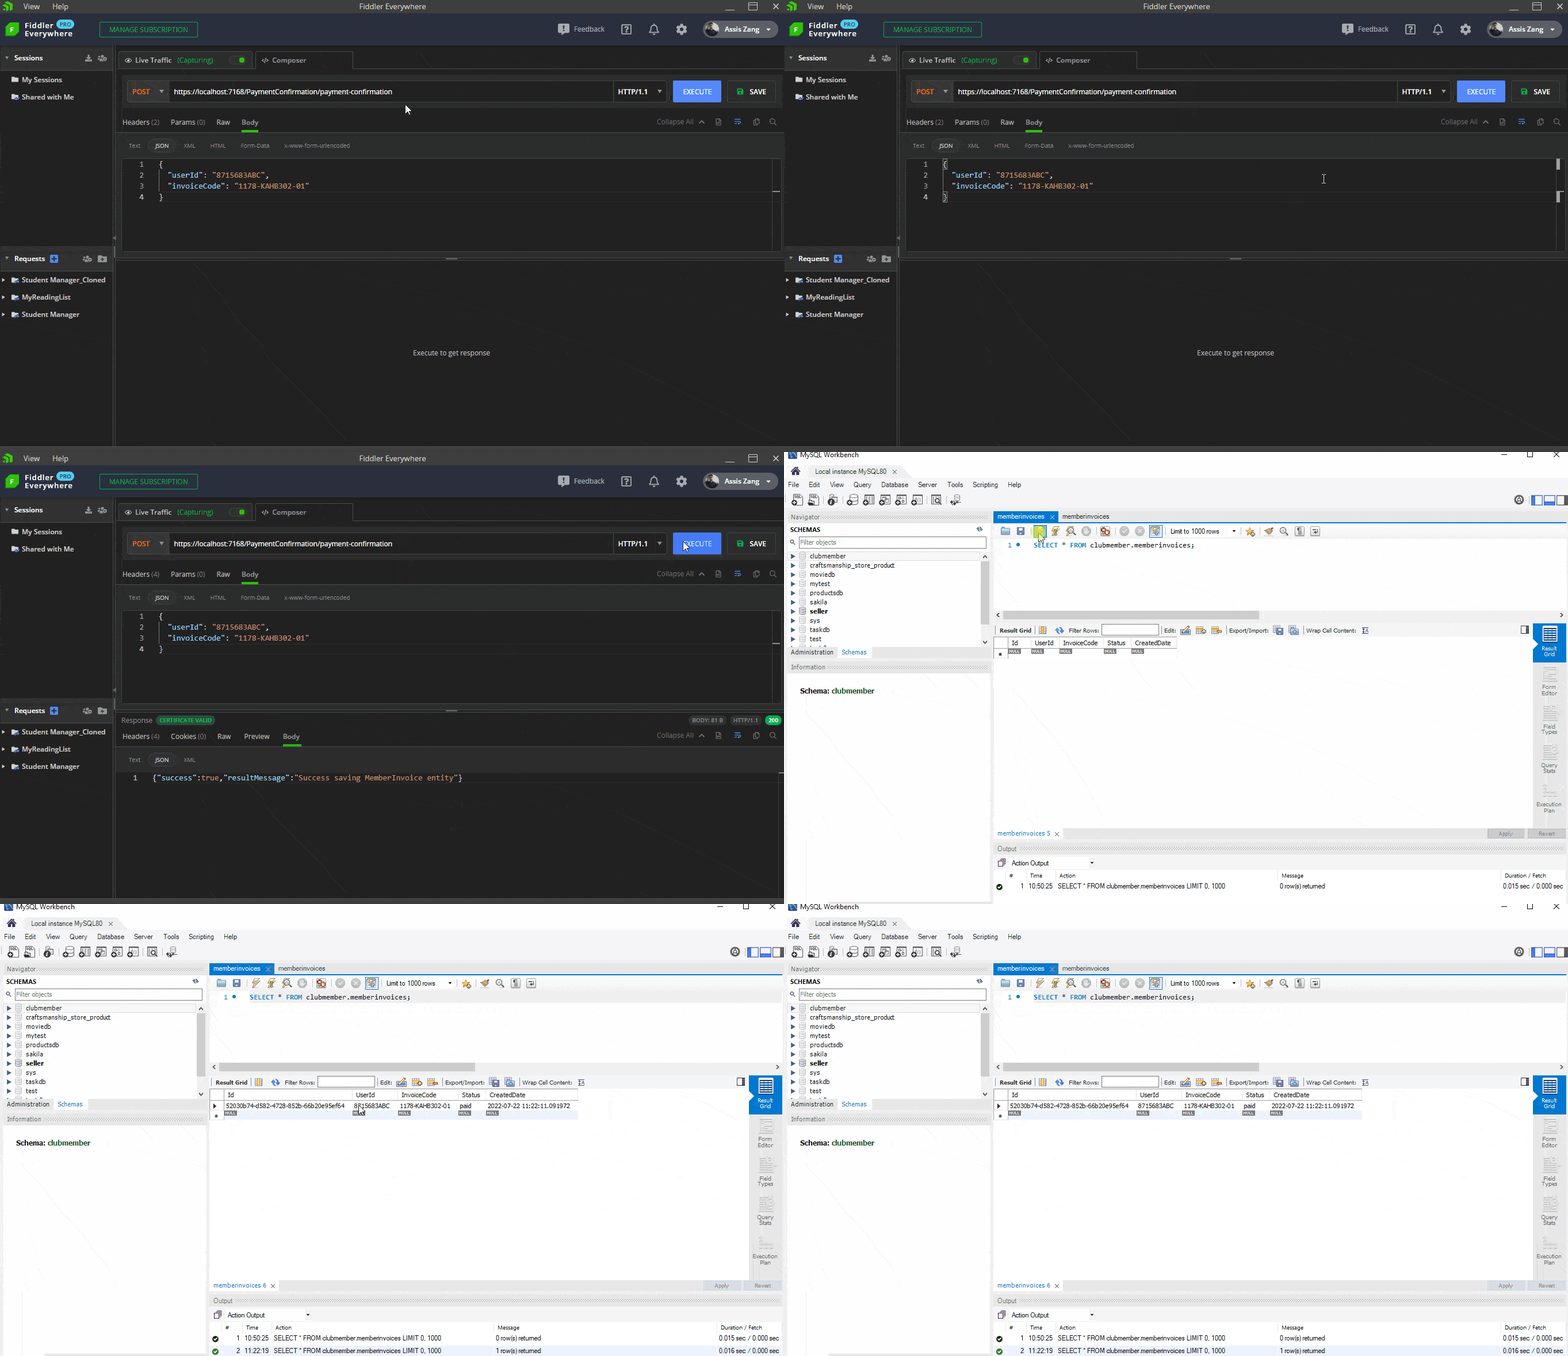
Finally, the Confirmation module is ready and can be tested. I will use Fiddler Everywhere—a secure and modern web debugging proxy—to access the endpoints, and MySQL Workbench to verify the database. In this way, we can guarantee that the application is working as expected.
The GIF below shows a request to the endpoint, where the user and invoice data are sent, then a check is made to generate a “paid” or pending” status and is saved in the MySQL database.
The other endpoints will be used by the second module that we will create next.
Creating the Second Module—Resend Payment Confirmation
The second module will be a worker service that, at each time interval, will make a request on the “/pending-invoices” endpoint to fetch the invoices with pending status. Then sends these invoices to the “/resend-pending-invoices” endpoint, and if it gets a “paid” status it will update the record with that status.
So, inside the “Modules” folder add a new folder called “ResendPaymentConfirmation,” and inside it add a new “Class Library”:
- ClubMember.ResendPaymentConfirmation.Application
After creating the project, double-click on it and add the following dependencies:
  <ItemGroup>
    <PackageReference Include="Newtonsoft.Json" Version="13.0.1" />
  </ItemGroup>
And inside “ClubMember.ResendPaymentConfirmation.Application” project, add a new folder called “Services” and inside it add the following class:
- ResendPaymentConfirmationService
using ClubMember.PaymentConfirmation.Application.Contracts.Request;
using ClubMember.PaymentConfirmation.Application.Contracts.Response;
using Microsoft.Extensions.Logging;
using Newtonsoft.Json;
using System.Text;

namespace ClubMember.ResendPaymentConfirmation.Application.Services;
public class ResendPaymentConfirmationService
{
    private readonly HttpClient _httpClient;
    private readonly ILogger<ResendPaymentConfirmationService> _logger;

    public ResendPaymentConfirmationService(HttpClient httpClient, ILogger<ResendPaymentConfirmationService> logger)
    {
        _httpClient = httpClient;
        _logger = logger;
    }

    public async Task<bool> ResendPaymentConfirmation()
    {
        try
        {
            var pendingInvoices = GetPendingIvoices().Result;

            if (!pendingInvoices.Any())
            {
                _logger.LogInformation("No records to process");
                return true;
            }
            return await ExecuteResendPendingInvoices(pendingInvoices);
        }
        catch (Exception ex)
        {
            _logger.LogError($"Error IN ResendPaymentConfirmation - {ex.Message}");
            return false;
        }
    }

    public async Task<List<PendingInvoiceResponse>> GetPendingIvoices()
    {
        const string uriPendingInvoices = "/PaymentConfirmation/pending-invoices";

        var responseString = await _httpClient.GetStringAsync(uriPendingInvoices);

        return JsonConvert.DeserializeObject<List<PendingInvoiceResponse>>(responseString);
    }

    public async Task<bool> ExecuteResendPendingInvoices(List<PendingInvoiceResponse> pendingInvoices)
    {
        bool success = true;

        foreach (var invoice in pendingInvoices)
        {
            const string uriUpdateInvoices = "PaymentConfirmation/resend-pending-invoices";
            var requestItem = new PaymentConfirmationRequest(invoice.UserId, invoice.InvoiceCode);

            var dataAsString = JsonConvert.SerializeObject(requestItem);

            var content = new StringContent(dataAsString, Encoding.UTF8, "application/json");

            var result = await _httpClient.PutAsync(uriUpdateInvoices, content);

            success = result.IsSuccessStatusCode;
        }
        return success;
    }
}
The above method executes the resending of the outstanding invoices. To do it, it makes a request on the “/pending-invoices” endpoint to fetch the invoices with pending status, then sends those invoices to the “/resend-pending-invoices” endpoint and returns a variable if it was successful or not.
The last step is to create the worker service that will use the methods created earlier. So, inside the “ResendPaymentConfirmation” folder create a new project of type “Worker Service” and name “ClubMember.ResendPaymentConfirmation.WorkerService.”
After creating the project, double-click on it and add the following dependencies:
  <ItemGroup>
    <PackageReference Include="Microsoft.Extensions.Hosting" Version="6.0.1" />
<PackageReference Include="Microsoft.Extensions.Http" Version="6.0.0" />
  </ItemGroup>
So, in the Program.cs archive, bellow AddHostedService method add the following code:
services.AddHttpClient<ResendPaymentConfirmationService>(client =>
        {
            client.BaseAddress = new Uri("https://localhost:[LOCALPORTNUMBER/");
        });
Replace “LOCALPORTNUMBER” with the number that starts the API project.
And finally, replace the code in the “Worker.cs” file with the code below:
using ClubMember.ResendPaymentConfirmation.Application.Services;

namespace ClubMember.ResendPaymentConfirmation.WorkerService
{
    public class Worker : BackgroundService
    {
        private readonly ILogger<Worker> _logger;
        private readonly ResendPaymentConfirmationService _resendService;

        public Worker(ILogger<Worker> logger, ResendPaymentConfirmationService resendService)
        {
            _logger = logger;
            _resendService = resendService;
        }

        protected override async Task ExecuteAsync(CancellationToken stoppingToken)
        {
            while (!stoppingToken.IsCancellationRequested)
            {
                _logger.LogInformation("Worker running at: {time}", DateTimeOffset.Now);

                bool result = await _resendService.ResendPaymentConfirmation();

                _logger.LogInformation($"End process - Success: {result}");

                await Task.Delay(5000, stoppingToken);
            }
        }
    }
}
The code above executes a call to the service method “ResendPaymentConfirmation,” which in turn executes calls to the API endpoints. Every 5 seconds the worker will run and execute the calls.
Testing the Application
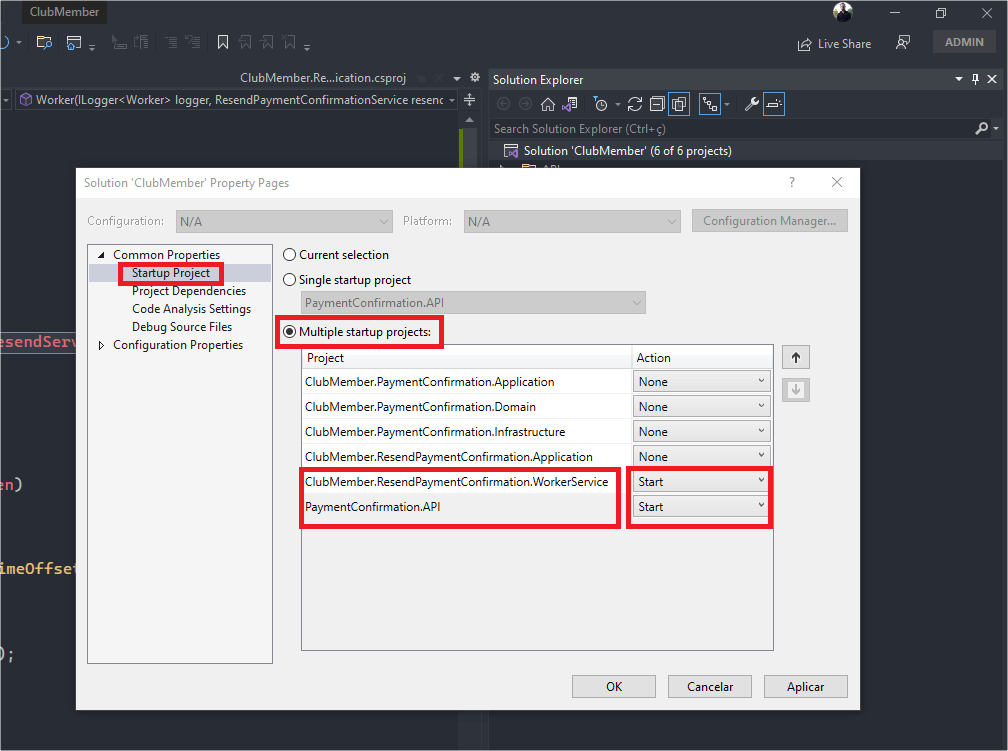
To test the application, it is necessary to configure it so that both the API project and Worker run at the same time. For that, in Visual Studio, right-click on the Solution project, click on “Properties” and then configure it as shown in the image below:
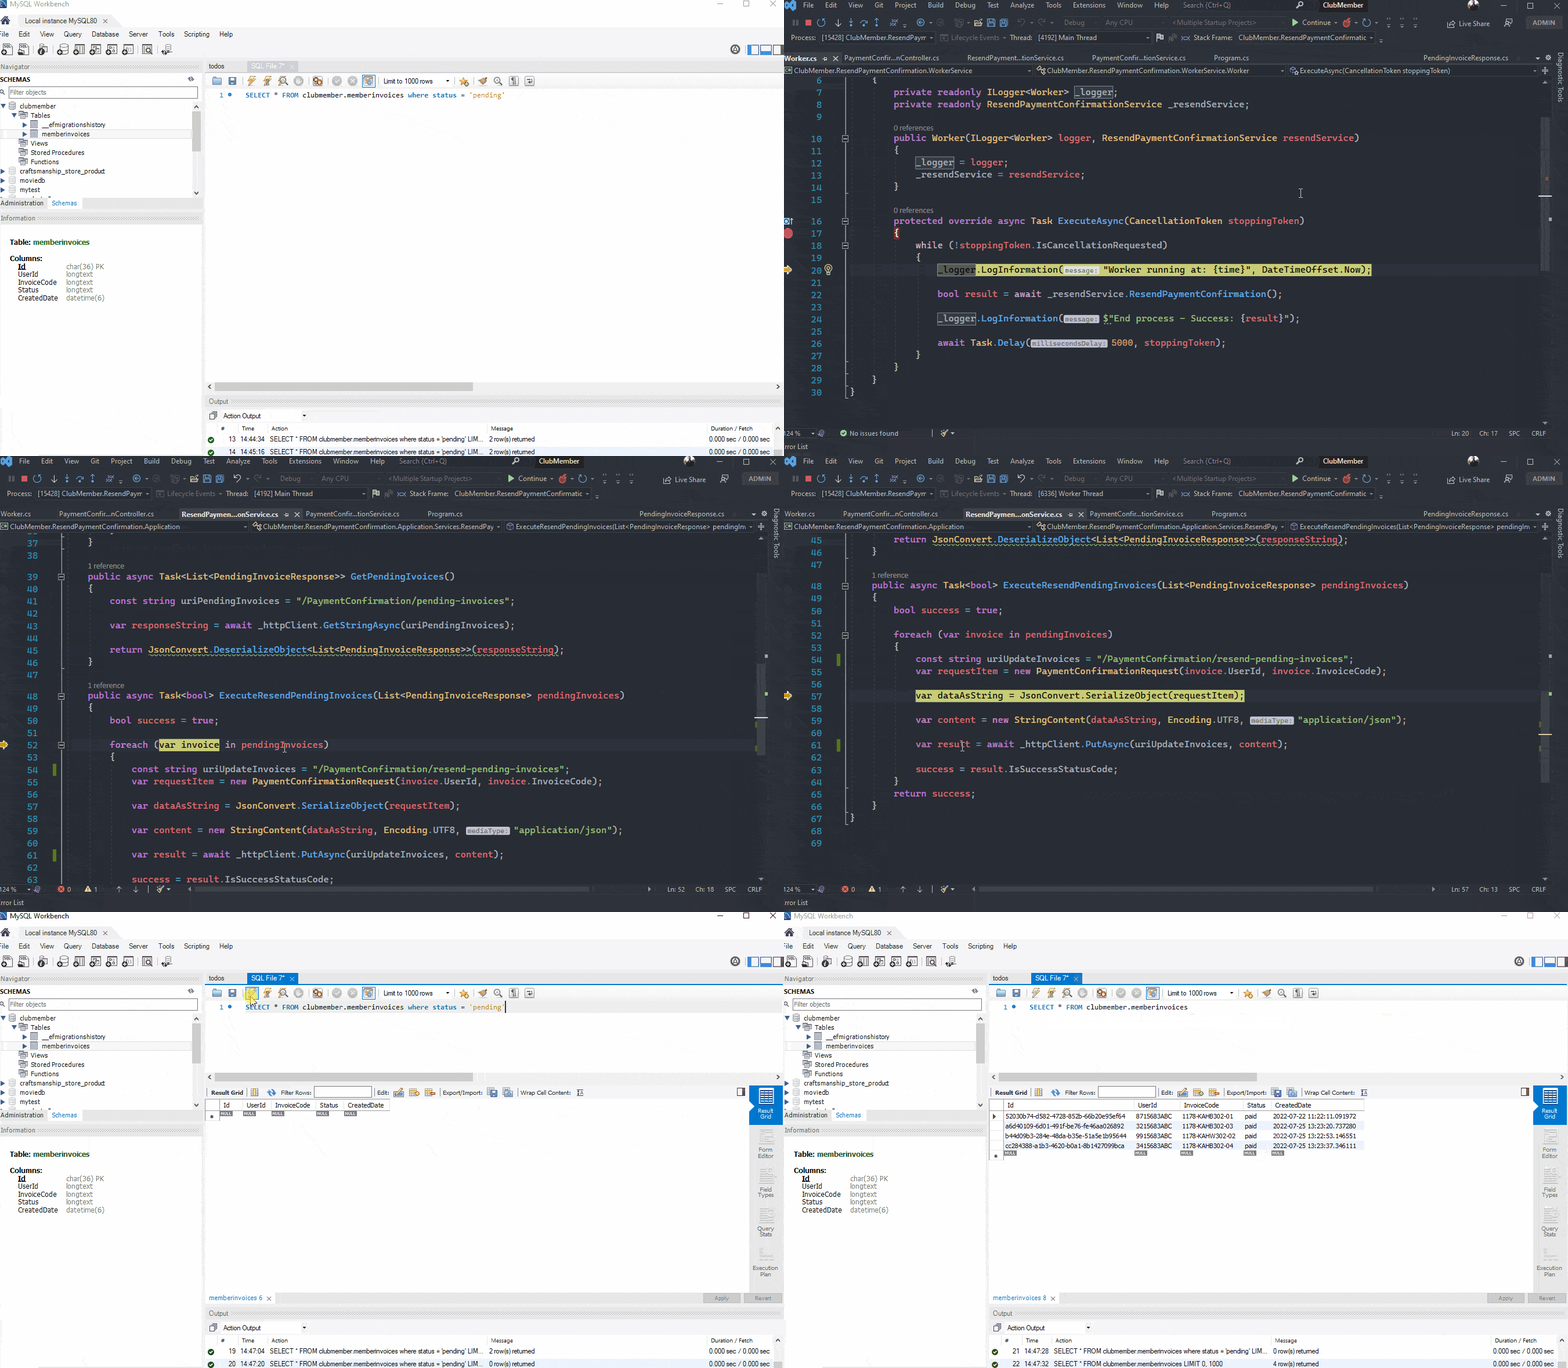
The GIF below shows two records in the table with the status “pending” (you can use the endpoint “/payment-confirmation” to insert them into the database). Then it shows the execution of the project in debug mode, where the worker fetches the records with status “pending,” then sends them to the endpoint “/PaymentConfirmation/resend-pending-invoices,” which processes them and updates the status to “paid” and ends the execution.
Conclusion
It is generally agreed that microservices make building applications easier, but, according to Martin Fowler, the best option is always to start with a monolith and as the project grows, refactor it into small microservices.
So, in this blog post, we saw how to create a good example of a monolith using the modular monolith approach, creating a modular monolith from scratch with .NET 6.
This project has a certain degree of complexity, so if you have any errors when creating this example, please put them in the comments and we will help you as soon as possible.
Next up, you might want to try your first microservice.
This content originally appeared on Telerik Blogs and was authored by Assis Zang
Assis Zang | Sciencx (2022-10-27T12:49:03+00:00) Creating Good Monoliths in ASP.NET Core. Retrieved from https://www.scien.cx/2022/10/27/creating-good-monoliths-in-asp-net-core/
Please log in to upload a file.
There are no updates yet.
Click the Upload button above to add an update.


