This content originally appeared on DEV Community 👩💻👨💻 and was authored by Demola Malomo
Organizations are always looking for innovative ways to tackle threats and vulnerabilities on their platform. They are constantly investing in human resources and technologies to help build and ship secure applications. Two-factor authentication, Authenticator app, and Biometrics, among others, are some of the innovative methods organizations are adopting to keep their platform safe.
In this post, we will learn how to build APIs that authenticate users with their phone numbers using Rust and Twilio’s Verification Service. For this post, we will be using Actix Web to build our API. However, the same approach also applies to any Rust-based framework.
Prerequisites
To fully grasp the concepts presented in this tutorial, the following requirements apply:
- Basic understanding of Rust
- A Twilio account;signup for a trial account is completely free.
Getting started
To get started, we need to navigate to the desired directory and run the command below in our terminal:
cargo new rust-sms-verification && cd rust-sms-verification
This command creates a Rust project called rust-sms-verification and navigates into the project directory.
Next, we proceed to install the required dependencies by modifying the [dependencies] section of the Cargo.toml file as shown below:
//other code section goes here

[dependencies]
actix-web = "4"
serde = { version = "1.0.145", features = ["derive"] }
dotenv = "0.15.0"
reqwest = { version = "0.11", features = ["json"] }
actix-web = "4" is a Rust-based framework for building web applications.
serde = { version = "1.0.145", features = ["derive"] } is a framework for serializing and deserializing Rust data structures. E.g. convert Rust structs to JSON and vice versa.
dotenv = "0.15.0" is a crate for managing environment variables.
reqwest = { version = "0.11", features = ["json"] } is a HTTP request crate.
PS: The feature flags used in the crates above enable a specific feature of the crate.
We need to run the command below to install the dependencies:
cargo build
Structuring our application
It is essential to have a good project structure as it makes the project maintainable and makes it easier for us and others to read our codebase.
To do this, we need to navigate to the src directory and, in this folder, create a models.rs, services.rs, and handlers.rs files.
models.rs is for structuring our application data
services.rs is for abstracting our application logic
handlers.rs is for structuring our APIs
Finally, we need to declare these files as a module and import them into the main.rs file as shown below:
mod handlers;
mod models;
mod services;

fn main() {
  println!("Hello, world!");
}
Setting up Twilio
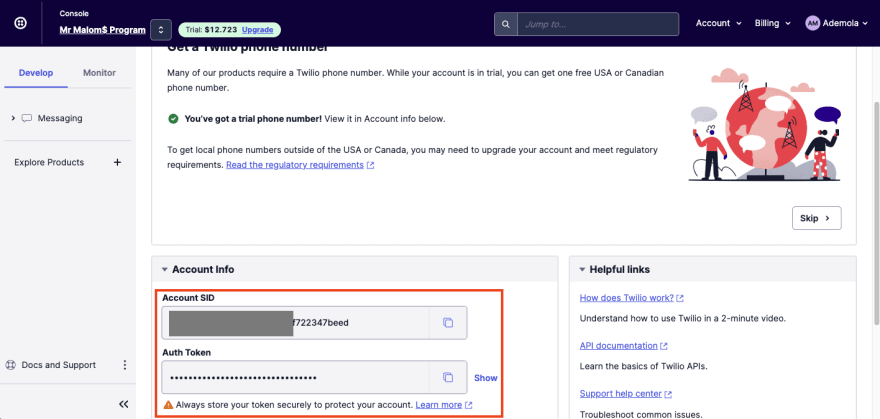
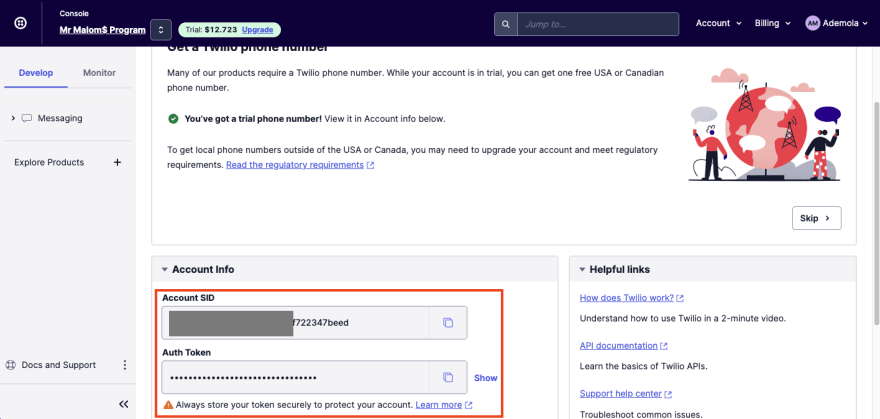
To enable OTP verification in our API, we need to sign into our Twilio Console to get our Account SID and an Auth Token. We need to keep these parameters handy as we need them to configure and build our APIs.
Create a Verification Service
Twilio ships with secure and robust services for seamlessly validating users with SMS, Voice, and Email. In our case, we will use the SMS option to verify users through phone numbers. To do this, navigate to the Explore Products tab, scroll to the Account security section, and click on the Verify button.
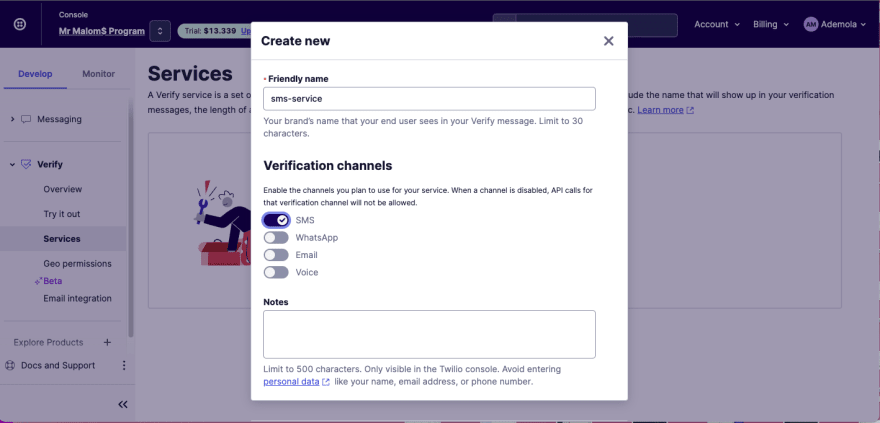
Navigate to the Services tab, click on the Create new button, input sms-service as the friendly name, toggle-on the SMS option, and Create.
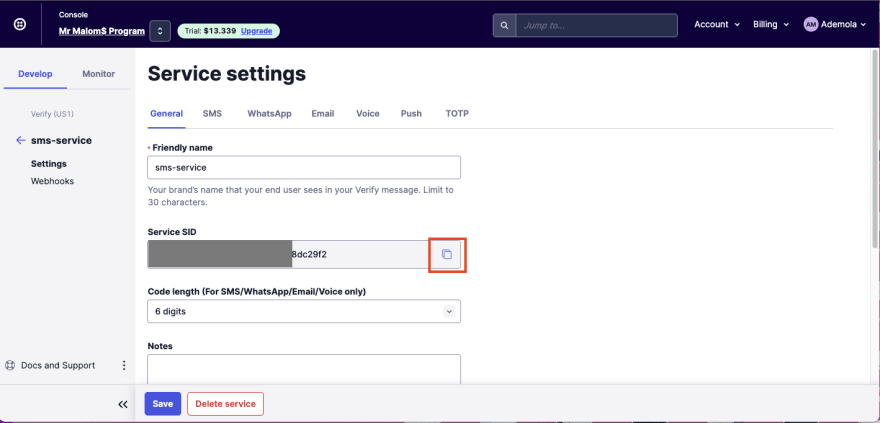
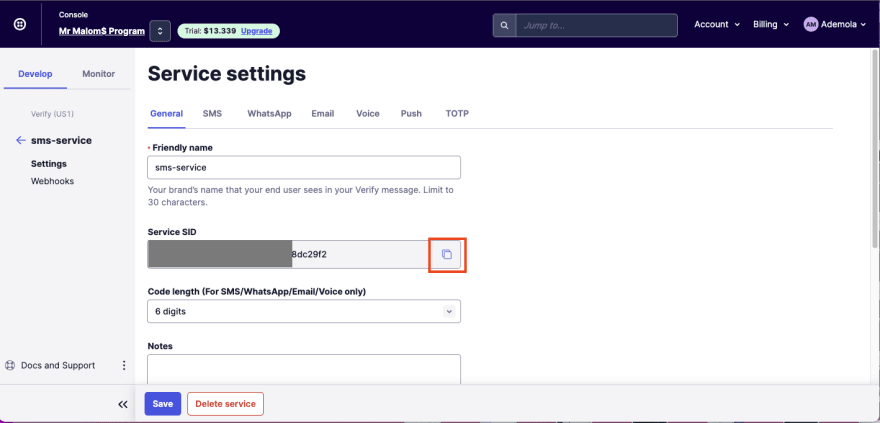
Upon creation, we need to copy the Service SID. It will also come in handy when building our API.
Enable geographical permission
Geographical Permissions are mechanisms put in place by Twilio to control the use of their services. It provides a tool for enabling and disabling countries receiving voice calls and SMS messages from a Twilio account.
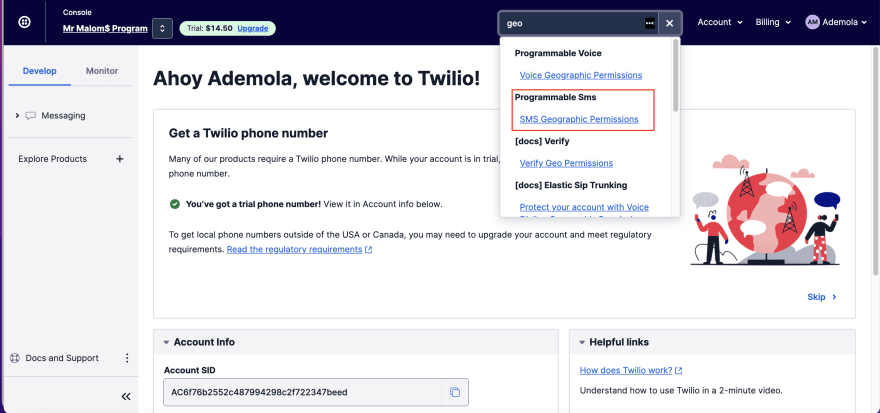
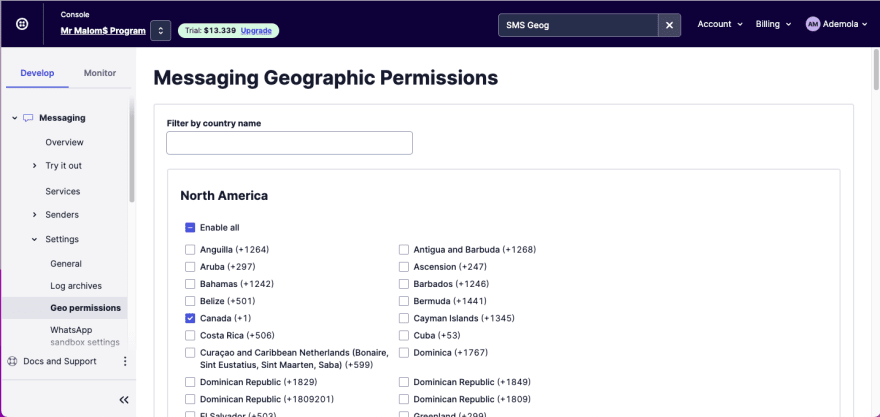
To enable SMS, we need to search for SMS Geographic Permissions in the search bar, click on the SMS Geographic Permissions result, and then check the country where the SMS provider operates.
Creating OTP Verification APIs in Rust
With the configuration done, we can start building our APIs by following the steps.
Add environment variables
Next, we need to create a .env file in the root directory and add the snippet below:
TWILIO_ACCOUNT_SID=<ACCOUNT SID>
TWILIO_AUTHTOKEN=<AUTH TOKEN>
TWILIO_SERVICES_ID=<SERVICE ID>
As mentioned earlier, we can get the required credentials from Twilio console and Service Setting.
Create the API models
Next, we need to create models to represent our application data. To do this, we need to modify the model.rs file as shown below:
use serde::{Deserialize, Serialize};

#[derive(Deserialize, Debug, Clone)]
#[serde(rename_all = "camelCase")]
pub struct OTPData {
    pub phone_number: String,
}

#[derive(Deserialize, Debug, Clone)]
#[serde(rename_all = "camelCase")]
pub struct VerifyOTPData {
    pub user: OTPData,
    pub code: String,
}

#[derive(Deserialize, Debug, Clone)]
pub struct OTPResponse {
    pub sid: String,
}

#[derive(Deserialize, Debug, Clone)]
pub struct OTPVerifyResponse {
    pub status: String,
}

#[derive(Serialize, Debug, Clone)]
pub struct APIResponse {
    pub status: u16,
    pub message: String,
    pub data: String,
}
The snippet above does the following:
- Imports the required dependency
- Creates
OTPDataandVerifyOTPDatastructs with required properties needed for the API request body - Creates
OTPResponse,OTPVerifyResponse, andAPIResponsestructs with required properties needed for the API response
PS: The #[serde(rename_all = "camelCase")] macro converts snake case properties to camel case and the derive macro adds implementation support for serialization, deserializations, and cloning.
Create the API service
Twilio ships with an open API specification for accessing their services. In this section, we will use the Verification Service to send and verify OTP. To do this, first, we need to update the services.rs file as shown below:
use std::{collections::HashMap, env};

use dotenv::dotenv;
use reqwest::{header, Client};

use crate::models::{OTPResponse, OTPVerifyResponse};

pub struct TwilioService {}

impl TwilioService {
    fn env_loader(key: &str) -> String {
        dotenv().ok();
        match env::var(key) {
            Ok(v) => v.to_string(),
            Err(_) => format!("Error loading env variable"),
        }
    }

    pub async fn send_otp(phone_number: &String) -> Result<OTPResponse, &'static str> {
        let account_sid = TwilioService::env_loader("TWILIO_ACCOUNT_SID");
        let auth_token = TwilioService::env_loader("TWILIO_AUTHTOKEN");
        let service_id = TwilioService::env_loader("TWILIO_SERVICES_ID");

        let url = format!(
            "https://verify.twilio.com/v2/Services/{serv_id}/Verifications",
            serv_id = service_id
        );

        let mut headers = header::HeaderMap::new();
        headers.insert(
            "Content-Type",
            "application/x-www-form-urlencoded".parse().unwrap(),
        );

        let mut form_body: HashMap<&str, String> = HashMap::new();
        form_body.insert("To", phone_number.to_string());
        form_body.insert("Channel", "sms".to_string());

        let client = Client::new();
        let res = client
            .post(url)
            .basic_auth(account_sid, Some(auth_token))
            .headers(headers)
            .form(&form_body)
            .send()
            .await;

        match res {
            Ok(response) => {
                let result = response.json::<OTPResponse>().await;
                match result {
                    Ok(data) => Ok(data),
                    Err(_) => Err("Error sending OTP"),
                }
            }
            Err(_) => Err("Error sending OTP"),
        }
    }
}
The snippet above does the following:
- Imports the required dependencies
- Creates a
TwilioServicestruct - Creates an implementation block that adds methods to the
TwilioServicestruct - Adds an
env_loaderhelper method to load the environment variable - Adds a
send_otpmethod that takes in thephone_numberas a parameter and returns theOTPResponseor a string describing the error. The method also does the following:-
Line 20 - 22: - Uses the
env_loaderhelper method to create the required environment variable -
Line 24 - 27: Creates the
urlby formatting it with the required parameter - Line 29 - 33: Creates the API request header and sets it to a form type
-
Line 35 - 37: Creates a key-value pair form body to set the phone number that will receive the OTP and set the channel for sending the OTP as
sms -
Line 39 - 46: Creates a
clientinstance using thereqwestlibrary to make HTTP call to Twilio API by passing in the required authentication parameters, request header, and the form body - Line 48 - 57: Returns the appropriate response
-
Line 20 - 22: - Uses the
Lastly, we need to add a method to verify the sent OTP as shown below:
//imports goes here

pub struct TwilioService {}

impl TwilioService {
    fn env_loader(key: &str) -> String {
        //code goes here
    }

    pub async fn send_otp(phone_number: &String) -> Result<OTPResponse, &'static str> {
        //code goes here
    }

  //add
  pub async fn verify_otp(phone_number: &String, code: &String) -> Result<(), &'static str> {
        let account_sid = TwilioService::env_loader("TWILIO_ACCOUNT_SID");
        let auth_token = TwilioService::env_loader("TWILIO_AUTHTOKEN");
        let service_id = TwilioService::env_loader("TWILIO_SERVICES_ID");

        let url = format!(
            "https://verify.twilio.com/v2/Services/{serv_id}/VerificationCheck",
            serv_id = service_id,
        );

        let mut headers = header::HeaderMap::new();
        headers.insert(
            "Content-Type",
            "application/x-www-form-urlencoded".parse().unwrap(),
        );

        let mut form_body: HashMap<&str, &String> = HashMap::new();
        form_body.insert("To", phone_number);
        form_body.insert("Code", code);

        let client = Client::new();
        let res = client
            .post(url)
            .basic_auth(account_sid, Some(auth_token))
            .headers(headers)
            .form(&form_body)
            .send()
            .await;

        match res {
            Ok(response) => {
                let data = response.json::<OTPVerifyResponse>().await;
                match data {
                    Ok(result) => {
                        if result.status == "approved" {
                            Ok(())
                        } else {
                            Err("Error verifying OTP")
                        }
                    }
                    Err(_) => Err("Error verifying OTP"),
                }
            }
            Err(_) => Err("Error verifying OTP"),
        }
    }
}
The snippet above works similarly to the send_otp method. However, we changed the url to a Verification Check URL, changed the Channel to Code in the form body, and returned the appropriate response by checking that the response status is approved.
Create the API handlers
With services fully configured, we can use them to create our API handler. To do this, we need to update the handlers.rs as shown below:
use actix_web::{post, web::Json, HttpResponse};
use reqwest::StatusCode;

use crate::{
    models::{APIResponse, OTPData, VerifyOTPData},
    services::TwilioService,
};

#[post("/otp")]
pub async fn send_otp(new_data: Json<OTPData>) -> HttpResponse {
    let data = OTPData {
        phone_number: new_data.phone_number.clone(),
    };

    let otp_details = TwilioService::send_otp(&data.phone_number).await;

    match otp_details {
        Ok(otp) => HttpResponse::Ok().json(APIResponse {
            status: StatusCode::ACCEPTED.as_u16(),
            message: "success".to_string(),
            data: otp.sid,
        }),
        Err(e) => HttpResponse::InternalServerError().json(APIResponse {
            status: StatusCode::INTERNAL_SERVER_ERROR.as_u16(),
            message: "failure".to_string(),
            data: e.to_string(),
        }),
    }
}

#[post("/verifyOTP")]
pub async fn verify_otp(new_data: Json<VerifyOTPData>) -> HttpResponse {
    let data = VerifyOTPData {
        user: new_data.user.clone(),
        code: new_data.code.clone(),
    };

    let otp_details = TwilioService::verify_otp(&data.user.phone_number, &data.code).await;

    match otp_details {
        Ok(_) => HttpResponse::Ok().json(APIResponse {
            status: StatusCode::ACCEPTED.as_u16(),
            message: "success".to_string(),
            data: "OTP verified successfully".to_string(),
        }),
        Err(e) => HttpResponse::InternalServerError().json(APIResponse {
            status: StatusCode::INTERNAL_SERVER_ERROR.as_u16(),
            message: "failure".to_string(),
            data: e.to_string(),
        }),
    }
}
The snippet above does the following:
- Imports the required dependencies
- Creates a
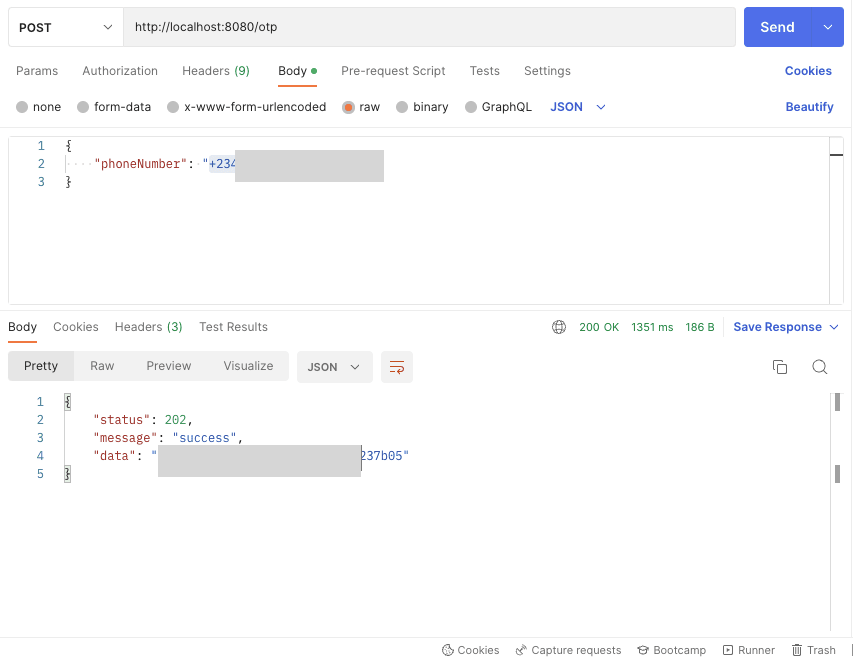
send_otphandler with a/otpAPI route that uses thesend_otpservice to send OTP and returns the appropriate response using theAPIResponse - Creates a
verify_otphandler with a/verifyOTPAPI route that uses theverify_otpservice to verify OTP and returns the appropriate response using theAPIResponse
Putting it all together
With the that done, we need to update the main.rs file to include our application entry point and use the send_otp and verify_otp handlers.
use actix_web::{App, HttpServer}; //add
use handlers::{send_otp, verify_otp}; //add
mod handlers;
mod models;
mod services;

//add
#[actix_web::main]
async fn main() -> std::io::Result<()> {
    HttpServer::new(move || App::new().service(send_otp).service(verify_otp))
        .bind(("127.0.0.1", 8080))?
        .run()
        .await
}
The snippet above does the following:
- Imports the required dependencies
- Creates a new server that adds the
send_otpandverify_otphandlers and runs onlocalhost:8080
With that done, we can start a development server using the command below:
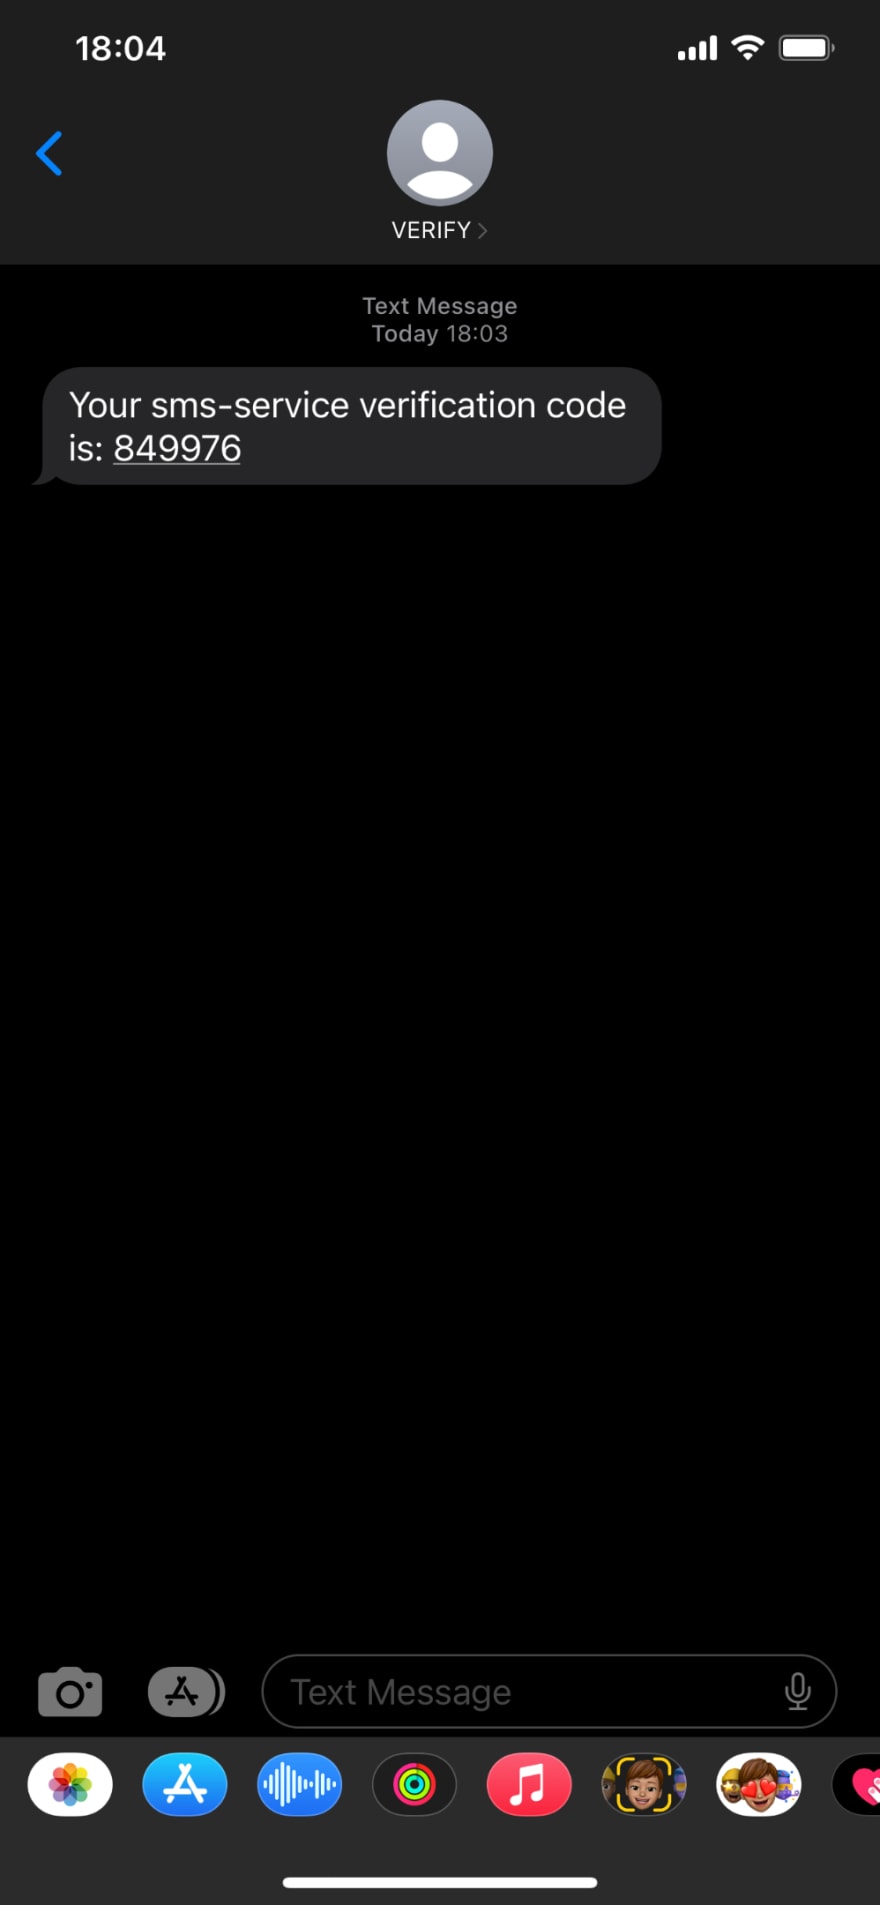
cargo run main.go
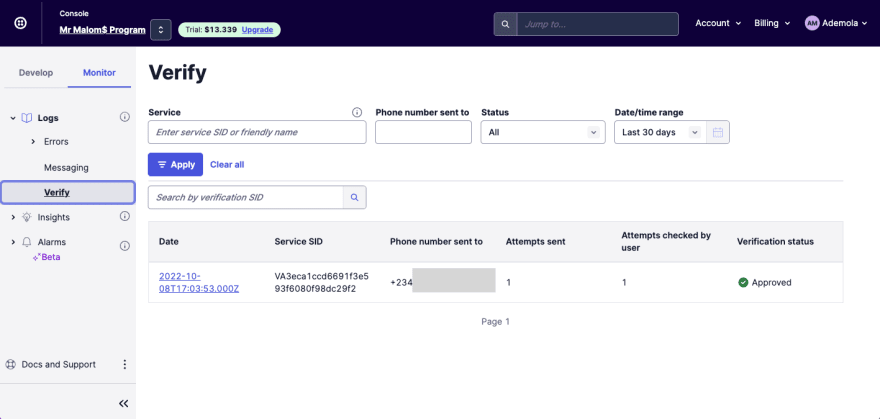
We can also verify the message logs by navigating to the Verify tab of the Logs on Twilio
Conclusion
This post discussed how to create APIs that check and verify users with their phone numbers using Rust and Twilio’s Verification Service. Beyond SMS-based verification, Twilio ships multiple services to seamlessly integrate authentication into a new or existing codebase.
This resources might be helpful:
This content originally appeared on DEV Community 👩💻👨💻 and was authored by Demola Malomo
Demola Malomo | Sciencx (2022-10-29T10:04:09+00:00) How to build a One-Time-Password(OTP) Verification API with Rust and Twilio. Retrieved from https://www.scien.cx/2022/10/29/how-to-build-a-one-time-passwordotp-verification-api-with-rust-and-twilio/
Please log in to upload a file.
There are no updates yet.
Click the Upload button above to add an update.


