This content originally appeared on Level Up Coding - Medium and was authored by Daniil Slobodeniuk
Yo, my dear learners✌️. Do you want to learn more about networking and web: OSI, ARP, MAC, DNS etc? Then dive in the article to learn ton of new info with examples.
I would like to make a grateful shout out to Hussein Nasser whose YouTube channel navigated me through all the stuff and provided further research steps: https://www.youtube.com/c/HusseinNasser-software-engineering
All the images are screenshots from the Hussein Nasser’s videos which I will mention at the beginning of each section. 👏
Table of contents with links to the sections 📌:
- OSI model and:
- ARP
- NAT
- Public vs Private IP addresses - DNS
- TCP and UDP protocols
- TCP Handshake
- HTTP with:
- HTTP 1.0
- HTTP 1.1
- HTTP 2
- HTTP 3
- GET VS POST - HTTP caching with E-Tags
- TLS:
- ver. 1.2
- ver 1.3
- DNS over HTTPS aka DoH - Certificate and Certificate Authority
- SNI, ESNI
- Web Server and
- Stateful vs Stateless applications - CORS + preflight request
- HTTP cookies
- Proxy vs Reverse Proxy and:
- L4 vs L7 Load Balancers
- TLS/SSL Termination
- TLS Passthrough - HSTS
- MIME Sniffing

Intro && Disclaimer
Recently I faced a problem on my current job as a software engineer: I needed to make the settings for one of the systems responsible for Load Testing. Aka play as a DevOps engineer. However, before starting doing it my team lead told me: rehearse/learn about OSI, L4 vs L7 load balancer, SNI stuff. Hmm, I thought it would take me roughly a couple of days. But OSI led me to NAT, ARP and so on. All in all, I spent 2.5 weeks of daily studying learning everything about networking and web related stuff.
Even though I spent tens of hours, I touched only the surface as I don’t need to delve much deeper in some of the topics for now. That’s why I won’t cover “How fragments from Layer 2 get morphed into Layer 1” as I simply don’t need it + I have other things to learn which are more crucial for now‼️
But, if you find any errors in the article or want to ask anything, then feel free to drop me a message in the comments or write me via provided sources at the end of the article 📣
Also, I will provide corresponding resources in each sections. Often, it will be something from Hussein Nasser’s videos 💻
1. OSI model with ARP, NAT, Public vs Private IP addresses
1. OSI
Video 1: https://www.youtube.com/watch?v=7IS7gigunyI
Video 2: https://www.youtube.com/watch?v=eNF9z5JNl-A
Further reading to get better understanding of MAC address:
OSI — Open System Intercommunication model. It is a model which is responsible for defining how data flows from uppermost levels when we make, for example, GET request, to the lowest levels — physical cables that cross our globe.
There are 7 layers in the model where 1 is the lowest (aka physical) and layer 7 is the highest (aka application). For software engineers the most important are Layer 7 and Layer 4. We can say that each layer adds some headers to the data.
Let’s look at all of them in reverse order➿:
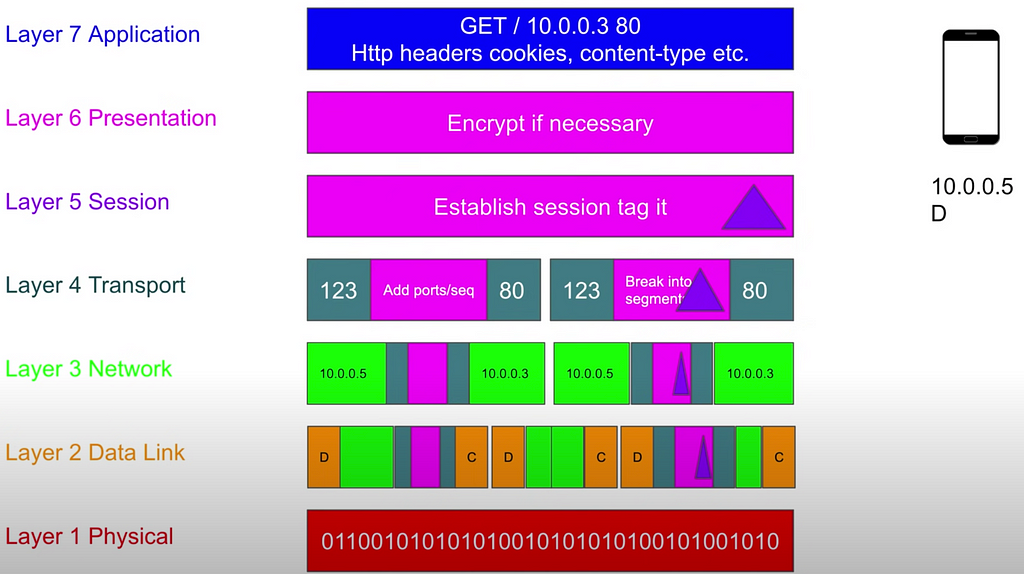
7. Layer 7 — Application layer. It is the layer where we make those HTTP/HTTPS protocols request within our applications. For example, we make GET request:
- GET/ — type of the request
- 10.0.0.3 — IP address
- 80 — Port
- HTTP headers with cookies, content-type
If we send POST/ request, then we also serialize data at this level.
6. Layer 6 — Presentation layer. This layer is responsible for encryption/decryption of the data if we use HTTPS.
5. Layer 5 — Session Layer. This layer tags data to discern it further. For example, when data will come from 1 to 7 layer, this layer checks that it is session for this TCP connection as there can be multiple TCP connections to the single server.
4. Layer 4 — Transport Layer. Before this layer all the request was a single blob of data. On this layer it will be splitted into segments. Also, at this layer all the segments are prepended and appended with source port and destination port respectively. It looks like: sourcePort Segment destinationPort. Also, this layer adds sequence to order those segments when they will be received.
3. Layer 3 — Network Layer (IP protocol). This layer just receives segments from transport layer (moreover, it doesn’t know anything about the port) and adds more headers: ports. So, after this layer data will look like:
source IP Address — IP Packet — destination IP Address
On this layer we call data as IP Packet (and on Layer 4 it is segment).
2. Layer 2 — Data Link. On this layer IP Packets are chunked into even smaller parts. On this layer we form so called frames which look like:
MAC Source — IP PACKET — MAC Destination
Next, bits like 01100010 are shoved into the lowest layer.
- as usual, there can easily be multiple fragments if IP Packets are huge
- if we don’t know MAC address, then make ARP request to find the gateway of the destination
- if request goes not to our subnet, then the MAC address of the router that connects us with the outer world.
- Layer 1 — Physical Layer. It accepts frames from layer 2 and puts them in physical stuff: Ethernet aka electric cables, WiFi aka radio waves.
2. ARP
Address resolution protocol
Video: https://youtu.be/mqWEWye-8m8
Recall when I said that to go from Layer 3 to Layer 2 in OSI model we need to get MAC address of the destination? However, how is it possible to get the one? ARP is the stuff that finds the MAC for the given IP Address.
Each machine has ARP Table which has mapping: IP address — MAC address. But what if we don’t have MAC for the current IP? No problem!
There are 2 cases which I want to look at 🔍:
- Inside our subnet
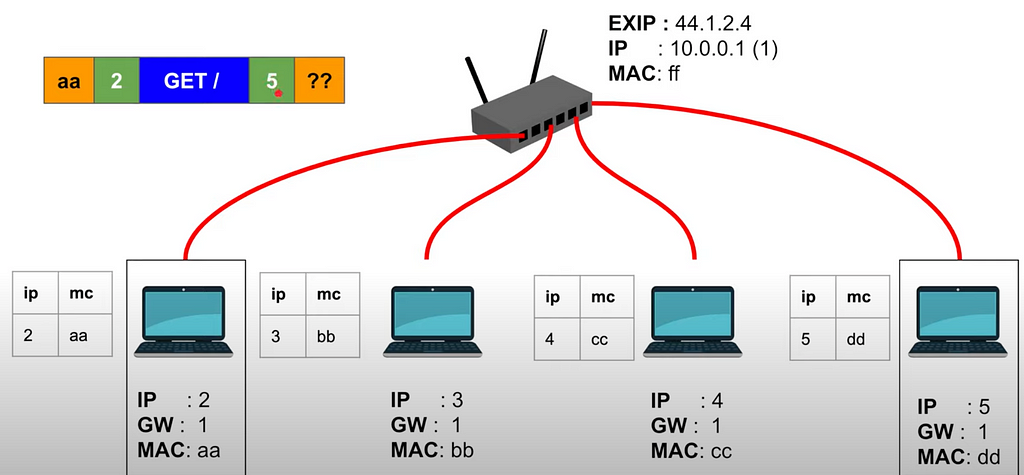
- On the picture above you can see ARP table near each of the machines.
- At first, machine makes request for the desired IP address to the router.
- Router notifies all the machines in the subnet and, if success, one of the machines responds with MAC address.
- Router gives this MAC address to us, we cache it in the ARP table.
- And our machine can send data to the given MAC address (look at the OSI Layer 2 and Layer 1)
2. Outside our subnet:
- When we send data to the outer subnet (we know this by calculating mask of the destination IP address), we need to do this via our router.
- At first do ARP request to the router, receive MAC address of the router and cache in the table.
- Use this MAC address to build the request (aka fragment from OSI layer 2) and send to the router.
- Router swaps IP address of our machine and puts itself. So, it sends request to the outer world from its behalf. To match back it needs NAT.
PS: MITM (man-in-the-middle-attack) can occur if someone pretends to be a router. Read more about it in the section below
3. NAT
Network address translation
Video: https://www.youtube.com/watch?v=RG97rvw1eUo
Further reading:
It is a process of mapping one IP address to another IP address. Actually, it is more difficult, that’s why let’s delve deeper.
Firstly, what are the purposes of the NAT⚙️:
- private to public IP translation (solve issue of not enough IPV4 addresses)
- port forwarding
- L4 load balancing
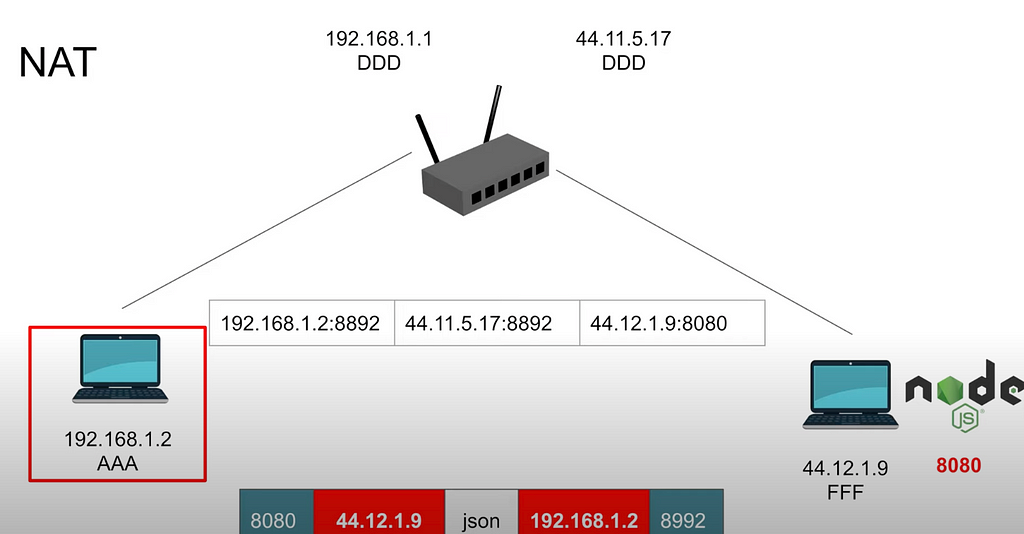
- Our machine from subnet makes request to machine outside our subnet. It knows that from calculating mask. So, we can’t make ARP request to the machine outside our network.
- At first our machine makes ARP request (read above about it) to the router.
- Then we send data to the router (it is also called default gateway). Router swaps source IP Address to its own:
- Source IP address:Port → Router IP address:Port (port can be the same as first or different) Also, router swaps for IP address for the outer network (router has IP address for inner network and for outer network), not the subnet.
- Router IP address:Port →Destination IP address:Port
So, router has this table where it can match response back to the IP of the machine in the subnet. If nothing found — nothing was actually sent from this machine.
4. Public vs Private IP address
Video: https://www.youtube.com/watch?v=92b-jjBURkw
Further reading:
Public IP addresses are pretty expensive nowadays, so we can make a trick: buy one public IP address and create bunch of private IP addresses which are behind that public one in the internal network/subnet(LAN). Of course, router has private IP address as well for the machines in the subnet to communicate with each other.
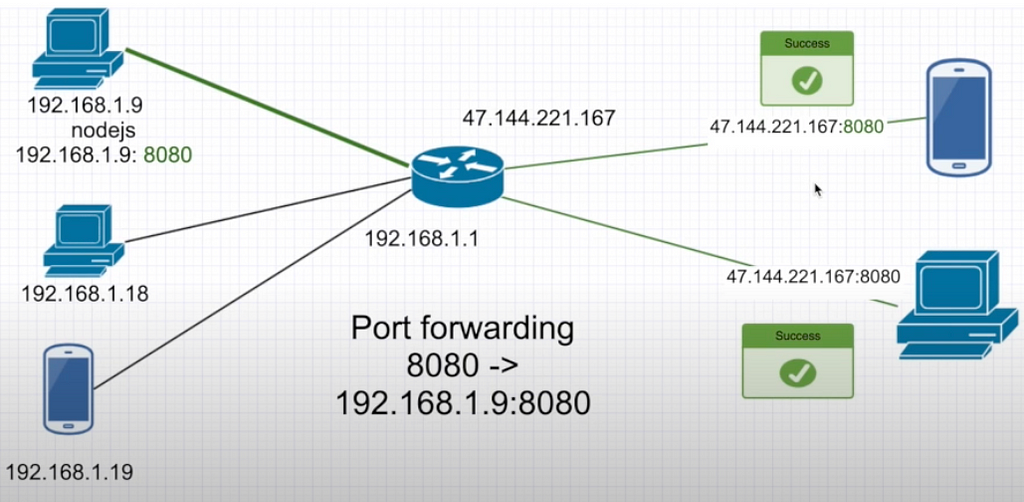
To discern internal machines for the requests from the outer world we assign unique ports to each machine. So, it is called port forwarding. It uses NAT under the hood.
Pipeline: public IP address of the router + 8080 called from outer world → 192.168.x.x:8080 (aka internal machine)
In internal subnet machines have different IP addresses, by the way.
2. DNS
Video: https://www.youtube.com/watch?v=tgWx81_NGcg
More to read: https://superuser.com/a/1075081
DNS — domain name server. It is a system to find IP address of the domain name that we enter in the browser. Why doing so? Our dear machines can’t read text and transmit it into data, so they need some numbers to work with. Recall from OSI model that we also don’t operate with text, but with ports, IP, MAC etc.
DNS works as a database (and it is actually the one), but extremely smart and well-designed. If it weren’t such, imagine how long it would take to process one request.
“To work with billions of rows you need to avoid working with billions of rows” — by Hussein Nasser
That’s why it is designed in an extremely smart way.
Each site link is splitted into 2 parts:
- .com/.org etc — top level domain
- by knowing this, you eliminate many results (i.e. you look for .org and thus no need to sift through .net/.com etc) => much faster - actual domain and sub-domains
- use them to look for IP address
How does the process look like?
IMPORTANT: read 2 chunks below together as first one is more of a diagram and second is explanation
First chunk❗️:
-> means make request
- Client → Resolver (Your machine DNS server) → Root Server
Root Server → Resolver (IP of TLD Server) - Resolver → TLD Server
TLD Server → Resolver (IP of Auth NS) - Resolver → Auth NS Server
Auth NS Server → Resolver (IP of the asked Server) - Resolver → Client
Second chunk❗️:
- You know only about the server that can tell you top-level domains => Root servers
- there are 13 root servers
- you ask them to give you, for example, .com server, .io server etc => IP address of the desired server — called TLD (top level domain server)
- client uses UDP in this case - Another request to the given IP server
- this server won’t give you IP of the asked domain (i.e. example.com)
- it will make point back, aka response, to another server IP address, named auth NS (full — authoritative name server)
- this auth NS will have the answer for the asked server - Resolver gives the result back to the client
Notes about DNS:
- If you add one more IP address for the server — it will touch only Auth NS
- Chances are Resolver has already made a request to the particular IP address and it sits in the cache of the Resolver. But it lead to NS Poisoning
- Protocol being used in DNS — UDP
- as it is stateless, we need to define who was the initiator of the request
- generate random number, called DNS query id (aka transaction id), and add to the UDP request (tag the request)
- it will be cached in the Resolver cache
NS Poisoning:
- Attacker will send a bunch of UDP requests to resolver to maybe get the DNS query id
- Client ends up in the attackers site as cached domains from the DNS will point to the attackers specified site
- Also, attacker needs to know the destination IP that was sent from the Resolver. It is generated randomly, usually
3. TCP and UDP protocols
Video: https://www.youtube.com/watch?v=qqRYkcta6IE
So, there are 2 types of protocols that are most widely used: TCP and UDP. They happen at Layer 4 of OSI model.
Please, read section 3 and section 4 together as there will be lots of links to one and another‼️
TCP — transmission control protocol.
Pros:
- acknowledgement: adds info to message to define if the data has been received by the server. What info? More in the section about TCP handshake
- guaranteed delivery: if no acknowledgement, then it will resend info (either packets didn’t arrive or they were corrupted)
- connection based: client-server need to establish unique connection between them
- congestion control: send data when it can handle it otherwise wait
- ordered packets: data will be chopped into packets which are unordered. Also discussed in TCP handshake
Cons:
- larger packets: all stuff from pros is packets
- more bandwidth
- slower than UDP
- stateful: if a client is connected and you destroy server — connection is closed. Stateless means such an action won’t destroy the connection
- server memory (prone to DOS — denial of service attacks): server needs to allocate memory for each connection => limit on connections. What? Server and connections? Read in the Web Server section
UDP — user datagram protocol
Cons:
- no acknowledgement
- no guaranteed delivery: only some checksum to say if the packet is bad or good
- connectionless: no physical connection between client and server
- no congestion control
- no ordered packets
- security: no trust in the connection as there is no connection, actually
Pros:
- smaller packets
- less bandwidth
- stateless
Notes about TCP and UDP:
- can’t use UDP for databases in most cases
- UDP is scalable (as you can send data to the server without real connection and TCP — stateful)
4. TCP Handshake
Video: https://www.youtube.com/watch?v=bW_BILl7n0Y
We discussed TCP in general above. And now I wanted to show you how actually that connection gets established in the TCP (as UDP is stateless, remember this). Recall that TCP is Layer 4 in OSI.
Quick overview🌪:
- Client sends request, for example, via CURL GET/.
- Data will be separated into packets
- each packet has a sequence number to order packets after they have been splitted and meshed as web doesn’t guarantee you strict order and delivery of them
- server responds to the client after each packet has been received — acknowledgment (recall from the previous section). If not received — resend. Shout out to guaranteed delivery. - Server will wait for all the packets to be arrived
More in-depth overview:
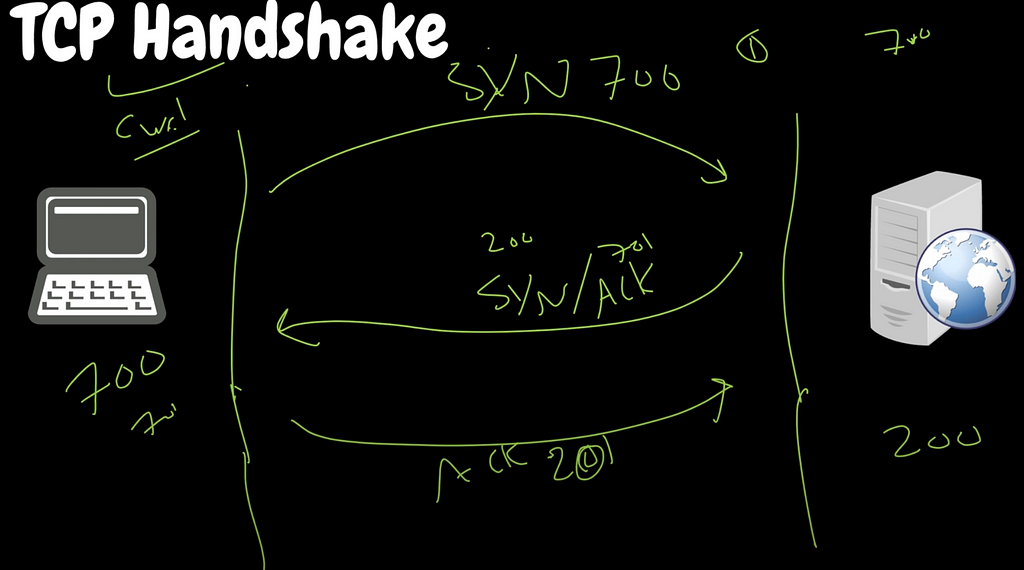
But how does the server understand that this sequence starts with x and ends with y? => Server and Client need to agree on these sequence numbers — synchronization
- Client comes up with a sequence — randomness to secure from attacks. i.e. this number is 700
- Client sends syn sequence number: 700
- Server responds with:
- syn another sequence number: i.e. 200
- acknowledgment: syn sequence number of the client + length of the packet which is 1 in this first request => 701 - Now client sends acknowledgment: server syn sequence number + length of the packet which is also 1 as it is first request from the server => 201
Important: 3rd step is composed from 2 requests to 1. It is called syn/ack, so one packet in result.
=> After all of this: first real GET request (or POST, you got it)
- GET (length of the packet is 10) and syn sequence number 701
- Server sends back an acknowledgment: 701 + length of the packet which is 10 in our case
5. HTTP
Video 1: https://www.youtube.com/watch?v=0OrmKCB0UrQ
Video 2 (mode about HTTP 2): https://www.youtube.com/watch?v=fVKPrDrEwTI&list=WL&index=10
1. Generally about HTTP:
HTTP stands for hyper text transfer protocol:
- HTTP request properties: URL, Method type, headers (kind of content, cookies, host), body (for certain method types)
- HTTP Response: status code, headers, body
Shortly about HTTP parties 💨:
- Client (for example, Java application) makes request
- HTTP Server (server which needs to know how to deal with HTTP requests) accepts the request
- HTTP is a layer 7 protocol from OSI model
- TCP is a vehicle that transports blob of string (data) for us which is HTTP as TCP is layer 4 and HTTP is layer 7
Briefly about data exchange in HTTP:
- Open a connection between client and server: GET/some-step.com. Recall TCP handshake
- This string will be converted to bytes. Bytes become bits (010101) → sent across the net to the server
- Server processes the request and sends response over TCP connection: headers, .html file.
- there can be multiple packets as TCP breaks data into packets. Recall section about TCP - Close the connection if no more requests are done
And what about HTTPS? How is it done? Oh boy, it is a pretty heavy stuff, hence it is a separate section that will be below. But if you’re impatient, then visit section about TLS
HTTP versions:
- HTTP 1.0:
How request/response works:
- request: GET /index.html.
- response
- connection closed.
=> After each request/response we have connection being closed.
But imagine there is an image in that index.html page sent in the previous step. You make one more request to get it: GET /image1.jpg => Keep in mind that TCP is slow for start by default and here we have so much open/close.
- HTTP 1.1
What is the difference compared to HTTP 1.0:
- it invented keep-alive header which is sent from client to server => we don’t close connection after each request/response cycle, but keep it open.
How request/response works:
- request: GET /index.html
- response
- leave connection open
- close connection after we are finally done
What’s more in HTTP 1.1:
- also introduced caching, E-Tags
- streaming with chunked transfer: as soon as part of the html page is ready, start sending it in chunks: part 1, part 2 etc
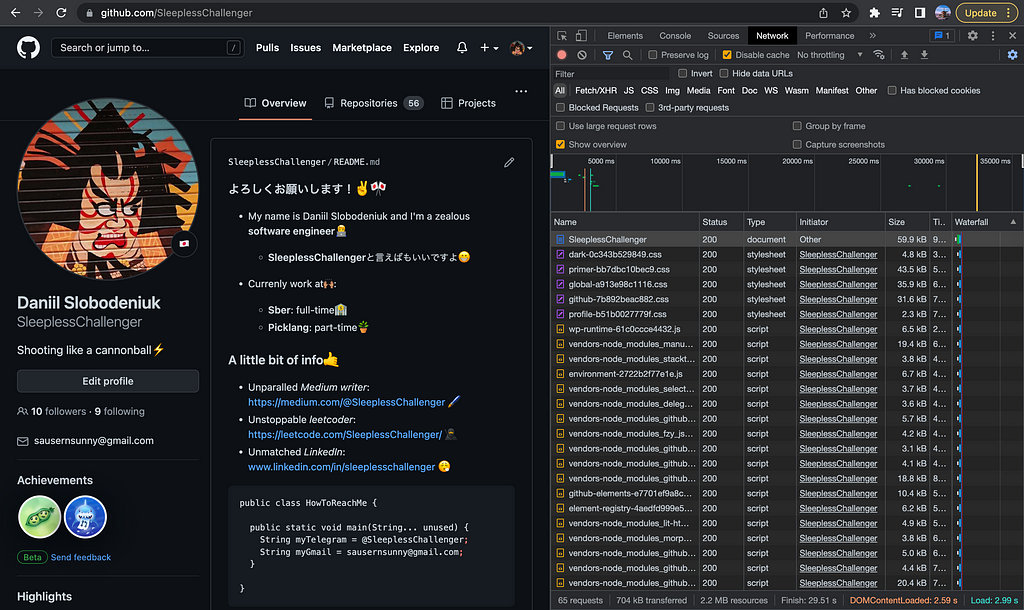
- modern browsers allow 6 TCP connections per request. Why so many? During one request to the page, it actually has lots of other requests to retrieve data for the page. Look at how one simple page load looks like:
- HTTP 2 (aka SPDY)
Pros:
- Multiplexing: multiple requests are shoved into one channel => one request in result (but many packets as usual in TCP). I.e. you make 6 GET requests to get different resources. Each HTTP packet will be tagged with stream id (as there are multiple packets for one request) and it allows the server to map the response back to the particular request. And the client to understand which response to map to initial request.

- Compression: protocol buffers (aka binary format) allow to do so. Due to stream id in the multiplexing we can compress even headers (it can’t be done in HTTP 1.1)
- Server push (DISABLED BY DEFAULT)- you don’t have to wait for response as server will do it.
Client asks for index.html: GET index.html. If server is configured correctly, it can push not only this file, but main.js, main.css etc. Though, client must support HTTP 2 for this action. - Secure by default: HTTPS
- Protocol negotiation during TLS as some old servers don’t support HTTP 2.0 (NPN/ALPN)
- this stuff allows server to tell the client that it supports HTTP 2 during TLS handshake => no need to make another request to upgrade to HTTP 2
Cons:
- Server push can be abused: if client doesn’t need additional data and server is configured incorrectly => extra bandwidth
- Can be slower when in mixed mode (Backend is HTTP 2, but load balancer is HTTP 1 or vice versa). Quick solution is to use layer 4 HTTP proxy
Wow, even HTTP 3 exists and it actually goes over UDP, not TCP. Yeah, it is bonkers. Just a couple of words.
- HTTP 3 (aka HTTP 2 over QUIC):
- replaces TCP with QUIC (UDP with congestion control)
- all HTTP 2 features
2. POST vs GET requests in HTTP
Video: https://www.youtube.com/watch?v=K8HJ6DN23zI
If you don’t know anything about HTTP verbs, then go give a read to MDN: https://developer.mozilla.org/en-US/docs/Web/HTTP/Methods
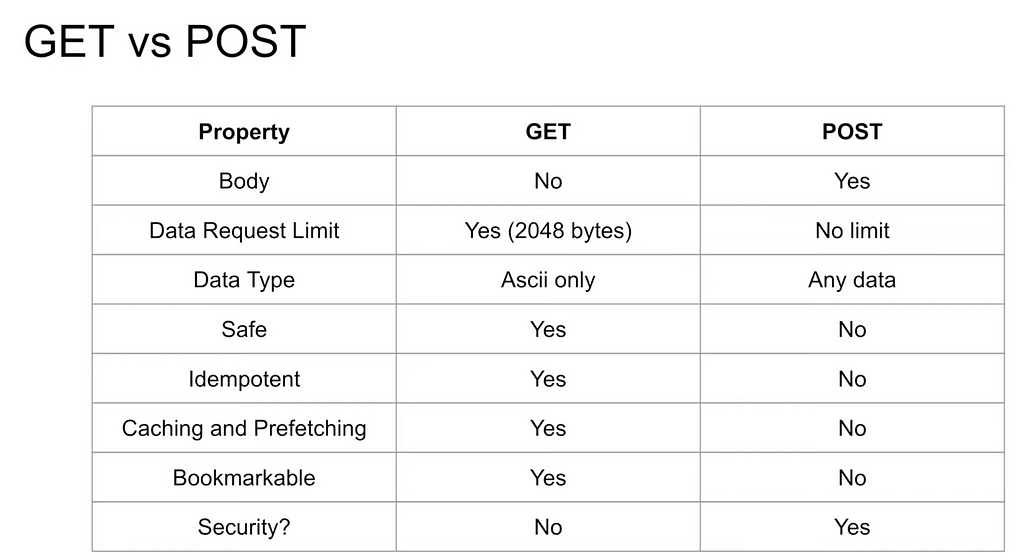
And now, if you want to have a summary of differences between GET and POST:
6. HTTP caching with E-Tags
Video: https://www.youtube.com/watch?v=TgZnpp5wJWU
E-Tag — mechanism to validate web-cache to improve performance.
How it works 🧐:
- Client makes request: GET /user/bob
- Web Server responds with JSON where E-Tag is present
- E-Tag: “10c32–434g-creg” (just example)
- Client responsibility (whether browser or HTTP client which we wrote) to persist it
3. Next time we request the same endpoint, add header [If-None-Match: “10c32–434g-creg”]
- Example: GET /user/bob + header [If-None-Match: “10vfv-34cd-23f”]
4. If file not changed, server will respond with response code: 304 Not Modified
Pros:
- fast response
- less bandwidth
- consistency of databases: if multiple transactions don’t modify the same resource — can be executed in parallel
Cons:
- E-Tags are generated per server, hence if you have:
client — load balancer
          /          \
      server 1      server 2
=> client gets E-Tag from server 1. Next request with the same endpoint and with If-None-Match will be redirected to another server due to load balancer. And server 2 doesn’t have this E-Tag => it will generate its own.
It is solvable by configuring server to have similar E-Tag across servers
- E-Tag allows servers to track clients by always sending 304 Not Modified, as E-Tag lives in the browser
7. TLS 🔑
Video 1: https://www.youtube.com/watch?v=AlE5X1NlHgg
Video 2: https://www.youtube.com/watch?v=ntytZy3i-Jo
Look at my notes on GitHub about TLS:
SystemsExpert/22) Security And HTTPS.md at main · SleeplessChallenger/SystemsExpert
Quick and brief:
HTTP (port 80):
1. Open connection
2. Send request (i.e. GET/)
3. Headers + html page returned
4. Close if needed else keep alive
HTTPS (port 443):
1. Open connection
2. Handshake (read my notes on GitHub)
3. Send request (i.e. GET/) with encryption (happens on layer 6 OSI)
4. Server decrypts and process
5. Sends response
6. Close if needed else keep alive
There are 2 main versions of TLS that are currently under usage: 1.2 and 1.3. Former is worse compared to latter in case of security.
1. TLS 1.2
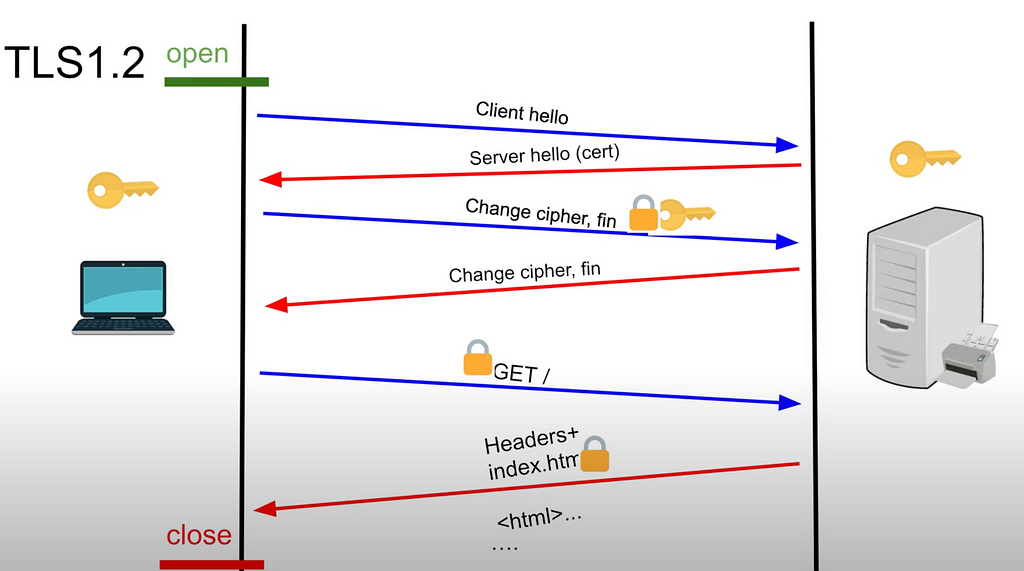
- client hello from the client
- server hello from the server and sends public key (aka certificate, aka cert) of the server
- client will use this key to encrypt the symmetric key which client generates (premaster key to generate the symmetric key)
- send the key to the server locked by the public key from above
- only private key of the server can decrypt the public key of the server
3. Server decrypts with private key of its own: now it also has symmetric key
4. Secure communication can be started (server sends something like OK to the client)
2. TLS 1.3
Issues with TLS 1.2:
- we encrypt symmetric key and send over the network. If someone gets private key of the server — breach of privacy
- high latency: lots of back and forth communication between client and server to establish the connection
Diffie Hellman for TLS 1.3:
TLDR: send info about the key, but not the key
- Private key of the client
- Public key of the client (but it depends)
- Private key of the client
=> Merge of all 3 results in symmetric key which is private
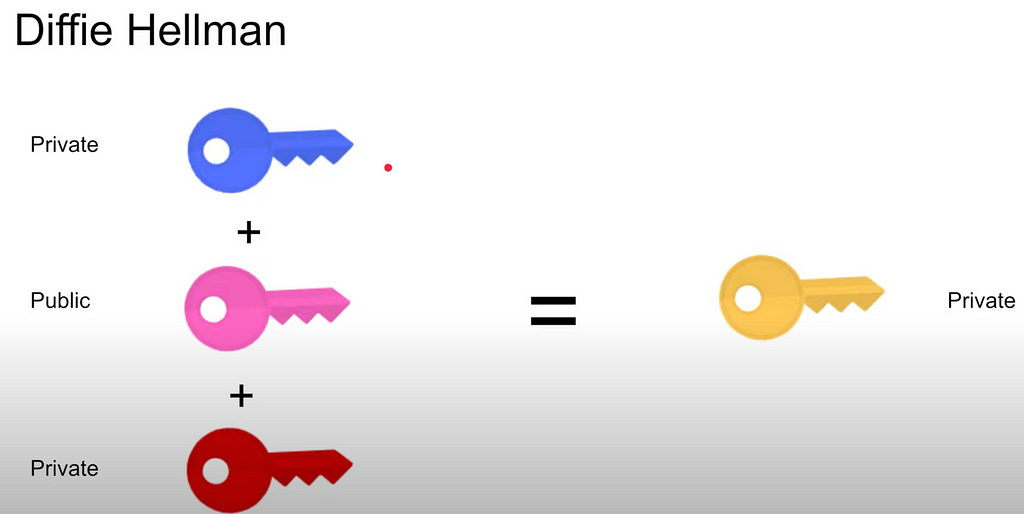
1 and 2: public/unbreakable — OK
2 and 3: public/unbreakable — OK
TLS 1.3 process:
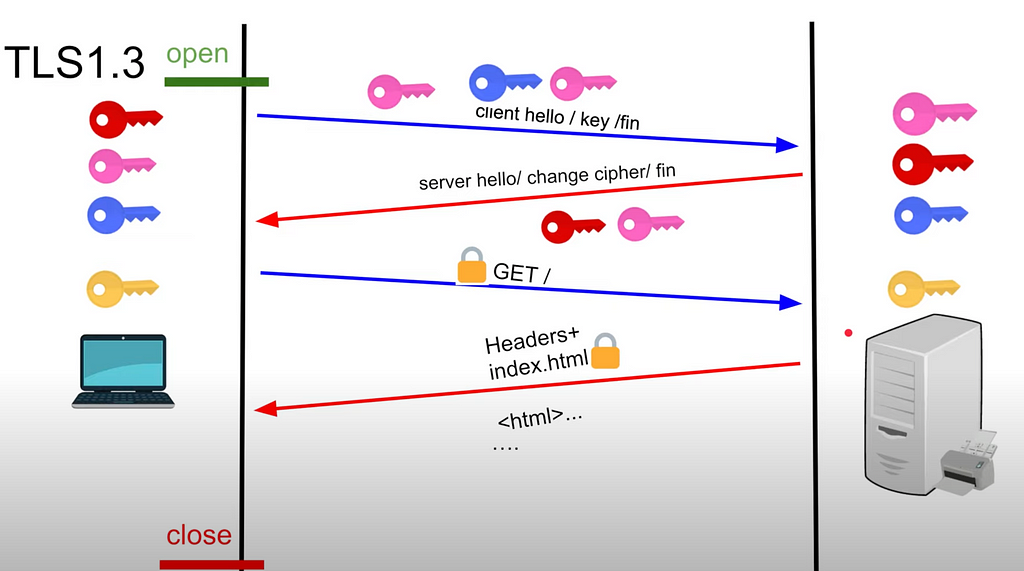
- Client sends to the server: public key and merge of public + private => 2 parts are sent
- Client has private key of itself - Server generates private key for itself
- it accepts merge of 2 keys from the client: private of the client and public of the client
- adds its own private key → symmetric key - Server sends merge of client public key and server private key. Client merges them with private of itself => symmetric key
- Now client and server can communicate with each other via symmetric key
=> Much faster compared to TLS 1.2 as only 2 round trips
3. DNS over HTTPS aka DoH
Video 1: https://www.youtube.com/watch?v=SudCPE1Cn6U
Video 2: https://www.youtube.com/watch?v=flnw78uhFkE
Further reading:
- https://www.cloudflare.com/learning/ssl/what-is-encrypted-sni/
- https://blog.cloudflare.com/encrypted-sni/
ISP — internet servide provider
If client uses plain HTTP — ISPs and government can see everything.
In HTTPS connection government can only see domain (as ISP can): example.com. And they can give you bogus IP address or block as they are able to sift through DNS.
DoH is difficult to make as you need to establish secure connection (aka TLS) between:
- DNS resolver and the client
- client and server
Process:
- DoH with the DNS provider (like Cloudfare)
- Establish TCP connection
- Establish TLS
- Make request
=> ISP doesn’t even know that you have made a DNS request
But SNI is still a valid way for ISP to block you => ESNI is a way to go
8. Certificates and Certificate Authority 📝
Video 1: https://www.youtube.com/watch?v=x_I6Qc35PuQ
Video 2: https://www.youtube.com/watch?v=r1nJT63BFQ0
When client hello goes from client to server, it can be intercepted. It is known as Man-In-The-Middle-Attack aka MITM. It happens on the Layer 4 of OSI model.
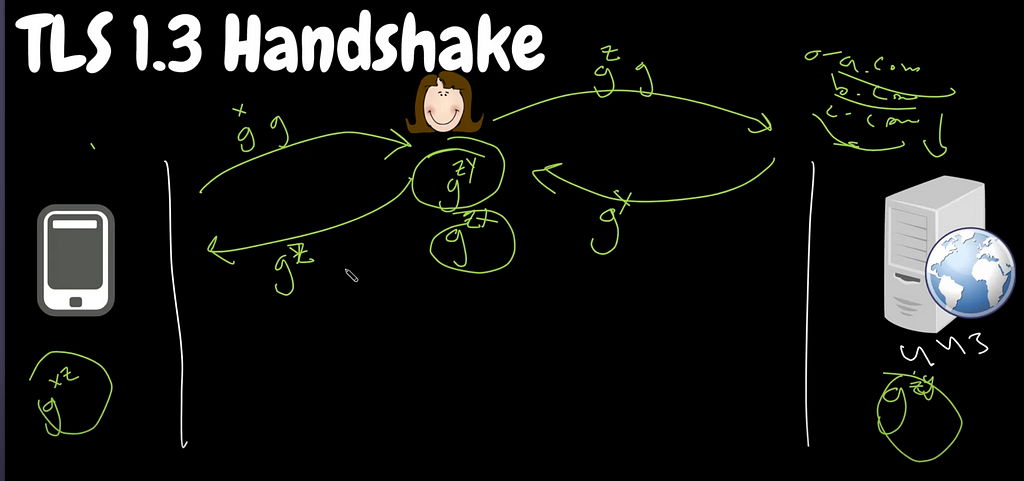
And then, the villain responds with the IP address of Google (on the behalf of Google). Now, this response has another TLS params (to impersonate Google).
Moreover, villain will have 2 sided communication:
- with Google (using keys)
- with client (using another keys)
=> So, it acts as invisible proxy
We need some third party to verify that server is legitimate. It is called Certificate Authority aka CA.
I.e. Google, to start the server, needs some sort of certificate.
- It says: “this is my public key and my info. Give me a certificate.”
- CA takes this info, encrypts (aka signs) with its private key and gives to Google (server) back
- Signed certificate with public key of the server.
Read section above about TLS before going forward
1. After client receives server hello with certificate which has public key, it needs to verify it.
2. It takes public key of the server [Server certificate]
3. Sees the CA in the Certificate, goes to the certificate of the CA [CA certificate]
4. Uses public key of the CA and encrypts (aka signs) public key of the server:
- see if it matches with initial server certificate
- another way: take public key of the CA, decrypt certificate and see if public key of the server match with given by the server
- same process with ROOT certificate which goes after CA certificate. Actually, ROOT certificates are installed on our machines.
Why the process above with CA is even eligible: no one can fake the signature as no one has private key of the CA.
9. SNI 🗝
SNI — server name indication
Video 1: https://www.youtube.com/watch?v=t0zlO5-NWFU
Video 2: https://www.youtube.com/watch?v=manTiXESYG0
SNI is a TLS extension which allows client to specify which host it wants to connect during TLS handshake => multiple websites/domains to be hosted in a single public IP address. Recall section about public/private IP addresses.
Why SNI:
- public IP is expensive: multiple websites into a single public IP address:
- make TCP connection with the public IP address of the server - host header in HTTP 1.1 was introduced and now you can specify which host you want to connect to. It is an ordinary header.
=> Not secure. We need HTTPS. But we don’t have any info during TLS.
Process:
- Unencrypted below aka ordinary HTTP:
- at first we send request, i.e. GET/ a.com
- in DNS we find the IP of the server + we also sends header: {HOST — site domain}.
-then we establish TCP. We route to the server.
- and imagine that one IP address has multiple domains: 1.2.3.4/a.com; 1.2.3.4/b.com. Hence that header will navigate us to the desired domain in that single public IP address. - Encrypted aka HTTPS:
- establish TLS (read above about this)
- BUT: not simple client hello, but client hello + specific website within that public IP address. I.e. TLS + SNI(a.com)
- server will send back the certificate of the a.com from SNI. If we specify b.com → certificate of b.com. TLS 1.3 stuff as usual, but with that particular server.
- client apart from SNI will tell which encryption it does support
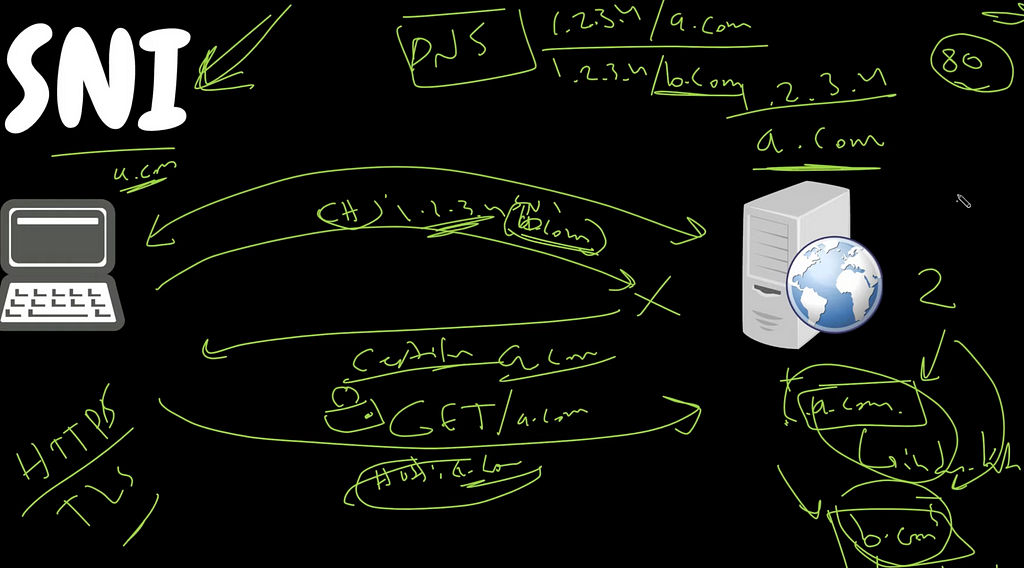
Issues of SNI:
- SNI sends host name in clear text
- No privacy (everyone can look at client hello)
Meet ESNI:
- encrypts client hello
- public key of the server is received from DNS. client hello is encrypted with it
- ESNI must be done via DoH/DoT as request to DNS is unencrypted — UDP
10. Web Server and State of the applications
1. Web Server 🗃
Video: https://www.youtube.com/watch?v=JhpUch6lWMw
What is a web server:
- software that serves web content: html page, image, audio, video etc. Consumed by client that knows how to process that particular content
- uses HTTP protocol — Layer 7
- has 2 types of content:
- static content: html, js code, pdf, css
- dynamic content: blog post — query to the database where everyone has different content. Content depends on many things: location, user etc - used to host web pages, blogs, build APIs
How web servers work:
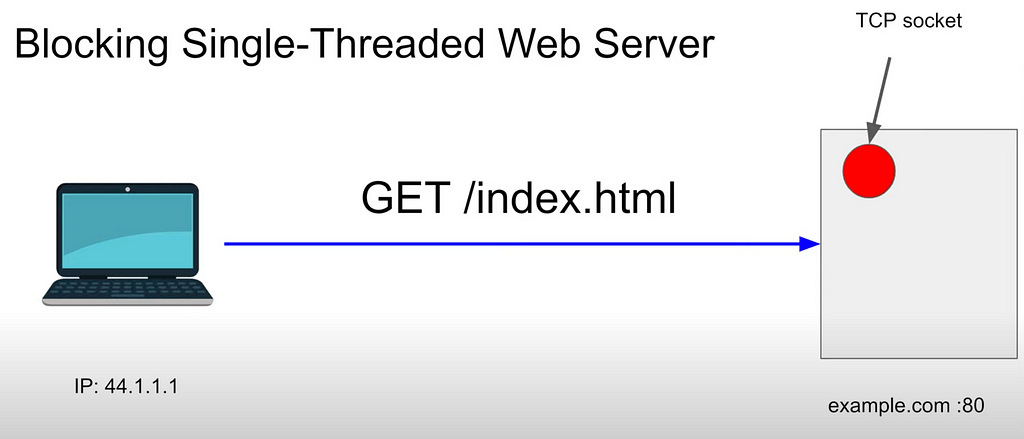
- client, for example on public IP 44.1.1.1, makes request: GET /index.html.
- server, for example with domain and port example.com:80, makes a response with html page and headers
- due to TCP, server reserves place in memory for this connection/client: TCP socket
- if another client makes a request: new TCP connection for this client (2 connections for now) and server reserves second TCP socket for this second client.
- in Blocking Single-Threaded server it will process only one TCP socket at a time
2. Stateful vs Stateless applications
Video: https://www.youtube.com/watch?v=nFPzI_Qg3FU&list=WL&index=16
Stateful:
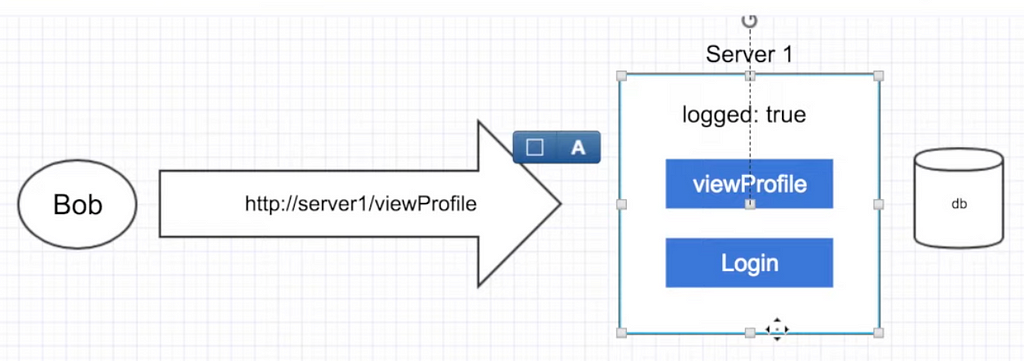
- client sends request for login
- server authenticate the user with the help of database and swaps the flag for this user
- but what if we have LB and the next call of the user for, i.e. viewing his profile, will be redirected to the second server? => Fail
=> So, stateful are okay when we have one machine. It saves some call to the database as you don’t make additional calls and just keeps some data on the server side. But you can’t scale
Stateless:
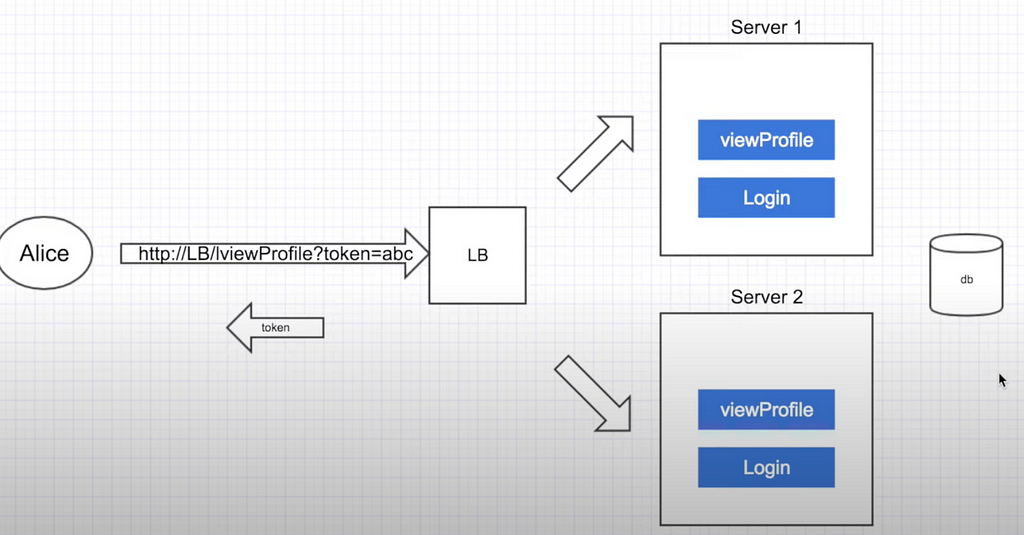
- client sends request for login
- LB authenticates and responds with token to the user
- next time client will make a request, he will need to add token to the call
- LB → server where server queries database to check if token is valid
- generally, token has expiration date and client has to get new one
- stateless — slower on the backend compared to stateful, but are much more scalable. I.e REST is an example
11. CORS
Video: https://www.youtube.com/watch?v=Ka8vG5miErk&list=WL&index=15
By default CORS is turned off. So, we’ll look at CORS if it is turned on
Further reading:
- https://developer.mozilla.org/en-US/docs/Glossary/Preflight_request
- https://stackoverflow.com/a/29954326/16543524
- https://stackoverflow.com/a/35850184/16543524
CORS — cross origin resource sharing.
CORS — mechanism that provides configuration to configure access to shared resources. CORS applies when a webpage makes a request to another server other than its origin server, this could mean that either the domain, protocol, or port differs.
- Accessing another site resource will be prohibited unless you set header: “Access-Control-Allow-Origin”. This will mean that requesting part has access to the requested one.
Error if you don’t specify it:

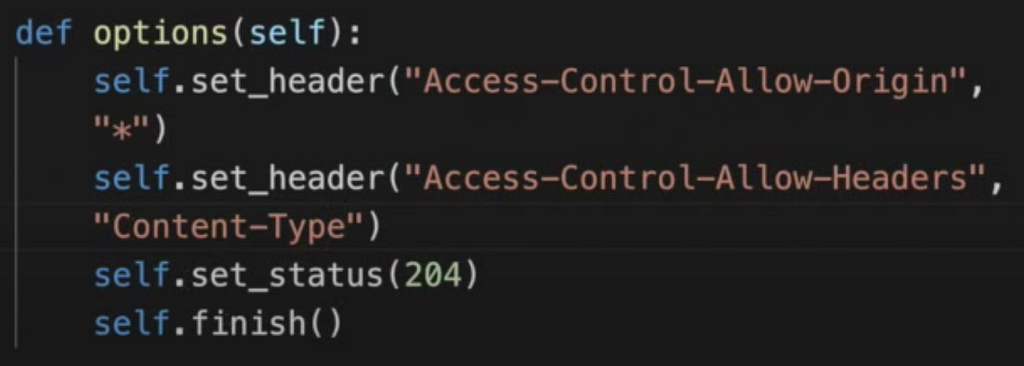
2. If error like: “Access-Control-Allow-Origin” found and there is no current domain, which makes request, specified, then you need either write it or even use “*” in header value to allow everyone.

3. If you send some complex request (there is list of simple requests), then browser will at first make so-called preflight request — CORS request to see if the request is eligible. In our simple example we can do something like the following (see that you need Access-Control-Allow-Origin and other headers if needed):
Simple requests:
Cross-Origin Resource Sharing (CORS) - HTTP | MDN
12. HTTP cookies 🍪
Video: https://www.youtube.com/watch?v=sovAIX4doOE
Video about samesite cookies: https://www.youtube.com/watch?v=aUF2QCEudPo&list=WL&index=18
Video about zombie cookies: https://www.youtube.com/watch?v=lq6ZimHh-j4&list=WL&index=17
Cookies — pieces of data that are used as storage media and sent to server with each request. Used for session management.
- Creating cookies:
There are 2 ways to create cookies:
- Javascript way in the browser console: document.cookie = “someName=76”
- Web Server way (cookie header):
2. Cookie properties
- cookie scope:
1. domain: super.example.com will have a bucket with cookies. example.com will have another bucket. www.super.example.com is yet another domain with its cookies
- BUT: if you make document.cookie = “someName=76; domain = .example.com” — will make it available for all sub-domains.
- as HTTP is stateless, all cookies are to be sent with each request
2. path: /app1 will have certain cookies, /app2 will have another cookies => less bandwidth is needed: document.cookie = “someName = 76; path = /path1” - Expires, Max-age. If you don’t specify these properties, cookies will be destroyed after the browser is closed. If you specify, then cookies are called permanent cookies (yeah weird, but MDN calls them these way). Then, if you close browser, the cookies still live: document.cookie = “someName = 76; max-age = 3min”
- samesite cookies:
- document.cookie = “someName=76; samesite=strict” : if you click link on some shady site, your cookies will be sent as well. But if you specify samesite=strict, then you’ll never get cookies (they won’t be sent to the server) from the site unless you are on it. I.e. if you visit link directly from the browser, you’ll get cookies. But if you click on the link from some site that leads to the site — no cookies.
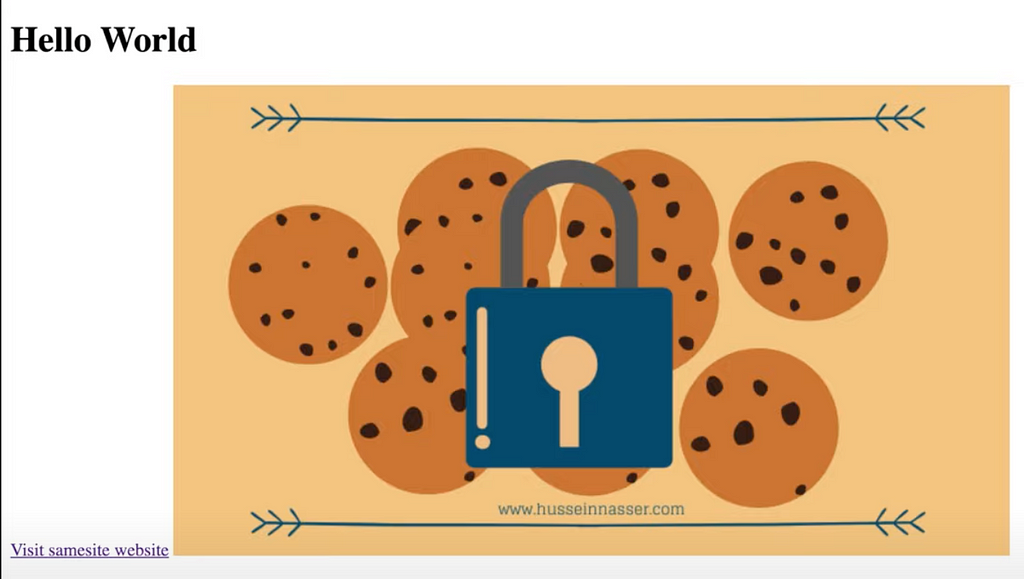
- document.cookie = “someName=76; samesite=lax” : this cookie will be sent. However, i.e. the image, won’t be present on the site as it is on another domain.

Still, clicking the link will navigate to this page. So, you can’t retrieve data from other sites/domains, but you can visit them and observer data there. samesite=lax == No samesite at all. If samesite=none => really none. So, you are on some site and image was loaded to it:
3. Cookie types
- Session cookies
- don’t have max-age,expires — browser closed => destroyed as session ends - Permanent cookies
- have expires, max-age - Httponly — can only be set from the server
- browser can’t read them (security thing)
- can’t be accessed from document.cookie on the browser side
=> if you type document.cookie => this cookie can’t be seen. You can see them in the cookies section of the developer tools, but JS can’t read them. Cool for tokens, session ids
- Secure cookie: only available for HTTPS sites. In other way — ordinary cookies
- Third party cookies: used for tracking services. They are from other sites, but sit in your domain (for example from some adds page). They can’t access your domain, but they know that they are in your domain: track you IP, website. Usually used for analytics and so on
- Zombie cookies: if you delete them, they recreate themselves with the same values. There are a lot of implementations for them, but one of them is by E-Tag. Read section above if you missed it. Another ways are by using other storage stuff: Local Storage, Session Storage, IndexedDB, Web SQL
4. Security
- stealing cookies: app that reads document.cookie and sends somewhere
- Cross site request forgery: samesite was developed to secure from this. Otherwise: you click on the link on some shady site. This link leads to, i.e. bank site, browser will recall your cookies if present => bad:((
13. Proxy and Reverse Proxy⛓
1. Proxy and Reverse proxy
Video: https://www.youtube.com/watch?v=SqqrOspasag
Video about only Reverse Proxy: https://www.youtube.com/watch?v=ylkAc9wmKhc
Video about Load Balancer: https://www.youtube.com/watch?v=aKMLgFVxZYk
Video about TLS/SSL Termination: https://www.youtube.com/watch?v=H0bkLsUe3no
Video about TLS Passthrough: https://www.youtube.com/watch?v=iLHhL-vAPqo
Proxy — software that makes a request on behalf of the client.
Client → Proxy → Server
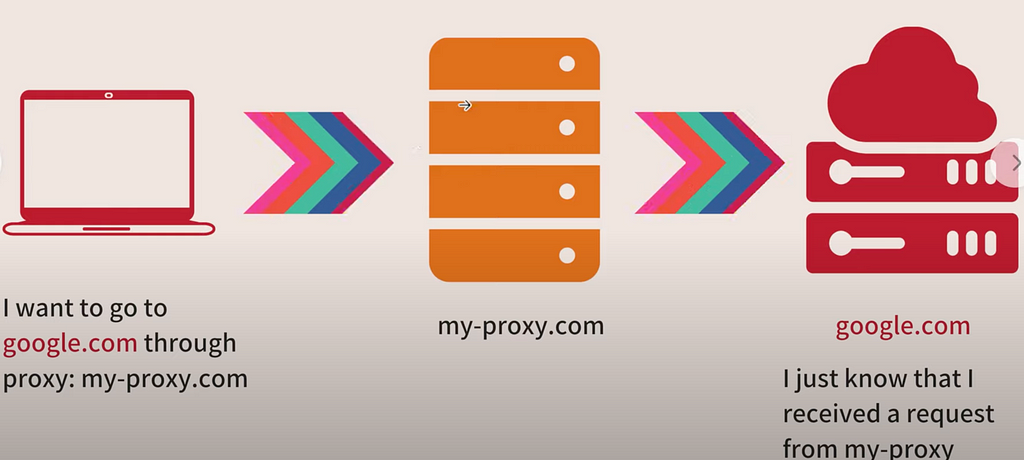
- In some organizations Proxy prevents you from visiting certain websites
- Another client uses the same proxy and asks for the same info. Proxy will take it from the cache rather than making request again.
- Use cases: 1. Caching 2. Anonymity 3. Logging 4. Block sites 5. Microservices: i.e. sidecar proxy
Reverse proxy — software that hides final destination for client. So, client doesn’t know exactly where request goes. Actually, client thinks that he knows where to go, but in reality request is mapped to another server.
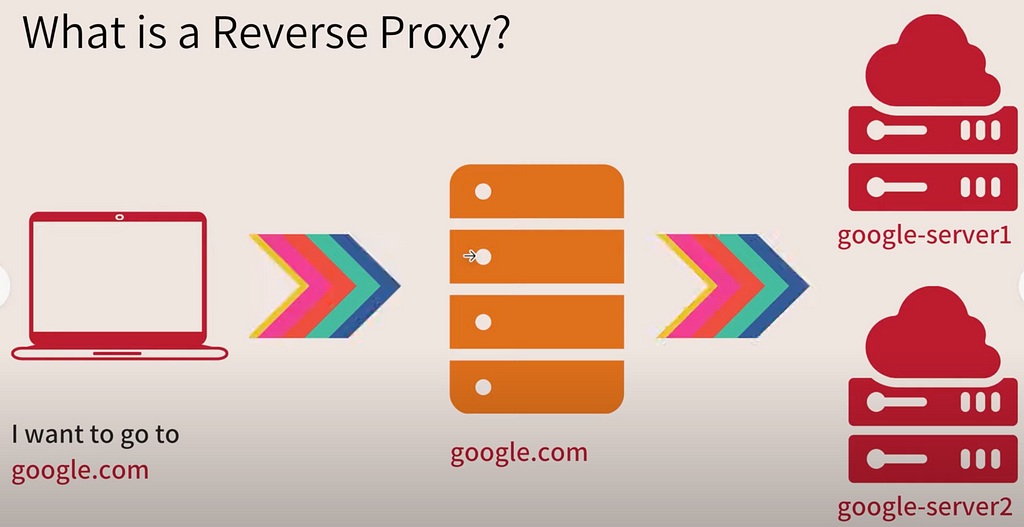
- Use cases: 1. Caching (Reverse Proxy will reply to the client without actually visiting backend) 2. Load balancing 3. Ingress: Kubernetes stuff 4. Canary deployment 5. Microservices: sidecar where it is proxy and reverse proxy
- Service mesh (side car proxy) — proxy and reverse proxy are used at the same time
2. Level 4 vs Level 7 load balancer
Load balancer (LB for short) — software that distributes the load, in our case requests, to multiple servers to prevent over-loading. Oftentimes, reverse proxy is used as a load balancer as well (i.e. NGINX).
Second definition: LB separates load into different servers by various techniques. I.e. round robin
Before diving in this section, be sure to check first section about OSI.
There will be 2 similar chunks about L4 and L7 below with various information. Check out!
First chunk:
Layer 7
- Send request to Reverse Proxy
- TLS established with Reverse Proxy - Request is a composite thing which encompasses packets
- only after all packets have been received by Reverse Proxy, the request is finished - As it is layer 7, Reverse Proxy terminates TLS
- Next, Reverse Proxy will send new packets to Server N
Doing the same thing as client with Reverse Proxy
Layer 4
- Send request to Reverse Proxy: packets
- Layer 4 is called packet level proxying
- it doesn’t look at the data as it is encrypted at this level - After first packets have been received by Reverse Proxy, it will be sent to the Server N, without waiting for the second packet. Next, second packet will do the same thing, third as well
- while client IP address is the same, Reverse Proxy will send data to the same server all the time
- response is done in the same way: packet will be sent to Reverse Proxy and then to the client. Then, next packet etc - Layer 4 doesn’t need to make sense of the request/response.
It is good when you don’t want/need Reverse Proxy to understand protocol: i.e. gRPC is ok
Layer 4 TLS is TLS Passthrough
Second chunk:
Layer 4 load balancer: we know only IP address and Port:
- changes the IP address from itself to one of the servers. It is done via NAT (read section above): source IP (of the client — on the picture it is 44.1.1.1) to Data Destination IP (on the picture it is 44.3.3.3)— one TCP connection from client to server
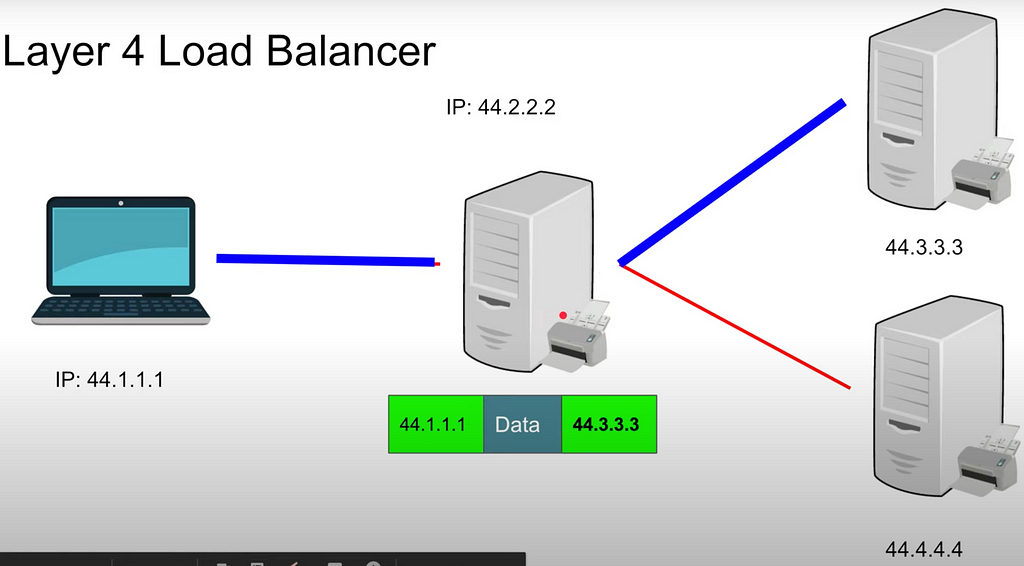
- client doesn’t know where the request was forwarded to as it is reverse proxy
Pros:
- simpler load balancing (doesn’t need to look at the data)
- efficient (doesn’t need to look at the data)
- more secure as no TLS termination
- one TCP connection
Cons:
- no smart load balancing: no URL rewriting as you know only IP address
- not applicable for Microservices (i.e. Ingress uses path to forward to various services)
- no caching for multiple users
Layer 7 load balancer:
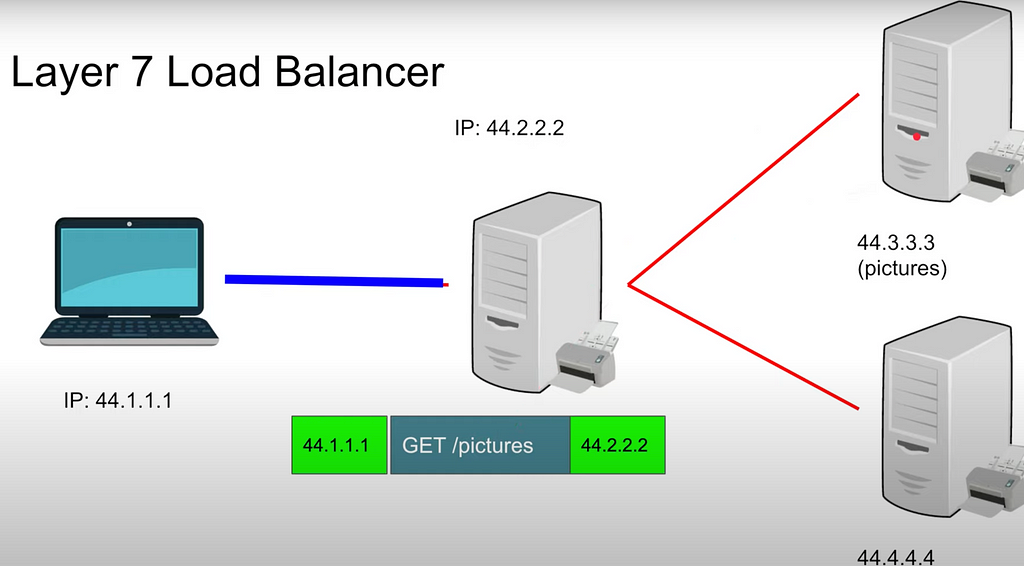
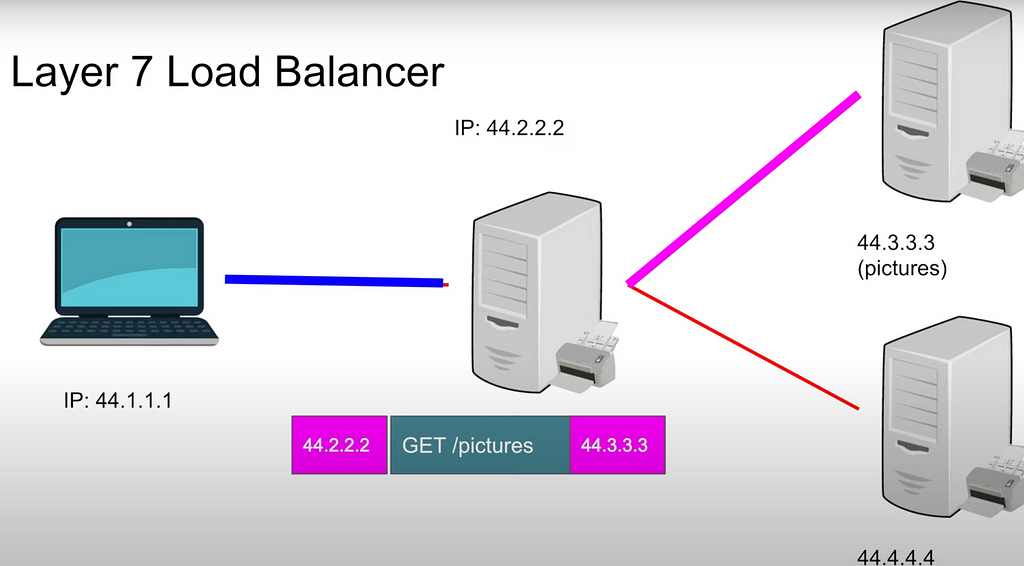
- client makes request to load balancer: IP_address_source GET/ pictures IP_address_destination: one TCP connection to Load Balancer, another TCP connection from Load Balancer to Server (which may be many for one path, i.e. 7 servers for /image)
- so, 2 connections for seemingly one connection
Pros:
- smart load balancing (based on certain logic: i.e. headers)
- caching
- great for microservices
Cons:
- expensive (looks at the data as TLS termination)
- decrypts (terminates TLS)
- two TCP connections
- must share TLS certificate: i.e. Client to Load Balancer
Pay attention in .cfg files: if layer 4 — won’t round robin as TCP is continuous, whilst in layer 7 — change constantly as round robin is active.
Below you can observe an example for Layer 7 LB (HAProxy)
3. TLS/SSL termination⚔️
TLS termination — process of ending TLS connection and sending unencrypted data to the main server. Only possible at layer 7 as at layer 4 data in encrypted.
Client <-> Load Balancer (Reverse Proxy) <-> Original Server
Client and Reverse Proxy have TLS between them.
To allow server to help the client: cache data, choose better server (if multiple), it needs to terminate TLS aka decrypt data.
TLS forward proxy — process of decrypting data from client and then encrypting again to send to original server. It is considered a way of TLS termination, but more secure as data between Reverse Proxy and Original Server is secure.
Client <-> Load Balancer (Reverse Proxy) — have TLS connection between them.
Proxy <-> Original Server — have also secure connection, but other than the first one.
We can put various stuff in our Proxy: intrusion detection systems, http accelerator does the work (like Varnish), Kafka fire off some event — because data in unencrypted.
Pros of TLS termination/TLS forward proxy:
- put proxy closer to the client location than the real server
- HTTP accelerator (i.e. Varnish) as data in decrypted
- intrusion detection system: sniff the data to detect such issues
- load balancing at layer 7/Service mesh
Cons:
- if one machine (proxy) and many servers — bottleneck as at layer 7 we have fewer connections (limited by max number of file descriptors on the server — this is a max number of connections) => running out of TCP connections
- load balancers at layer 4 are much better
- solution: multiple proxies at layer 7 or even layer 4 proxies in front of - data can be compromised
4. TLS Passthrough
Again, layer 4 proxy can only look only at IP address and port.
Rehearse from the above section: client makes request to the server. Reverse Proxy will either:
- first variant: merely send request to one of the backends (via round robin, for example) — one TCP connection that is not terminated
- second variant: establishes a connection with the client and itself (so, you put a certificate inside reverse proxy). Then establishes another TCP connection with itself and one of the servers
TLS passthrough:
Available only on Layer 4
- Reverse Proxy will crack the client hello to look at the SNI parameter to find the domain
- pass to the desired domain, but encrypted
- receive response from one of the servers, but don’t understand anything
- now, reverse proxy just forwards messages between client and server without understanding the content
=> Layer 4 reverse proxy
Also, I recommend watch the following video and try on your own to play with HAProxy: https://www.youtube.com/watch?v=qYnA2DFEELw
14. HSTS 🔩
HSTS — http strict transport security
SSL Stripping:
- most web servers support HTTP and HTTPS
- if client connects with HTTP, he will be redirected by the server to HTTPS
- problem: during first HTTP request from the client, the request can be MITM’ed and attacker will redirect request to his site, which looks quite the same and can also be HTTPS
=> Solution is HSTS
- browsers keep list of all sites that force clients to work over HTTPS. It is called HSTS list
- so, if you type http site, browser will connect you to the HTTPS version automatically
- your website should return Strict-Transport-Security header to make browser update that HSTS list
- even if you have some pages of the site on HTTP and others on HTTPS => always connect via HTTPS with the website
Limitations:
- speed of the request is lower
- doesn’t work with Downgrade Attack (TLS)
- attacker intercepts client hello to downgrade encryption algorithm of the client so that server can’t choose the latest and best encryption algorithm - if client goes to the site for the first time, which can support HTTPS, but client goes to HTTP version → browser doesn’t have this site in the HSTS list => MITM possibility (ARP poisoning, precisely. Read about ARP in the section above). That’s why look at the certificate (must be issued by the very site which we enter, i.e. google.com)
15. MIME sniffing 🌫
Video: https://www.youtube.com/watch?v=eq6R6dxRuiU
Further reading: https://www.coalfire.com/the-coalfire-blog/mime-sniffing-in-browsers-and-the-security
MIME — multipurpose internet mail exchange
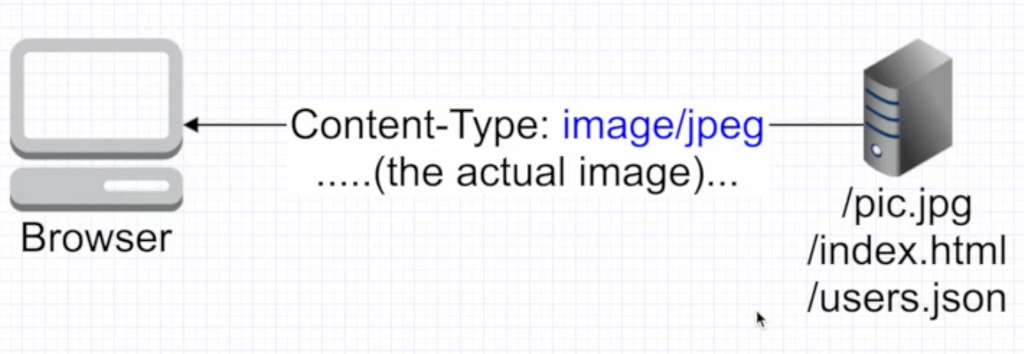
MIME sniffing is an approach done by the browser to identify what kind of content it is being served. Browser relies on this content type to know what to do.
If you don’t specify the type of the content returned, then browser doesn’t know what to do. Hence it tries to sniff the body of the content and parse it to get to know what to do.
Let’s look at the image below:
- .jpg extension is a plain path, it doesn’t specify anything (I mean, content type)
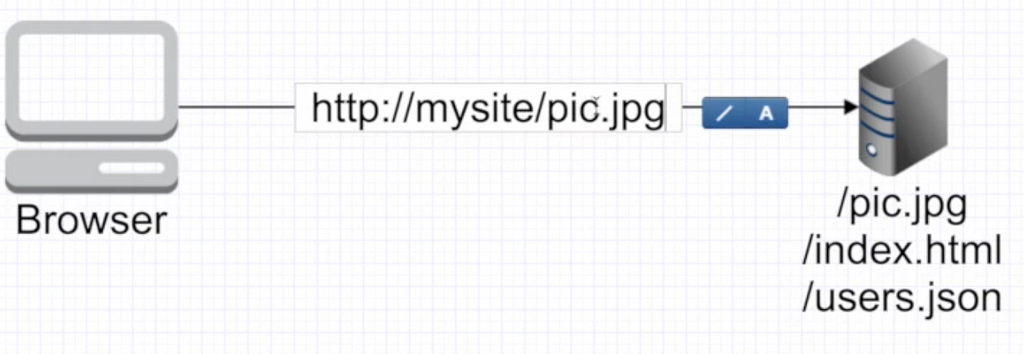
BUT: client asks for resource, server responds with html page where no content-type is specified. Browser tries to parse it, finds that it is html. But inside that html there is a bad javascript code. And you get hacked
Outro 🙌
If you reached this point, then many thanks for your patience and kudos to your inquisitiveness 🎉. Feel free to write comments or drop connect me via the provided resources📩:
- LinkedIn: www.linkedin.com/in/sleeplesschallenger
- GitHub: https://github.com/SleeplessChallenger
- Leetcode: https://leetcode.com/SleeplessChallenger/
- Telegram: @SleeplessChallenger
Huge course about networking, web and everything in between was originally published in Level Up Coding on Medium, where people are continuing the conversation by highlighting and responding to this story.
This content originally appeared on Level Up Coding - Medium and was authored by Daniil Slobodeniuk
Daniil Slobodeniuk | Sciencx (2022-11-10T03:21:58+00:00) Huge course about networking, web and everything in between. Retrieved from https://www.scien.cx/2022/11/10/huge-course-about-networking-web-and-everything-in-between/
Please log in to upload a file.
There are no updates yet.
Click the Upload button above to add an update.
