This content originally appeared on Bits and Pieces - Medium and was authored by Quokka Labs

Documentation is more important than you think and is essential to the whole application development process and back-end and front-end development. Generally, good API documentation is necessary for clients to use an API effectively. In this blog, we are doing a Swagger Configuration with NestJS, and we will learn how to configure it effectively.
If you are into web development and want to know about current trends, head here: Top web development trends.
We are using NestJS as it provides a dedicated module to enable swagger and supports OpenAPI specs.
Let’s get started.
Step 1. Installing Dependencies
Installing dependencies is one of the first and most important steps. Let’s add the below command:
$ npm install --save @nestjs/swagger swagger-ui-express
We are using express to install the `swagger-ui-express package`, but to make this process faster, we will use the `fastify-swagger package`.
Step 2. NestJS Swagger Bootstrapping
Let’s bootstrap the NestJS swagger module into our app. We will do it by swagger initialization with SwaggerModule like the below code:
import { NestFactory } from '@nestjs/core';
import { DocumentBuilder, SwaggerModule } from '@nestjs/swagger';
import { AppModule } from './app.module';

async function bootstrap() {
  const app = await NestFactory.create(AppModule);

  const config = new DocumentBuilder().setTitle('Demo Application')
                      .setDescription("Demo API Application")
                      .setVersion('v1')
                      .addTag('books')
                      .build();

  const document = SwaggerModule.createDocument(app, config);
  SwaggerModule.setup('api', app, document);

  await app.listen(3000);
}
bootstrap();
Did you notice the DocumentBuilder class in the above code? The DocumentBuilder helps to build the structure of the document. The document confirms the OpenAPI specs; it helps us set title, description, version, and tag properties. So we finally built an instance of the doc in this process.
Now we will call the createDocument() process from the SwaggerModule class. It takes two arguments as input.
- The first argument is the app instance
- the second argument is the doc itself
Ultimately, we call the setup() process from the SwaggerModule class. So, this process agrees with a few inputs like below:
- We needed to path the mount Swagger UI, so we specified the path as API. It means that Swagger UI will be available locally on http://localhost:3000/api.
- The app instances
- Some secondary configurations
- The document object from the last step
Step 3. UI of NestJS Swagger
We need a display that shows something meaningful, so we have to add a few endpoints for demo use. See the code below.
import { Body, Controller, Get, Param, Post, Res } from '@nestjs/common';
import { AppService } from './app.service';
import { Book } from './book.model';

@Controller('books')
export class AppController {
  constructor(private readonly appService: AppService) { }

  @Post()
  async createBook(@Res() response, @Body() book: Book) {
    console.log("Book: ", book);
  }

  @Get()
  async fetchAll(@Res() response) {

  }

  @Get('/:id')
  async findById(@Res() response, @Param('id') id) {
    console.log("Fetch Book for Id: ", id)
  }
}
To start this basic app with basic configurations, do follow the below command:
$ npm run start
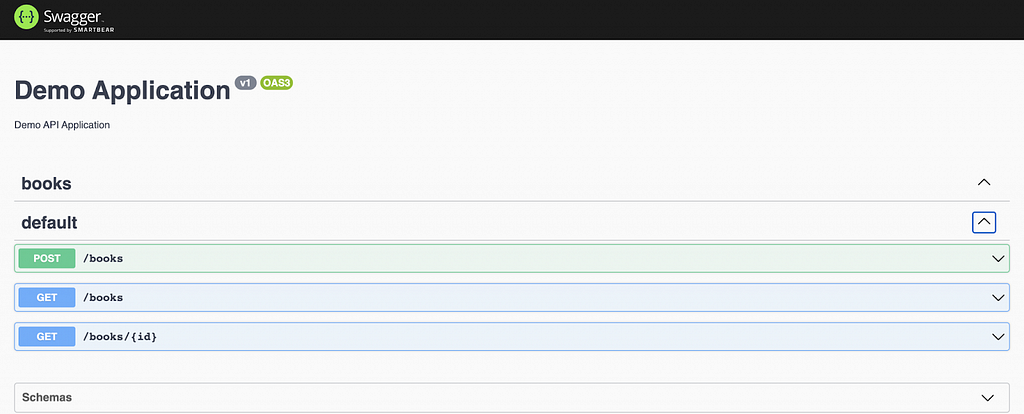
Now you can check http://localhost:3000/api like the below screen.

If you notice, SwaggerModule will automatically reflect all endpoints with title, description, version, etc.
If you want, you can download the Swagger JSON file from the local link http://localhost:3000?api-json. The JSON file will look like the code below.
{
"openapi": "3.0.0",
    "paths": {
        "/books": {
            "post": {
                "operationId": "AppController_createBook",
                "parameters": [],
                "requestBody": {
                    "required": true,
                    "content": {
                        "application/json": {
                            "schema": {
                                "$ref": "#/components/schemas/Book"
                            }
                        }
                    }
                },
                "responses": {
                    "201": {
                        "description": ""
                    }
                }
            },
            "get": {
                "operationId": "AppController_fetchAll",
                "parameters": [],
                "responses": {
                    "200": {
                        "description": ""
                    }
                }
            }
        },
        "/books/{id}": {
            "get": {
                "operationId": "AppController_findById",
                "parameters": [],
                "responses": {
                    "200": {
                        "description": ""
                    }
                }
            }
        }
    },
    "info": {
        "title": "Demo Application",
        "description": "Demo API Application",
        "version": "v1",
        "contact": {}
    },
    "tags": [{
        "name": "books",
        "description": ""
    }],
    "servers": [],
    "components": {
        "schemas": {
            "Book": {
                "type": "object",
                "properties": {}
            }
        }
    }
}
Step 4. Configuration Options of Nest Swagger
It is possible to provide additional NestJS Swagger configurations via the SwaggerDocumentOptions class. See the below code.
export interface SwaggerDocumentOptions {
    /**
     * List of components to include in the spec
     */
    include?: Function[];

    /**
     * Extra type that should be scanned and added in the spec
     */
    extraModels?: Function[];

    /**
     * If `true`, swagger will ignore the global prefix set through `setGlobalPrefix()` method
     */
    ignoreGlobalPrefix?: boolean;

    /**
     * If `true`, swagger will also load routes from the modules imported by `include` modules
     */
    deepScanRoutes?: boolean;

    /**
     * Custom operationIdFactory that will be used to produce the `operationId`
     * based on the `controllerKey` and `methodKey`
     * @default () => controllerKey_methodKey
     */
    operationIdFactory?: (controllerKey: string, methodKey: string) => string;
}
We can configure the option like the below code. But it’s optional for swagger configuration.
const options: SwaggerDocumentOptions = {
    deepScanRoutes: true
};

const document = SwaggerModule.createDocument(app, config, options);
Step 5. UI Configuration Options for NestJS Swagger
This configuration is about adding another layer of configuration options. We can add option objects relating to the class ExpressSwaggerCustomOptions as the fourth argument to process SwaggerModule.setup.
You can see the below interface definition:
export interface ExpressSwaggerCustomOptions {
    explorer?: boolean;
    swaggerOptions?: Record<string, any>;
    customCss?: string;
    customCssUrl?: string;
    customJs?: string;
    customfavIcon?: string;
    swaggerUrl?: string;
    customSiteTitle?: string;
    validatorUrl?: string;
    url?: string;
    urls?: Record<'url' | 'name', string>[];
}
If you noticed, then you can see that there are many configuration options so that we can use them like the below:
const customOptions: SwaggerCustomOptions = {
    customSiteTitle: 'Book API Docs'
}

SwaggerModule.setup('api', app, document, customOptions);
So here we finalized the swagger configuration with NESTJS. Refer to Back end development frameworks to learn more about impacting frameworks.
Conclusion
This is it! The NestJS Swagger Configuration lesson was a success. We reached document-level custom options and Swagger UI customization options. It will help your app development in back-end and front-end development to document the API.
Comment below on how it was helpful to you.
Build apps with reusable components like Lego

Bit’s open-source tool help 250,000+ devs to build apps with components.
Turn any UI, feature, or page into a reusable component — and share it across your applications. It’s easier to collaborate and build faster.
Split apps into components to make app development easier, and enjoy the best experience for the workflows you want:
→ Micro-Frontends
→ Design System
→ Code-Sharing and reuse
→ Monorepo
Learn more
- How We Build Micro Frontends
- How we Build a Component Design System
- The Bit Blog
- 5 Ways to Build a React Monorepo
- How to Create a Composable React App with Bit
A Guide to NestJS Swagger Configuration was originally published in Bits and Pieces on Medium, where people are continuing the conversation by highlighting and responding to this story.
This content originally appeared on Bits and Pieces - Medium and was authored by Quokka Labs
Quokka Labs | Sciencx (2022-11-16T09:40:23+00:00) A Guide to NestJS Swagger Configuration. Retrieved from https://www.scien.cx/2022/11/16/a-guide-to-nestjs-swagger-configuration/
Please log in to upload a file.
There are no updates yet.
Click the Upload button above to add an update.
