This content originally appeared on DEV Community 👩💻👨💻 and was authored by Suraj Vishwakarma
Introduction
Analytics plays an important role in knowing the user and the performance of a website. People ask me about my audience's country and views for sponsored posts on my website. So, knowing your audience is always a plus point. Analytics can also be helpful in knowing your least and best-performing page/article. You can work on the least one to improve it.
Google Analytics is a fantastic tool to know your traffic but it’s better for non-developer people to add analytics. Umami is a self-hosted web analytics solution that is open-source and privacy-focused. You can customize the database and hosting as per your need. The feature that impresses me is that with one click you can get a shareable link to the analytics for sharing. That’s why Hashnode uses Umami to provide article analytics to users. A solid reason to at least give it a try.
So, today we are going to look into adding analytics to a web application with Umami. We are going to cover the following topics:
- Installing Umami
- Setting up database
- Deploying Umami to Vercel
- Adding a script to our web page
- Collecting the data
The topics look a lot but the setup is quite easy if you are familiar with web development. So, let’s get started with it.
Prerequisite and environment setup
The guide is simple but you need to have at least basic knowledge of web development and GitHub. We are going to code anything but this will help you understand it better.
As for the tools, we need to have the following tools pre-installed:
- Git: It is a distributed version control system. This will help fork the Umami repository and push code to GitHub for deployment on Vercel.
- Node: It provides you with a JavaScript runtime environment. We will use this for installing dependencies and running the Umami server locally.
Umami needs yarn for installing the package(npm might give some error). After installing Node, you can run the below command to install the yarn globally. Enter the command in the terminal.
npm install -g yarn
Installing Umami
Navigate to the directory in which you want to create the project and open the terminal to enter the below command one by one in the terminal. This will fork a repository from GitHub.
    git clone https://github.com/umami-software/umami.git
    cd umami
    yarn install
This will install the dependencies of our Umami server.
Database
We need to have a database to store user and analytics details. Umami supports SQL and PostgreSQL for databases. We are not going to use any local database, we are going to use PostgreSQL from the supabase. It provides an all-in-one solution to the backend having support for Database, Authentication, instant APIs, Edge Functions, Realtime subscriptions, and Storage.
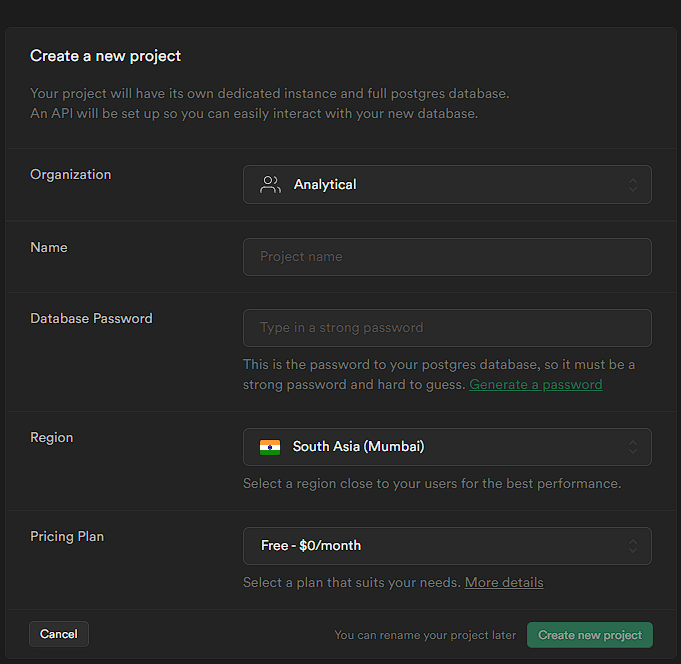
Now, go to their website through supabase.com and click on Start your project. After registering/logging in, you will be redirected to their project page. Here, click on New project to create a new project. You will redirect to Create a new project page. Fill in the details related to the project.
Note: The password section does not support some special characters. So avoid using them. You can use their
Generate a passwordto generate a strong password that will not have any errors.
Now, after creating the project then click on Setting from the left panel. Then select Database and scroll down to the bottom to find the Connection string.
The connecting string will look like postgres://postgres:[YOUR-PASSWORD]@host:6543/postgres. Replace the [YOUR-PASSWORD] with the project’s password and add ?pgbouncer=true at the end.
Now, back to the code editor. Create a .env file at the root and add two environment variables. DATABASE_URL for adding the connecting string and HASH_SALT for adding a random string for hashing. This will make our .env file:
    DATABASE_URL=postgres://postgres:[YOUR-PASSWORD]@host:6543/postgres?pgbouncer=true
    HASH_SALT=any-random-string
Now, it's time to create a build. Open the terminal and run the below command to create a production-ready build.
yarn build
This will take some time, after successfully creating the build. Run the below command to start the umami server locally.
yarn start
If the server start running, check it on the machine by going to http://localhost:3000/. By default, the user will be admin and the password will be umami. Enter the credentials for logging in. After logging in, change the password by navigating to Setting → Profile → Change password.
Now, we are ready to deploy the umami web app to a hosting provider.
Deploying Umami
We need to have our code in a repository either on GitHub, GitLab, or Bitbucket. Choose whatever you feel comfortable with. Push the code them. You can check DigitalOcean’s How to Push an Existing Project to GitHub guide to push code to GitHub.
As the Umami is made using NextJS, it will be a better option to host it on vercel. So, we are going to host the umami web app on vercel. Navigate to vercel.com, after registering/login then click on Add new… then Project. In the Import Git Repository page, click on the option where you have pushed the code. Then it might ask you for permission to access the repository, provide that. After this, you will have your repository, select the one where you have pushed the code.
Now, you will be redirected to Configure Project. Vercel will automatically detect the framework that is NextJS and will run the build accordingly we don’t need to change anything from the Build and Output Setting. We need to add the Environment Variables. Click on it and add the environment variable that we have added in the .env file initially.
After this click on Deploy to start the process of deployment. After successful deployment, visit the website and log in with the changed password. If everything goes well, you will be able to see the dashboard.
Now, it's time to add a website and collect data.
Adding Website and Collecting Data
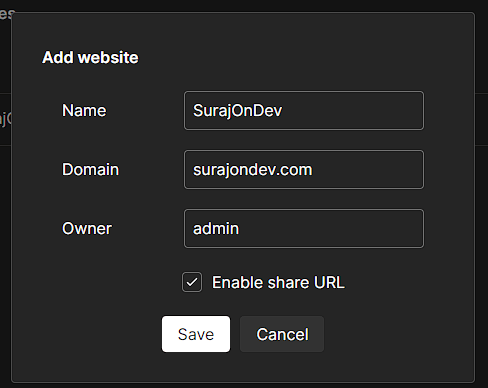
On your Umami’s vercel page, navigate to Setting → Websites → +Add website, for adding website for analytics. Enter the required information on the webpage and configuration.
Let’s look into the field one by one:
- Name: Enter a relevant name for the website.
- Domain: Enter the domain of the website. This should not include the
HTTP. - Owner: When you will have multiple users, this will be helpful to sort. Initially select the admin.
- Enable share URL: Check this box for getting a shareable URL for the analytics.
Now, click on Save to save the website.
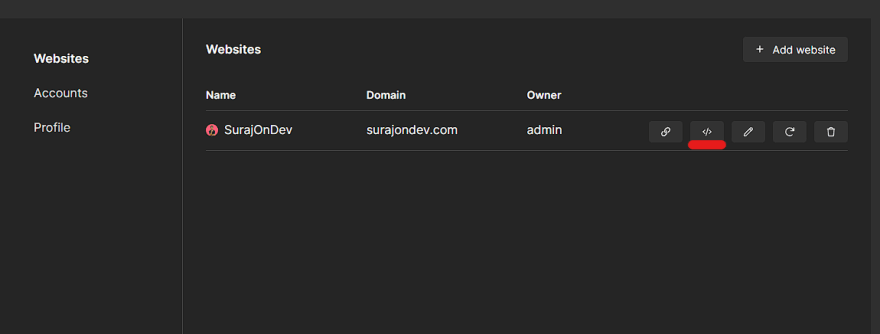
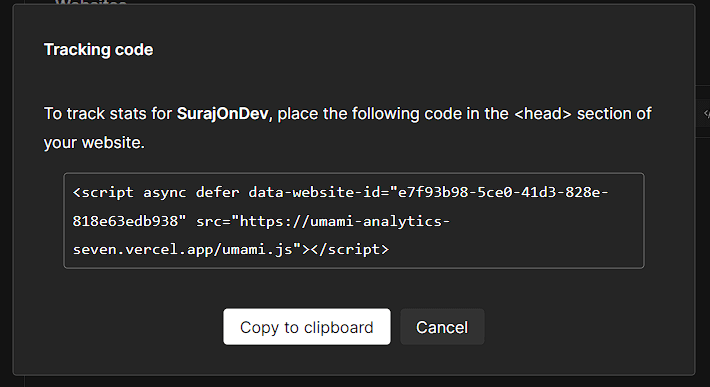
This will result in the above screenshot. Click on the code logo to get the code added to our website for data col collection
Add the code to the Head section of the website for collecting the data. After successfully adding the code and deploying your website, you will be able to see the analytics in the dashboard section of the Umami.
Note: To test the visit, visit the website from another device, from the same device it will not register the view. Otherwise, you can always check the website’s code from the inspect tool of the browser.
Conclusion
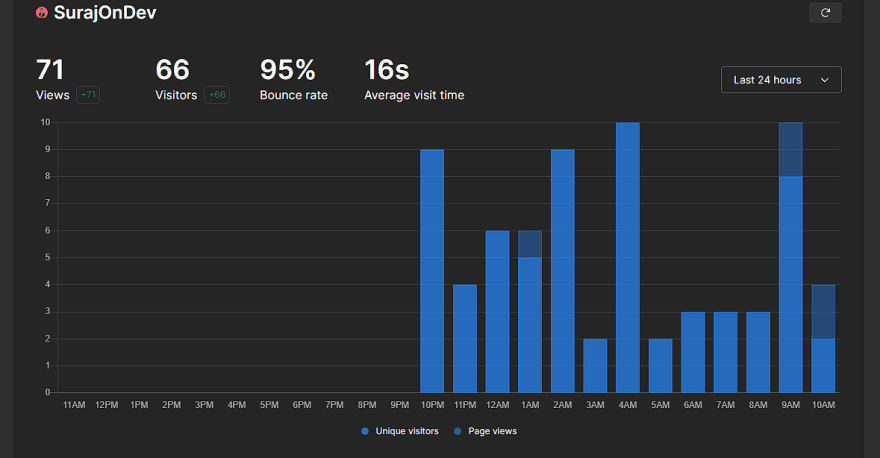
We have gone from running Umami locally to deploying it on the web. Once set up, you won’t need to do anything, the data will be collected and display by the Umami. It will show analytics for views, visitors, pages, referrers, browsers, OS, devices, and countries with a map. This variety of data will be enough to work on it. Also, you can always share these analytics with anyone with a link.
Umami also tracks events from your webpage. It’s also quite easy to set up. You can look at the docs here for more information regarding event tracking.
I hope this article has helped you in knowing the Umami tool for analytical solutions. Thanks for reading the blog post.
This content originally appeared on DEV Community 👩💻👨💻 and was authored by Suraj Vishwakarma
Suraj Vishwakarma | Sciencx (2022-11-19T11:30:00+00:00) Add Umami Analytics to a Web Application. Retrieved from https://www.scien.cx/2022/11/19/add-umami-analytics-to-a-web-application/
Please log in to upload a file.
There are no updates yet.
Click the Upload button above to add an update.

