This content originally appeared on Level Up Coding - Medium and was authored by Dilip Kashyap

Images are always displayed on your website by uploading them to your hosting server and using the path in your HTML code to display them, right?
However, I have a way to automate this process using Google Apps Script. Here is a detailed explanation of the process.
Process to fetch images from Google drive folder
- Create function to fetch URLs of Google Drive images
- Publish script as Web App
- Parse JSON Array on your webpage
Step 1: Create function to fetch URLs of Google Drive images
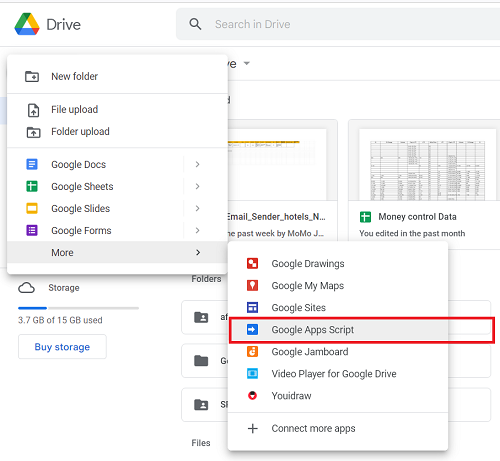
We need to create Google Script file from the Google drive and write the script as follows:

After creating Google Apps Script file, we have written the script as shown below in code block.
var filelinks = [];
var mimetypes = ["image/png","image/jpeg","image/gif","image/bmp"];

function doGet(e) {

  var fid;
  //var data = travseFolderGetId(e.parameters.folderId[0]);
  if(e.parameters.fid==undefined){
  fid='YOUR_FOLDER_ID';  // you can get it from folder URL, after folder/YOUR_FOLDER_ID
  }
  var data = imageItems(fid);
  return   buildSuccessResponse(data, 1);
}
Above written doGet() function will return the response to your Web API and here we just defined the folder Id in fid variable and pass it to the imageItems() function.
Now let’s see the script for imageItems() function in detail.
function imageItems(folderid){
 var folder = DriveApp.getFolderById(folderid);
 var files=folder.getFiles();
  var x=0;

  while(files.hasNext()){

    var file = files.next();
    if( mimetypes.indexOf(file.getMimeType()) != -1){
      var filelink ={};
      filelink['img_id']=file.getId();

      console.log(filelink['img_id']+"---folder:"+filelink['folder_id']+"\n\n");
      filelinks.push(filelink);
    }
  return filelinks;
  }
In the above written function, we used the folder id to fetch the files from the folder and stored them in the filelink array with img_id key value. By doing this finally we got the filelink array with all the file URLs, which are the link of images from the folder and at the end of the function we return the array to doGet() function.
Step 2: Publish script as Web App
Now, we are at the end of the process, we just need to create function, which is used to generate build response including all the return type we got from functions. Please see the script for the same.
function buildSuccessResponse(posts, pages) {
  var output = JSON.stringify({
    status: 'success',
    data: posts,
    pages: pages
  });

  return ContentService.createTextOutput(output).setMimeType(ContentService.MimeType.JSON);
}
As shown we sent response in data key and others keys are just for information tags and it informs that the response has been sent successfully.
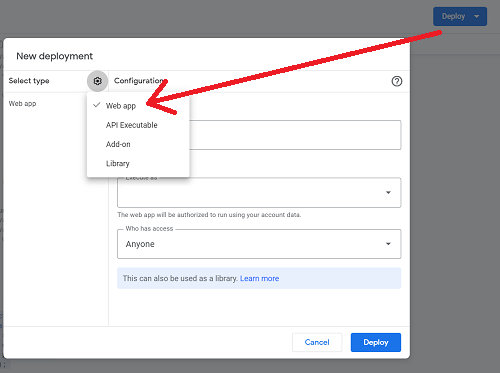
Now, we need to publish the script as Web App from the script editor deploy menu option as show in screenshot. Click on Deploy and publish as Web app.

Now See entire code in single frame.
var filelinks = [];
var mimetypes = ["image/png","image/jpeg","image/gif","image/bmp"];

function doGet(e) {

  var fid;
  if(e.parameters.fid==undefined){
  fid='YOU_FOLDER_ID';
  }  else {
    fid=e.parameters.fid[0];
  }
  var data = travseItems(fid);
  return   buildSuccessResponse(data, 1);

}


function travseItems(folderid){
 var folder = DriveApp.getFolderById(folderid);
 var files=folder.getFiles();
  var x=0;

  while(files.hasNext()){

    var file = files.next();
    if( mimetypes.indexOf(file.getMimeType()) != -1){
      var filelink ={};
      filelink['img_id']=file.getId();
      filelink['name']='';
      filelink['folder_id']='';

      console.log(filelink['img_id']+"---folder:"+filelink['folder_id']+"\n\n");
      filelinks.push(filelink);
    }

  }  //is file

  return filelinks;
}


function buildSuccessResponse(posts, pages) {
  var output = JSON.stringify({
    status: 'success',
    data: posts,
    pages: pages
  });

  return ContentService.createTextOutput(output).setMimeType(ContentService.MimeType.JSON);
}
Step 3: Parse JSON Array on your webpage
There are lot of different ways in programming language to parse JSON array on your webpage. We will see it in PHP programming language as shown below.
After publishing Web app you will get the URL like:
https://script.google.com/macros/s/AKuskiehfbx9wvmmnkIEAXfFUXKfuN-spGN31kNT7c8qfOwdsPCJW5SrVi0/exec
Now use this URL in your PHP code as follows:
<?php

      $json = file_get_contents('YOUR_WEB_APP_URL');
      $obj = json_decode($json);
      $list = $obj->data;

      for($i=0;$i<count($list); $i++){
          $url_split[$i] = explode('/d/',$list[$i]->book_url);
          $image_id[$i] = explode('/view', $url_split[$i][1]);
          print_r($image_id[$i][0]);
       }
   ?>
From the above code, you will get the image ids in this
variable => $image_id[$i]
You need to use this image id in your HTML <img> tag as follows:
<img src="<?php echo 'https://drive.google.com/uc?export=view&id='.$image_id[$i][0]?>" >
Using this all your images available in your Google drive folder will be displayed in this <img> tag using the for loop in PHP.
I hope you find this article helpful. For more such articles please upvote, follow and share this with friends.
Happy Learning … 😁✌️
For any query, please drop an email at: dilipkashyap.sd@gmail.com
Level Up Coding
Thanks for being a part of our community! Before you go:
- 👏 Clap for the story and follow the author 👉
- 📰 View more content in the Level Up Coding publication
- 🔔 Follow us: Twitter | LinkedIn | Newsletter
🚀👉 Join the Level Up talent collective and find an amazing job
How to display images from Google drive folder to your webpage using Google Apps Script was originally published in Level Up Coding on Medium, where people are continuing the conversation by highlighting and responding to this story.
This content originally appeared on Level Up Coding - Medium and was authored by Dilip Kashyap
Dilip Kashyap | Sciencx (2022-11-28T00:30:09+00:00) How to display images from Google drive folder to your webpage using Google Apps Script. Retrieved from https://www.scien.cx/2022/11/28/how-to-display-images-from-google-drive-folder-to-your-webpage-using-google-apps-script/
Please log in to upload a file.
There are no updates yet.
Click the Upload button above to add an update.
