This content originally appeared on Telerik Blogs and was authored by Leomaris Reyes
Learn how to add maps to your .NET MAUI applications in a very fast and easy way, with the IMap interface.
Howdy! Probably at some point of your developer life you have had the need to add maps to your apps. This is a very common requirement which you must be prepared to face. That is why in this article I will be teaching you how to add maps to your .NET
MAUI applications in a very fast and easy way, all thanks to the IMap interface.
Settings per Platform
To be sure that maps are integrated into our app correctly, we must make sure to have appropriate configurations. That’s why I leave you the set of instructions that you have to apply for each platform.
 Android
To launch the Maps app, Android uses the geo URI scheme, which will allow the user to use any app already installed on the device that supports this URI scheme.
Go to Platforms ➡ Android ➡ AndroidManifest.xml file and inside Manifest nodes add the following:
<queries>
    <intent>
    <action android:name="android.intent.action.VIEW" />
    <data android:scheme="geo"/>
    </intent>
</queries>
 Windows
No setup is required.
 iOS / macOS
No setup is required.
How Do Maps Work in .NET MAUI?
.NET MAUI has the IMap interface available, which allows your applications to open your installed map apps with specific data such as a placemark or a specific location. It’s contained in the Microsoft.Maui.ApplicationModel namespace and you can use it through the Map.Default property.
How Can I Open a Map?
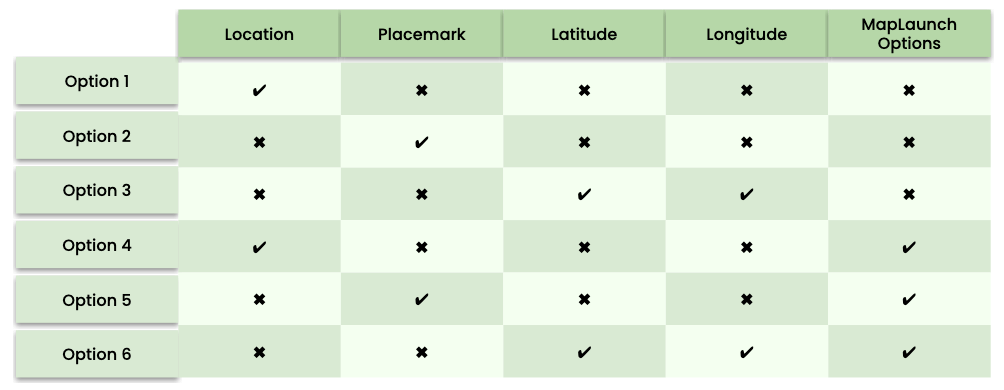
To open a map, you must use the OpenAsync method. This contains six overloads. In this article, we will define all the parameters that accept its different overloads and in the end you only have to select the ones that adapt to the overload of your choice.
Before moving on to the explanation of the parameters, let’s look at the available overload options.

Parameters You Need To Know
Let’s continue explaining the parameters.
Location: This value is made up of the latitude and longitude of the address you want to open in Maps.
var location = new Location(18.481077500388174, -69.918856715392);
Placemark: It offers you more detailed information about the location of your map—information such as the name of the country, thoroughfare, locality, among others. Let’s see an example of how to do it:
var placemark = new Placemark
{
CountryName = "Dominican Republic",
AdminArea = "SD",
Thoroughfare = "National Theater",
Locality = "Esperilla",
CountryCode = "10204"
};
Latitude: It’s a Double value which receives a latitude as value.
Example: 47.645160
Longitude: It’s a Double value which receives a longitude as value.
Example: -122.1306032
MapLaunchOptions: These options are the set of features that the map can have. Within these options to display, we have the following:
- Name: It’s the name that will be displayed on the Map, based on the coordinates that are added in the Location.
- NavigationMode: It’s the type of navigation with which the map will be opened. Within the navigation modes we have the following:
| Emoji | Description |
|---|---|
| Bicycling | |
| Driving | |
| ️ | Transit |
| Walking |
We will have a result like this:
var options = new MapLaunchOptions { Name = "Statue of Liberty Museum",
NavigationMode= NavigationMode.Driving };
OpenAsync
Finally, let’s open the Map with the OpenAsync method.

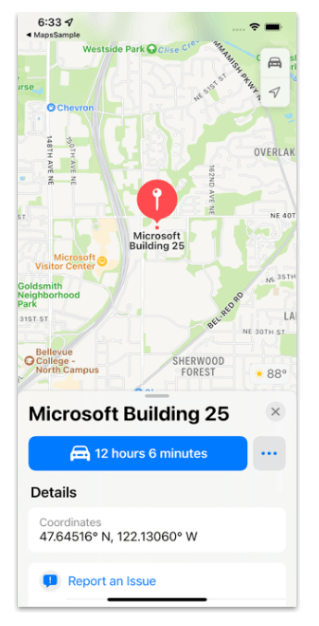
public async Task OpenMap()
{
    var location = new Location(47.645160, -122.1306032);
    var options = new MapLaunchOptions { Name = "Microsoft Building 25" };
    await Map.Default.OpenAsync(location, options);
}
Make Sure To Check if the Map Opened
Don’t forget that opening the map can fail, either because it does not have an application installed or because it does not have the necessary permissions. That’s why it’s advisable that you always check if the map opened or not.
This is achieved with the TryOpenAsync method. It has the same overloads as the OpenAsync method and returns a Bool as a response.
if (await Map.Default.TryOpenAsync(location, options) == true)
{
    // Write the code for when it opens your map.
}
Platform Limitations
The NavigationMode will be presented in your application if the platform allows it. Below I show you the support for each of them:
 Android
- Bicycling, Driving and Walking.
 iOS / macOS
- Driving, Transit and Walking.
 Windows
- Driving, Transit and Walking.
Wrapping Up
And done! You are ready to start implementing Maps in your .NET MAUI applications!!
See you next time! ♀️
Reference:
This content originally appeared on Telerik Blogs and was authored by Leomaris Reyes
Leomaris Reyes | Sciencx (2022-12-20T15:08:00+00:00) Implementing Maps in .NET MAUI. Retrieved from https://www.scien.cx/2022/12/20/implementing-maps-in-net-maui/
Please log in to upload a file.
There are no updates yet.
Click the Upload button above to add an update.
