Pair Of Tools To Build React Dashboards Fast And Easy.

Pair Of Tools To Build React Dashboards Fast And Easy.

Dashboards are widely used and a great way to interact with complex data. Here I would love to tell about the way how to build them with React with minimum effort. It is going to be very useful especially for such cases when you need to build POC of your idea or just you want to get some practice building dashboards. My demo application will contain only 1 page and several widgets. But, it will be scalable enough, so you can pick it up and do add-ons or just play around.

As I mentioned above it will be React application, so first, we need to set it up, and then more about that pair of tools which are very handy for such type of app we want to build.

To set up React application, I decide to use Vite. It is a build tool that is an alternative to create-react-app, but a much faster one. That’s a brief story about that, if you want to know more, check out that documentation. Here is the command we need to run and select the following configuration.

npm create vite@latest
Project name: › dashboard-demo
? Select a framework: ›
Vanilla
Vue
❯ React
Preact
Lit
Svelte
Others
? Select a variant: ›
❯ JavaScript
TypeScript
JavaScript + SWC
TypeScript + SWC

React app is set. Before we start implementing the dashboards, a few sentences about the initial design and libraries we need to make all these happen.

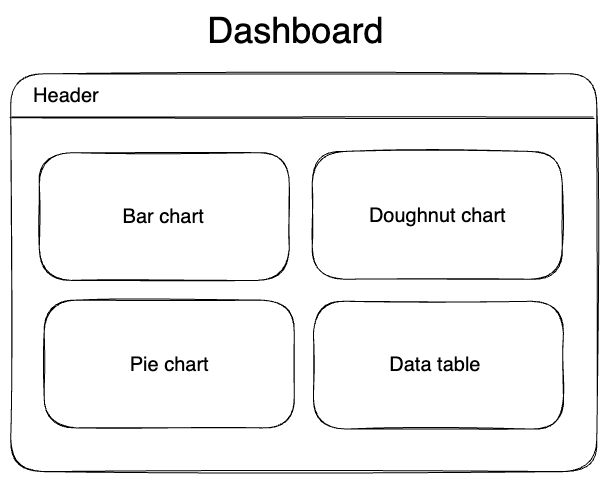
As I wrote above, the app will contain 1 page and several widgets in it. Besides that, we will add a basic header.

The last step before the development will be getting those two pairs of tools to help us build everything quickly and easily. For that purpose, I picked MUI and ChartJS.

MUI

Very popular React component library. It is quite easy to integrate and it has everything we need to build the dashboard layout.

ChartJS

One of the most popular charting libraries. It is easy to understand and it provides ready-to-use charts, the only thing we need is just to provide data set. To be able to integrate it to React application, we need to use that wrapper react-chartjs-2. Let’s install those dependencies

npm install @mui/material @emotion/react @emotion/styled

npm install --save chart.js react-chartjs-2

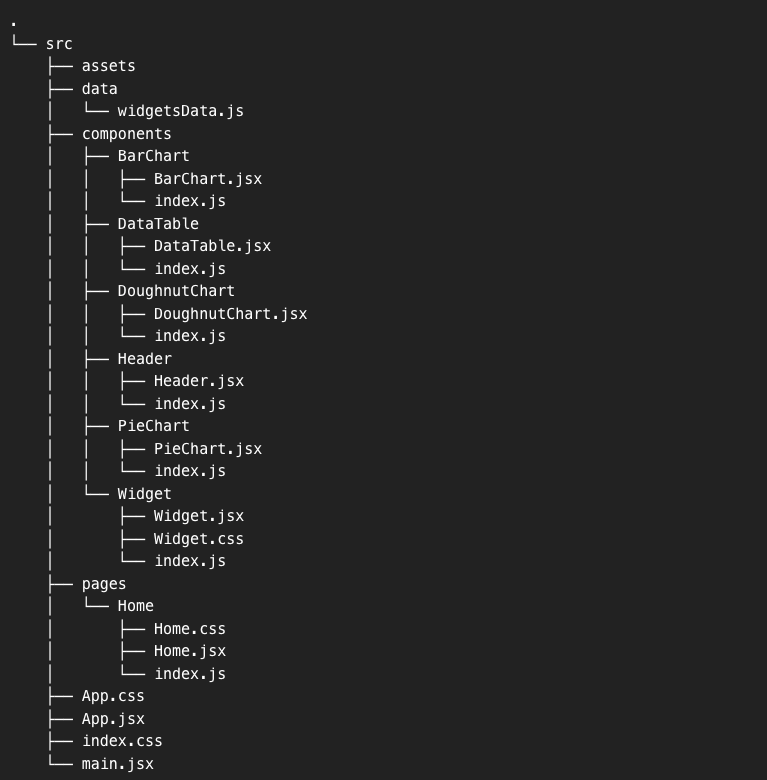
All is set almost. Here is how I split the application. The initial page is stored in the Home component. Widgets and charts are stored in the components folder. Besides that, we have a separate folder that stores dummy data set for charts and data table.

Header.jsx

We can grab ready-to-use header bars from MUI components. It is going to be pretty simple. It will contain just the app title, but if needed it can be scaled by adding a menu, action buttons, etc.

import * as React from 'react';
import AppBar from '@mui/material/AppBar';
import Toolbar from '@mui/material/Toolbar';
import Typography from '@mui/material/Typography';

export const Header = () => {
return (
<AppBar position="static" style={{backgroundColor: 'rgb(35, 48, 68)'}}>
<Toolbar variant="dense">
<Typography variant="h6" color="inherit" component="div">
Crypto Dashboard Demo
</Typography>
</Toolbar>
</AppBar>
)
};

Home (Home.jsx)

To achieve the desired layout we can use such elements as Container and Grid from MUI. It’s quite easy to configure those parts by following examples in library documentation. Here we split the layout into 4 boxes with different sizes. Each of them will contain a widget.

import * as React from 'react';
import Box from '@mui/material/Box';
import Grid from '@mui/material/Grid';
import { Container } from "@mui/material";
import { DataTable } from "../../components/DataTable";
import { PieChart } from "../../components/PieChart";
import { DoughnutChart } from "../../components/DoughnutChart";
import { BarChart } from "../../components/BarChart";
import { Widget } from "../../components/Widget";
import './Home.css';

export const Home = () => {
return (
<section className="dashboard">
<Container maxWidth="xl">
<Box sx={{ flexGrow: 1 }}>
<Grid container spacing={2}>
<Grid item xs={6} md={8} sm={12}>
<Widget title="Crypto price">
<BarChart/>
</Widget>
</Grid>
<Grid item xs={6} md={4} sm={12}>
<Widget title="Gainers">
<DoughnutChart/>
</Widget>
</Grid>
<Grid item xs={6} md={4} sm={12}>
<Widget title="Losers">
<PieChart/>
</Widget>
</Grid>
<Grid item xs={6} md={8} sm={12}>
<Widget title='Crypto market'>
<DataTable/>
</Widget>
</Grid>
</Grid>
</Box>
</Container>
</section>
)
}

Home.css

Adding margins, so the dashboard layout has enough space around.

.dashboard {
margin-top: 20px;
margin-bottom: 20px;
}

Widget.jsx

For widgets, we need a Paper element that adds a nice box shadow to the divs and also we add some simple custom CSS to a widget.

import { IconButton, Paper } from "@mui/material";
import { Edit } from "@mui/icons-material";
import './Widget.css';

export const Widget = ({title, children}) => {
return (
<Paper className="widget">
<div className="widget-header">
<div className="widget-title">{title}</div>
<div className="widget-button">
<IconButton color="primary" aria-label="upload picture" component="label">
<Edit/>
</IconButton>
</div>
</div>
{children}
</Paper>
)
}

Widget.css

.widget {
background-color: rgb(35, 48, 68);
padding: 20px;
}

.widget-header {
display: flex;
justify-content: space-between;
align-items: center;
color: rgba(0, 0, 0, 0.87);
font-weight: 500;
font-size: 20px;
}

Time to add content to widgets. We can start with charts by grabbing them from ChartJS components.

All datasets for charts and data table will be stored in the windgetsData.js file. To add a chart, we just need to import it and pass a simple configuration object and data. The same procedures will repeat for each chart in the dashboard.

BarChart.jsx

import * as React from "react";
import {
Chart as ChartJS,
CategoryScale,
LinearScale,
BarElement,
Title,
Tooltip,
Legend,
} from 'chart.js';
import { Bar } from 'react-chartjs-2';
import { barChartData } from "../../dummyData/widgetsData";

ChartJS.register(
CategoryScale,
LinearScale,
BarElement,
Title,
Tooltip,
Legend
);

const options = {
responsive: true,
plugins: {
legend: {
position: 'top',
},
},
};

const data = {
labels: ['Bitcoin', 'Pax gold', 'Ethereum', 'Maker', 'Monero', 'Quant', 'Litecoin'],
datasets: barChartData
};

export const BarChart = () => {
return (
<Bar options={options} data={data} />
)
}

DoughnutChart.jsx

import * as React from "react";
import { Chart as ChartJS, ArcElement, Tooltip, Legend } from 'chart.js';
import { Doughnut } from 'react-chartjs-2';
import { doughnutChartData } from "../../dummyData/widgetsData";

ChartJS.register(ArcElement, Tooltip, Legend);

const data = {
labels: ['BTC', 'ETH', 'LTC'],
datasets: doughnutChartData,
};

export const DoughnutChart = () => {
return (
<Doughnut data={data} />
)
};

PieChart.jsx

import * as React from "react";
import { Chart as ChartJS, ArcElement, Tooltip, Legend } from 'chart.js';
import { Pie } from 'react-chartjs-2';
import { pieChartData } from "../../dummyData/widgetsData";

ChartJS.register(ArcElement, Tooltip, Legend);

const data = {
labels: ['FTT', 'SFP', 'FIL'],
datasets: pieChartData,
};

export const PieChart = () => {
return (
<Pie data={data}/>
)
}

The last thing to add is a data table. Let’s get one from MUI components.
You can just copy-paste it from there. That’s what I did.

DataTable.jsx


import * as React from 'react';
import Table from '@mui/material/Table';
import TableBody from '@mui/material/TableBody';
import TableCell from '@mui/material/TableCell';
import TableHead from '@mui/material/TableHead';
import TableRow from '@mui/material/TableRow';
import { tableData } from "../../dummyData/widgetsData";

export const DataTable = () => {
return (
<Table sx={{ minWidth: 650 }} size="large" aria-label="a dense table">
<TableHead>
<TableRow>
<TableCell>Crypto</TableCell>
<TableCell align="right">Price</TableCell>
<TableCell align="right">24h change</TableCell>
<TableCell align="right">24h Volume</TableCell>
<TableCell align="right">Market cap</TableCell>
</TableRow>
</TableHead>
<TableBody>
{tableData.map((row) => (
<TableRow
key={row.name}
sx={{ '&:last-child td, &:last-child th': { border: 0 } }}
>
<TableCell component="th" scope="row">
{row.name}
</TableCell>
<TableCell align="right">{row.price}</TableCell>
<TableCell align="right">{row.change}</TableCell>
<TableCell align="right">{row.volume}</TableCell>
<TableCell align="right">{row.cap}</TableCell>
</TableRow>
))}
</TableBody>
</Table>
);
}

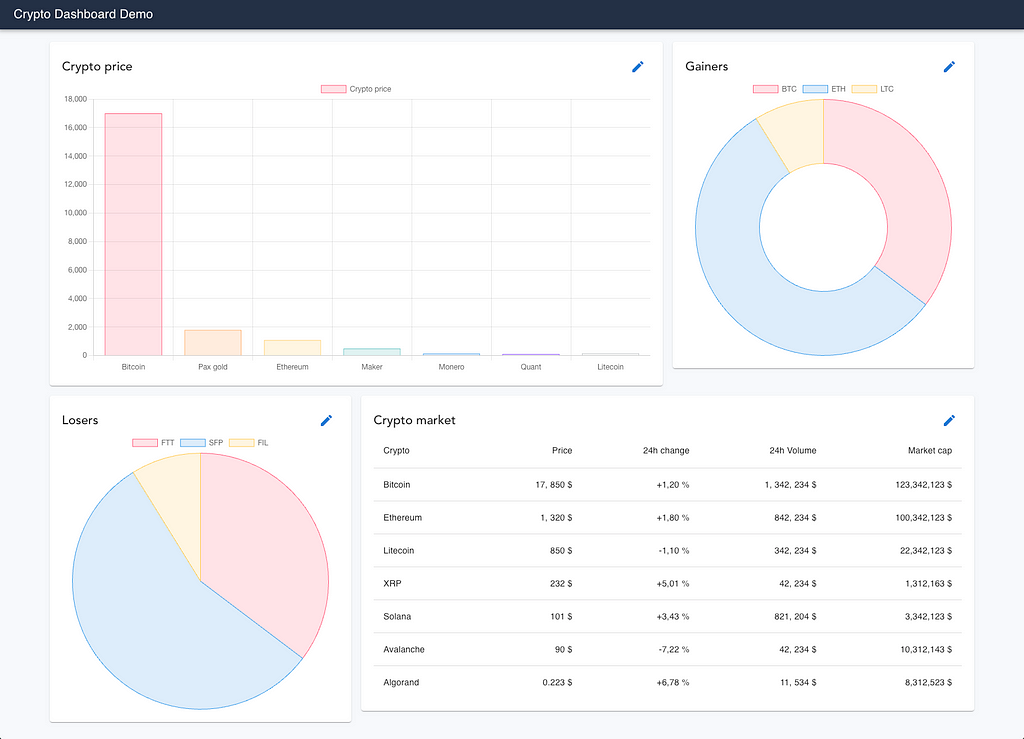
Let’s take a look at the result now.

Wrapping up

As you see using MUI and CharJS makes development much easier and faster. Implementing that dashboard we barely need to code. As I mentioned it’s a great approach to build POCs or initial applications for your needs. Then it’s easily scalable, by adding more pages and business logic. Here is a link to that project source code, feel free to play around with that or use that initial setup for your future application.

Cheers!

Level Up Coding

Thanks for being a part of our community! Before you go:

🚀👉 Join the Level Up talent collective and find an amazing job


Pair Of Tools To Build React Dashboards Fast And Easy. was originally published in Level Up Coding on Medium, where people are continuing the conversation by highlighting and responding to this story.


This content originally appeared on Level Up Coding - Medium and was authored by Maksym Mostovyi

Pair Of Tools To Build React Dashboards Fast And Easy.
Dashboards are widely used and a great way to interact with complex data. Here I would love to tell about the way how to build them with React with minimum effort. It is going to be very useful especially for such cases when you need to build POC of your idea or just you want to get some practice building dashboards. My demo application will contain only 1 page and several widgets. But, it will be scalable enough, so you can pick it up and do add-ons or just play around.

As I mentioned above it will be React application, so first, we need to set it up, and then more about that pair of tools which are very handy for such type of app we want to build.

To set up React application, I decide to use Vite. It is a build tool that is an alternative to create-react-app, but a much faster one. That's a brief story about that, if you want to know more, check out that documentation. Here is the command we need to run and select the following configuration.

npm create vite@latest
Project name: › dashboard-demo
? Select a framework: ›
Vanilla
Vue
❯ React
Preact
Lit
Svelte
Others
? Select a variant: ›
❯ JavaScript
TypeScript
JavaScript + SWC
TypeScript + SWC

React app is set. Before we start implementing the dashboards, a few sentences about the initial design and libraries we need to make all these happen.

As I wrote above, the app will contain 1 page and several widgets in it. Besides that, we will add a basic header.
The last step before the development will be getting those two pairs of tools to help us build everything quickly and easily. For that purpose, I picked MUI and ChartJS.

MUI

Very popular React component library. It is quite easy to integrate and it has everything we need to build the dashboard layout.

ChartJS

One of the most popular charting libraries. It is easy to understand and it provides ready-to-use charts, the only thing we need is just to provide data set. To be able to integrate it to React application, we need to use that wrapper react-chartjs-2. Let's install those dependencies

npm install @mui/material @emotion/react @emotion/styled

npm install --save chart.js react-chartjs-2

All is set almost. Here is how I split the application. The initial page is stored in the Home component. Widgets and charts are stored in the components folder. Besides that, we have a separate folder that stores dummy data set for charts and data table.
Header.jsx

We can grab ready-to-use header bars from MUI components. It is going to be pretty simple. It will contain just the app title, but if needed it can be scaled by adding a menu, action buttons, etc.

import * as React from 'react';
import AppBar from '@mui/material/AppBar';
import Toolbar from '@mui/material/Toolbar';
import Typography from '@mui/material/Typography';

export const Header = () => {
return (
<AppBar position="static" style={{backgroundColor: 'rgb(35, 48, 68)'}}>
<Toolbar variant="dense">
<Typography variant="h6" color="inherit" component="div">
Crypto Dashboard Demo
</Typography>
</Toolbar>
</AppBar>
)
};

Home (Home.jsx)

To achieve the desired layout we can use such elements as Container and Grid from MUI. It's quite easy to configure those parts by following examples in library documentation. Here we split the layout into 4 boxes with different sizes. Each of them will contain a widget.

import * as React from 'react';
import Box from '@mui/material/Box';
import Grid from '@mui/material/Grid';
import { Container } from "@mui/material";
import { DataTable } from "../../components/DataTable";
import { PieChart } from "../../components/PieChart";
import { DoughnutChart } from "../../components/DoughnutChart";
import { BarChart } from "../../components/BarChart";
import { Widget } from "../../components/Widget";
import './Home.css';

export const Home = () => {
return (
<section className="dashboard">
<Container maxWidth="xl">
<Box sx={{ flexGrow: 1 }}>
<Grid container spacing={2}>
<Grid item xs={6} md={8} sm={12}>
<Widget title="Crypto price">
<BarChart/>
</Widget>
</Grid>
<Grid item xs={6} md={4} sm={12}>
<Widget title="Gainers">
<DoughnutChart/>
</Widget>
</Grid>
<Grid item xs={6} md={4} sm={12}>
<Widget title="Losers">
<PieChart/>
</Widget>
</Grid>
<Grid item xs={6} md={8} sm={12}>
<Widget title='Crypto market'>
<DataTable/>
</Widget>
</Grid>
</Grid>
</Box>
</Container>
</section>
)
}

Home.css

Adding margins, so the dashboard layout has enough space around.

.dashboard {
margin-top: 20px;
margin-bottom: 20px;
}

Widget.jsx

For widgets, we need a Paper element that adds a nice box shadow to the divs and also we add some simple custom CSS to a widget.

import { IconButton, Paper } from "@mui/material";
import { Edit } from "@mui/icons-material";
import './Widget.css';

export const Widget = ({title, children}) => {
return (
<Paper className="widget">
<div className="widget-header">
<div className="widget-title">{title}</div>
<div className="widget-button">
<IconButton color="primary" aria-label="upload picture" component="label">
<Edit/>
</IconButton>
</div>
</div>
{children}
</Paper>
)
}

Widget.css

.widget {
background-color: rgb(35, 48, 68);
padding: 20px;
}

.widget-header {
display: flex;
justify-content: space-between;
align-items: center;
color: rgba(0, 0, 0, 0.87);
font-weight: 500;
font-size: 20px;
}

Time to add content to widgets. We can start with charts by grabbing them from ChartJS components.

All datasets for charts and data table will be stored in the windgetsData.js file. To add a chart, we just need to import it and pass a simple configuration object and data. The same procedures will repeat for each chart in the dashboard.

BarChart.jsx

import * as React from "react";
import {
Chart as ChartJS,
CategoryScale,
LinearScale,
BarElement,
Title,
Tooltip,
Legend,
} from 'chart.js';
import { Bar } from 'react-chartjs-2';
import { barChartData } from "../../dummyData/widgetsData";

ChartJS.register(
CategoryScale,
LinearScale,
BarElement,
Title,
Tooltip,
Legend
);

const options = {
responsive: true,
plugins: {
legend: {
position: 'top',
},
},
};

const data = {
labels: ['Bitcoin', 'Pax gold', 'Ethereum', 'Maker', 'Monero', 'Quant', 'Litecoin'],
datasets: barChartData
};

export const BarChart = () => {
return (
<Bar options={options} data={data} />
)
}

DoughnutChart.jsx

import * as React from "react";
import { Chart as ChartJS, ArcElement, Tooltip, Legend } from 'chart.js';
import { Doughnut } from 'react-chartjs-2';
import { doughnutChartData } from "../../dummyData/widgetsData";

ChartJS.register(ArcElement, Tooltip, Legend);

const data = {
labels: ['BTC', 'ETH', 'LTC'],
datasets: doughnutChartData,
};

export const DoughnutChart = () => {
return (
<Doughnut data={data} />
)
};

PieChart.jsx

import * as React from "react";
import { Chart as ChartJS, ArcElement, Tooltip, Legend } from 'chart.js';
import { Pie } from 'react-chartjs-2';
import { pieChartData } from "../../dummyData/widgetsData";

ChartJS.register(ArcElement, Tooltip, Legend);

const data = {
labels: ['FTT', 'SFP', 'FIL'],
datasets: pieChartData,
};

export const PieChart = () => {
return (
<Pie data={data}/>
)
}

The last thing to add is a data table. Let's get one from MUI components.
You can just copy-paste it from there. That's what I did.

DataTable.jsx


import * as React from 'react';
import Table from '@mui/material/Table';
import TableBody from '@mui/material/TableBody';
import TableCell from '@mui/material/TableCell';
import TableHead from '@mui/material/TableHead';
import TableRow from '@mui/material/TableRow';
import { tableData } from "../../dummyData/widgetsData";

export const DataTable = () => {
return (
<Table sx={{ minWidth: 650 }} size="large" aria-label="a dense table">
<TableHead>
<TableRow>
<TableCell>Crypto</TableCell>
<TableCell align="right">Price</TableCell>
<TableCell align="right">24h change</TableCell>
<TableCell align="right">24h Volume</TableCell>
<TableCell align="right">Market cap</TableCell>
</TableRow>
</TableHead>
<TableBody>
{tableData.map((row) => (
<TableRow
key={row.name}
sx={{ '&:last-child td, &:last-child th': { border: 0 } }}
>
<TableCell component="th" scope="row">
{row.name}
</TableCell>
<TableCell align="right">{row.price}</TableCell>
<TableCell align="right">{row.change}</TableCell>
<TableCell align="right">{row.volume}</TableCell>
<TableCell align="right">{row.cap}</TableCell>
</TableRow>
))}
</TableBody>
</Table>
);
}

Let's take a look at the result now.
Wrapping up

As you see using MUI and CharJS makes development much easier and faster. Implementing that dashboard we barely need to code. As I mentioned it's a great approach to build POCs or initial applications for your needs. Then it's easily scalable, by adding more pages and business logic. Here is a link to that project source code, feel free to play around with that or use that initial setup for your future application.

Cheers!

Level Up Coding

Thanks for being a part of our community! Before you go:

🚀👉 Join the Level Up talent collective and find an amazing job


Pair Of Tools To Build React Dashboards Fast And Easy. was originally published in Level Up Coding on Medium, where people are continuing the conversation by highlighting and responding to this story.


This content originally appeared on Level Up Coding - Medium and was authored by Maksym Mostovyi


Print Share Comment Cite Upload Translate Updates
APA

Maksym Mostovyi | Sciencx (2022-12-30T15:13:43+00:00) Pair Of Tools To Build React Dashboards Fast And Easy.. Retrieved from https://www.scien.cx/2022/12/30/pair-of-tools-to-build-react-dashboards-fast-and-easy/

MLA
" » Pair Of Tools To Build React Dashboards Fast And Easy.." Maksym Mostovyi | Sciencx - Friday December 30, 2022, https://www.scien.cx/2022/12/30/pair-of-tools-to-build-react-dashboards-fast-and-easy/
HARVARD
Maksym Mostovyi | Sciencx Friday December 30, 2022 » Pair Of Tools To Build React Dashboards Fast And Easy.., viewed ,<https://www.scien.cx/2022/12/30/pair-of-tools-to-build-react-dashboards-fast-and-easy/>
VANCOUVER
Maksym Mostovyi | Sciencx - » Pair Of Tools To Build React Dashboards Fast And Easy.. [Internet]. [Accessed ]. Available from: https://www.scien.cx/2022/12/30/pair-of-tools-to-build-react-dashboards-fast-and-easy/
CHICAGO
" » Pair Of Tools To Build React Dashboards Fast And Easy.." Maksym Mostovyi | Sciencx - Accessed . https://www.scien.cx/2022/12/30/pair-of-tools-to-build-react-dashboards-fast-and-easy/
IEEE
" » Pair Of Tools To Build React Dashboards Fast And Easy.." Maksym Mostovyi | Sciencx [Online]. Available: https://www.scien.cx/2022/12/30/pair-of-tools-to-build-react-dashboards-fast-and-easy/. [Accessed: ]
rf:citation
» Pair Of Tools To Build React Dashboards Fast And Easy. | Maksym Mostovyi | Sciencx | https://www.scien.cx/2022/12/30/pair-of-tools-to-build-react-dashboards-fast-and-easy/ |

Please log in to upload a file.


There are no updates yet.
Click the Upload button above to add an update.

You must be logged in to translate posts. Please log in or register.