This content originally appeared on DEV Community 👩💻👨💻 and was authored by Scofield Idehen
Cyber security has become necessary for every business today, with over seven websites created every second, 380 websites every minute, and 547,000 daily.
Security specialists at IBM cannot emphasize this importance enough, with the current statistics of 30,000 websites being lost to hackers daily.
Learning how to build a port scanner and use it to find vulnerability/open ports in your website or infrastructure and see how to mitigate against hacks is critical.
What is a port scanner?
A port scanner is a network observation technique that tracks and identifies open and closed ports in an infrastructure.
A scanner can identify which infrastructure is running and what kind of program, like the Operating system, while listening to traffic.
Port scanners are said to be surveillance tools. When such surveillance is retrieved, they perform attacks on ports that listen for traffic, such as ports 80 and 443, and attacks such as DDOS attacks (Distributed Denial of Service), MITH attacks (Man in The Middle), and many others.
PING SCAN
This scan checks the network to see if the target is alive, and it sends an ICMP (Internet Control Message Protocol) request to the target machine. When there is ICMP feedback, the target is active. However, firewalls and routers are enhanced to see and block these pings; accurate reading of the target machine/website might be difficult even if the target is alive.
TCP HALF-OPEN
The most widely used port scan, TCP HALF OPEN, scans many ports in seconds as it does not complete the TCP(Transmission Control Protocol) handshake of acknowledging the synchronization from the target machine.
The half handshake makes it faster to pick up which ports are open as the response from the SYN-ACK flag sent to the target will not be acknowledged by our scanner, which tells us the port is active and listening for traffic, but when we get an RST (reset), the port is alive but closed.
TCP CONNECT
TCP Connect functions almost like the half-open, but this time the connection is acknowledged by our scanner; while it is slow, it allows for a more accurate reading of the target infrastructure.
UDP
UDP (User Datagram Protocol) scan mainly detects ports 53, 161, and 67, which are DNS, DHCP, and SNMP; however, these scans are very slow as they wait for feedback that might never come.
Create your first scanner.
In creating our first scanner, you must have a few prerequisites.
- Any code editor (Vs. Code)
- basic understanding of python
- if you do not have python installed on your machine, download one here
Find the code repo here to get started.
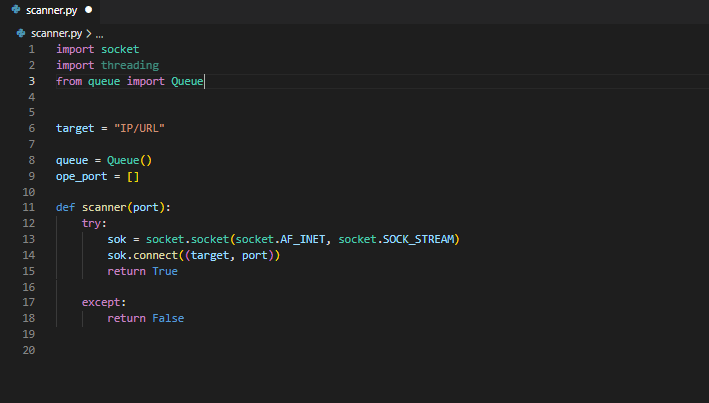
Open your code editor and create a file name of scanner.py
Next, we start by importing our first library called socket.
A socket is an endpoint of communication between two programs on the network. A socket is tied to a port number so the TCP layer can identify the application.
Next, we define our target = “IP/URL”
A target is the destined URL/IP of the machine we intend to scan. A target might be one or multiple targets.
Next, we define a function, call an argument of port, and say try; if it does not work, return false.
Here we said the socket type. AF_INET is the Internet address structure for IPv4. SOCK_STREAM is the socket type for TCP protocol for transporting messages in the network.
Next line, we said to connect to the target IP and ports in that IP, and if it does, it returns true when there is an exception, it returns false.
Next, we create our output data.
Here we said that for the first 1020 ports, the most critical ports, scan them and show output if the ports are open or closed.
Our scanner is ready. Let us test it.
Here we see the open ports, but it might take some while to get this done as it is a bit slow, and very few people build ports like this today.
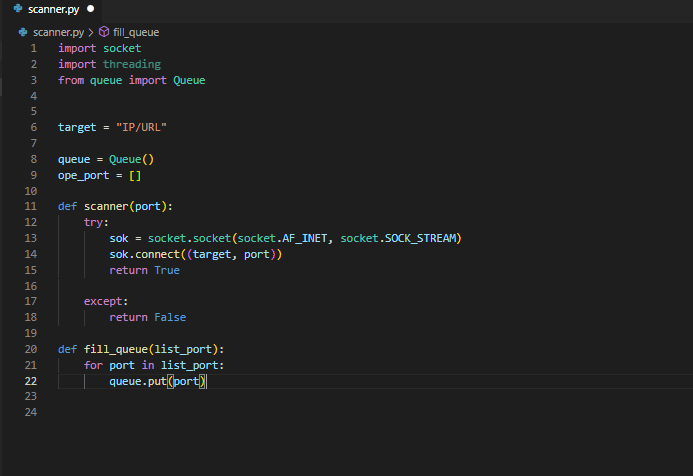
Let us, therefore, remove the last part of our code and import a new library called Threading and Queue. Threading allows us to run multiple threads simultaneously, saving time, while Queue allows each port scan to be kept in a queue list.
Delete the last line in your code, as we will not be building our scanner this way. Let us import the following modules.
Notice we also created a list for all the ports in the Queue, and we will see how it ties up at the end. We also created an array for the ports.
We created a new method called fill_queue which we called an argument that for every port scanned in the list_port, it should be queued and put in our queue list.
Here we specify that if our queue is not empty, our scanner should get a port from the scanner(port) and print if the port is open.
Append the port to the array we created called ope_port .
Next, we said list_port = range(1, 100) which means the number of the port that our scanner should scan should be 100 for every list and in a queue, and after checking a port, that port should be added to the list_port
Next, we created a new thrend_list to target the threads.
for sc in range(10):
Here we specify that for scan in a thread, it should scan ten ports at once, and this scan should target the worker, which is where we set the scan syntax.
After scanning, it should append the scanned port to the thread_list
Next, we begin the thread by starting it.
Next, we join the thread together and print the output.
Conclusion
This article taught us how to create a port scanner and the steps to take to build a comprehensive and scalable scanner.
Please check the following resources if you require further help becoming a better python developer.
Resource
This content originally appeared on DEV Community 👩💻👨💻 and was authored by Scofield Idehen
Scofield Idehen | Sciencx (2023-02-04T04:11:17+00:00) Build Your First Port Scanner using Python. Retrieved from https://www.scien.cx/2023/02/04/build-your-first-port-scanner-using-python/
Please log in to upload a file.
There are no updates yet.
Click the Upload button above to add an update.


