
This content originally appeared on Bits and Pieces - Medium and was authored by JB
Building a Scrollable Chat Box with React
How to build a scrollable chat box with React — the kind of standard chat window you might find in the bottom right-hand corner of a website
In this article we’re going to build a support window — the kind of standard chat window you might find in the bottom right hand corner of a website. As you chat to the person (or bot) on the other end, messages appear and the previous messages shift upwards to make room.
We’re not going to implement any kind of API functionality. The component we build will be ‘dumb’; that is to say it’ll handle layout and UI only. To see our functionality we’ll fake an incoming feed with a button that adds new ‘messages’ to our container, as seen in this low-quality gif 🤷.
The functionality we’re looking to implement is as follows:
- Start with a bunch of messages, pre-scrolled to the bottom.
- When a new message is added, pop it onto the bottom of the list and then gracefully scroll down to display the message
- If the user has scrolled upwards to see old messages and a new message arrives, don’t auto-scroll to the new message (this would be horribly annoying). Instead, surface a button to let the user scroll to the new message when they’re ready.
If you’re impatient and just want to see the code it can be found here, with a working example:
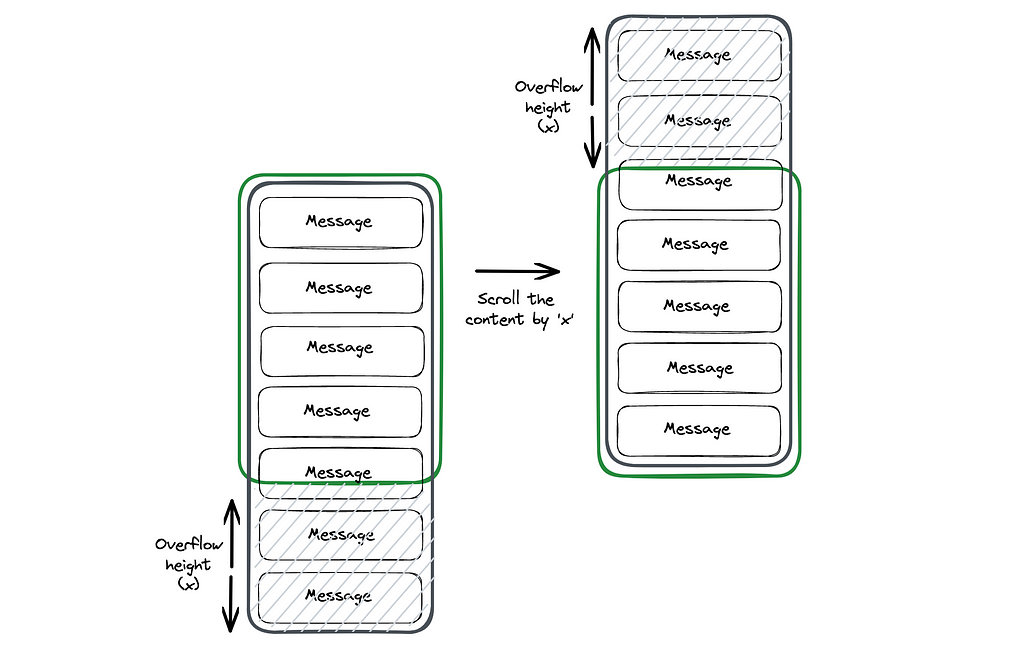
Our component architecture will look something like this:

The green window will remain a fixed size, while the longer message window will expand in size indefinitely while being anchored to the bottom of the green container.
Our top-level component (wherever we’re housing the chat window) will need to look something like this:
const App = () => {
  return (
    <div>
      <ScrollContainer>
        {someChildItems}
      <ScrollContainer>
    </div>
  )
};
The ScrollContainer component represents the green ‘visible’ window in our architecture diagram, and the content (someChildItems) represents our long message thread.
Our ScrollContainer will do the heavy-lifting and make sure everything is positioned correctly / scrolls nicely:
const ScrollContainer = ({children}) => {
  const outerDiv = useRef(null);
  const innerDiv = useRef(null);

   // start the container at the bottom
  useEffect(() => {
    const outerHeight = outerRef.current.clientHeight;
    const innerHeight = innerRef.current.clientHeight;

    outerRef.current.scrollTo({
      top: innerHeight - outerHeight,
      left: 0
    });
  }, []);

  // scroll smoothly on change of children
  useEffect(() => {
    const outerHeight = outerRef.current.clientHeight;
    const innerHeight = innerRef.current.clientHeight;

    outerRef.current.scrollTo({
      top: innerHeight - outerHeight,
      left: 0,
      behavior: "smooth"
    });
  }, [children]);

  return (
    <div
      ref={outerDiv}
      style={{
        position: "relative",
        height: "100%",
        overflow: "scroll"
       }}
    >
      <div
        ref={innerDiv}
        style={{
          position: "relative"
        }}
      >
        {children}
      </div>
    </div>
  )
};
There are a couple of things going on in the code above.
We’ve set refs on both the outer and inner divs. This allows us to measure the height of both, and then use these heights to scroll our content to the correct position.
We’ve set up a couple of useEffects to control the scroll position. The first one fires on load, and calculates how much of the scrollable content is overflowing. It then uses ‘scrollTo’ on the outer element to offset the content by that amount:
This means that as far as the user is concerned we’ve started our chat scrolled to the bottom of the messages — great!
The second useEffect does exactly the same thing whenever the ScrollContainer’s childen update (thanks to the depency array containing ‘children’). The only difference is that the ‘scrollTo’ in this effect has ‘behaviour: smooth’. This means that if the children change (a new message is added) the useEffect will recalculate the scroll overflow value and smoothly scroll to the bottom.
The combination of the 2 effects gives us the functionality we’re looking for — start off scrolled to the bottom, then scroll smoothly when any additional messages arrive 🎉.
To see this in action we’ll need a way of updating our children, so lets update the App component with a button that adds children on click:
const ChatMessage = ({ message }) => {
  return (
    <div
      style={{
        padding: "8px 20px 8px 8px"
      }}
    >
      <div
        style={{
          padding: "8px",
          backgroundColor: "#047857",
          color: "#FFFFFF",
        }}
      >
        {message}
      </div>
    </div>
  );
};

const App = () => {
  const [numItems, setNumItems] = useState(5);

  return (
    <div
      style={{
        width: "100%",
        height: "100vh",
        backgroundColor: "#111827",
        padding: "20px"
      }}
    >
      <div
        style={{
          height: "400px",
          width: "200px",
          border: "2px solid white"
        }}
      >
        <ScrollContainer>
          {Array.from(Array(numItems).keys()).map((n) => (
            <ChatMessage message={`Message ${n + 1}`} key={`message-${n}`} />
          ))}
        <ScrollContainer>
      </div>
      <div
        style={{
          marginTop: "8px"
        }}
      >
        <button
          onClick={
            () => setNumItems(numItems + 1)
          }
        >
          Add Item
        </button>
      </div>
    </div>
  )
};
At the top of the component there’s now a little ChatMessage element. This is just a UI element so we can see what’s going on.
There’s now a state value which acts as a counter for the number of messages in our thread. We’ve also added a button that increments this counter onClick, and inside the ScrollContainer we render a number of ChatMessage elements based on the value of the state.
So, in short — we start with 5 messages, and each time we click ‘Add Item’ we add one more message 🥳.
We’ve also added a little styling — purely cosmetic.
At this point we’ve got a compnent that functions pretty nicely. The next step is to make sure that if the user has scrolled up the message thread (to see an earlier message) we don’t auto-scroll them to the bottom when a new message comes in.
To do this, we’ll modify our ScrollContainer:
const ScrollContainer = ({children}) => {
  ...

  const prevInnerDivHeight = useRef(null);

  useEffect(() => {
    const outerDivHeight = outerDiv.current.clientHeight;
    const innerDivHeight = innerDiv.current.clientHeight;
    const outerDivScrollTop = outerDiv.current.scrollTop;

    if (
      !prevInnerDivHeight.current ||
      outerDivScrollTop === prevInnerDivHeight.current - outerDivHeight
    ) {
      outerDiv.current.scrollTo({
        top: innerDivHeight! - outerDivHeight!,
        left: 0,
        behavior: prevInnerDivHeight.current ? "smooth" : "auto"
      });
    };

    prevInnerDivHeight.current = innerDivHeight;
  }, [children]);

...
We’re keeping the component the same apart from the above changes…
- We’ve added a new ref to track the height of the inner div between renders
- We’ve replaced our 2 useEffects with one useEffect, which now takes care of both the initial and subsequent scrolling, and doesn’t auto-scroll if the user isn’t at the bottom of the message thread.
Here’s a bit more detail…
We’ve added a new variable to our effect — outerDivScrollTop , which is the current scroll position of the messages.
We can use this to check if the user is scrolled to the bottom by checking whether the scroll position is equal to the offset (which, remember, is just the inner div height minus the outer div height). If the user is at the bottom of the div when the new message arrives, then we should scroll to the bottom.
By this logic, we should be able to check outerDivScrollTop === innerDivHeight — outerDivHeight, right?
Unfortunately not 😖. By the time we’re inside the useEffect, the height of the inner div has changed:
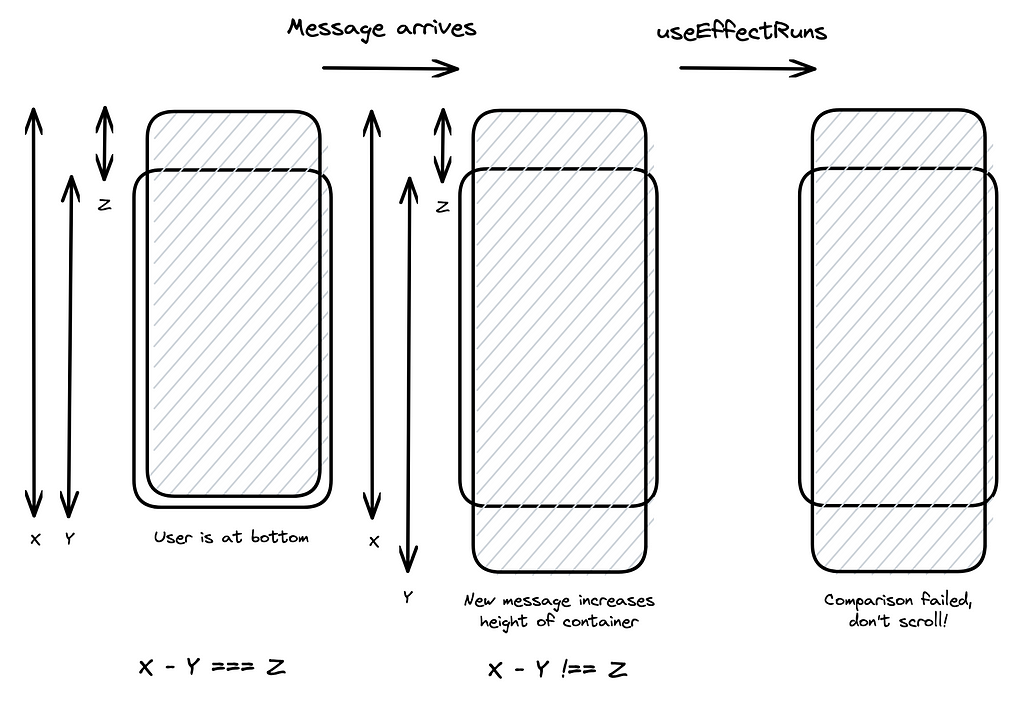
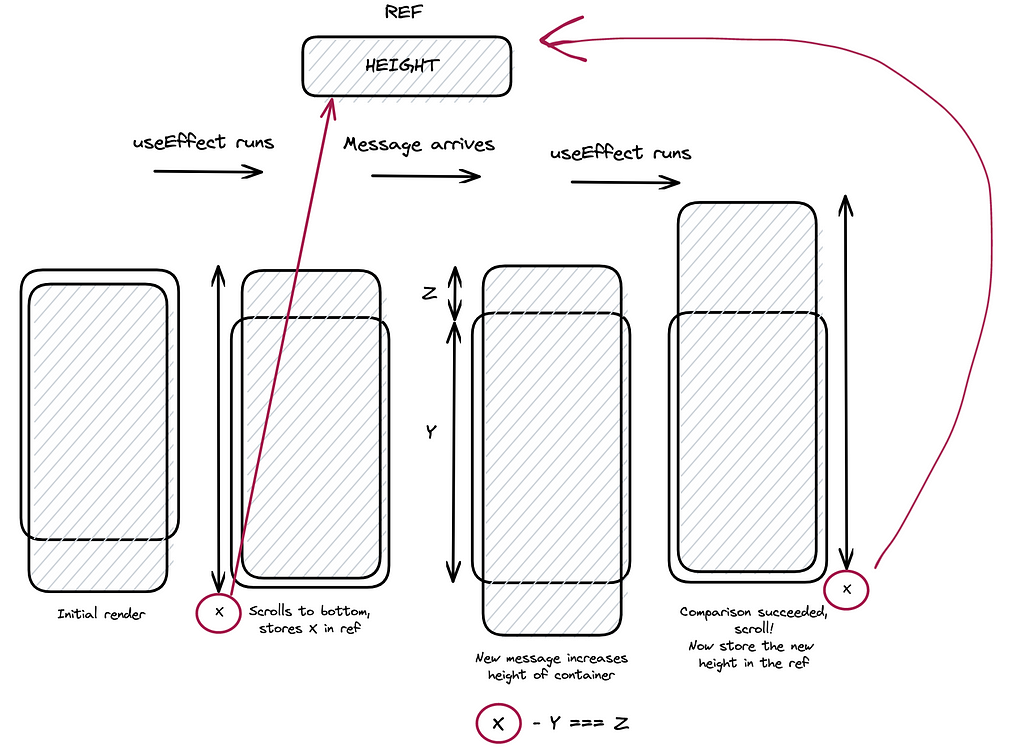
We need to check whether the scroll position matches the offset from before the message arrived, which is where our ref comes in.
The first time our useEffect runs, we’re going to scroll to the bottom of the messages (as normal) and then store the height of the inner div in our ref.
Any subsequent times the useEffect runs we’ll compare the current scroll position to the previous offset value. This will tell us if the user was scrolled to the bottom before the new message arrived.
outerDivScrollTop === prevInnerDivHeight.current - outerDivHeight
If so, we scroll to the bottom of the new message, if not we dont. Finally, we’ll update the ref with the new inner div height before exiting, so we can do the same thing next time around.
We can also use our new prevInnerDivHeight ref to deal with our initial load. If you recall, we were using two useEffects, one to scroll on first load, and a second to scroll when we get new messages.
The only difference between the two is the scrollBehaviour value. The initial scroll needs to jump to the bottom, whereas the subsequent scrolls need to be smooth.
We’re initialising our prevInnerDivHeight to null. Inside our useEffect we can check for this to determine whether we’re on the first render, which is what we’re doing here:
if (
      !prevInnerDivHeight.current ||
      outerDivScrollTop === prevInnerDivHeight.current - outerDivHeight
    ) {
      outerDiv.current.scrollTo({
        top: innerDivHeight! - outerDivHeight!,
        left: 0,
        behavior: prevInnerDivHeight.current ? "smooth" : "auto"
      });
    };
Our ‘if’ statement checks whether
- it’s the first render (!prevInnerDivHeight.current), so we definitely have to scroll
- we were scrolled to the bottom when the new message arrived, so we should scroll to the bottom of the new message(outerDivScrollTop === prevInnerDivHeight.current — outerDivHeight).
Inside scrollTo we set the behaviour based upon the existence of prevInnerDivHeight.current. If it doesn’t exist, we’re on first render so we need to scroll to the bottom immediately. If it does exist then we have a new message arriving, so we should scroll smoothly.
We’re almost there!
The final step is to add a button that appears if we’re scrolled up the message thread and a new message arrives. The button should scroll the user smoothly to the bottom.
We’ll need to add a button to our component, along with some state to determine whether we display the button, and a handler to deal with the button’s onClick.
Here’s the ScrollContainer with all of this in place:
const ScrollContainer = ({children}) => {
  const outerDiv = useRef(null);
  const innerDiv = useRef(null);

  const prevInnerDivHeight = useRef(null);

  const [showScrollButton, setShowScrollButton] = useState(false);

  useEffect(() => {
    const outerDivHeight = outerDiv.current.clientHeight;
    const innerDivHeight = innerDiv.current.clientHeight;
    const outerDivScrollTop = outerDiv.current.scrollTop;

    if (
      !prevInnerDivHeight.current ||
      outerDivScrollTop === prevInnerDivHeight.current - outerDivHeight
    ) {
      outerDiv.current.scrollTo({
        top: innerDivHeight! - outerDivHeight!,
        left: 0,
        behavior: prevInnerDivHeight.current ? "smooth" : "auto"
      });
    } else {
      setShowScrollButton(true);
    };

    prevInnerDivHeight.current = innerDivHeight;
  }, [children]);

  const handleScrollButtonClick = useCallback(() => {
    const outerDivHeight = outerDiv.current.clientHeight;
    const innerDivHeight = innerDiv.current.clientHeight;

    outerDiv.current.scrollTo({
      top: innerDivHeight! - outerDivHeight!,
      left: 0,
      behavior: "smooth"
    });

    setShowScrollButton(false);
  }, []);

  return (
    <div
      style={{
        position: "relative",
        height: "100%"
      }}
    >
      <div
        ref={outerDiv}
        style={{
          position: "relative",
          height: "100%",
          overflow: "scroll"
         }}
      >
        <div
          ref={innerDiv}
          style={{
            position: "relative"
          }}
        >
          {children}
        </div>
      </div>
      <button
        style={{
          position: "absolute",
          backgroundColor: "red",
          color: "white",
          left: "50%",
          transform: "translateX(-50%)",
          opacity: showScrollButton ? 1 : 0,
          pointerEvents: showScrollButton ? "auto" : "none"
        }}
        onClick={handleScrollButtonClick}
      >
        New message!
      </button>
    </div>
  )
};
We’ve got a new handler called handleScrollButtonClick that performs a manual version of our useEffect — it’ll scroll smoothly to the bottom of the thread.
We trigger this with a new button that we’ve added. For styling we’ve had to add a new wrapper in the return — this allows us to float the button over the thread. Our conditional opacity — opacity: showScrollButton ? 1 : 0 — means that we’ll only ever see the button when our showScrollButton state is true.
Inside our useEffect we’ve added one more thing:
...
  } else {
    setShowScrollButton(true);
  };
...
Now the functionality is
- on first render, scroll to the bottom with behaviour auto
- when a new message arrives, if the user was scrolled to the bottom scroll them to the bottom of the new message
- If the user was not scrolled to the bottom, update our state to show a button that will allow us to manually scroll to the bottom of the thread.
That just about covers it!
💡Note: Once you’ve built this Scrollable chat box, it might be a good idea to isolate and extract this component into packages, so you can use an open-source toolchain like Bit to publish, version, and reuse it across all of your projects with a simple npm i @bit/your-username/ScrollableChatBox. Find out more here, and here.
The CodeSandbox example shared earlier contains a working version of this, with a few tweaks:
- The styling is in Tailwind utility classes to keep things a bit more streamlined
- There’s a bit of extra logic around showing and hiding the message thread — the thread fades in from opacity 0 on load, for example.
There’s still the odd bit of janky functionality — one example is what happens if the user has scrolled upwards when a new message comes in, then scrolls back to the bottom manually without clicking the button. As implemented the button will stay visible until clicked, whereas a nicer experience would be for it to vanish on manual scroll-to-bottom. This could be implemented with a scroll listener, but for the purpose of this example it felt a bit like overkill.
Thanks for reading, and happy coding ✌️
Build Apps with reusable components, just like Lego
Bit’s open-source tool help 250,000+ devs to build apps with components.
Turn any UI, feature, or page into a reusable component — and share it across your applications. It’s easier to collaborate and build faster.
Split apps into components to make app development easier, and enjoy the best experience for the workflows you want:
→ Micro-Frontends
→ Design System
→ Code-Sharing and reuse
→ Monorepo
Learn more
- How We Build Micro Frontends
- How we Build a Component Design System
- How to reuse React components across your projects
- 5 Ways to Build a React Monorepo
- How to Create a Composable React App with Bit
Building a scrollable chat box with React was originally published in Bits and Pieces on Medium, where people are continuing the conversation by highlighting and responding to this story.
This content originally appeared on Bits and Pieces - Medium and was authored by JB
JB | Sciencx (2023-02-16T12:34:13+00:00) Building a scrollable chat box with React. Retrieved from https://www.scien.cx/2023/02/16/building-a-scrollable-chat-box-with-react/
Please log in to upload a file.
There are no updates yet.
Click the Upload button above to add an update.