
This content originally appeared on Level Up Coding - Medium and was authored by Tarik
A Comprehensive Guide to Implementing Tests in React Native Apps

React Native has become a popular choice for building mobile applications due to its fast development cycle and cross-platform compatibility. To make the most out of React Native development, developers often turn to third-party libraries like React-Query and Zustand to handle data fetching and state management. React-Query provides a flexible and efficient way to fetch, cache, and manage your data, while Zustand makes state management simple and powerful with its minimalist approach.
In this article, we will explore how to effectively test React Native applications that use these two libraries. We will be using a simple store app as an example and will provide comprehensive and detailed examples to help you understand the testing process. By the end of this article, you will have a good understanding of how to use React-Query and Zustand in your React Native apps, as well as how to implement end-to-end and unit tests to ensure quality in your code.
1 — Setting up the environment
We will be using React Native version 0.71.2 to initialize our store app and React-Query(Tanstack query) version 3.39.3 and Zustand version 4.3.2 to handle data fetching and state management. I will provide the full source code for the complete app on GitHub, so if you want to jump in and see it in action, you can do so by accessing the link which is shared at the end of the article. This will allow you to follow along with the examples and see the complete code for the app.
1.1 — Setting up store API
We will be using https://fakestoreapi.com as our API to demonstrate effective testing techniques in React Native. Our store app will fetch a set of products from this API and provide a detailed view of each product. Although the FakeStoreProduct has other REST APIs that we could utilize, doing so would increase complexity and detract from the primary objective of this article.
To communicate with our API across our app, we will create an axios instance.
1.2— Setup axios instance
Next steps will be creating our react-query setup for our API.
1.3 — Create the key-factory for managing query caching
What is key-factory?
Although the simplicity of our app does not necessarily require the use of caching, we will be utilizing React-Query’s powerful caching features nonetheless. Thus, we will be creating a simple key factory, which will be demonstrated below.
1.4— Fetching products using react-query
Above, we’ve created useGetAllProducts hook for fetching the products, as well as utilizing the query-key we created in the previous section.
1.5 — Fetching product detail using react-query
Almost the same as the previous hook, except this timeuseGetProductById hook will be used for fetching the product’s detail by its id.
1.6— Product type
Let’s not skip to get an idea of how the product object does look.
1.7 — Here comes zustand, managing products in the basket
The app will include basic features that allow users to add or remove products from their basket, as well as adjust the quantity of individual products. Additionally, users have the ability to reset the entire basket. These functionalities will be managed using Zustand. Below, we will examine its implementation.
The first part of the code defines three functions, updateProductQuantity, increaseProductQuantityInBasket, and decreaseProductQuantityInBasket, which are helper methods for updating the quantity of a product in the basket. updateProductQuantity function takes an array of objects which corresponds to productsInBasket, a product ID, and an update type (increase or decrease) as inputs, and return a new array productsInBasket with the updated quantity for the given product.
The ProductStore interface defines the schema for the product store. It contains two properties:
- productsInBasket is an array of ProductInBasketobjects representing the products in the basket.
- actions is an object containing functions for managing the products in the basket, including adding a product, removing a product, increasing/decreasing its quantity, and resetting the basket.
The useProductStore hook is created using the create function from Zustand. It returns the product store with its state and actions.
The remaining hooks, useProductActions, useProductsInBasket, useProductsInBasketCount, and useProductInBasketQuantityById, are selectors derived from the useProductStore hook. They allow access to specific parts of the product store, such as the actions or the count of favorited products.
On the other hand, worth to mention that we used shallowfrom zustand in useProductsInBasket. It's because the array of objects that will be returned from useProductsInBasket will cause a rerender as they are not being primitive types, thus we simply tell zustand that we want the object to be diffed shallowly by passing the shallow equality function.
1.8 — Installing necessary packages for testing
Now, we can move on to the part that we more care about, testing. We will be using the packages below:
- jest (29.4.1)
- ts-jest (29.0.5)
- @testing-library/react-hooks (8.0.1)
- @testing-library/react-native (11.5.1)
- Mock service worker aka MSW(1.0.0)
For the purpose of brevity and to avoid elongating the article, we will omit some processes of configuring the testing environment such as jest.config.js and ts-jest .
Feel free to take a look at how we did end up setting up the test environment by using the complete source code link that is available at the end of the article.
1.9— Mocking API data with MSW
In order to effectively test our app with react-query, we need to mock our API. To accomplish this, we will utilize the mock service worker (MSW).
In the code above, we import the necessary modules and set up the MSW handlers. We create two mock endpoints, one for fetching all products and the other for fetching a product by its id, both returning a successful response. To ensure thorough testing, we also create failed handlers for these two endpoints to simulate and test failure scenarios.
In order to complete the mocking setup above, we need to use mswServer object in our jest.setup.js . We simply will want to initialize mswServer before any test cases, as well as reset handlers after each test case, and in the end, we will shut down it.
Now, we mocked our API to be able to use it in the tests. But we still are not complete yet. We do also need to set up testing for zustand using the documentation they have provided. This will allow us to reset state between tests when using zustand in our test cases.
1.10 — Configuring zustand for testing
The crucial thing is here to put the file above in the correct directory depending on our testing environment. Since we use jest, we should place this file to the __mocks__/zustand.js as described in the documentation.
You might be already feeling overwhelmed dealing with setting up the (testing) environment, nevertheless, I needed to cover them regardless, as they are the skeleton of our environment.
That said, let’s jump right into the section in which we create our screen for displaying the products.
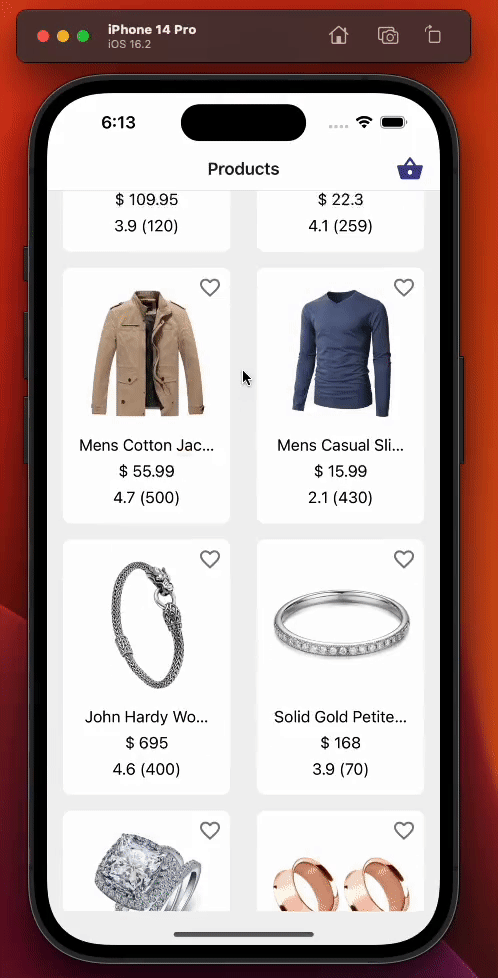
2 — Product list screen overview
As we mentioned before, we will have a screen for displaying products. Let’s see the full code of product list screen below:
This screen is responsible for the followings:
- Displaying products with the custom react query hook, useGetAllProducts , which we created in 1.4 — Fetching products using react-query section.
- Allowing users to add or remove products from their basket using the useProductActions custom zustand hook which again we have covered in 1.7 — Here comes zustand, managing products in the basket section.
- Refetching products using pull-to-refresh.
- Updating the quantity text displayed in the header right basket icon.
Below is the demonstration of product list screen:
2.1 — Testing product list screen
In this section, we will be conducting testing on product list screen. The initial test cases that will be carried out are as follows:
- Initially, the loading indicator should be displayed, even though we mock the data. The isLoading boolean flag in react-query will still be set to truefor a short period of time. After the data is fetched, isLoading will be false, and the loader will not be displayed.
- The product list should be displayed accurately after the data has been fetched. The testID prop of the ProductListCardcomponent will be utilized to verify this case.
- In the event of a failed query to get all products, the screen should display an error message. We will be utilizing the setupGetAllProductsFailedHandler helper that was created in 1.9 — Mocking API data with MSW section.
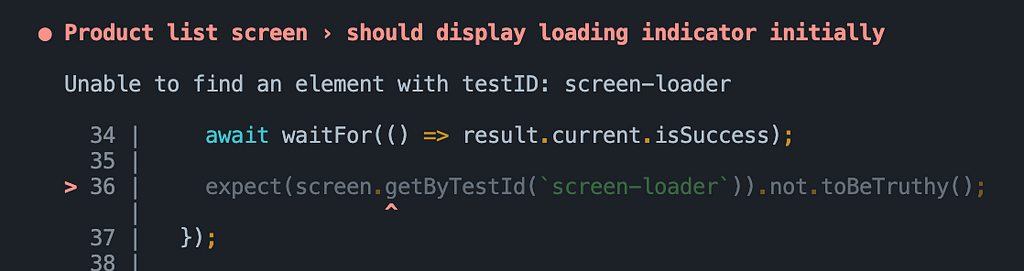
2.1.1 —Test case: It should display loading indicator initially
At the top of the file, we’ve imported the necessary modules in order to run our tests. And then we created a variable called as component to store our product list screen, so that we can reuse this variable throughout our test cases. Furthermore, since it is a screen, and we declared screen props in section 2 — Product list screen overview, and in line 22, we also need to provide the required screen props, navigationand route. We will come back in upcoming test cases on why we destructed the navigation object in the above.
A short review of terminology we need to take care of in order to understand test cases:
- render: Deeply renders given React element and returns helpers to query the output components structure.
- screen: Hold the value of latest render call for easier access to query and other functions returned by render.
- renderHook : Renders a test component that will call the provided callback, including any hooks it calls, every time it renders.
Since the primary objective of this article is to provide guidance on how to conduct testing rather than an introduction to testing libraries, and their functions, we will skip diving into deep detail about them. We will have enough examples to see their usage anyway throughout the article.
The test case above checks if a screen loader component is displayed initially on the screen. The render function renders the ProductListScreen component wrapped in the createReactQueryWrapper function, which is a simple utility function used for creating QueryClientProvider . The screen.queryByTestId() function checks if the screen loader is displayed on the screen.
The renderHook function is used to test the useGetAllProducts hook, which is used in the ProductListScreen component to fetch the products data. The wrapper option is passed to the renderHook function to wrap the useGetAllProducts hook in the createReactQueryWrapper function. The result variable contains the value returned by the useGetAllProducts hook. Meanwhile, the waitFor function waits until the isSuccess property of the result object is true, which means that the products data has been successfully fetched.
The second part checks if the screen loader component is no longer displayed after the product data has been successfully fetched.
The reason we used queryByTestId instead of getByTestId is because we know that screen loader component will not be visible after data has been fetched, thus using getByTestId would throw an error.
The error we would be facing could be the following in case of using getByTestId:
2.1.2 — Test case: It should display product list data correctly
This test code tests whether the product list screen displays the fetched product data correctly.
This time again we wait for data to be fetched successfully, then we are ensuring product list data is displayed correctly by looping through the fetched data and expecting that a product list card with the testID of product-list-card-${id} exists for each product in the data. The id property is dynamically generated based on the product ID. If the test fails, it means that the product list items are not displaying the product data correctly.
Notice how we were using the renderItem function in order to render list items below. We loop through product.id and combine with the string product-list-card to generate a dynamic testID for the ProductListCard component. In this way, we will be able to test all of the products along with their respective testID prop.
2.1.3— Test case: It should display error text in case get all products query fails
In this test case, we are testing the scenario where the API call to fetch all products fails.
To simulate API failure, we use the setupGetAllProductsFailedHandler function from the mock server worker (msw), which we implement 1.9 — Mocking API data with MSW section in line 38. We then render the ProductListScreencomponent using the render function, and invoke the useGetAllProducts hook which fetches the data using the renderHook function.
We use the waitFor function from @testing-library/react-hooks to wait for the isError property of the result.current object to become true. This ensures that the hook has completed executing and the API call has failed. Finally, we assert that the error message “An error occurred” (which you can double check by taking a look at the source code of the product list screen) will be displayed on the screen by checking if the text is present using the getByText function from @testing-library/react-native.
2.1.4 — Test case: It should call navigation action on pressing the first product item
We will test the following code snippet which is actually extracted from our product list screen. This code is responsible for handling user press action to any of the product list card in the list.
Let’s see below how we can approach testing it:
In this test code snippet, we are testing whether the navigation action is called when a product item is pressed. First, we render the ProductListScreen component and wait for data to be fetched successfully just like in previous test cases. Afterward, we retrieve the first product item from the list and simulate a press event on it using fireEvent.press. Finally, we expect that the navigate function of the navigation object has been called with the expected RouteName and productId parameters.
2.1.5 — Test case: It should add/remove product item correctly on pressing product item’s basket icon
The test case below is testing the scenario where the user adds and removes a product from the basket by pressing the basket icon on the product card on the Product List screen.
In order to test the functionality of the basket icon on the header, we need to render the entire ProductStack in addition to the ProductListScreen. This is because we need to access the header of the Product List screen to get the basket icon by its test ID. This requires us to have the entire ProductStackrendered, along with the NavigationContainer .
After we are done with fetching products successfully, it uses fireEvent.press to simulate pressing the basket icon on the first product item, which adds the product to the basket. We then check that the basket icon displays the correct quantity, and that the product is added to the productsInBasket array in the product store with the correct quantity and product object.
After that, we do simulate pressing the basket icon again to remove the product from the basket, and check that the basket icon no longer displays the quantity, and that the productsInBasket array in the product store is empty.
In summary, this test case is testing the functionality of adding and removing a product from the basket as well as adjusting their quantities by pressing the basket icon on the product card on the Product List screen, and confirms that the product store correctly manages the products and their quantities in the basket.
2.1.6 — Product list screen complete test flow
The complete test flow of the product list screen is as follows:
Wrapping up
To conclude, this article has explored effective testing strategies for React Native applications that use React-Query and Zustand libraries which are pretty popular these days in any React/React Native applications. By using a simple store app as an example and providing comprehensive and detailed examples, we have covered the testing process and how to ensure code quality through the implementation of tests. Feel free to take a look at the full source code using the link below. Have a good day!
Level Up Coding
Thanks for being a part of our community! Before you go:
- 👏 Clap for the story and follow the author 👉
- 📰 View more content in the Level Up Coding publication
- 💰 Free coding interview course ⇒ View Course
- 🔔 Follow us: Twitter | LinkedIn | Newsletter
🚀👉 Join the Level Up talent collective and find an amazing job
Testing React Native with React-Query and Zustand was originally published in Level Up Coding on Medium, where people are continuing the conversation by highlighting and responding to this story.
This content originally appeared on Level Up Coding - Medium and was authored by Tarik
Tarik | Sciencx (2023-02-21T17:47:00+00:00) Testing React Native with React-Query and Zustand. Retrieved from https://www.scien.cx/2023/02/21/testing-react-native-with-react-query-and-zustand/
Please log in to upload a file.
There are no updates yet.
Click the Upload button above to add an update.