This content originally appeared on DEV Community 👩💻👨💻 and was authored by Leandro Proença
It's been a while I wanted to take a time to sit down and write about Kubernetes. The time has come.
In short, Kubernetes is an open-source system for automating and managing containerized applications. Kubernetes is all about containers.
❗ If you don't have much idea of what a container is, please refer to my Docker 101 series first and then come back to this one. Thereby you'll be more prepared to understand Kubernetes.
Disclaimer said, let's see the problem all this "K8s thing" tries to solve.
📦 Containers management
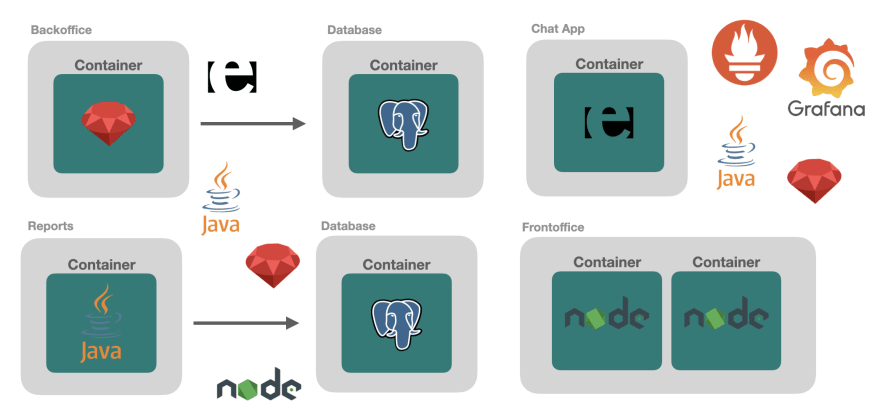
Suppose we have a complex system that is composed by:
- A Backoffice written in Ruby
- Various databases running PostgreSQL
- A report system written in Java
- A Chat app written in Erlang
- A Frontoffice written in NodeJS
Okay, this architecture is quite heterogeneous, but it serves the purpose of this article. In addition, we run everything in containers:
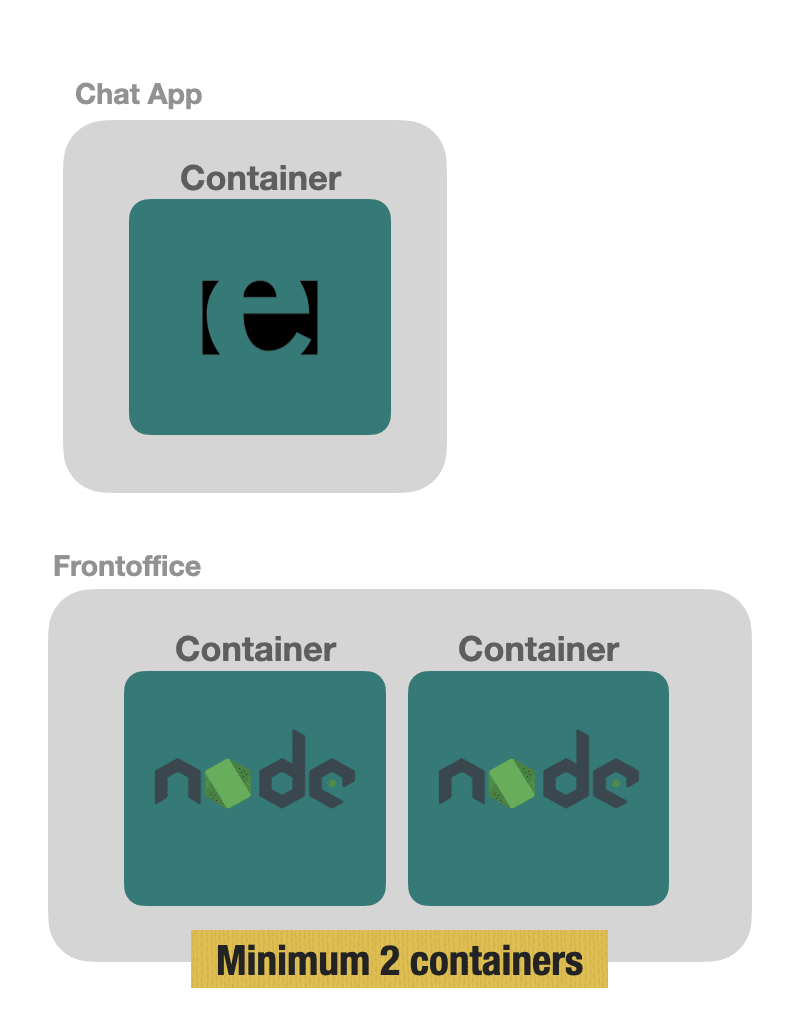
Assume we have to ensure maximum availability and scalability of the "Frontoffice" application, because eventually it is the application that final users consume. Here, the system requires at least 2 Frontoffice containers running:
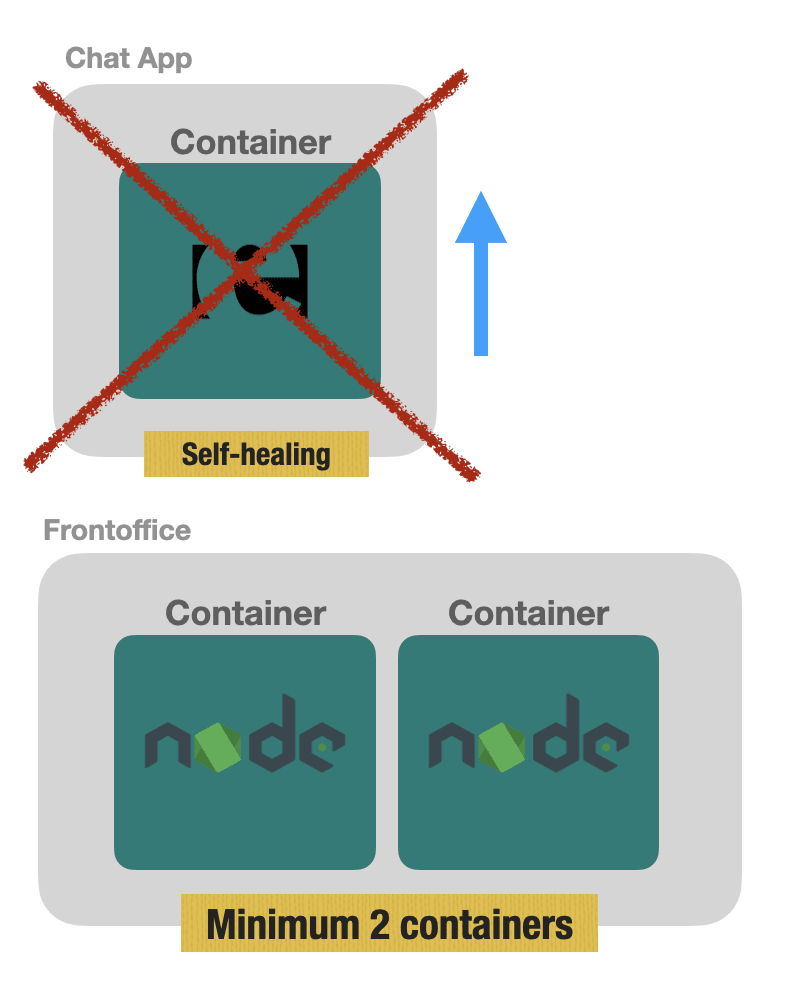
Moreover, there's another functional requirement that the Chat app cannot be down for much time, and in case it goes down, we should make sure it is started again, having the capability of self-healing:
Now think of an architecture where we have dozens if not hundreds of containers:
Container management is not easy, that's where Kubernetes comes in.
📜 A bit of history
After 15 years of running complex workloads internally, Google decided to make public their former container management tool called "Borg".
In 2014, the launch was made and they named it "Kubernetes". The tool went open-source and the community soon embraced it.
Kubernetes is written in Golang, initially it used to support only Docker containers but later support to other container runtimes have come too, such as containerd and CRI-O.
☁️ Cloud Native Computing Foundation
In 2015 the Linux Foundation created a foundation branch that aims for supporting open-source projects that run and manage containers in the cloud computing.
Then, the Cloud Native Computing Foundation, or CNCF, was created.
Less than a year later, Kubernetes was introduced as the first CNCF graduated project ever.
Currently as of 2023, a lot of companies and big players run Kubernetes on their infrastructure, Amazon, Google, Microsoft, RedHat, VMWare to name a few.
Kubernetes Architecture
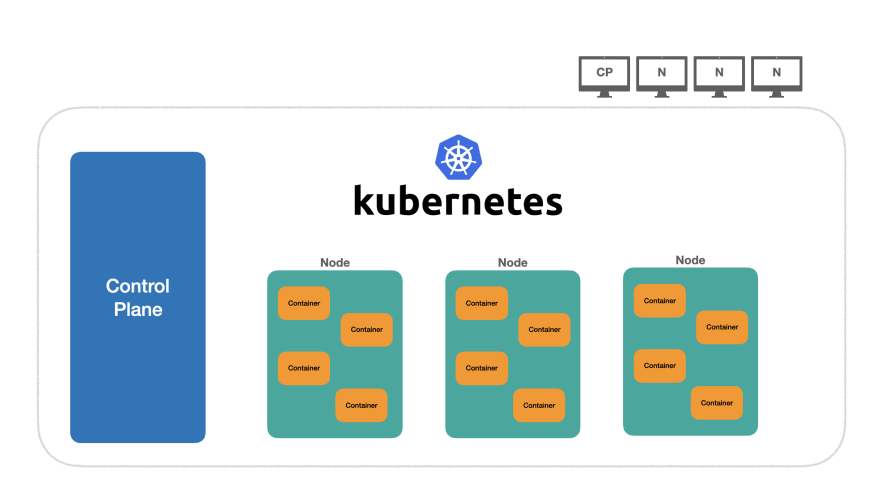
Here's a brief picture of how a Kubernetes architecture looks like:
In the above scenario, we have a k8s cluster that consists of "4 machines" (or virtual machines that's more common nowadays), being:
- 1 machine called Control Plane, in which the cluster is created and is responsible to accept new machines (or nodes) on the cluster
- 3 other machines called Nodes, which will contain all the managed containers by the cluster.
👍 A rule of thumb
All the running containers establish what we call the cluster state.
In Kubernetes, we declare the desired state of the cluster by making HTTP requests to the Kubernetes API, and Kubernetes will "work hard" to achieve the desired state.
However, making plain HTTP requests in order to declare the state can be somewhat cumbersome, error prone and a tedious job. How about having some CLI in the command-line which would do the hard work of authenticating and making HTTP requests?
Meet kubectl.
👤 Creating objects in the cluster
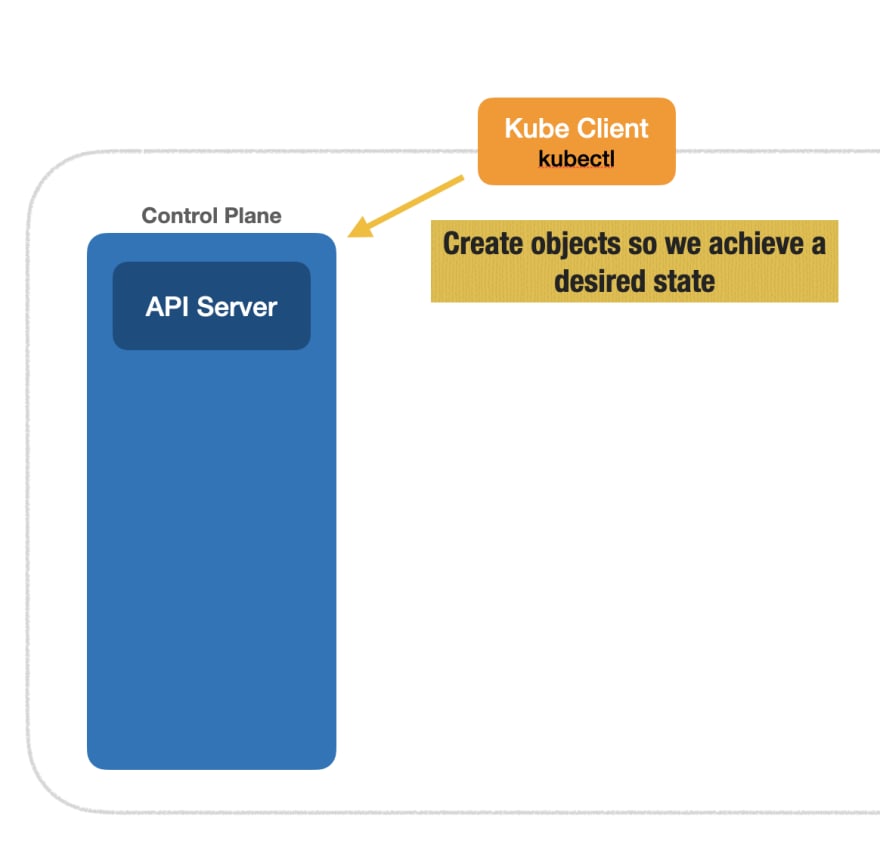
Kubernetes treats everything in the cluster as objects, where objects can have different types (kind).
$ kubectl run nginx --image=nginx
pod/nginx created
The following picture describes such interaction where we use the kubectl CLI which will perform a request to the control plane API:
But what's a Pod?, you may be wondering. Pod is the smallest object unit we can interact with.
Pods could be like containers, however Pods can contain multiple containers.
🔎 Architecture Flow
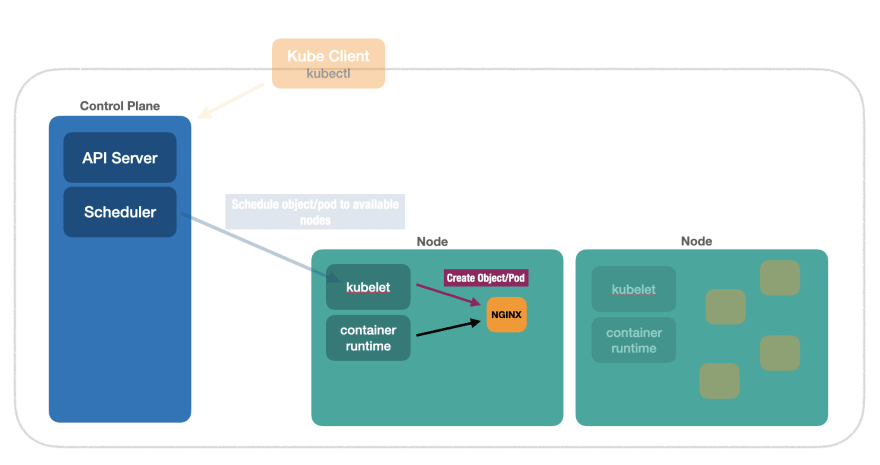
Now let's dig into the flow of creating objects, on how the cluster performs the pod scheduling and state updates.
That's supposed to be a brief architecture flow, so we can understand better the k8s architecture.
👉 Control Plane Scheduler
The Control Plane Scheduler looks out for the next available node and schedules the object/pod to it.
👉 Node Kubelet
Each node contains a component called Kubelet, which admits objects coming from the Scheduler and, using the container runtime installed in the node (could be Docker, containerd, etc), creates the object in the node.
👉 etcd
In the Control Plane there's a component called etcd which is a distributed key-value store that works well in distributed systems and cluster of machines. It's a good fit for Kubernetes.
K8s uses etcd to persist and keep the current state.
✋ A bit of networking in Kubernetes
Suppose we have two NGINX pods in the cluster, a server and a client:
$ kubectl run server --image=nginx
pod/server created

$ kubectl run client --image=nginx
pod/client created
Assume we want to reach the server, how do we reach such pod in the port 80?
In containerized applications, by default, containers are isolated and do not share the host network. Neither do Pods.
We can only request the localhost:80 within the server Pod. How do we execute commands in a running pod?
$ kubectl exec server -- curl localhost

<html>
...
It works, but only requesting within the pod.
How about requesting the server from the client, is it possible? Yes, because each Pod receives an internal IP in the cluster.
$ kubectl describe pod server | grep IP
IP: 172.17.0.6
Now, we can perform the request to the server from the client using the server internal IP:
$ kubectl exec client -- curl 172.17.0.6

<html>
...
However, in case we perform a deploy, i.e change the old server Pod to a newer Pod, there's no guarantee that the new Pod will get the same previous IP.
We need some mechanism of pod discovery, where we can declare a special object in Kubernetes that will give a name to a given pod. Therefore, within the cluster, we could reach Pods by their names instead of internal IP's.
Such special object is called Service.
👉 Controller Manager
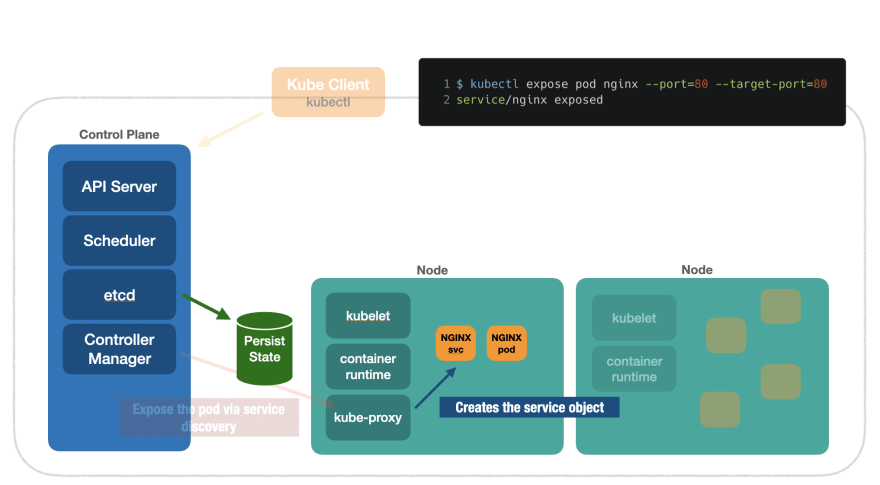
The Control Plane also employs a component called Controller Manager. It's responsible to receive a request for special objects like Services and expose them via service discovery.
All we have to do is issuing kubectl expose and the control plane will do the job.
$ kubectl expose pod server --port=80 --target-port=80

service/server exposed
Then we are able to reach the server pod by its name, istead of its internal IP:
$ kubectl exec client -- curl server

<html>
...
Let's look at what happened in the architecture flow. First, the kubectl expose command issued the creation of the Service object:
Then, the Controller Manager exposes the Pod via service discovery:
Afterwards, the controller manager routes to the kube-proxy component that is running in the node, which will create the Service object for the respective Pod. At the end of the process, the state is persisted in etcd.
👉 Cloud Controller
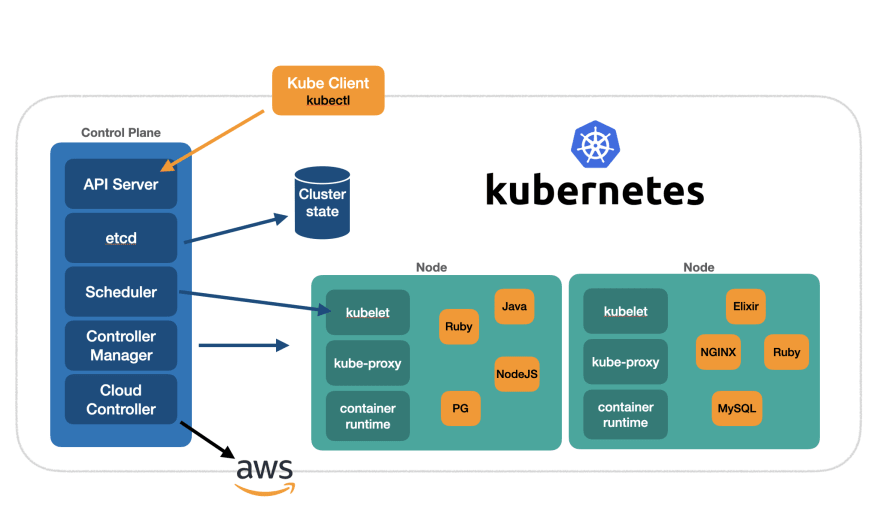
Another controller that exists in the control plane is the Cloud Controller, responsible for receiving requests to create objects and interacting with the underlying cloud provider if needed.
For example, when we create a Service object of type LoadBalancer, the Cloud Controller will create a LB in the underlying provider, be it AWS, GCP, Azure etc
💯 The final overview
After learning about the kubernetes architecture, let's summarize the main architecture flow in one picture:
This post was an introduction to Kubernetes along with an overview to its main architecture.
We also learned about some building block objects like Pods and Services.
In the upcoming posts, we'll see a more detailed view about Kubernetes workloads, configuration and networking.
Stay tuned!
This content originally appeared on DEV Community 👩💻👨💻 and was authored by Leandro Proença
Leandro Proença | Sciencx (2023-02-23T02:25:00+00:00) Kubernetes 101, part I, the fundamentals. Retrieved from https://www.scien.cx/2023/02/23/kubernetes-101-part-i-the-fundamentals/
Please log in to upload a file.
There are no updates yet.
Click the Upload button above to add an update.


