
This content originally appeared on DEV Community and was authored by Emanuele Bartolesi
Swagger UI is an open-source tool that allows developers to visualize and interact with the APIs they are building. It provides a user-friendly interface that allows developers to explore the API’s resources, parameters, and responses. Swagger UI is particularly useful for developers who want to test and debug their APIs before deploying them.
Azure Functions can be used to build RESTful APIs, making it a popular choice for developers who want to create lightweight and scalable APIs. Azure Functions also provides built-in support for Swagger UI, making it easy for developers to add it to their APIs.
So, let’s dive in!
NuGet Package
You can start from an existing project or from a new Azure Function project.
First of all, we have to add the NuGet package called AzureExtensions.Swashbuckle.
This package is not really up-to-date but still working and it's the only way to achieve our goal.
Startup class
The second task is adding a Startup class to the project.
Create a new empty class and replace everything with the following code.
[assembly: FunctionsStartup(typeof(Startup))]
namespace FunctionApp1
{
    public class Startup : FunctionsStartup
    {
        public override void Configure(IFunctionsHostBuilder builder)
        {
            builder.AddSwashBuckle(Assembly.GetExecutingAssembly(), opts =>
            {
                opts.SpecVersion = OpenApiSpecVersion.OpenApi2_0;
                opts.AddCodeParameter = true;
                opts.PrependOperationWithRoutePrefix = true;
                opts.Documents = new[]
                {
                        new SwaggerDocument
                        {
                            Name = "v1",
                            Title = "My API Documentation",
                            Description = "a long description of my APIs",
                            Version = "v1"
                        }
                };
                opts.Title = "Swagger Test";
                opts.ConfigureSwaggerGen = (x =>
                {
                    x.CustomOperationIds(apiDesc =>
                    {
                        return apiDesc.TryGetMethodInfo(out MethodInfo methodInfo)
                            ? methodInfo.Name
                            : new Guid().ToString();
                    });
                });
            });
        }
    }
}
It's obvious, but you can modify the properties values of the Swagger Document class.
Swagger UI endpoints
Now it's time to override the response of the two main endpoints for Swagger.
In order to do that, you can create a new empty class and paste the following code inside.
This code simply replaces the default Swagger pages with the new ones.
   public static class SwaggerController
   {
       [SwaggerIgnore]
       [FunctionName("Swagger")]
       public static Task<HttpResponseMessage> Run(
           [HttpTrigger(AuthorizationLevel.Function, "get", Route = "Swagger/json")] HttpRequestMessage req,
           [SwashBuckleClient] ISwashBuckleClient swashBuckleClient)
       {
           return Task.FromResult(swashBuckleClient.CreateSwaggerJsonDocumentResponse(req));
       }

       [SwaggerIgnore]
       [FunctionName("SwaggerUi")]
       public static Task<HttpResponseMessage> Run2(
           [HttpTrigger(AuthorizationLevel.Function, "get", Route = "Swagger/ui")] HttpRequestMessage req,
           [SwashBuckleClient] ISwashBuckleClient swashBuckleClient)
       {
           return Task.FromResult(swashBuckleClient.CreateSwaggerUIResponse(req, "swagger/json"));
       }
   }
View the new page
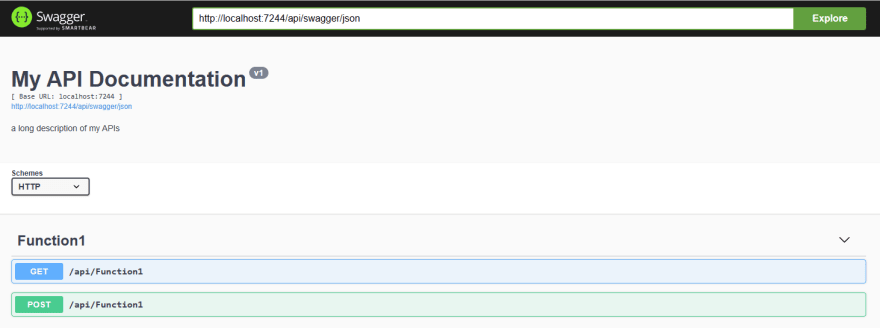
Now you are ready to see the result of our changes.
Launch the Azure Function project in debug or without debug and navigate to "{hostname}/api/swagger/ui".
You should view the Swagger UI page with the new information.
Are you interested in learning GitHub but don't know where to start? Try my course on LinkedIn Learning: Learning GitHub.

Thanks for reading this post, I hope you found it interesting!
Feel free to follow me to get notified when new articles are out 🙂

This content originally appeared on DEV Community and was authored by Emanuele Bartolesi
Emanuele Bartolesi | Sciencx (2023-02-25T17:17:08+00:00) Customizing Swagger in Azure Functions. Retrieved from https://www.scien.cx/2023/02/25/customizing-swagger-in-azure-functions/
Please log in to upload a file.
There are no updates yet.
Click the Upload button above to add an update.