Creating a Machine Learning Workflow for Arduino Nano RP2040 Connect with Edge Impulse

Building a TinyML Handwriting Recognition System with Edge Impulse and Arduino Nano RP2040 Connect
It had been a while since I last dabbled in embedded systems projects, and like any other Arduino enthusiast, I found myself browsing for exciting new development boards to tinker with. That’s when I stumbled upon the Arduino Nano RP2040 Connect, and I was immediately hooked. I tried to resist the urge to buy it, but I couldn’t resist for long and ended up getting one. Let me tell you why this development board is so cool before we dive into the tutorial!
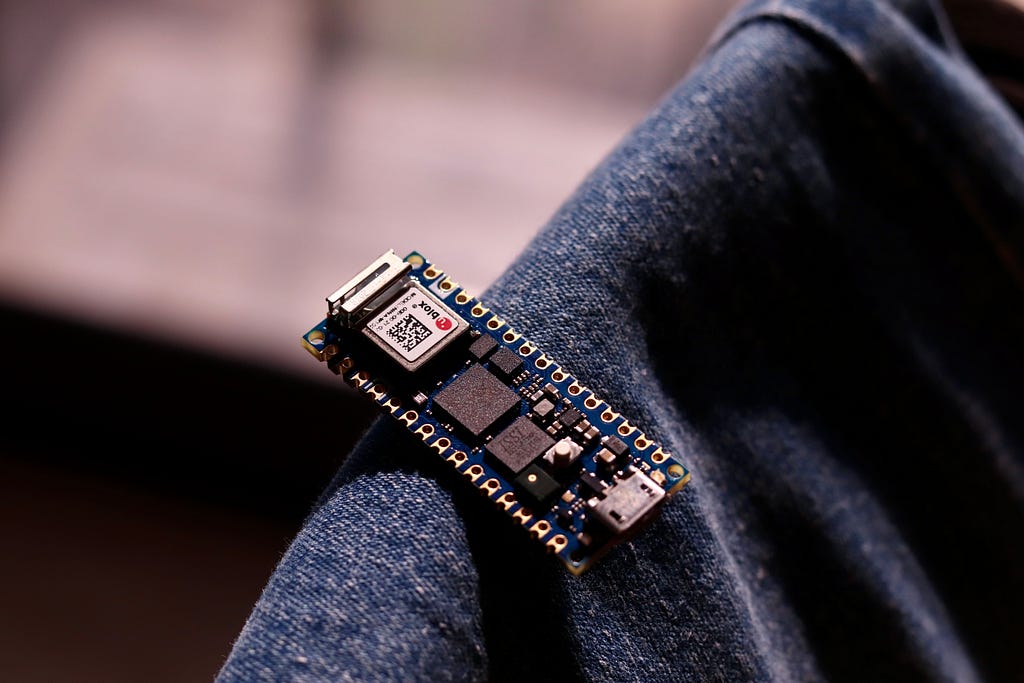
Arduino Nano RP2040 Connect

The RP2040 Connect, which launched in May 2021, is based on the Raspberry Pi RP2040 MCU, also found on many other boards like the Pico. While other manufacturers, including Adafruit, SeeedStudio, and Sparkfun, are developing their own RP2040-based boards, the Nano RP2040 Connect has a few tricks up its sleeve. When compared to other RP2040 boards, the Arduino Nano RP2040 Connect boasts a built-in 6-axis IMU, temperature sensor, Bluetooth with BLE, and WiFi integrated in the Nina W102 uBlox module, along with a microphone and MicroPython compatibility. The Nina W102 module and 6-axis IMU set the Arduino Nano RP2040 Connect apart from other development boards. In summary, it’s like the Arduino Nano BLE Sense and Raspberry Pi Pico W had a baby, making it the ideal board for TinyML development.
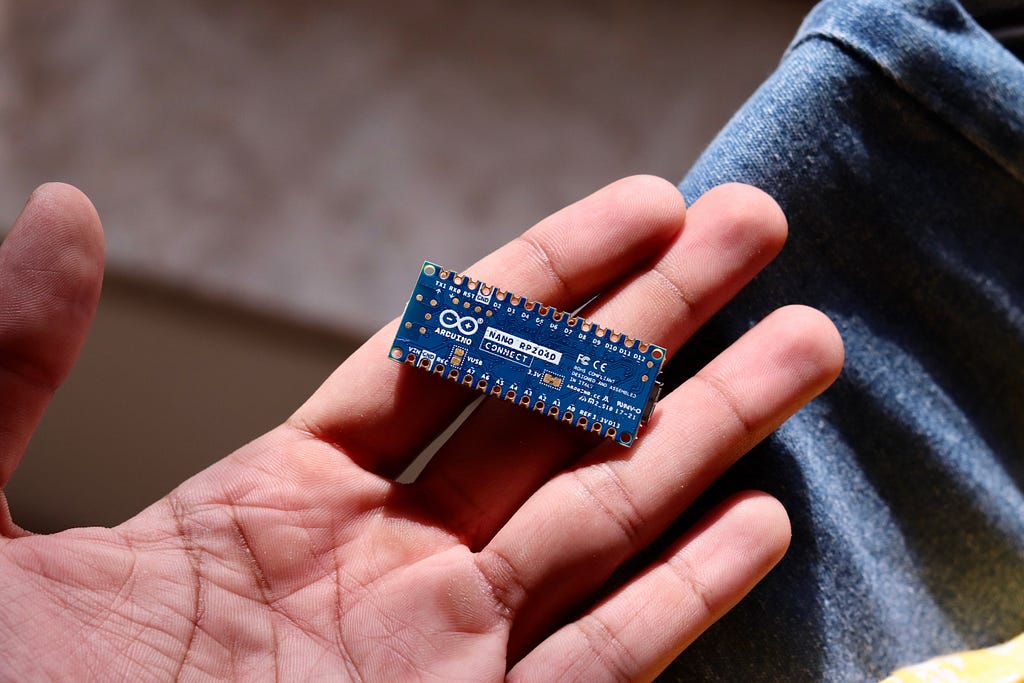
Arduino Nano RP2040 Connect

What is TinyML?

“Tiny machine learning is broadly defined as a fast growing field of machine learning technologies and applications including hardware, algorithms and software capable of performing on-device sensor data analytics at extremely low power, typically in the mW range and below, and hence enabling a variety of always-on use-cases and targeting battery operated devices.” — tinyml.org

Embedded systems and development boards, like the Arduino, are often resource-constrained, making it challenging to use full-blown machine learning models. This is where TinyML models come in, as they are optimized for such devices. There are several TinyML frameworks available, including TensorFlow Lite, CoreML, and PyTorch Mobile, which enable the deployment of machine learning models on embedded systems.

However, not everyone has the expertise or time to dive deep into training an ML model using these frameworks. In some cases, it may be necessary to deploy a model for smaller and niche use cases without the hassle of coding everything from scratch. This is where Edge Impulse comes into the picture. Edge Impulse is a platform that enables the rapid development and deployment of TinyML models, allowing developers to easily create and deploy machine learning models on embedded systems without requiring significant expertise in machine learning.

What is Edge Impulse?

Edge Impulse is a platform that makes it possible to create and deploy TinyML models on edge devices like microcontrollers without having to have a lot of programming or machine learning experience. The platform offers developers a full toolchain, including data collection, labelling, feature engineering, model training, optimization, and deployment, to design and deploy machine learning models on edge devices.

For a variety of use cases, such as predictive maintenance, anomaly detection, speech recognition, gesture identification, and more, developers can quickly construct, test, and deploy bespoke machine learning models with Edge Impulse. The platform allows for the development of models for a wide range of applications because it supports a wide variety of sensors, including accelerometers, gyroscopes, microphones, and environmental sensors.

To give you a holistic overview of how you can deploy an ML model on your embedded system, the following steps need to be taken:

  1. Data Acquisition
  2. Impulse Design
  3. EON Tuner
  4. Deployment

Building a Handwriting Gesture Recognition System

I was inspired by Jalson’s ML-controlled smart suspension for mountain bikes, and I decided to try my hand at TinyML. For my project, I’m building a handwriting recognition system that will classify letters based on accelerometer values from the LSM6DSOX IMU. Specifically, I’ll be focusing on classifying just two letters, A and B. While it would be ideal to collect data for the entire English alphabet, I have chosen to start with a smaller scope for the sake of simplicity and practicality (and I’m lazy). Without any further ado, let’s get started.

Before you start with the tutorial, make sure you have created an Edge Impulse account and started a new project.

Data Acquisition

There are multiple ways to collect training data on Edge Impulse, such as using your mobile phone or computer, uploading your data, or connecting a fully supported development board. Unfortunately, the Arduino Nano RP2040 Connect is not currently supported by Edge Impulse. However, there is a simple solution to this problem. By using the data forwarder built into the Edge Impulse CLI client, you can connect any development board.
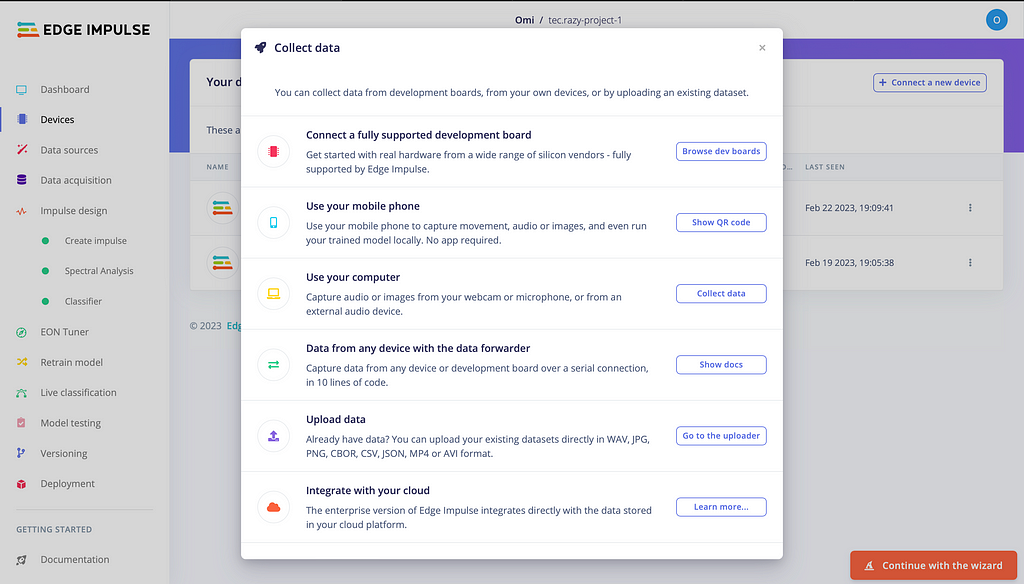
Different method to acquire data

The data forwarder is a tool that enables you to easily relay data from any device to Edge Impulse over a serial connection. Devices can write sensor values over this connection, and the data forwarder will collect, sign, and send the data to the ingestion service. It’s a smart and simple solution for integrating unsupported development boards with Edge Impulse.

In order to install the Edge Impulse CLI you will need to follow these steps:

  1. Install Python 3 on your host system.
  2. Install Node.js v14 or higher. For Windows users, install the Additional Node.js tools (called Tools for Native Modules on newer versions) when prompted.
  3. Type the following command: npm install -g edge-impulse-cli –force

You should now have the tools available in your PATH.

For more information on the installation.

Once you have connected your Arduino Nano RP2040 Connect to your computer, you’ll need to upload a sketch that writes the accelerometer readings to the serial monitor. After uploading the sketch, it’s important to disconnect your IDE to avoid errors while running the data forwarder.

// Install the library first.
#include <Arduino_LSM6DSOX.h>

float Ax, Ay, Az;

void setup() {
Serial.begin(115200);

while(!Serial);

if (!IMU.begin()) {
Serial.println("Failed to initialize IMU!");
while (1);
}

}

void loop() {
// put your main code here, to run repeatedly:
if (IMU.accelerationAvailable()) {
IMU.readAcceleration(Ax, Ay, Az);

Serial.println("Accelerometer data: ");
Serial.print(Ax);
Serial.print(',');
Serial.print(Ay);
Serial.print(',');
Serial.println(Az);
Serial.println();
}
}

In case you are facing any issues in reading the LSM6DSOX IMU values, make sure you have installed the latest NINA Firmware.

To use the data forwarder, run edge-impulse-data-forwarder. When running the data forwarder for the first time, you may need to sign into your Edge Impulse account and select the project. You will need to mark the comma separated values as x, y and z in the data forwarder as we are printing the accelerometer values on the serial monitor. Once connected, the Edge Impulse CLI will detect your development board and it will be visible in the devices tab within the Edge Impulse Studio. With that done, you can now move on to the exciting part in Edge Impulse Studio.

With the data forwarder running in the background, you can start collecting data on Edge Impulse Studio. Since we will only be classifying between two letters, you need to collect a minimum of 3 minutes of data for each letter, with each sample lasting 10 seconds. Label your data as A or B. Click on the ‘Record Data’ button and move your Arduino in the motion of the letter (air writing). Record multiple samples for each label in varying speeds and orientations.

The collected data must now be categorized into training and testing data. The recommended partition is 70:30, meaning 70% of the data should be used for training and 30% for testing. Choose a few random samples from each label to use as testing data.

Impulse Design

Time to dive into the fun part now. An Impulse is the training pipeline for your ML model consisting of 3 blocks:

  1. Input Block: It indicates the type of input data you are training your model with. It can either be time series or images.
  2. Processing Block: It is a feature extractor.
  3. Learning Block: A neural network trained to learn on your data.

I will explain them in more detail going forward.
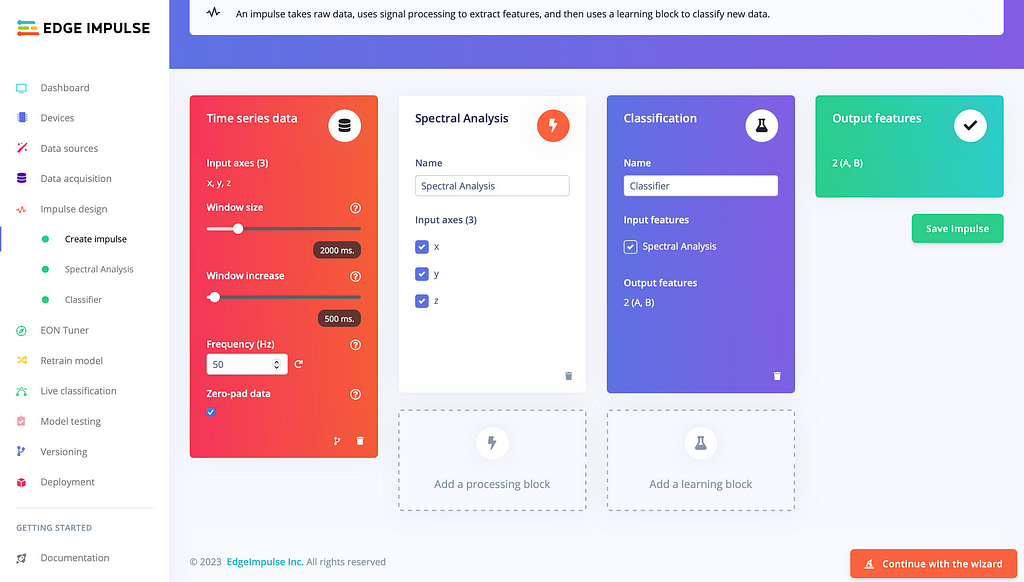
Impulse for my project

Coming to our project, we will be using the Time Series input block since our project is based on movements and gestures. The input axes field lists all the axis referenced from your training dataset. The window size is the size of the raw features that is used for the training. The window increase is used to artificially create more features (and feed the learning block with more information). There aren’t any concrete or correct values that must be set for them, you can proceed with the default values or tweak them as per your dataset.
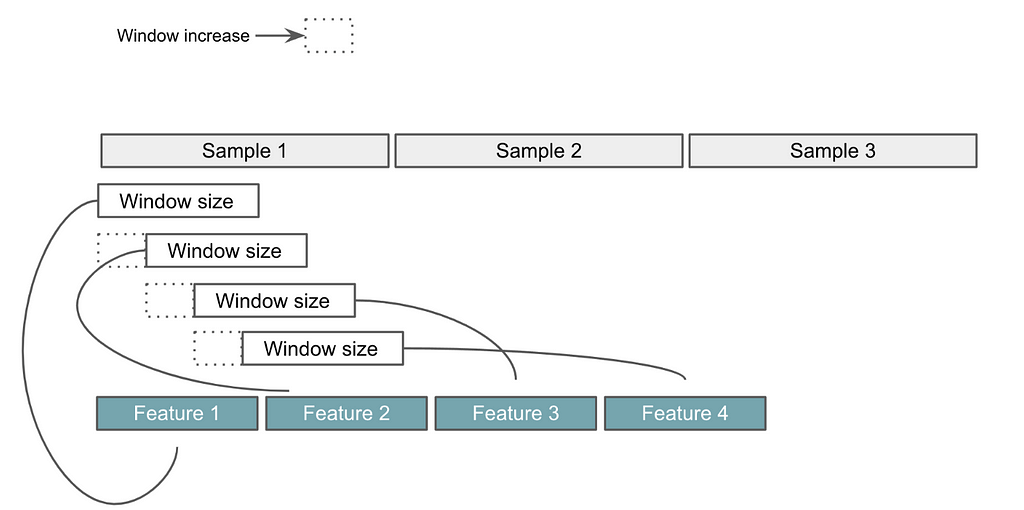
Source: Edge Impulse

There are multiple processing blocks that you can use to train your model. Don’t worry if you are not an ML expert (neither am I). Edge Impulse makes our lives simpler by giving us a brief idea about what each processing block is capable of.
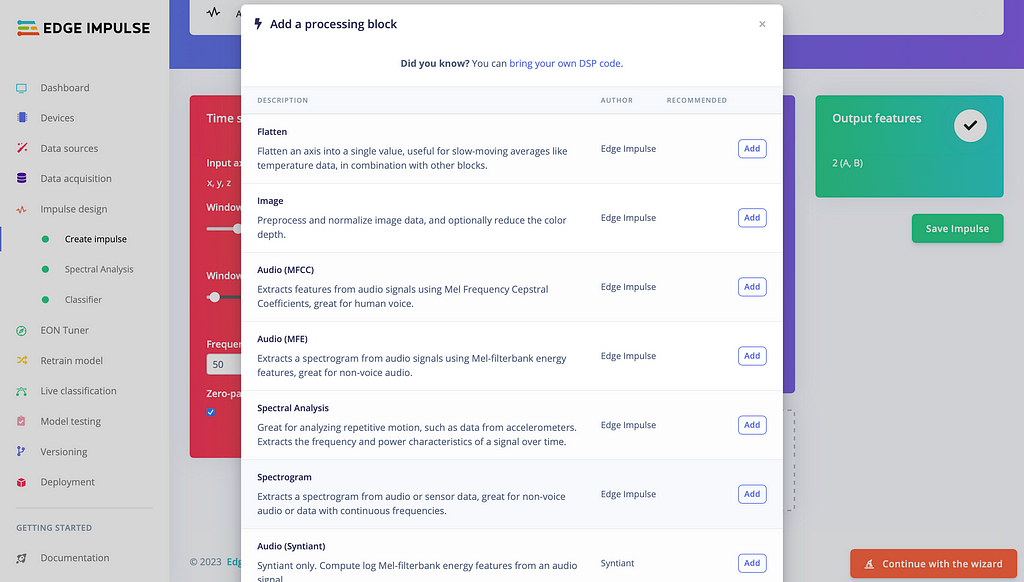
Types of processing blocks

Based on the description given, I went ahead with Spectral Analysis since that seemed to be well-suited for our use-case. You can add multiple processing blocks, too, if required.

Learning blocks vary depending on what you want your model to do and the type of data in your training dataset.
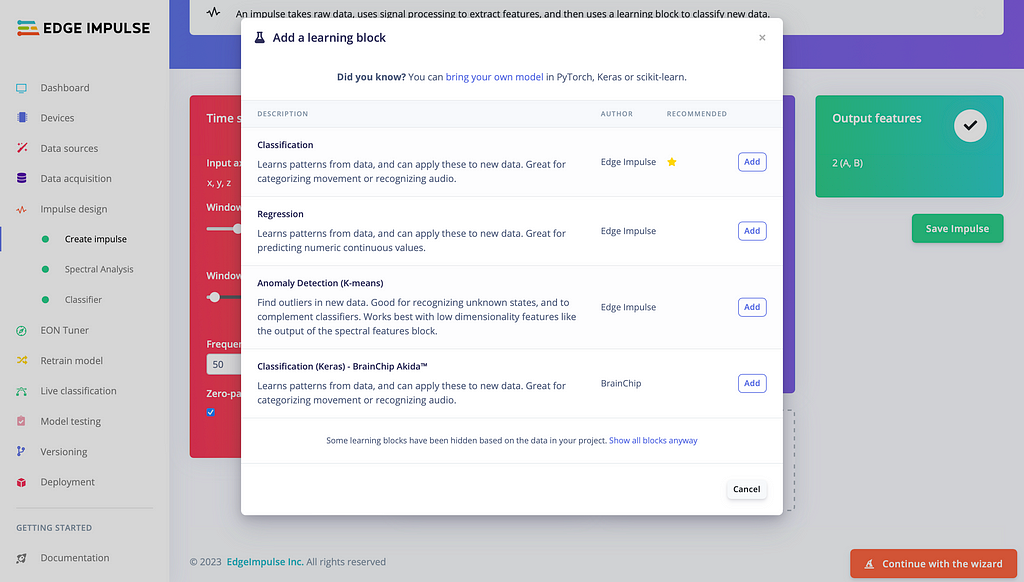
Types of Learning Blocks

As we will be classifying between different letters, I chose classification.

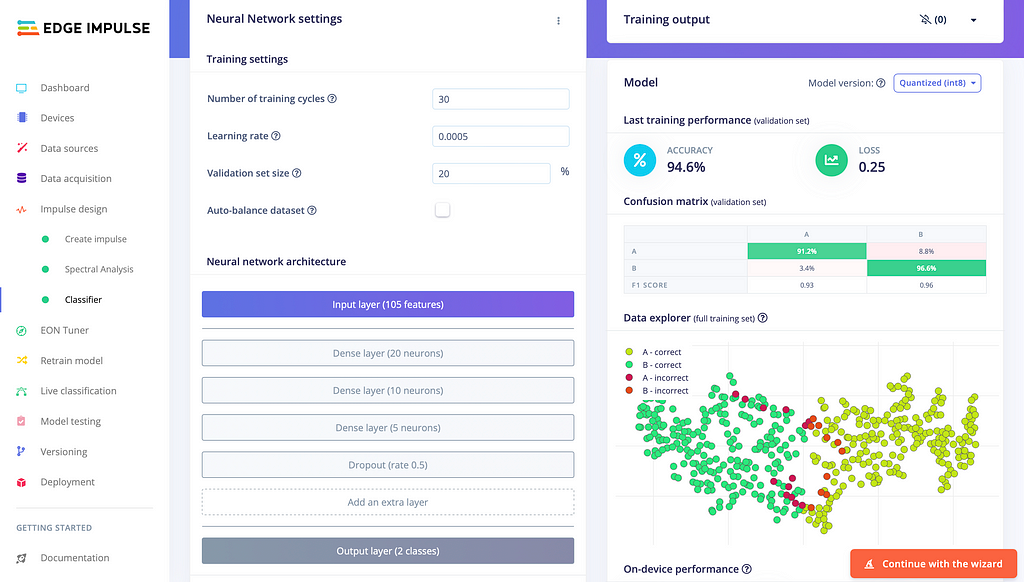
To fine-tune the learning block, you have the freedom to choose between different layers and customize the layers within the learning block. Edge Impulse provides detailed descriptions of what each layer does, and you can experiment with them to find the perfect configuration. As I won’t be delving deep into the ML aspects, I’ll share my learning block configuration. However, if you want to learn more about ML, Edge Impulse has comprehensive documentation that can help you understand the different layers and their functions.
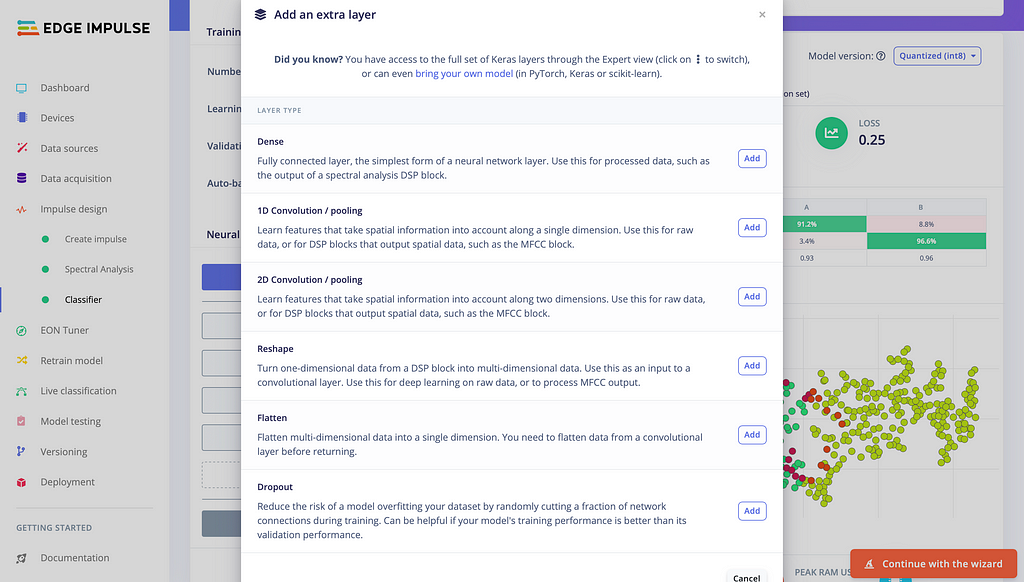
Types of Layers
My configuration

Optimizing the learning block configuration is often an iterative process that requires experimentation and fine-tuning. It may take multiple attempts to achieve optimal performance, and it’s important to be patient and persistent in this regard.

EON Tuner

If you’re like me and don’t have the patience or persistence to fine-tune your own model, Edge Impulse has you covered (yet again). The EON Tuner performs end-to-end optimizations, from the digital signal processing (DSP) algorithm to the machine learning model, and improved my model accuracy from 66% to 95% (yep, I’m definitely not an ML expert). The EON Tuner runs multiple model configurations in parallel based on your target device specification and use-case.
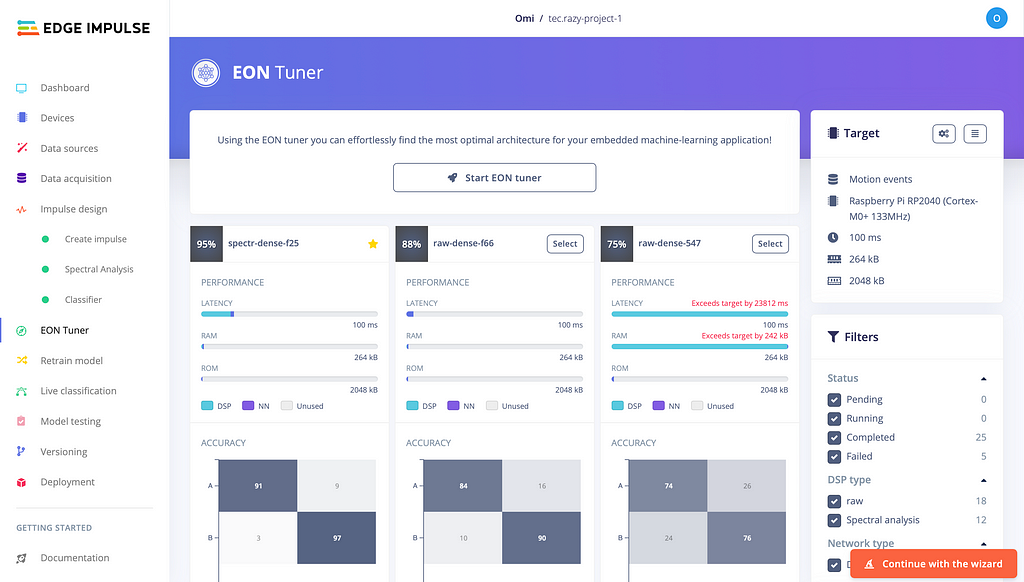
EON Tuner Configuration

Deployment

After training and validating your model, you can now deploy it to any device. The following are the 5 main categories of deploy options currently supported by Edge Impulse:

  1. Deploy as a customizable library.
  2. Deploy as a pre-built firmware — for fully supported development boards.
  3. Run directly on your phone or computer.
  4. Use Edge Impulse for Linux for Linux targets.
  5. Create a custom deployment block (Enterprise feature).

As the Nano RP2040 is not fully supported by Edge Impulse, we will be deploying it as a customizable library for the Arduino.
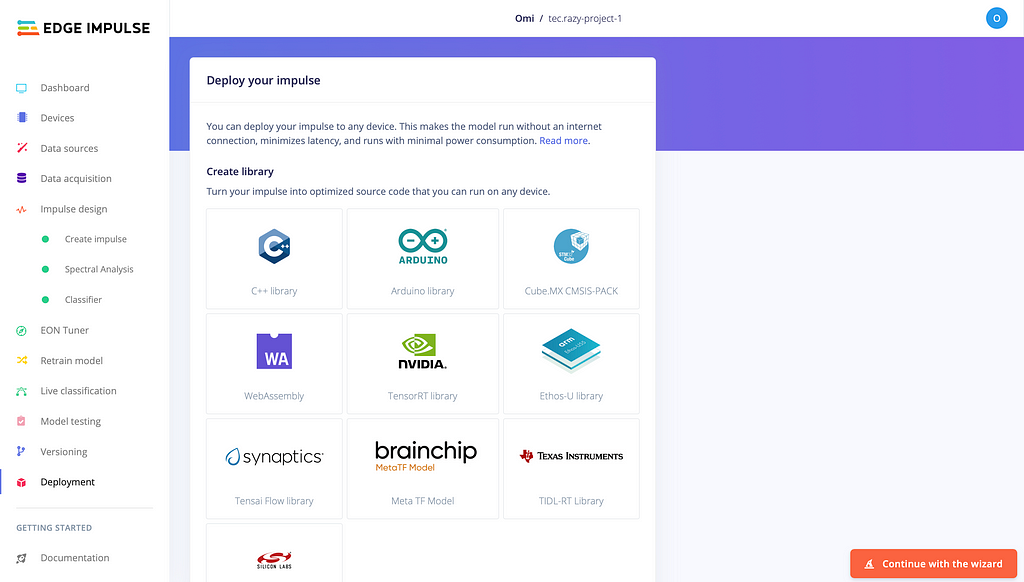
Deploying your impulse
Adding the library as .zip

After downloading the model as a library, you can navigate to File > Examples > (Your Project Name) > static_buffer to access the boilerplate code that you can use as a starting point. I modified the example sketch to read the accelerometer values directly.

Final Code:

#include <Arduino_LSM6DSOX.h>
#include <tec.razy-project-1_inferencing.h>


static float features[EI_CLASSIFIER_DSP_INPUT_FRAME_SIZE];

int raw_feature_get_data(size_t offset, size_t length, float *out_ptr) {
memcpy(out_ptr, features + offset, length * sizeof(float));
return 0;
}

void print_inference_result(ei_impulse_result_t result);

/**
* @brief Arduino setup function
*/
void setup()
{
// put your setup code here, to run once:
Serial.begin(115200);
while (!Serial);

Serial.begin(115200);
Serial.println("Started");

if (!IMU.begin()) {
Serial.println("Failed to initialize IMU!");
while (1);
}

delay(1000);

Serial.println("Edge Impulse Inferencing Demo");
}

/**
* @brief Arduino main function
*/
void loop()
{
ei_printf("Edge Impulse standalone inferencing (Arduino)\n");
delay(2000);
ei_printf("Start the motion capture\n");
delay(5000);

// Modified Code
for (size_t ix = 0; ix < EI_CLASSIFIER_DSP_INPUT_FRAME_SIZE; ix += 3) {
IMU.readAcceleration(features[ix], features[ix+1], features[ix+2]);
}

ei_impulse_result_t result = { 0 };

signal_t features_signal;
features_signal.total_length = EI_CLASSIFIER_DSP_INPUT_FRAME_SIZE;
features_signal.get_data = &raw_feature_get_data;

EI_IMPULSE_ERROR res = run_classifier(&features_signal, &result, false);
if (res != EI_IMPULSE_OK) {
ei_printf("ERR: Failed to run classifier (%d)\n", res);
return;
}

ei_printf("run_classifier returned: %d\r\n", res);
print_inference_result(result);

delay(2000);
Serial.write(0x0C);
}

void print_inference_result(ei_impulse_result_t result) {

ei_printf("Timing: DSP %d ms, inference %d ms, anomaly %d ms\r\n",
result.timing.dsp,
result.timing.classification,
result.timing.anomaly);

ei_printf("Predictions:\r\n");
for (uint16_t i = 0; i < EI_CLASSIFIER_LABEL_COUNT; i++) {
ei_printf(" %s: ", ei_classifier_inferencing_categories[i]);
ei_printf("%.5f\r\n", result.classification[i].value);
}
}
Final Output

Demo

https://medium.com/media/f459509c36310fdcbd3bc3daa739493f/href

To wrap up

This project was primarily aimed at familiarizing myself with Edge Impulse, rather than creating a foolproof classification system, since this was my first time experimenting with it. While there is room for improvement, I hope this article has demonstrated how easy it is to build machine learning models with Edge Impulse. I noticed a lack of comprehensive tutorials on this topic and encountered several issues and questions while building this project, which I have tried to address in this article. If you have any questions or concerns about this project or using Edge Impulse, feel free to ask in the comments section and I’ll be more than happy to assist you.

Links

Edge Impulse

TinyML

Level Up Coding

Thanks for being a part of our community! Before you go:

🚀👉 Join the Level Up talent collective and find an amazing job


Creating a Machine Learning Workflow for Arduino Nano RP2040 Connect with Edge Impulse was originally published in Level Up Coding on Medium, where people are continuing the conversation by highlighting and responding to this story.


This content originally appeared on Level Up Coding - Medium and was authored by Om Kamath

Building a TinyML Handwriting Recognition System with Edge Impulse and Arduino Nano RP2040 Connect

It had been a while since I last dabbled in embedded systems projects, and like any other Arduino enthusiast, I found myself browsing for exciting new development boards to tinker with. That’s when I stumbled upon the Arduino Nano RP2040 Connect, and I was immediately hooked. I tried to resist the urge to buy it, but I couldn’t resist for long and ended up getting one. Let me tell you why this development board is so cool before we dive into the tutorial!

Arduino Nano RP2040 Connect

The RP2040 Connect, which launched in May 2021, is based on the Raspberry Pi RP2040 MCU, also found on many other boards like the Pico. While other manufacturers, including Adafruit, SeeedStudio, and Sparkfun, are developing their own RP2040-based boards, the Nano RP2040 Connect has a few tricks up its sleeve. When compared to other RP2040 boards, the Arduino Nano RP2040 Connect boasts a built-in 6-axis IMU, temperature sensor, Bluetooth with BLE, and WiFi integrated in the Nina W102 uBlox module, along with a microphone and MicroPython compatibility. The Nina W102 module and 6-axis IMU set the Arduino Nano RP2040 Connect apart from other development boards. In summary, it’s like the Arduino Nano BLE Sense and Raspberry Pi Pico W had a baby, making it the ideal board for TinyML development.

Arduino Nano RP2040 Connect

What is TinyML?

“Tiny machine learning is broadly defined as a fast growing field of machine learning technologies and applications including hardware, algorithms and software capable of performing on-device sensor data analytics at extremely low power, typically in the mW range and below, and hence enabling a variety of always-on use-cases and targeting battery operated devices.” — tinyml.org

Embedded systems and development boards, like the Arduino, are often resource-constrained, making it challenging to use full-blown machine learning models. This is where TinyML models come in, as they are optimized for such devices. There are several TinyML frameworks available, including TensorFlow Lite, CoreML, and PyTorch Mobile, which enable the deployment of machine learning models on embedded systems.

However, not everyone has the expertise or time to dive deep into training an ML model using these frameworks. In some cases, it may be necessary to deploy a model for smaller and niche use cases without the hassle of coding everything from scratch. This is where Edge Impulse comes into the picture. Edge Impulse is a platform that enables the rapid development and deployment of TinyML models, allowing developers to easily create and deploy machine learning models on embedded systems without requiring significant expertise in machine learning.

What is Edge Impulse?

Edge Impulse is a platform that makes it possible to create and deploy TinyML models on edge devices like microcontrollers without having to have a lot of programming or machine learning experience. The platform offers developers a full toolchain, including data collection, labelling, feature engineering, model training, optimization, and deployment, to design and deploy machine learning models on edge devices.

For a variety of use cases, such as predictive maintenance, anomaly detection, speech recognition, gesture identification, and more, developers can quickly construct, test, and deploy bespoke machine learning models with Edge Impulse. The platform allows for the development of models for a wide range of applications because it supports a wide variety of sensors, including accelerometers, gyroscopes, microphones, and environmental sensors.

To give you a holistic overview of how you can deploy an ML model on your embedded system, the following steps need to be taken:

  1. Data Acquisition
  2. Impulse Design
  3. EON Tuner
  4. Deployment

Building a Handwriting Gesture Recognition System

I was inspired by Jalson’s ML-controlled smart suspension for mountain bikes, and I decided to try my hand at TinyML. For my project, I’m building a handwriting recognition system that will classify letters based on accelerometer values from the LSM6DSOX IMU. Specifically, I’ll be focusing on classifying just two letters, A and B. While it would be ideal to collect data for the entire English alphabet, I have chosen to start with a smaller scope for the sake of simplicity and practicality (and I’m lazy). Without any further ado, let’s get started.

Before you start with the tutorial, make sure you have created an Edge Impulse account and started a new project.

Data Acquisition

There are multiple ways to collect training data on Edge Impulse, such as using your mobile phone or computer, uploading your data, or connecting a fully supported development board. Unfortunately, the Arduino Nano RP2040 Connect is not currently supported by Edge Impulse. However, there is a simple solution to this problem. By using the data forwarder built into the Edge Impulse CLI client, you can connect any development board.

Different method to acquire data

The data forwarder is a tool that enables you to easily relay data from any device to Edge Impulse over a serial connection. Devices can write sensor values over this connection, and the data forwarder will collect, sign, and send the data to the ingestion service. It’s a smart and simple solution for integrating unsupported development boards with Edge Impulse.

In order to install the Edge Impulse CLI you will need to follow these steps:

  1. Install Python 3 on your host system.
  2. Install Node.js v14 or higher. For Windows users, install the Additional Node.js tools (called Tools for Native Modules on newer versions) when prompted.
  3. Type the following command: npm install -g edge-impulse-cli --force

You should now have the tools available in your PATH.

For more information on the installation.

Once you have connected your Arduino Nano RP2040 Connect to your computer, you’ll need to upload a sketch that writes the accelerometer readings to the serial monitor. After uploading the sketch, it’s important to disconnect your IDE to avoid errors while running the data forwarder.

// Install the library first.
#include <Arduino_LSM6DSOX.h>

float Ax, Ay, Az;

void setup() {
Serial.begin(115200);

while(!Serial);

if (!IMU.begin()) {
Serial.println("Failed to initialize IMU!");
while (1);
}

}

void loop() {
// put your main code here, to run repeatedly:
if (IMU.accelerationAvailable()) {
IMU.readAcceleration(Ax, Ay, Az);

Serial.println("Accelerometer data: ");
Serial.print(Ax);
Serial.print(',');
Serial.print(Ay);
Serial.print(',');
Serial.println(Az);
Serial.println();
}
}
In case you are facing any issues in reading the LSM6DSOX IMU values, make sure you have installed the latest NINA Firmware.

To use the data forwarder, run edge-impulse-data-forwarder. When running the data forwarder for the first time, you may need to sign into your Edge Impulse account and select the project. You will need to mark the comma separated values as x, y and z in the data forwarder as we are printing the accelerometer values on the serial monitor. Once connected, the Edge Impulse CLI will detect your development board and it will be visible in the devices tab within the Edge Impulse Studio. With that done, you can now move on to the exciting part in Edge Impulse Studio.

With the data forwarder running in the background, you can start collecting data on Edge Impulse Studio. Since we will only be classifying between two letters, you need to collect a minimum of 3 minutes of data for each letter, with each sample lasting 10 seconds. Label your data as A or B. Click on the ‘Record Data’ button and move your Arduino in the motion of the letter (air writing). Record multiple samples for each label in varying speeds and orientations.

The collected data must now be categorized into training and testing data. The recommended partition is 70:30, meaning 70% of the data should be used for training and 30% for testing. Choose a few random samples from each label to use as testing data.

Impulse Design

Time to dive into the fun part now. An Impulse is the training pipeline for your ML model consisting of 3 blocks:

  1. Input Block: It indicates the type of input data you are training your model with. It can either be time series or images.
  2. Processing Block: It is a feature extractor.
  3. Learning Block: A neural network trained to learn on your data.

I will explain them in more detail going forward.

Impulse for my project

Coming to our project, we will be using the Time Series input block since our project is based on movements and gestures. The input axes field lists all the axis referenced from your training dataset. The window size is the size of the raw features that is used for the training. The window increase is used to artificially create more features (and feed the learning block with more information). There aren’t any concrete or correct values that must be set for them, you can proceed with the default values or tweak them as per your dataset.

Source: Edge Impulse

There are multiple processing blocks that you can use to train your model. Don’t worry if you are not an ML expert (neither am I). Edge Impulse makes our lives simpler by giving us a brief idea about what each processing block is capable of.

Types of processing blocks

Based on the description given, I went ahead with Spectral Analysis since that seemed to be well-suited for our use-case. You can add multiple processing blocks, too, if required.

Learning blocks vary depending on what you want your model to do and the type of data in your training dataset.

Types of Learning Blocks

As we will be classifying between different letters, I chose classification.

To fine-tune the learning block, you have the freedom to choose between different layers and customize the layers within the learning block. Edge Impulse provides detailed descriptions of what each layer does, and you can experiment with them to find the perfect configuration. As I won’t be delving deep into the ML aspects, I’ll share my learning block configuration. However, if you want to learn more about ML, Edge Impulse has comprehensive documentation that can help you understand the different layers and their functions.

Types of Layers
My configuration

Optimizing the learning block configuration is often an iterative process that requires experimentation and fine-tuning. It may take multiple attempts to achieve optimal performance, and it’s important to be patient and persistent in this regard.

EON Tuner

If you’re like me and don’t have the patience or persistence to fine-tune your own model, Edge Impulse has you covered (yet again). The EON Tuner performs end-to-end optimizations, from the digital signal processing (DSP) algorithm to the machine learning model, and improved my model accuracy from 66% to 95% (yep, I’m definitely not an ML expert). The EON Tuner runs multiple model configurations in parallel based on your target device specification and use-case.

EON Tuner Configuration

Deployment

After training and validating your model, you can now deploy it to any device. The following are the 5 main categories of deploy options currently supported by Edge Impulse:

  1. Deploy as a customizable library.
  2. Deploy as a pre-built firmware — for fully supported development boards.
  3. Run directly on your phone or computer.
  4. Use Edge Impulse for Linux for Linux targets.
  5. Create a custom deployment block (Enterprise feature).

As the Nano RP2040 is not fully supported by Edge Impulse, we will be deploying it as a customizable library for the Arduino.
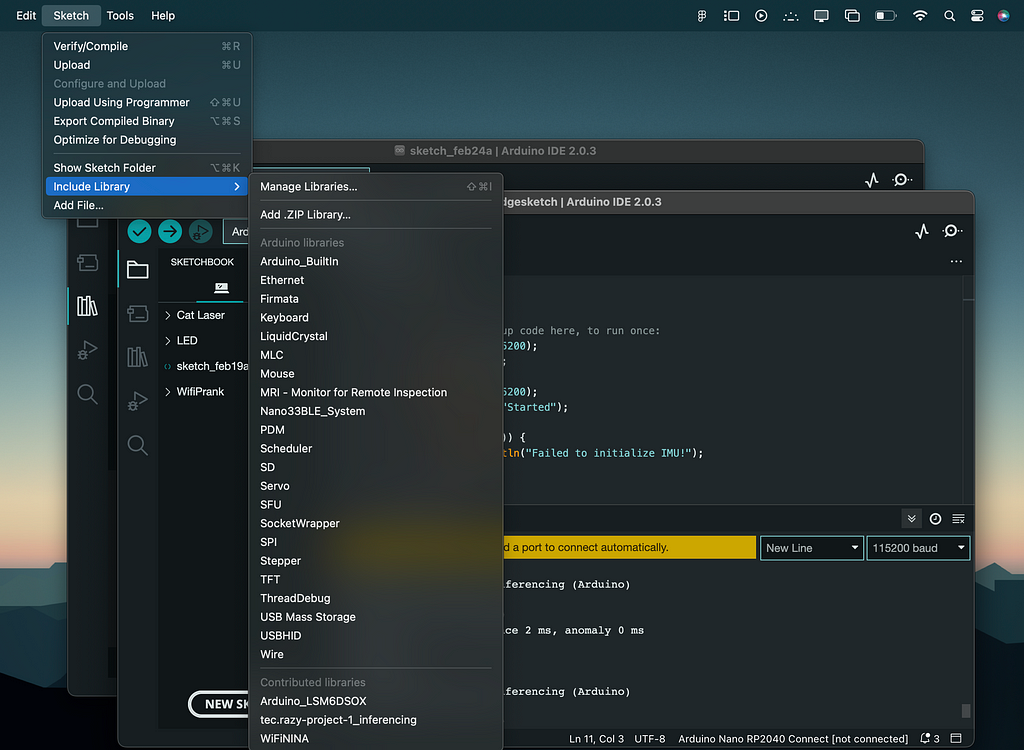
Deploying your impulse
Adding the library as .zip

After downloading the model as a library, you can navigate to File > Examples > (Your Project Name) > static_buffer to access the boilerplate code that you can use as a starting point. I modified the example sketch to read the accelerometer values directly.

Final Code:

#include <Arduino_LSM6DSOX.h>
#include <tec.razy-project-1_inferencing.h>


static float features[EI_CLASSIFIER_DSP_INPUT_FRAME_SIZE];

int raw_feature_get_data(size_t offset, size_t length, float *out_ptr) {
memcpy(out_ptr, features + offset, length * sizeof(float));
return 0;
}

void print_inference_result(ei_impulse_result_t result);

/**
* @brief Arduino setup function
*/
void setup()
{
// put your setup code here, to run once:
Serial.begin(115200);
while (!Serial);

Serial.begin(115200);
Serial.println("Started");

if (!IMU.begin()) {
Serial.println("Failed to initialize IMU!");
while (1);
}

delay(1000);

Serial.println("Edge Impulse Inferencing Demo");
}

/**
* @brief Arduino main function
*/
void loop()
{
ei_printf("Edge Impulse standalone inferencing (Arduino)\n");
delay(2000);
ei_printf("Start the motion capture\n");
delay(5000);

// Modified Code
for (size_t ix = 0; ix < EI_CLASSIFIER_DSP_INPUT_FRAME_SIZE; ix += 3) {
IMU.readAcceleration(features[ix], features[ix+1], features[ix+2]);
}

ei_impulse_result_t result = { 0 };

signal_t features_signal;
features_signal.total_length = EI_CLASSIFIER_DSP_INPUT_FRAME_SIZE;
features_signal.get_data = &raw_feature_get_data;

EI_IMPULSE_ERROR res = run_classifier(&features_signal, &result, false);
if (res != EI_IMPULSE_OK) {
ei_printf("ERR: Failed to run classifier (%d)\n", res);
return;
}

ei_printf("run_classifier returned: %d\r\n", res);
print_inference_result(result);

delay(2000);
Serial.write(0x0C);
}

void print_inference_result(ei_impulse_result_t result) {

ei_printf("Timing: DSP %d ms, inference %d ms, anomaly %d ms\r\n",
result.timing.dsp,
result.timing.classification,
result.timing.anomaly);

ei_printf("Predictions:\r\n");
for (uint16_t i = 0; i < EI_CLASSIFIER_LABEL_COUNT; i++) {
ei_printf(" %s: ", ei_classifier_inferencing_categories[i]);
ei_printf("%.5f\r\n", result.classification[i].value);
}
}
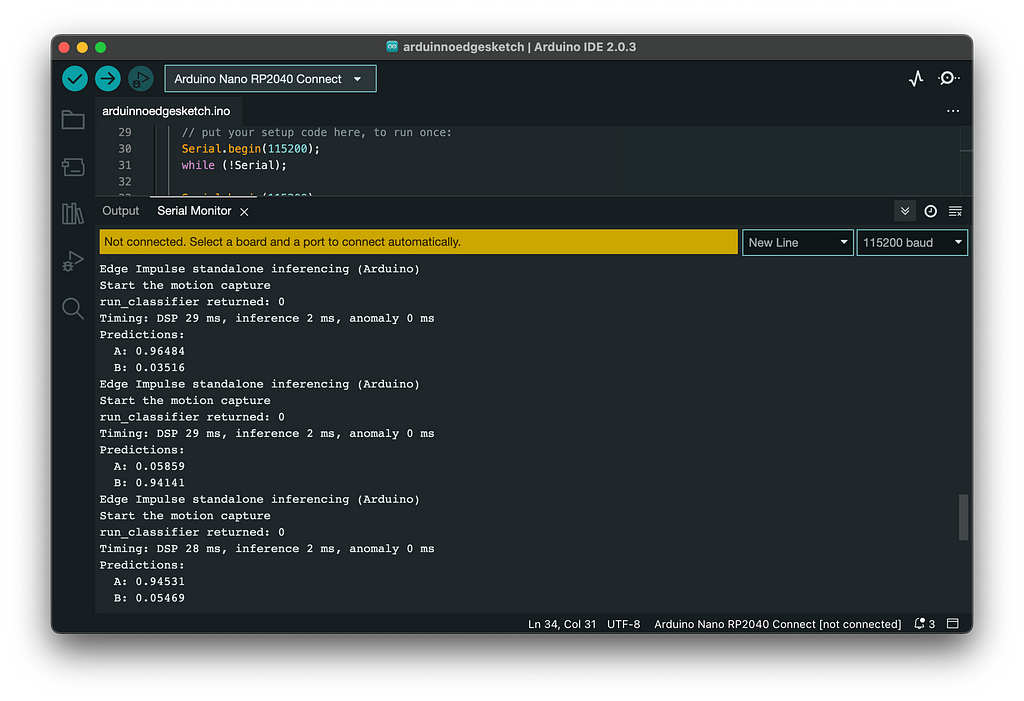
Final Output

Demo

To wrap up

This project was primarily aimed at familiarizing myself with Edge Impulse, rather than creating a foolproof classification system, since this was my first time experimenting with it. While there is room for improvement, I hope this article has demonstrated how easy it is to build machine learning models with Edge Impulse. I noticed a lack of comprehensive tutorials on this topic and encountered several issues and questions while building this project, which I have tried to address in this article. If you have any questions or concerns about this project or using Edge Impulse, feel free to ask in the comments section and I’ll be more than happy to assist you.

Links

Edge Impulse

TinyML

Level Up Coding

Thanks for being a part of our community! Before you go:

🚀👉 Join the Level Up talent collective and find an amazing job


Creating a Machine Learning Workflow for Arduino Nano RP2040 Connect with Edge Impulse was originally published in Level Up Coding on Medium, where people are continuing the conversation by highlighting and responding to this story.


This content originally appeared on Level Up Coding - Medium and was authored by Om Kamath


Print Share Comment Cite Upload Translate Updates
APA

Om Kamath | Sciencx (2023-03-01T03:05:17+00:00) Creating a Machine Learning Workflow for Arduino Nano RP2040 Connect with Edge Impulse. Retrieved from https://www.scien.cx/2023/03/01/creating-a-machine-learning-workflow-for-arduino-nano-rp2040-connect-with-edge-impulse/

MLA
" » Creating a Machine Learning Workflow for Arduino Nano RP2040 Connect with Edge Impulse." Om Kamath | Sciencx - Wednesday March 1, 2023, https://www.scien.cx/2023/03/01/creating-a-machine-learning-workflow-for-arduino-nano-rp2040-connect-with-edge-impulse/
HARVARD
Om Kamath | Sciencx Wednesday March 1, 2023 » Creating a Machine Learning Workflow for Arduino Nano RP2040 Connect with Edge Impulse., viewed ,<https://www.scien.cx/2023/03/01/creating-a-machine-learning-workflow-for-arduino-nano-rp2040-connect-with-edge-impulse/>
VANCOUVER
Om Kamath | Sciencx - » Creating a Machine Learning Workflow for Arduino Nano RP2040 Connect with Edge Impulse. [Internet]. [Accessed ]. Available from: https://www.scien.cx/2023/03/01/creating-a-machine-learning-workflow-for-arduino-nano-rp2040-connect-with-edge-impulse/
CHICAGO
" » Creating a Machine Learning Workflow for Arduino Nano RP2040 Connect with Edge Impulse." Om Kamath | Sciencx - Accessed . https://www.scien.cx/2023/03/01/creating-a-machine-learning-workflow-for-arduino-nano-rp2040-connect-with-edge-impulse/
IEEE
" » Creating a Machine Learning Workflow for Arduino Nano RP2040 Connect with Edge Impulse." Om Kamath | Sciencx [Online]. Available: https://www.scien.cx/2023/03/01/creating-a-machine-learning-workflow-for-arduino-nano-rp2040-connect-with-edge-impulse/. [Accessed: ]
rf:citation
» Creating a Machine Learning Workflow for Arduino Nano RP2040 Connect with Edge Impulse | Om Kamath | Sciencx | https://www.scien.cx/2023/03/01/creating-a-machine-learning-workflow-for-arduino-nano-rp2040-connect-with-edge-impulse/ |

Please log in to upload a file.


There are no updates yet.
Click the Upload button above to add an update.

You must be logged in to translate posts. Please log in or register.