This content originally appeared on DEV Community and was authored by Shailesh Mangal
Over last few years, Panel has gained lots of popularity thro’ its unlimited list of features to fetch, analyze, present any and all types of data and bring familiar python tools. And all this, without having to write a single line of UI code (You can, if you really want to). There is a lot that has been written about Panel features and its capabilities. This post is primarily around connecting and authenticating panel with oAuth.
Panel has a built in authentication and authorization framework. Out of the box, Panel supports
- 1. azure
- 2. bitbucket
- 3. github
- 4. gitlab
- 5. google
- 6. okta In addition to this, Panel can also connect to any generic oAuth provider. One that I definitely wanted to work with is Keycloak which is missing from this list. This is not well documented, however its really easy to do. This can be done in one of the two ways.
Environment Variable
You can setup following env variable with appropriate values. This will be covered in detail in Keycloak example.
export PANEL_OAUTH_KEY
export PANEL_OAUTH_SECRET
export PANEL_OAUTH_AUTHORIZE_URL
export PANEL_OAUTH_TOKEN_URL
export PANEL_OAUTH_USER_URL
export PANEL_COOKIE_SECRET
export PANEL_OAUTH_REDIRECT_URL
Command Line Parameter
You can pass following parameters with appropriate values thro’ command line to panel runtime.
panel serve MyAnalysis.py --oauth-provider=generic \

--oauth-key=ClientID --oauth-secret=SECRET --cookie-secret=panel \

--oauth-authorize-url="" --oauth-token-url="" --oauth-redirect-url=""
Setting Keycloak for oAuth SSO
Setup client :
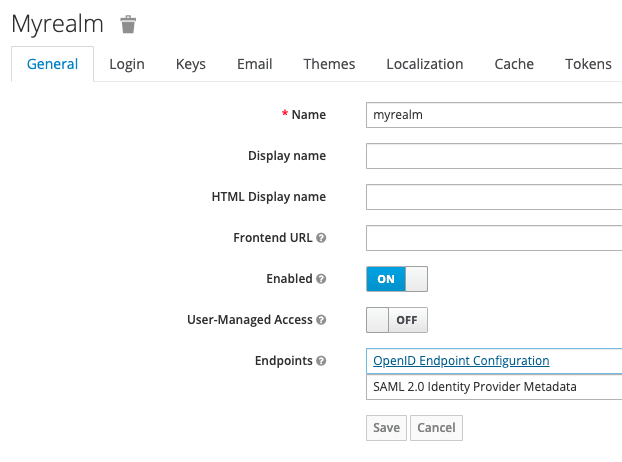
Create a Realm
Create client inside that realm. Make sure you choose Access Type as Confidential
Fill out other URL appropriately
Access Type should be confidential
Get oAuth URLs
Get client Secret and copy to PANEL_OAUTH_SECRET
Go to Realm Setting → General → Endpoints
Click on OpenID Endpoint Configuration
Note down following URLs
"authorization_endpoint": "http://localhost:8080/realms/myrealm/protocol/openid-connect/auth",
"token_endpoint": "http://localhost:8080/realms/myrealm/protocol/openid-connect/token",
"introspection_endpoint": "http://localhost:8080/realms/myrealm/protocol/openid-connect/token/introspect",
"userinfo_endpoint": "http://localhost:8080/realms/myrealm/protocol/openid-connect/userinfo",
"end_session_endpoint": "http://localhost:8080/realms/myrealm/protocol/openid-connect/logout",
Export these as Env Variables
export PANEL_OAUTH_KEY=panel-sso
export PANEL_OAUTH_SECRET="Pm8Bcs6QgygjaiyxRxSTfPpIzUkW40lM"
export PANEL_OAUTH_AUTHORIZE_URL="http://localhost:8080/realms/myrealm/protocol/openid-connect/auth"
export PANEL_OAUTH_TOKEN_URL="http://localhost:8080/realms/myrealm/protocol/openid-connect/token"
export PANEL_OAUTH_USER_URL="http://localhost:8080/realms/myrealm/protocol/openid-connect/userinfo"
export PANEL_COOKIE_SECRET="bZJc2sWbQLKos6GkHn/VB9oXwQt8S0R0kRvJ5/xJ89E="
export PANEL_OAUTH_REDIRECT_URL="http://localhost:5008"
Run panel with generic SSO
panel serve my_pages.py --oauth-provider=generic
You should be able to see keycloak login
Conclusion
Panel is an amazing tool. Being able to connect with any generic oAuth provider is simple and should make it securely accessible.
This content originally appeared on DEV Community and was authored by Shailesh Mangal
Shailesh Mangal | Sciencx (2023-03-01T20:40:18+00:00) Panel SSO with Keycloak. Retrieved from https://www.scien.cx/2023/03/01/panel-sso-with-keycloak/
Please log in to upload a file.
There are no updates yet.
Click the Upload button above to add an update.


