This content originally appeared on DEV Community and was authored by Jason F
Hello and welcome to the third and final post of this series. If you missed the previous, please feel free to give them a quick read before proceeding. In this post I'll show you how I set up a GitHub Action to automatically scrape some weather data on a schedule.
Before we begin I must tell you that I changed the source of the weather data due to some complications with weather.com. I'm sure it's possible to get around the issues I was having, but for the sake of moving forward without the extra kerfuffle, I changed the source to one that I believe will not cause you any grief.
Note: This post assumes you're comfortable with creating and updating a GitHub repository
Catching up
In the previous post I shared with you the scrape function that we used to scrape weather.com and console.log the output. I'll go ahead and paste the updated scrape function, with the new source below:
async function scrape() {
  const browser = await puppeteer.launch();
  const page = await browser.newPage();

  await page.goto(
    "https://www.weathertab.com/en/d/united-states/texas/austin/"
  );

  const weatherData = await page.evaluate(() =>
    Array.from(document.querySelectorAll("tr.fct_day"), (e) => ({
      dayOfMonth: e.querySelector("td > div.text-left > .fct-day-of-month")
        .innerText,
      dayName: e.querySelector("td > div.text-left > .fct-day-of-week")
        .innerText,
      weatherIcon: e.querySelector("td.text-center > .fct_daily_icon")
        .classList[1],
      weatherIconPercent: e
        .querySelector("td.text-center")
        .getElementsByTagName("div")[1].innerText,
      highTempRange: e.querySelector(
        "td.text-center > .F > div > .label-danger"
      ).innerText,
      lowTempRange: e
        .querySelector("td.text-center > .F")
        .getElementsByTagName("div")[1].innerText,
    }))
  );

  await browser.close();
  return weatherData;
}
As you can see, the source is now https://www.weathertab.com/en/d/united-states/texas/austin/, of course you can change this to whatever city you fancy. The logic is practically the same (as in we're creating an array of data), however, since we switched sources, of course we have to target the elements in the page, which are without a doubt different than the weather.com page. Rather than a 10-day forecast, we're now getting the entire current month's forecast.
The data is a bit odd without some context. However, I'm sure you could develop some kind of map or object that would translate the data, such as the weather icon and weather icon percent to something meaningful.
Anyways, on with the show.
Preparing to write the data
In order for us to reach the end goal of writing this scraped data to a .json file in a GitHub repository, we'll need to add some final touches to the scraper.js file. Admittedly, I'm no expert when it comes interacting with the file system using node.js (or any language for that matter). However, I can fanagle my way around. I'll share with you what I've got, and if you're more knowledgeable than me on the subject, please feel free to fill in the blanks.
We want to write our scraped data to a file in our repository that we'll name weatherdata.json.
In order to do so, we'll have this line at the end of our scraper.js file:
// execute and persist data
scrape().then((data) => {
  // persist data
  fs.writeFileSync(path.resolve(pathToData), JSON.stringify(data, null, 2));
});
the writeFileSync method is part of the node.js filesystem module. You can loearn more about this method here. Essentially what we're doing with it is passing in the path to our file, weatherdata.json as the first parameter, and our scraped data as the second parameter. The writeFileSync method will create the file if it doesn't exist, or, overwrite the file with the new data if it does exist.
As I mentioned, our first parameter is the path to the weatherdata.json file, which is passed in to the writeFileSync like so: path.resolve(pathToData).
Since we are using ES Modules, __filename and __dirname are not readily available. I shamelessly cut and pasted the code below (from this source) in order to create the pathToData variable.
const __filename = fileURLToPath(import.meta.url);

const __dirname = path.dirname(__filename);

const pathToData = path.join(__dirname, "weatherdata.json");
Having the __dirname available helps us find the path to our weatherdata.json file.
That wraps up all of the changes to the scraper.js file, minus the import statements at the top. I'll share the whole file so that it may be easier to read.
import puppeteer from "puppeteer";
import fs from "fs";
import path from "path";
import { fileURLToPath } from "url";

const __filename = fileURLToPath(import.meta.url);

const __dirname = path.dirname(__filename);

const pathToData = path.join(__dirname, "weatherdata.json");

async function scrape() {
  const browser = await puppeteer.launch();
  const page = await browser.newPage();

  await page.goto(
    "https://www.weathertab.com/en/d/united-states/texas/austin/"
  );

  const weatherData = await page.evaluate(() =>
    Array.from(document.querySelectorAll("tr.fct_day"), (e) => ({
      dayOfMonth: e.querySelector("td > div.text-left > .fct-day-of-month")
        .innerText,
      dayName: e.querySelector("td > div.text-left > .fct-day-of-week")
        .innerText,
      weatherIcon: e.querySelector("td.text-center > .fct_daily_icon")
        .classList[1],
      weatherIconPercent: e
        .querySelector("td.text-center")
        .getElementsByTagName("div")[1].innerText,
      highTempRange: e.querySelector(
        "td.text-center > .F > div > .label-danger"
      ).innerText,
      lowTempRange: e
        .querySelector("td.text-center > .F")
        .getElementsByTagName("div")[1].innerText,
    }))
  );

  await browser.close();
  return weatherData;
}

// execute and persist data
scrape().then((data) => {
  // persist data
  fs.writeFileSync(path.resolve(pathToData), JSON.stringify(data, null, 2));
});
Setting Up the GitHub Action
The goal of our GitHub Action is to scrape our weather source on a weekly basis and save the latest data in a .json file.
If you've never created an action, I'll walk you through steps.
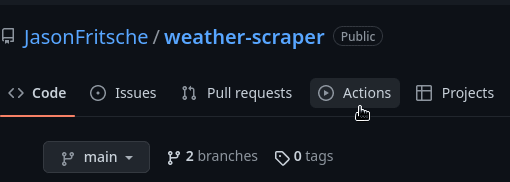
First, find the Actions tab in your GitHub repository.
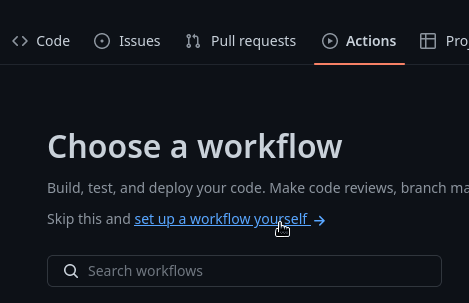
Click to go in to the Actions page. Next, click the "New Workflow" button. This will open up a page of options, however, we just want to select the "Set up a workflow yourself" options.
This will drop you in to an editor. Feel free to name the yaml file whatever you'd like, or leave it as main.yml.
Go ahead and paste this in:
name: Resources
on:
  schedule:
    - cron: "0 13 * * 1"
  # workflow_dispatch:
permissions:
  contents: write
jobs:
  resources:
    name: Scrape
    runs-on: ubuntu-latest
    steps:
      - uses: actions/checkout@v3

      - uses: actions/setup-node@v3
        with:
          node-version: 16
      - run: npm ci

      - name: Fetch resources
        run: node ./scraper.js

      - name: Update resources
        uses: test-room-7/action-update-file@v1
        with:
          file-path: weatherdata.json
          commit-msg: Update resources
          github-token: ${{ secrets.GITHUB_TOKEN }}
After pasting it in, you can commit the new yml file by clicking the "Start Commit" button and entering the commit message, etc.
So, there are a couple of things to note about this action:
- The action is run on a schedule using the cron property. The value that I have in place says that the action will be triggered every Monday at 1300 (1PM).
- Make sure your JavaScript file with the scrape method is named scraper.js, or, if it's not, update the action and replace scraper.js with your file name.
- We are using the
test-room-7/action-update-file@v1to assist us with updating the scraper.js file. Look them up on GitHub if you'd like to know more about that action.
If you'd rather run the action whenever you please, comment out or delete these two lines:
schedule:
    - cron: "0 13 * * 1"
and uncomment this line:
# workflow_dispatch:
Then you'll see a button somewhere in the actions area that will allow you to run the job whenever you'd like. This works well for testing out actions.
You can see my repository here
Conclusion
I have learned a whole heck of a lot in this series. I stepped out of my comfort zone and was able to get something working. There were some hurdles along the way, but at the end of the day, it's all about getting my hands dirty and figuring things out. I hope you learned something as well. If you found these posts interesting, boring, lacking, great, etc...please let me know. Thank you!
This content originally appeared on DEV Community and was authored by Jason F
Jason F | Sciencx (2023-03-02T22:00:44+00:00) Web Scraping With Puppeteer for Total Noobs: Part 3. Retrieved from https://www.scien.cx/2023/03/02/web-scraping-with-puppeteer-for-total-noobs-part-3/
Please log in to upload a file.
There are no updates yet.
Click the Upload button above to add an update.


