This content originally appeared on Level Up Coding - Medium and was authored by Artiom Khalilyaev
SwiftUI approach that works perfectly in the UIKit

UITableView and UICollectionView are great UI elements that provide us with lots of functionality. They allow us to display huge amount of data and to interact with a displayed data using their delegate methods.
But if you need to display a small amount of data, let’s say anything from 5 to 10 cells, using UITableView or UICollectionView is not the best idea. To display some data using table or collection, you need to do the following:
- Create a cell subclass;
- setup table or collection inside your view;
- setup data source, delegate, and delegate flow layout methods.
In SwiftUI, you can use stacks with for-each loop inside to display data from some collection. Here is a code snippet from Hacking With Swift article by Paul Hudson:
struct ContentView: View {
    let colors: [Color] = [.red, .green, .blue]

    var body: some View {
        VStack {
            ForEach(colors, id: \.self) { color in
                Text(color.description.capitalized)
                    .padding()
                    .background(color)
            }
        }
    }
}
And one more:
VStack(alignment: .leading) {
    ForEach((1...10).reversed(), id: \.self) {
        Text("\($0)…")
    }

    Text("Ready or not, here I come!")
}
As you can see, there is no need for delegates, data sources, and any other stuff. You can display data from some collection in few lines of code using only stack and for-each inside.
SwiftUI is a great UI framework, so I’m always trying to implement SwiftUI layout approaches in UIKit. What’s stopping me from implementing this approach I mentioned above? We have for-each and for-in loops, and we have a UIStackView. So nothing stops me, let’s start coding.
Before we go
I need to mention one small thing. This approach can be used only for small amount of data. In other case, you may face memory issues. UITableView and UICollectionView provide us with reuse functionality, so they do not store all cells in memory, but reuse them and store only visible cells.
Starting Project
For this article, I prepared a small project. It’s a simple one-screen app displaying the weather forecast for the next 7 days. To save you time, I prepared a starting version of a project we will work on. In this GitHub repository, you will find a StartingVersion folder with a project inside.
The project is compatible with XCode 12 and has iOS 13.0 deployment target, so I hope everybody will be able to start it. Even on old MacBooks.
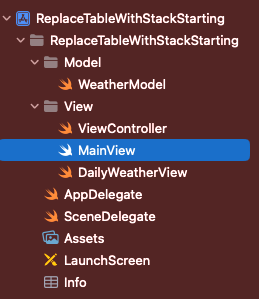
Starting project has the following structure:

Model folder contains a WeatherModel struct with 4 properties. They are day, minTemp, maxTemp, and isCloudy. It also has 3 getters to get temperature as a formatted string, and to get an icon depending on isCloudy value. getRandomForecast() function inside WeatherModel generates an array with a random weather for each day of the week.
Inside the View folder there are 3 files. View Controller is a default controller class generated by the XCode. MainView is a ViewController main view. DailyWeatherView is the view that we will use to display weather forecast. It looks like this:

Inside Assets catalog you will find two icons for cloudy and sun weather. I also removed storyboards and set up app entry point programmatically in SceneDelegate.
Clone project, build it, make sure you don’t have any issue and let’s start setting up stack view.
Setting up stack
I hope you got familiar with the project. Now we are going to implement the stack inside the MainView and fill it with DailyWeatherView objects. Let’s add the stack first. Create a UIStackView variable, set it alignment to .fill, so arranged subviews fill the available space perpendicular to the stack view’s axis. Set axis to .vertical. Our stack should look like this:
let stackView: UIStackView = {
    let stackView = UIStackView()
    stackView.translatesAutoresizingMaskIntoConstraints = false
    stackView.alignment = .fill
    stackView.distribution = .fill
    stackView.axis = .vertical
    return stackView
}()
Add it to the view and give it some constraints. I will give it leading and trailing constraints for the X axis and will center it on the Y axis. MainView code should look like this:
class MainView: UIView {

    let stackView: UIStackView = {
        let stackView = UIStackView()
        stackView.translatesAutoresizingMaskIntoConstraints = false
        stackView.alignment = .fill
        stackView.distribution = .fill
        stackView.axis = .vertical
        return stackView
    }()

    init() {
        super.init(frame: .zero)
        setup()
    }

    required init?(coder: NSCoder) {
        super.init(coder: coder)
        setup()
    }

    func setup() {
        backgroundColor = .white
        addSubview(stackView)
        setConstaints()
    }

    func setConstaints() {
        NSLayoutConstraint.activate([
            stackView.leadingAnchor.constraint(equalTo: leadingAnchor),
            stackView.trailingAnchor.constraint(equalTo: trailingAnchor),
            stackView.centerYAnchor.constraint(equalTo: centerYAnchor)
        ])
    }

}
When the stack is ready, it’s time to fill it with a content. Let’s create a function that will be used to pass data to the view. I will call it update(with data: [WeatherModel]).
 func update(with data: [WeatherModel]) {

 }
Now we want to map this data array into DailyWeatherView and put them into the stack. I will do it with help of for-each array method.
 func update(with data: [WeatherModel]) {
     data.forEach {
         let view = DailyWeatherView()
         view.translatesAutoresizingMaskIntoConstraints = false
         view.set($0)
         stackView.addArrangedSubview(view)
     }
 }
Inside forEach we are creating a DailyWeatherView, passing theWeatherModel object to it through the set(_:) function, and adding it to the stack. Let’s try how it works!
Open ViewController file, you will find a rootView variable here. This computed var just upcasting controller view to the MainView type. It helps us to avoid upcasting each time we need to access MainView methods and properties. In viewDidLoad() call update(_:) method and pass data to it. I already created the getRandomForecast() static function in WeatherModel, so just pass its result to the update(_:) method.
 override func viewDidLoad() {
     super.viewDidLoad()
     rootView.update(with: WeatherModel.getRandomForecast())
 }
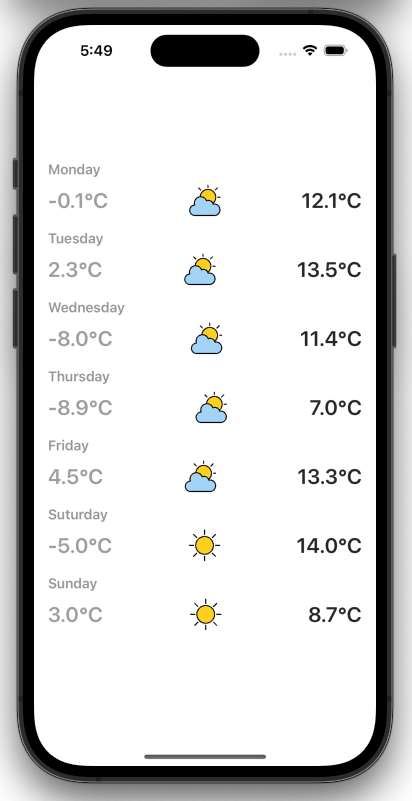
Run the app, if you were repeating all my steps, you will see something like this:

It works! And it took only 6 lines of code to fill the stack with a content. But our code has a critical bug. What happens if the update(_:) function is called multiple times? Let’s try it out. In the viewDidLoad() method, call update(_:) two times in a row.
 override func viewDidLoad() {
     super.viewDidLoad()
     rootView.update(with: WeatherModel.getRandomForecast())
     rootView.update(with: WeatherModel.getRandomForecast())
 }
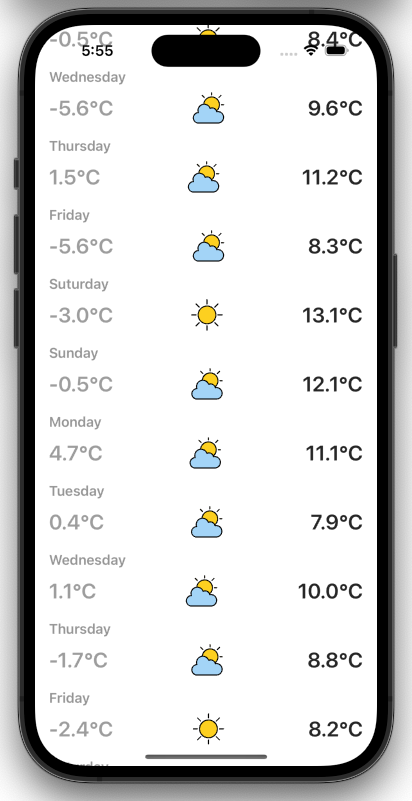
And here is a result:

It was very predictable. In the update(_:) we are just adding new arranged subviews to the stack, but old subviews are still here. To fix it, we need to clear the stack in the very beginning of the update(_:). We will create a UIStackView extension for this.
extension UIStackView {
    func removeAllArrangedSubviews() -> [UIView] {
        let removedSubviews = arrangedSubviews.reduce([]) { (removedSubviews, subview) -> [UIView] in
             self.removeArrangedSubview(subview)
             NSLayoutConstraint.deactivate(subview.constraints)
             subview.removeFromSuperview()
             return removedSubviews + [subview]
        }
        return removedSubviews
    }
}
Here we are going through all stack view subviews, removing them from the stack, and deactivating their constraints. Now let’s call this method in the beginning of the update(_:) function. Let’s run the app again. Everything should be fine now.
Our code works fine, but here is still some space for improvement.
Improvements
We don’t have access to the stack subviews at the moment. It would be better to have a reference to them, so we can do some actions if needed. To fix it, let’s create an empty array of type [DailyWeatherView] inside MainView. We will use this array to store DailyWeatherView objects we push into the stack.
var weatherViews = [DailyWeatherView]()
Now we need to populate this array in the update(_:) functions. Also, do not forget to clear it in the beginning.
func update(with data: [WeatherModel]) {
    weatherViews.removeAll()
    stackView.removeAllArrangedSubviews()
    data.forEach {
        let view = DailyWeatherView()
        view.translatesAutoresizingMaskIntoConstraints = false
        view.set($0)
        weatherViews.append(view)
        stackView.addArrangedSubview(view)
    }
}
Now we have all our subviews in an array, but we are not able to distinguish them. To be able to, we need to provide them with tags before pushing into the stack. We can use their array index as a tag, so it will be similar to the indexPath in UITablewView. To get access to indices, we need to call enumerated() method before forEach.
func update(with data: [WeatherModel]) {
    weatherViews.removeAll()
    stackView.removeAllArrangedSubviews()
    data.enumerated().forEach {
        let view = DailyWeatherView()
        view.translatesAutoresizingMaskIntoConstraints = false
        view.tag = $0.offset
        view.set($0.element)
        weatherViews.append(view)
        stackView.addArrangedSubview(view)
    }
}
Adding actions
UITableView provides us with a UITablewViewDelegate that gives us an ability to handle taps, scrolls, and swipes. With a UIStackView we can add UITapGestureRecognizer that will be able to handle touches. But if you need any other actions, it’s better to use UITableView.
UITapGestureRecognizer requires a selector. Let’s create it with a sender argument of an optional UITapGestureRecognizer type.
@objc private func weatherViewTapped(_ sender: UITapGestureRecognizer?) {
    guard let weatherView = sender?.view as? DailyWeatherView else { return }
    print(weatherView.tag)
}
I’m doing an upcating to the DailyWeatherView type, to be sure that action was sent by a DailyWeatherView object. And I’m not going to add some complex actions here. I’m just going to print the sender tag to be sure that everything works as expected. Inside forEach add a gesture recognizer to the view, before pushing it into the stack.
view.addGestureRecognizer(UITapGestureRecognizer(target: self, action: #selector(weatherViewTapped(_:))))
Run the app, tap on weather views and notice printed tags in the console. If you see them, your code is working as expected.
Conclusion
Now you know that you can use UIStackView to display small amount of data. But if you need to display lots of objects, or you need an advanced functionality like swipes and so on, use UITablewView. It has in-build tools for memory management and user interactions.
I hope you enjoyed this article and found it useful. Feel free to share your thoughts in comments.
Final and starting projects can be found here.
Check out my other articles about iOS Development

https://medium.com/@artem.khalilyaev
Level Up Coding
Thanks for being a part of our community! Before you go:
- 👏 Clap for the story and follow the author 👉
- 📰 View more content in the Level Up Coding publication
- 💰 Free coding interview course ⇒ View Course
- 🔔 Follow us: Twitter | LinkedIn | Newsletter
🚀👉 Join the Level Up talent collective and find an amazing job
Replace UITableView With UIStackView was originally published in Level Up Coding on Medium, where people are continuing the conversation by highlighting and responding to this story.
This content originally appeared on Level Up Coding - Medium and was authored by Artiom Khalilyaev
Artiom Khalilyaev | Sciencx (2023-03-03T02:24:42+00:00) Replace UITableView With UIStackView. Retrieved from https://www.scien.cx/2023/03/03/replace-uitableview-with-uistackview/
Please log in to upload a file.
There are no updates yet.
Click the Upload button above to add an update.
