
This content originally appeared on Level Up Coding - Medium and was authored by Dudu Popkhadze
What if your react-native mobile app code grows as fast as a web application and you end up writing the same components twice (or more)?

Problem
So every engineer has seen how fast client-side code grows. Every week brings new features, bug fixes, and minor improvements.
At this age, every startup needs a mobile application and most likely designs of mobile and web apps are quite similar but not exactly. So at my job, we have these types of client apps
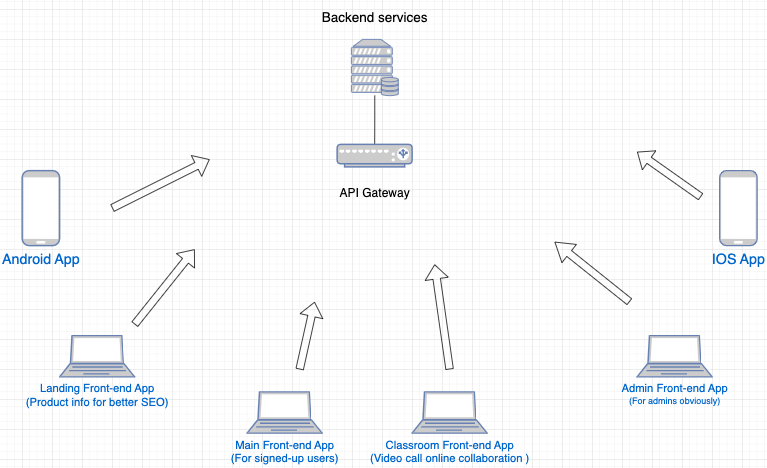
All of these applications have different layouts and designs but the building blocks were the same. The first thought that comes to mind after encountering this situation is to share styles somehow but soon you come to the realization that sharing just styles is just the same headache.
- While sharing styles you still need to implement components from scratch every time
- If you decide to share components, you still have to implement them twice (or more) for the web and for the mobile
- Takes more of the engineers' time, you need someone who knows your web technology and someone with mobile development knowledge as well
So what’s the solution?
Solution
While trying to find a solution we came across react-native-web, a kinda new tech that is highly used by Twitter and Uber, so since these tech giants are building their applications with it, it should be cool, right?
React Native for Web is an accessible implementation of React Native’s Components and APIs that is interoperable with React DOM.
what are the pros of rn-web?
- Support different devices and input modes, and render semantic tags.
- Support gestures and multiple input modes (touch, mouse, keyboard).
- Rely on scoped styles and automatic vendor prefixing.
- Respond to element resize events.
- Interoperates with existing React DOM components. Bundle only what you use.
Basically, we write client-side code with API provided by react-native-web and then use it on mobile and the web, API integrations are fully taken care of by rn-web. At this point, everything sounds good, but there is still a problem, how do we share code in the project? We need a helper library.
Tools
When developing a client-side library, it’s crucial to be able to test it properly, for this we need some kind of tool that will help us with testing this design system, Storybook is perfect for this.
Storybook is a frontend workshop for building UI components and pages in isolation. Thousands of teams use it for UI development, testing, and documentation. It’s open source and free.
Architecture
First of all, What do we need to share between the projects?
- Basic UI elements like: Text, Button, Loader
- Complex components built with basic UI elements
- Fonts
- Icons, Svgs, Illustrations
Implementation
First of all, let’s create a react-storybook project managed with webpack
mkdir optimum-uikit // create project folder

cd optimum-ukit // navigate to folder

npm init // init package.json

npm i react react-dom react-native react-native-web typescript // setup base packages

npx storybook init // init base storybook
By default storybook uses webpack, to make react-native-web work we need to adjust .storybook/main.js, also let’s change the stories config so the storybook looks for them in the src folder
module.exports = {
  "stories": [
    "../src/**/*.stories.mdx",
    "../src/**/*.stories.@(js|jsx|ts|tsx)"
  ],
  "addons": [
    "@storybook/addon-links",
    "@storybook/addon-essentials",
    "@storybook/addon-interactions"
  ],
  "framework": "@storybook/react",
  webpackFinal: async (config, { configType }) => {
    config.resolve.alias['react-native$'] = 'react-native-web'

    return config
  },
  typescript: {
    check: true,
  }
}
This config tells webpack to use code from react-native-web whenever it comes upon the code from react-native. Also, don’t forget to initialize tsconfig.json if you want to use Typescript.
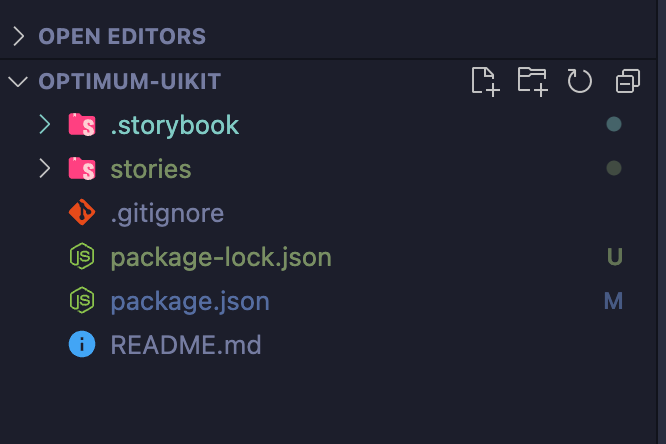
At this point our project structure looks like this, let’s get rid of the stories folder and create the basic component with the story by ourselves. The component story captures the rendered state of a UI component. The stories are written in Component Story Format (CSF) — an ES6 modules-based standard — for writing component examples, after we create a story for a component, storybook will take care of rendering and displaying it.
// src/Button/index.tsx

import React from "react"

interface ButtonProps {
  text: string
  onPress: () => void
}

export const Button = (props: ButtonProps) => {
  return <></>
}
// src/Button/index.stories.tsx

import React from 'react'
import { Meta, Story } from '@storybook/react'
import { Button, ButtonProps } from "."

const Template: Story<ButtonProps> = (args) => <Button text={args.text} onPress={args.onPress}/>

export const Default = Template.bind({})

Default.args = {
  text: "Click me!",
  onPress: () => console.log("You clicked.")
}

const meta: Meta = {
  component: Button,
  title: 'Design System/Button'
}

export default meta
- Create src/Button/index.tsx file in the project. So here you see a basic react button component, we have a text prop for displaying on a button, and an onPress prop that must be fired after the user clicks.
- Create src/Button/index.stories.tsx file. This is the most basic storybook story, just rendering our component and providing it with needed props. Meta helps storybook to render components properly and display the component’s name.
- As we know, there are no <div/> <button/> and addEventListeners in react-native, so what do we do now? This is where react-native-web shines.
// src/Button/index.tsx

import React from "react";
import { StyleSheet, TouchableOpacity, Text, View } from "react-native";

export interface ButtonProps {
  text: string;
  onPress: () => void;
}

export const Button = (props: ButtonProps) => {
  return (
    <TouchableOpacity onPress={props.onPress}>
      <View style={sheet.container}>
        <Text style={sheet.text}>{props.text}</Text>
      </View>
    </TouchableOpacity>
  );
};

const sheet = StyleSheet.create({
  container: {
    padding: 12,
    backgroundColor: "blue",
    justifyContent: "center",
    alignItems: "center",
    maxWidth: 200,
    borderRadius: 20,
  },
  text: { color: "white", fontSize: 18 },
});
So what’s happening here? If you have ever used react-native you would be familiar with View, Text, TouchableOpacity components. Those tags are just the same as <div/>, <span/>, <button/> but only in the react-native world.
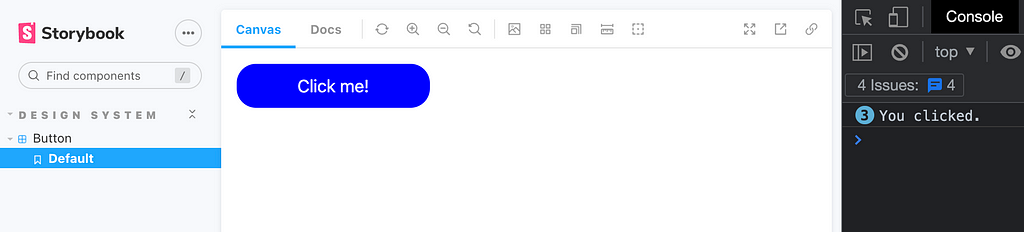
To sum up, we are writing code just like we would if we were building a mobile application but it works perfectly in the browser without any modification. This is the real power of react-native-web, it converts our View tag to div under the hood and maps all APIs accordingly. And here is the result :
But how does react-native-web do this? To answer that question first let’s take a look at HTML generated by our component
<div tabindex="0" class="...styles"> // corresponds to <TouchableOpacity/>
  <div class="...bunch of auto generated styles"> // corresponds to <View/>
    <div dir="auto" class="...styles">Click me!</div>// corresponds to <Text/>
  </div>
</div>
As you see, we used <Text/> tag but got another <div/> in your HTML tree, Why? To understand this process better let’s check out a small piece of code ( not complete, I removed some parts for simplicity ) from the react-native-web repo which is responsible for rendering <Text/> tag
// ref: https://github.com/necolas/react-native-web/blob/master/packages/react-native-web/src/exports/Text/index.js

let component = hasTextAncestor ? 'span' : 'div';


if (onClick || onPress) {
  supportedProps.onClick = handleClick;
}

supportedProps.style = [
  numberOfLines != null &&
    numberOfLines > 1 && { WebkitLineClamp: numberOfLines },
  hasTextAncestor === true ? styles.textHasAncestor$raw : styles.text$raw,
  numberOfLines === 1 && styles.textOneLine,
  numberOfLines != null && numberOfLines > 1 && styles.textMultiLine,
  props.style,
  selectable === true && styles.selectable,
  selectable === false && styles.notSelectable,
  onPress && styles.pressable
];

if (props.href != null) {
  component = 'a';
  if (hrefAttrs != null) {
    const { download, rel, target } = hrefAttrs;
    if (download != null) {
      supportedProps.download = download;
    }
    if (rel != null) {
      supportedProps.rel = rel;
    }
    if (typeof target === 'string') {
      supportedProps.target =
        target.charAt(0) !== '_' ? '_' + target : target;
    }
  }
}

const element = createElement(component, supportedProps, {
  writingDirection
});
- RNW checks if the ancestor of the current component was <Text/> tag. If true → select <span/> as a tag for layout purposes, If false → select <div/> tag.
- Adds onClick handler to supportedProps object
- Adds styles to supportedProps
- supportedProps object then is later on translated to DOM’s API by createDOMProps function
- Then it looks at href prop, if it’s present RNW switches to <a/> tag and adds all supported fields for this element
- After this RNW calls createElement function
// ref: https://github.com/necolas/react-native-web/blob/master/packages/react-native-web/src/exports/createElement/index.js#L15

const createElement = (component, props, options) => {
  // Use equivalent platform elements where possible.
  let accessibilityComponent;
  if (component && component.constructor === String) {
    accessibilityComponent =
      AccessibilityUtil.propsToAccessibilityComponent(props);
  }
  const Component = accessibilityComponent || component;
  const domProps = createDOMProps(Component, props, options);

  const element = React.createElement(Component, domProps);

  return element;
};
- createElement function adds accessibility stuff to the component, next translates provided props to DOM’s API standard and calls React.createElement at last
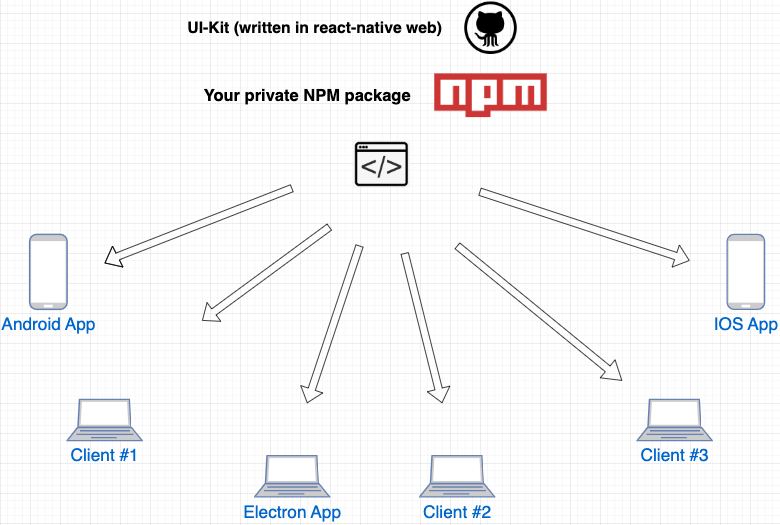
Finally, we got a picture like this, a single project that uses react-native-web for implementing components, but after the build, it gets distributed around projects on different platforms, on mobile, web, desktop, and maybe even somewhere else.
Next Steps
- Make this project into npm private package that can only be accessed with your team member’s tokens ( try out release-it npm package for making things easier)
- Build separate builds for esm and cjs, some of your projects can be using different module systems, this is quite easy with tsc, you just have to have separate tsconfig files
- When installing this ui-kit in the client app, you will need to adjust the bundler config a little bit, for example in the case of webpack you will need to add those two lines
resolve: {
  modules: [path.resolve(__dirname, 'src'), 'node_modules'],
    'react-native$': 'react-native-web'
  },
  extensions: ['.web.js', '.js']
}- Go ahead and try it out
Some Notes
- Use StyleSheet.create wisely, it’s a very good tool that can narrow down your bundle size drastically
- Use Platform.OS or Platform.pick({}) when dealing with platform-specific implementations
- You can add two implementations for the same component. If you have Button/index.tsx and Button/indext.web.tsx .
- If you use typescript in client apps, you can introduce a helper library for types, hooks, utils. This will help with normalizing component props.
- If you don’t want to deal with react-native-svg for icons, Fontello is a great tool for generating font from your svg icons, after that, you can use expo-font ’s createIconSetFromFontello function.
- Animations: you can make react-native-reanimated work with react-native-web but if you decide to do this, be ready for a rough journey, I would suggest keeping animation logic separate, maybe even splitting them into different files : animation.tsx and animation.web.tsx
- Use peerDependencies wisely, sometimes you will need platform-specific libraries and peer dependencies will come in handy
- Spin up a preview page automatically when a new PR opens up on this repo, will help a lot with reviewing
Resources for better understanding this project
- React Native Web
- Storybook
- release-it
- Repo with the code from above
Collaborators
This kind of tech is highly used within GoPeer , go check us out.
For any questions here are my twitter and github.
Level Up Coding
Thanks for being a part of our community! Before you go:
- 👏 Clap for the story and follow the author 👉
- 📰 View more content in the Level Up Coding publication
- 💰 Free coding interview course ⇒ View Course
- 🔔 Follow us: Twitter | LinkedIn | Newsletter
🚀👉 Join the Level Up talent collective and find an amazing job
One UI-Kit to rule them All was originally published in Level Up Coding on Medium, where people are continuing the conversation by highlighting and responding to this story.
This content originally appeared on Level Up Coding - Medium and was authored by Dudu Popkhadze
Dudu Popkhadze | Sciencx (2023-03-07T19:27:52+00:00) One UI-Kit to rule them All. Retrieved from https://www.scien.cx/2023/03/07/one-ui-kit-to-rule-them-all/
Please log in to upload a file.
There are no updates yet.
Click the Upload button above to add an update.