This content originally appeared on DEV Community and was authored by Will
Before we get going, let's go over some quick definitions/questions:
What does web accessibility mean?
Web accessibility means that websites, tools, and technologies are designed and developed so that people with disabilities can use them. More specifically, people can understand, navigate, and interact with the Web.
Why "a11y"?
That's its numeronym, with the "11" representing the count of letters between the "a" and the "y". You find the same concept for other words across the web dev world such as "i18n" (internationalization).
Does "automated" accessibility testing mean I don't have to do manual testing?
No. There have been studies that demonstrate that while it sets a great base, it doesn't cover everything that manual testing does. Different studies come back with different results on the subject of "how much is covered?". Deque concluded that ~57% of issues can be covered by automated testing tools, such as axe-core.
You can learn more about manual testing here.
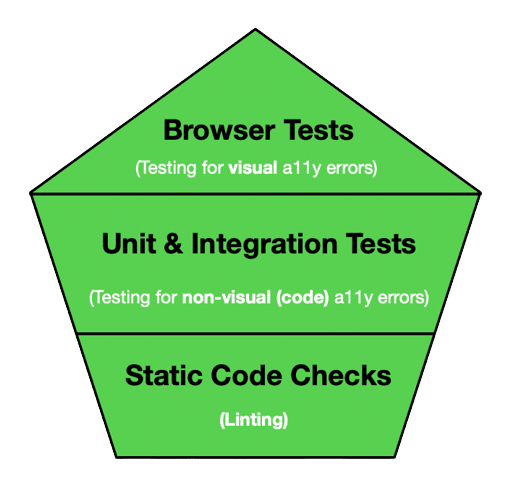
In this post we will cover how to automate accessibility testing by combining Static Code Checks, Unit & Integration Tests, and Browser Tests:
Static Code Checks
Similarly to how "Static" is at the base of many testing methodologies such as the Testing Trophy, the same can be said for automated accessibility. Static linting is the first line of defense when it comes to catching common accessibility violations. Linting refers to the way a program analyses code and flags potential problems according to predefined rules.
A popular industry standard for tackling this is the ESLint eslint-plugin-jsx-a11y plugin.
Note: If you are already using the Airbnb ESLint setup, this is included by default. 🪄
Refer to the docs to get it set up and you'll be receiving warnings in your IDE such as:
img elements must have an alt prop, either with meaningful text, or an empty string for decorative images. eslint(jsx-a11y/alt-text)
Not a bad start, but there's still more to uncover...
Unit & Integration tests
Linters look for standard HTML elements such as <img />. This means that if you're using an <Image /> component from a 3rd-party design system such as MaterialUI or Chakra, no issues will be flagged. We need to first render the code into a test DOM and then examine the rendered code.
This is where jest-axe comes into play. jest-axe is a custom Jest matcher for Axe which provides functions to check rendered code against Axe standards.
Here's an example of manually rendering an image without an alt tag:
/**
 * @jest-environment jsdom
 */
const { axe, toHaveNoViolations } = require('jest-axe')

expect.extend(toHaveNoViolations)

it('should demonstrate this matcher`s usage', async () => {
  const render = () => '<img src="#"/>'

  // pass anything that outputs html to axe
  const html = render()

  expect(await axe(html)).toHaveNoViolations()
})
...and what the error message you'd receive looks like:
Using this knowledge, what we can do is create a top-level test for the React App and use the toHaveNoViolations method:
import { axe, toHaveNoViolations } from 'jest-axe';
import { render } from '@testing-library/react';

import App from '../App';

expect.extend(toHaveNoViolations);

it('should have no accessibility violations caught by jest-axe', async () => {
  const { container } = render(<App />);
  const results = await axe(container);

  expect(results).toHaveNoViolations();
});
Note: this is a React specific example but there is also support for Vue with Vue Testing Library, Angular with Nx, etc.
The test will fail if there are any violations found within the rendered code, conversely, if it doesn't pick up on any issues the test will pass ✅
Browser tests
Last but not least, a powerful way to automate accessibility checks is through browser tests with solutions such as cypress-audit. Using cypress-audit you can run Lighthouse and Pa11y audits directly in your E2E test suites.
Check out the docs for installation/setup instructions as it'll depend on your current setup, but in general, a basic cypress.config.js setup could look something like this:
const { lighthouse, prepareAudit } = require("@cypress-audit/lighthouse");
const { pa11y } = require("@cypress-audit/pa11y");

module.exports = {
  e2e: {
    baseUrl: "http://localhost:3000", // this is your app
    setupNodeEvents(on, config) {
      on("before:browser:launch", (browser = {}, launchOptions) => {
        prepareAudit(launchOptions);
      });

      on("task", {
        lighthouse: lighthouse(),
        pa11y: pa11y(),
      });
    },
  },
};
This post is based on a11y, but it's worth mentioning that for for Lighthouse you can specify your thresholds for other things like performance and SEO like this:
it("should verify the lighthouse scores with thresholds", function () {
  // For each of these you can specify whatever threshold you want
  cy.lighthouse({
    performance: 100,
    accessibility: 100, // This is the a11y specific parameter
    "best-practices": 100,
    seo: 100,
    pwa: 100,
  });
});
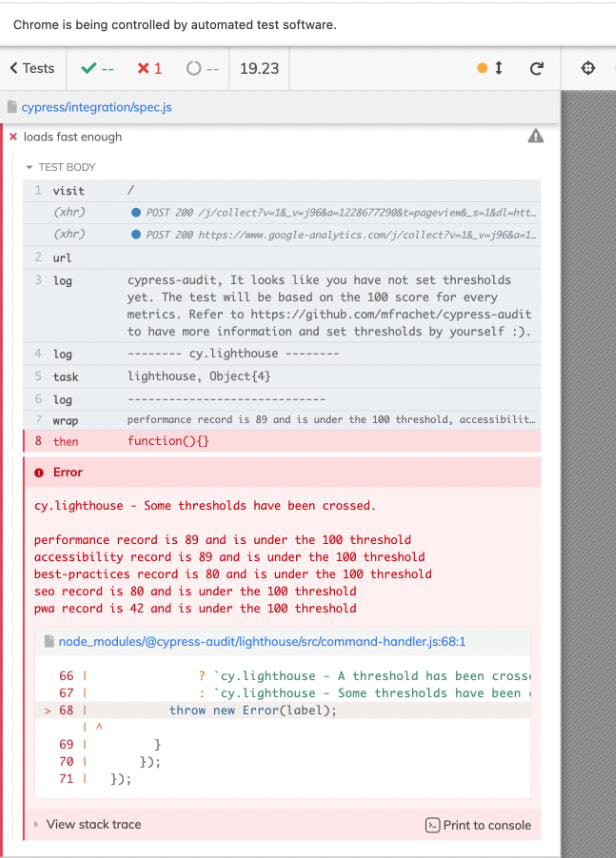
...which would give you a report looking something like this:
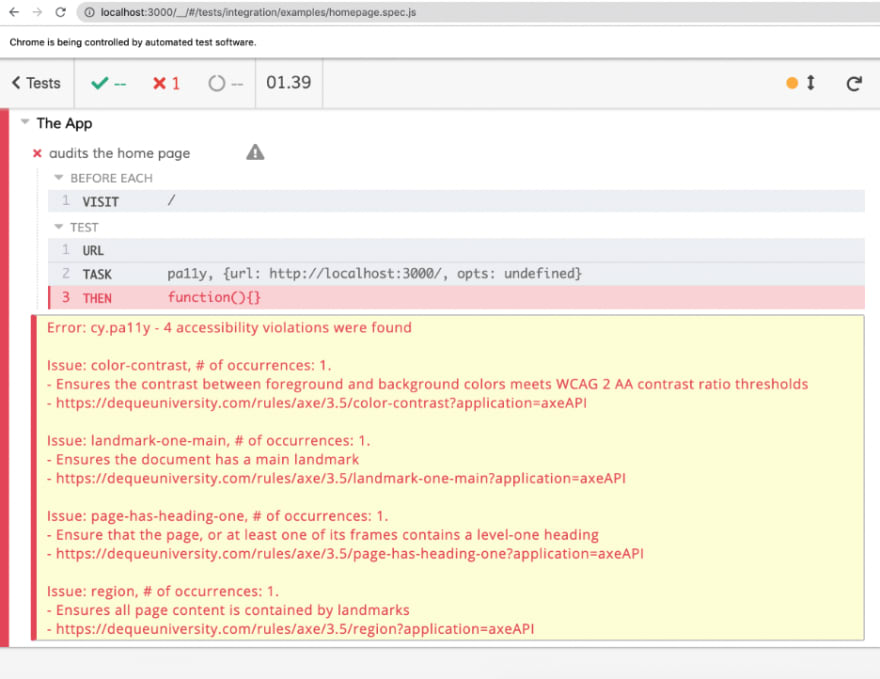
Similar thing for Pa11y (you'll need to update the cypress.config.js according to the docs), which will also generate a report for you and flag any accessibility violations:
If you're not using Cypress, lighthouse-ci and pa11y-ci are great alternatives you can use to directly automate accessibility checks.
That's it! 🪄 Those are the 3 main pillars when dealing with automated a11y. Be sure to check out the docs linked throughout the article for more configuration (there's too much to put in one article!). And remember - accessibility is not just a nice to have, but often a legality.
This content originally appeared on DEV Community and was authored by Will
Will | Sciencx (2023-03-12T12:21:59+00:00) 3 Ways to Automate Accessibility Testing (a11y). Retrieved from https://www.scien.cx/2023/03/12/3-ways-to-automate-accessibility-testing-a11y/
Please log in to upload a file.
There are no updates yet.
Click the Upload button above to add an update.


