5 Tips For A Cleaner and More Maintainable View Layer in iOS Apps

Practical advices for simplifying view layer code and improving development workflows

Image generated by MidjourneyAI

The view is one of the most important layers of any mobile app, present in any architecture. It represents our application to our users and customers, making it crucial to ensure that the view is safe, clean, and maintainable.

Perhaps you have come across huge view controllers that mix up business logic, routing, and layout, leading to everything breaking down when you attempt to introduce changes. Or maybe you have encountered view classes that span over 200 lines of code, with hundreds of constraints and tons of hardcoded values. If you recall situations like these, then be my guest and allow me to show you how to avoid such situations.

1. Separate View and View Controller

The first reason why we often end up with massive view controllers is due to creating subviews inside UIViewController subclasses. Within a UIViewController, you are already responsible for setting up lifecycle events, handling notifications, setting up actions for UIControl subclasses, and configuring delegates. Adding approximately 100–200 lines of layout code to this list can make it overwhelming. However, we can avoid this issue by moving all layout code to a separate UIView subclass and assigning an instance of this class to the UIViewController’s view property within the loadView() method. By layout code, I refer to all subviews, their styling, positioning, animations, and so on.

I have an article about this approach with an example. You can find it here.

2. Use Stack Views

UIStackView is one of the most powerful UI components Swift native libraries have to offer. In UIKit, it can help eliminate many constraints and make your layout code more readable and maintainable. You can even combine stacks within one another to build complex UI layouts. In such cases, the only necessary constraints are the stack’s constraints to the edges of the view and size constraints for your subviews.

3. One Entry Point

Entry point is a method used for view update. You may have lots of them in your view, and it may be the reason why UI displayed incorrect. Take a look at this view protocol:

protocol SomeView: AnyObject {
func updatePrice(_ price: Double)
func updateLocation(_ location: CLLocationCoordinate2D)
func setNewTitle(_ title: String)
func showError(_ error: Error)
}

With this interface, the view, that conforms to it, has 4 entry points. It means if you will have a UI bug in your code, you have to debug all 4 methods to find an issue and fix it. Also, with multiple entry points, one method can discard changes made by another method and behavior can be unpredictable.

To avoid such situations, create a state object for your view. It can be a struct or an enum with associated values. Include all properties your view need in this object. And then create only one entry point for your view, that takes this state as an argument.

Here is the updated SomeView protocol from the above:

struct SomeViewState {
var price: Double
var location: CLLocationCoordinate2D
var title: String
var error: Error?
}

protocol SomeView: AnyObject {
func updateState(_ state: SomeViewState)
}

In that case, if something is wrong with your view, an issue 99% inside updateState function.

I have an article about managing view state using enums. You can find it here.

4. Composition

Combining views together allows you to create complex user interfaces by assembling smaller, reusable components into larger, more complex structures. This approach is known as “composition” and is a powerful technique for building flexible, maintainable user interfaces.

Take a look at this Dribbble design:

App design by S. Datta

I’ve counted more than 20 subviews here. You can put all those subviews on your root view, set up all constraints and styling inside one class. But it will take more than 400 lines of code. Here is how it may look:

class RootView: UIView {
let topImageView: UIImageView
let topTitleLabel: UILabel
let searchButton: UIButton
let menuButton: UIButton
let videoPlayer: SomeVideoPlayer
let userView: UserView
let detailsButton: UIButton
let shareButton: UIButton
// And 15 more views
func setup() {
addSubview(topImageView)
addSubview(topTitleLabel)
// every other view
NSLayoutConstraint.activate([
// a ton of constraints
])
}
func set(_ state: RootViewState) {
topTitleLabel.text = state.topTitle
userView.text = state.user.username
userView.image = state.user.image
// And 50 more lines of code
// I feel like video player setup won't fit into 1-2 lines
}
}

Then you need to set up styles like fonts, colors, alignments, borders, shadows, etc. And layout all these views. It probably may take more than 500 lines of code.

Instead of doing it this way, you can divide the screen into four independent parts, each with their own configuration methods.

Now, your root view will contain only 4 subviews. All what you need to do is put them all into a UIStackView and pass some data into them.

class RootView: UIView {
let stackView: UIStackView
let navBarView: NavBarView
let nftView: NFTView
let descriptionView: DescriptionView
let bidView: BidView
func setup() {
addSubview(stackView)
stackView.addArrandgedSubview(navBarView)
stackView.addArrandgedSubview(nftView)
stackView.addArrandgedSubview(descriptionView)
stackView.addArrandgedSubview(bidView)

NSLayoutConstraint.activate([
// stacks top, leading, bottom and trailing constraints
])
}
func set(_ state: RootViewState) {
nftView.set(state.nftData)
descriptionView.set(state.description)
bidView.set(state.bidInfo)
}
}

By employing composition, you can make the layout process easier, more readable, and more maintainable. Each component can be modified independently without any worries of breaking the entire screen’s UI. This approach helps simplify the development process and make it more manageable.

5. Child View Controllers

The last but not least. Using child view controllers allows you to create a more modular, flexible, and reusable UI. A child view controller is a view controller that is embedded within another view controller, allowing you to break down complex user interfaces into smaller, more manageable pieces.

Let’s take a look at another Dribbble design:

App design by Arounda Mobile

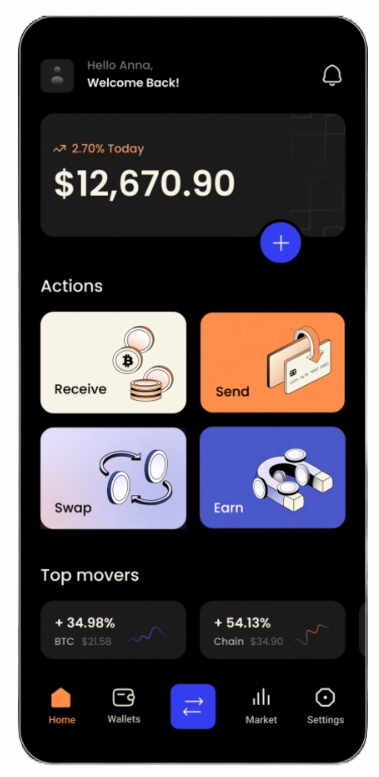
Based on the screenshot, it appears that this is an app related to cryptocurrency. The top of the screen displays a view that shows the current state of the user’s account and its worth. At the bottom of the screen, below the ‘Top movers’ label, there are views that show the current state of some of the top-performing cryptocurrencies.

These two sections can be moved into separate view controllers, which can then be embedded within the main view controller. But why would you want to do this?

These submodules contain a huge amount of business logic. In both cases, you need to fetch data about the user account or market state, perhaps from different endpoints, perform calculations, sorting, and then display the results. If you were to place all of this logic into a single module, it would become overloaded.

Moving some of the logic into a separate module will not only improve your view code, but the entire module as well.

Conclusion

There are many more ways to improve your view layer. In this article, I have highlighted the 5 most important ones, in my opinion. If you have any additional suggestions, please feel free to share them in the comments section.

Check out my other articles about iOS Development

https://medium.com/@artem.khalilyaev

Level Up Coding

Thanks for being a part of our community! Before you go:

🚀👉 Join the Level Up talent collective and find an amazing job


5 Tips For A Cleaner and More Maintainable View Layer in iOS Apps was originally published in Level Up Coding on Medium, where people are continuing the conversation by highlighting and responding to this story.


This content originally appeared on Level Up Coding - Medium and was authored by Artiom Khalilyaev

Practical advices for simplifying view layer code and improving development workflows
Image generated by MidjourneyAI

The view is one of the most important layers of any mobile app, present in any architecture. It represents our application to our users and customers, making it crucial to ensure that the view is safe, clean, and maintainable.

Perhaps you have come across huge view controllers that mix up business logic, routing, and layout, leading to everything breaking down when you attempt to introduce changes. Or maybe you have encountered view classes that span over 200 lines of code, with hundreds of constraints and tons of hardcoded values. If you recall situations like these, then be my guest and allow me to show you how to avoid such situations.

1. Separate View and View Controller

The first reason why we often end up with massive view controllers is due to creating subviews inside UIViewController subclasses. Within a UIViewController, you are already responsible for setting up lifecycle events, handling notifications, setting up actions for UIControl subclasses, and configuring delegates. Adding approximately 100–200 lines of layout code to this list can make it overwhelming. However, we can avoid this issue by moving all layout code to a separate UIView subclass and assigning an instance of this class to the UIViewController’s view property within the loadView() method. By layout code, I refer to all subviews, their styling, positioning, animations, and so on.

I have an article about this approach with an example. You can find it here.

2. Use Stack Views

UIStackView is one of the most powerful UI components Swift native libraries have to offer. In UIKit, it can help eliminate many constraints and make your layout code more readable and maintainable. You can even combine stacks within one another to build complex UI layouts. In such cases, the only necessary constraints are the stack’s constraints to the edges of the view and size constraints for your subviews.

3. One Entry Point

Entry point is a method used for view update. You may have lots of them in your view, and it may be the reason why UI displayed incorrect. Take a look at this view protocol:

protocol SomeView: AnyObject {
func updatePrice(_ price: Double)
func updateLocation(_ location: CLLocationCoordinate2D)
func setNewTitle(_ title: String)
func showError(_ error: Error)
}

With this interface, the view, that conforms to it, has 4 entry points. It means if you will have a UI bug in your code, you have to debug all 4 methods to find an issue and fix it. Also, with multiple entry points, one method can discard changes made by another method and behavior can be unpredictable.

To avoid such situations, create a state object for your view. It can be a struct or an enum with associated values. Include all properties your view need in this object. And then create only one entry point for your view, that takes this state as an argument.

Here is the updated SomeView protocol from the above:

struct SomeViewState {
var price: Double
var location: CLLocationCoordinate2D
var title: String
var error: Error?
}

protocol SomeView: AnyObject {
func updateState(_ state: SomeViewState)
}

In that case, if something is wrong with your view, an issue 99% inside updateState function.

I have an article about managing view state using enums. You can find it here.

4. Composition

Combining views together allows you to create complex user interfaces by assembling smaller, reusable components into larger, more complex structures. This approach is known as “composition” and is a powerful technique for building flexible, maintainable user interfaces.

Take a look at this Dribbble design:

App design by S. Datta

I’ve counted more than 20 subviews here. You can put all those subviews on your root view, set up all constraints and styling inside one class. But it will take more than 400 lines of code. Here is how it may look:

class RootView: UIView {
let topImageView: UIImageView
let topTitleLabel: UILabel
let searchButton: UIButton
let menuButton: UIButton
let videoPlayer: SomeVideoPlayer
let userView: UserView
let detailsButton: UIButton
let shareButton: UIButton
// And 15 more views
func setup() {
addSubview(topImageView)
addSubview(topTitleLabel)
// every other view
NSLayoutConstraint.activate([
// a ton of constraints
])
}
func set(_ state: RootViewState) {
topTitleLabel.text = state.topTitle
userView.text = state.user.username
userView.image = state.user.image
// And 50 more lines of code
// I feel like video player setup won't fit into 1-2 lines
}
}

Then you need to set up styles like fonts, colors, alignments, borders, shadows, etc. And layout all these views. It probably may take more than 500 lines of code.

Instead of doing it this way, you can divide the screen into four independent parts, each with their own configuration methods.
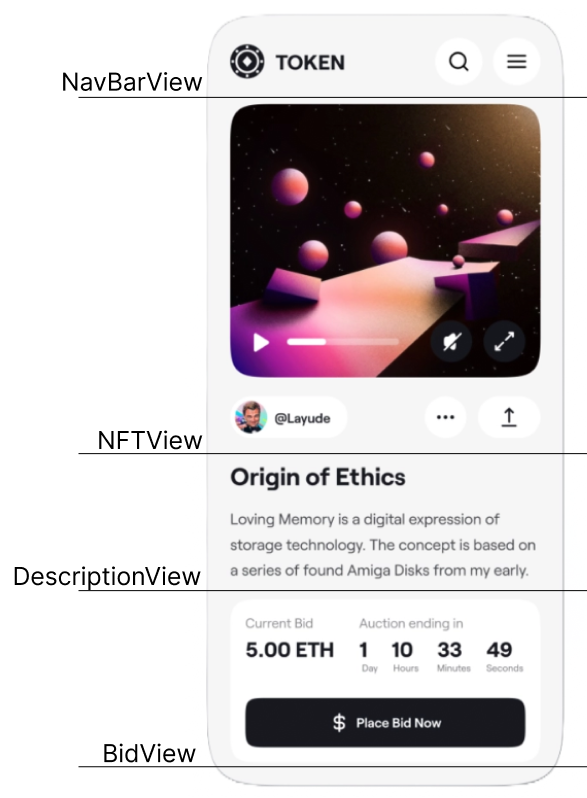
Now, your root view will contain only 4 subviews. All what you need to do is put them all into a UIStackView and pass some data into them.

class RootView: UIView {
let stackView: UIStackView
let navBarView: NavBarView
let nftView: NFTView
let descriptionView: DescriptionView
let bidView: BidView
func setup() {
addSubview(stackView)
stackView.addArrandgedSubview(navBarView)
stackView.addArrandgedSubview(nftView)
stackView.addArrandgedSubview(descriptionView)
stackView.addArrandgedSubview(bidView)

NSLayoutConstraint.activate([
// stacks top, leading, bottom and trailing constraints
])
}
func set(_ state: RootViewState) {
nftView.set(state.nftData)
descriptionView.set(state.description)
bidView.set(state.bidInfo)
}
}

By employing composition, you can make the layout process easier, more readable, and more maintainable. Each component can be modified independently without any worries of breaking the entire screen’s UI. This approach helps simplify the development process and make it more manageable.

5. Child View Controllers

The last but not least. Using child view controllers allows you to create a more modular, flexible, and reusable UI. A child view controller is a view controller that is embedded within another view controller, allowing you to break down complex user interfaces into smaller, more manageable pieces.

Let’s take a look at another Dribbble design:
App design by Arounda Mobile

Based on the screenshot, it appears that this is an app related to cryptocurrency. The top of the screen displays a view that shows the current state of the user’s account and its worth. At the bottom of the screen, below the ‘Top movers’ label, there are views that show the current state of some of the top-performing cryptocurrencies.

These two sections can be moved into separate view controllers, which can then be embedded within the main view controller. But why would you want to do this?

These submodules contain a huge amount of business logic. In both cases, you need to fetch data about the user account or market state, perhaps from different endpoints, perform calculations, sorting, and then display the results. If you were to place all of this logic into a single module, it would become overloaded.

Moving some of the logic into a separate module will not only improve your view code, but the entire module as well.

Conclusion

There are many more ways to improve your view layer. In this article, I have highlighted the 5 most important ones, in my opinion. If you have any additional suggestions, please feel free to share them in the comments section.

Check out my other articles about iOS Development

https://medium.com/@artem.khalilyaev

Level Up Coding

Thanks for being a part of our community! Before you go:

🚀👉 Join the Level Up talent collective and find an amazing job


5 Tips For A Cleaner and More Maintainable View Layer in iOS Apps was originally published in Level Up Coding on Medium, where people are continuing the conversation by highlighting and responding to this story.


This content originally appeared on Level Up Coding - Medium and was authored by Artiom Khalilyaev


Print Share Comment Cite Upload Translate Updates
APA

Artiom Khalilyaev | Sciencx (2023-03-23T23:22:55+00:00) 5 Tips For A Cleaner and More Maintainable View Layer in iOS Apps. Retrieved from https://www.scien.cx/2023/03/23/5-tips-for-a-cleaner-and-more-maintainable-view-layer-in-ios-apps/

MLA
" » 5 Tips For A Cleaner and More Maintainable View Layer in iOS Apps." Artiom Khalilyaev | Sciencx - Thursday March 23, 2023, https://www.scien.cx/2023/03/23/5-tips-for-a-cleaner-and-more-maintainable-view-layer-in-ios-apps/
HARVARD
Artiom Khalilyaev | Sciencx Thursday March 23, 2023 » 5 Tips For A Cleaner and More Maintainable View Layer in iOS Apps., viewed ,<https://www.scien.cx/2023/03/23/5-tips-for-a-cleaner-and-more-maintainable-view-layer-in-ios-apps/>
VANCOUVER
Artiom Khalilyaev | Sciencx - » 5 Tips For A Cleaner and More Maintainable View Layer in iOS Apps. [Internet]. [Accessed ]. Available from: https://www.scien.cx/2023/03/23/5-tips-for-a-cleaner-and-more-maintainable-view-layer-in-ios-apps/
CHICAGO
" » 5 Tips For A Cleaner and More Maintainable View Layer in iOS Apps." Artiom Khalilyaev | Sciencx - Accessed . https://www.scien.cx/2023/03/23/5-tips-for-a-cleaner-and-more-maintainable-view-layer-in-ios-apps/
IEEE
" » 5 Tips For A Cleaner and More Maintainable View Layer in iOS Apps." Artiom Khalilyaev | Sciencx [Online]. Available: https://www.scien.cx/2023/03/23/5-tips-for-a-cleaner-and-more-maintainable-view-layer-in-ios-apps/. [Accessed: ]
rf:citation
» 5 Tips For A Cleaner and More Maintainable View Layer in iOS Apps | Artiom Khalilyaev | Sciencx | https://www.scien.cx/2023/03/23/5-tips-for-a-cleaner-and-more-maintainable-view-layer-in-ios-apps/ |

Please log in to upload a file.


There are no updates yet.
Click the Upload button above to add an update.

You must be logged in to translate posts. Please log in or register.