This content originally appeared on Level Up Coding - Medium and was authored by Om Kamath
Take Your Arduino Nano RP2040 Connect Projects to the Next Level with Wireless Servo Control via Bluepad32 and CircuitPython.

As I was tidying up my cupboard, I stumbled upon an old game controller (Gamesir G3s) that I had purchased during my childhood. Nostalgia hit me hard! However, being the kind of person who enjoys inviting trouble, I decided to embark on the challenge of connecting this android gamepad to my new Arduino Nano RP2040 Connect. Before I knew it, I was knee-deep in research, scouring the internet for ways to connect the gamepad to my Arduino. Needless to say, my cleaning plans were quickly put on hold.
After dedicating an entire day to research, I stumbled upon a fantastic project created by Ricardo Quesada called Bluepad32. Hats off to Ricardo for making this seemingly daunting task a breeze! To make the overall process interesting, I will be controlling a servo motor using the gamepad.
What is Bluepad32?
Bluepad32 is an open-source project that allows you to connect a Bluetooth gamepad to an Arduino board. It is designed to work with a variety of gamepads and supports a range of functions, such as button presses, analog joystick values, and even motion controls. Bluepad32 is compatible with a number of popular Arduino boards, including the Arduino Nano RP2040 Connect, and can be easily configured with the Arduino IDE.
Compatible Boards and Compatible Gamepads
The pairing process can be broken down into two simple steps:
- Flashing the firmware
- Installing CircuitPython (ignore, if already installed)
- Installing the library
Flashing the firmware
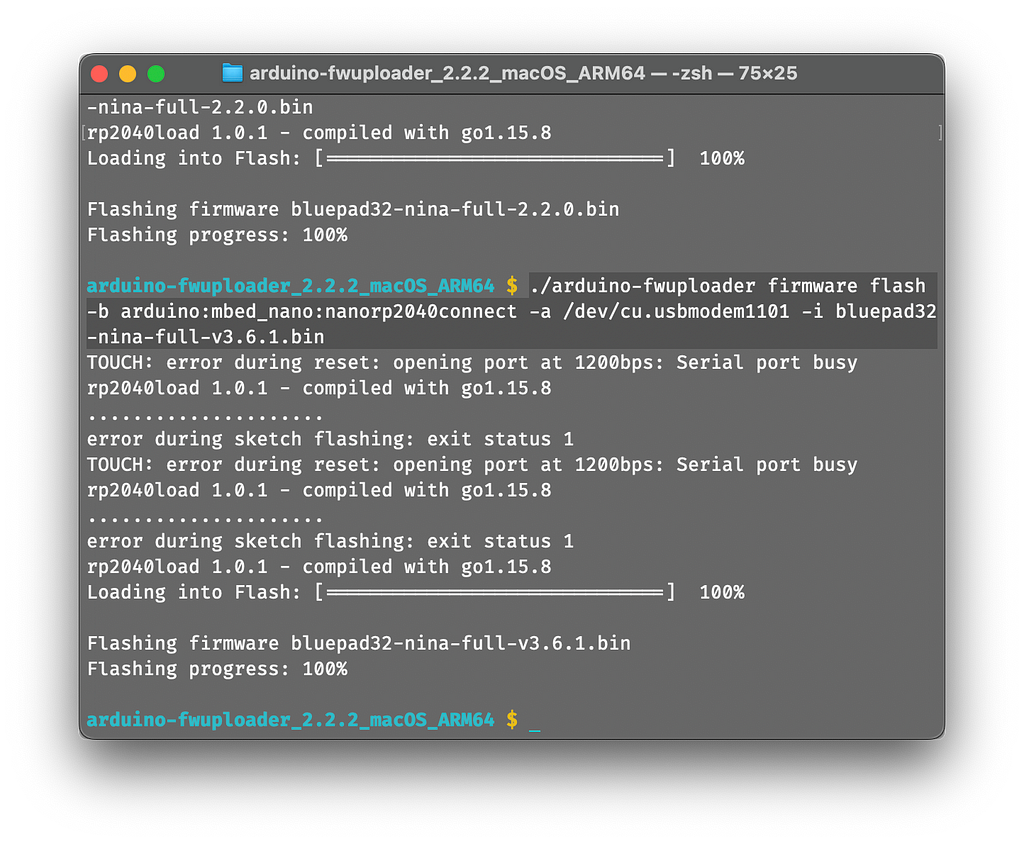
Before we can start using Bluepad32, we need to flash the firmware onto the Arduino nano board. This is because the Bluepad32 library uses the Bluetooth module embedded in the NINA module that requires the firmware. Luckily, the firmware is already available on the GitHub repository, and we just need to flash it onto the board. To do this, we’ll use the Arduino-fwuploader provided by Arduino.
Arduino Firmware Uploader tool can be downloaded from here. Once, you have installed the uploader, add the firmware file in the same folder as the tool for the ease of flashing. Make sure you have extracted the .bin file.
The following command should be typed in the terminal to flash the firmware:
./arduino-fwuploader firmware flash -b arduino:mbed_nano:nanorp2040connect -a <PORT> -I bluepad32-nina-full-v3.6.1.bin

Installing CircuitPython
I tried everything to make the servo work with the Arduino IDE, from using the default servo library to sending data from the Arduino Nano to the Uno via laser Morse code (went crazy). However, I soon realized that it’s not possible to control a Servo with Arduino libraries. Eventually, I decided to scrap the plan and install CircuitPython on my RP2040 Connect instead. The process was actually quite easy. All I had to do was download the .uf2 file and open the bootloader by connecting the RES pin to GND. This allowed me to see RPI-RP2 as an external storage device. After disconnecting the RES-GND connection, I simply dragged and dropped the .uf2 file to the device. The device will now be visible as CIRCUITPY.
Download the .uf2 file from here.
I will be using the Thonny IDE to program the RP2040 connect.
Installing Bluepad32
You have two options to install the Bluepad32 library for CircuitPython. Firstly, you can download the library from the following link: https://gitlab.com/ricardoquesada/bluepad32-circuitpython
Secondly, you can use CircUp, which is a package manager for CircuitPython and the easiest way to install the library.
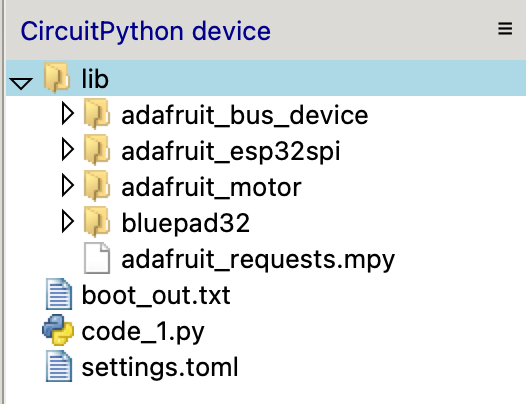
To use CircUp, you must first install it using the command pip install circup in your terminal. Once you have connected your device, type circup install bluepad32 in the terminal. This will automatically add the library along with its dependencies to the lib folder on your RP2040 connect.
As we will be controlling a servo, we will also need to install the adafruit_motor library, which can be a bit tricky. To do so, you must first download the Adafruit CircuitPython Bundle that corresponds to your CircuitPython version (in this case, Version 8.x). After downloading the bundle, unzip the file and search for the adafruit_motor folder. Then, drag and drop this folder into your device’s lib folder. With these steps completed, we are now all set up.

Stitching everything together
The Bluepad32 library comes with an example code that I referred to in order to create my own custom servo controller code.
Importing the libraries
import time
import board
import busio
import pwmio
from adafruit_motor import servo
from digitalio import DigitalInOut
from bluepad32.bluepad32 import Bluepad32
Defining the functions
# Callback that will be called once a gamepad is connected
def on_connect(gp):
    global gamepad  # pylint: disable=global-statement
    gamepad = gp
    print("on_connect: ", gp)
    # Change ligthbar to Green: Red, Green, Blue
    gp.set_lightbar_color((0x00, 0xFF, 0x00))


# Callback that will be called when a gamepad is disconnected
def on_disconnect(gp):
    global gamepad  # pylint: disable=global-statement
    gamepad = None
    print("on_disconnect: ", gp)

def map_range(value, in_min, in_max, out_min, out_max):
    return (value - in_min) * (out_max - out_min) / (in_max - in_min) + out_min
on_connect() and on_disconnect() are callbacks that will be called on gamepad connection and disconnection. map_range() will be used later to map the gamepad joystick values (-512, 511) to the servo values (0, 180).
Configuring the pins
esp32_cs = DigitalInOut(board.CS1)
esp32_ready = DigitalInOut(board.ESP_BUSY)
esp32_reset = DigitalInOut(board.ESP_RESET)

spi = busio.SPI(board.SCK1, board.MOSI1, board.MISO1)
bp32 = Bluepad32(spi, esp32_cs, esp32_ready, esp32_reset, debug=0)
bp32.setup_callbacks(on_connect, on_disconnect)
Since the board utilizes the NINA module as a co-processor, and the chip embedded within the NINA module is an ESP32, we must employ the CS, Ready, and Reset pins of the ESP32. While testing the example code, I encountered a SPI timeout error. After troubleshooting for a while, I discovered that there were slight variations in the pin nomenclature, such as CS1, SCK1, MOSI1, and MISO1.
Setting up the servo
# Create a PWMOut object on the board pin connected to the servo
pwm = pwmio.PWMOut(board.A2, duty_cycle=2 ** 15, frequency=50)

# Create a Servo object using the PWMOut object
my_servo = servo.Servo(pwm)

# Define the minimum and maximum input values
min_input = 511
max_input = -512

# Define the minimum and maximum output values
min_output = 0
max_output = 180
Final loop
while True:
    # Fetches data from Bluepad32 firmware, triggers callbaks, and more.
    # Must be called once per frame.
    bp32.update()

    if gamepad is None:
        continue

    print(gamepad)
    # Read the input value from the gamepad
    input_value = getattr(gamepad,'axis_x')
    # Map the input value to the output value range
    output_value = map_range(input_value, min_input, max_input, min_output, max_output)
    print(output_value)
    # Set the angle of the servo to the mapped output value
    my_servo.angle = output_value

    time.sleep(0.032)
Final Code
import time
import board
import busio
import pwmio
from adafruit_motor import servo
from digitalio import DigitalInOut
from bluepad32.bluepad32 import Bluepad32


# Callback that will be called once a gamepad is connected
def on_connect(gp):
    global gamepad  # pylint: disable=global-statement
    gamepad = gp
    print("on_connect: ", gp)
    # Change ligthbar to Green: Red, Green, Blue
    gp.set_lightbar_color((0x00, 0xFF, 0x00))


# Callback that will be called when a gamepad is disconnected
def on_disconnect(gp):
    global gamepad  # pylint: disable=global-statement
    gamepad = None
    print("on_disconnect: ", gp)

def map_range(value, in_min, in_max, out_min, out_max):
    return (value - in_min) * (out_max - out_min) / (in_max - in_min) + out_min

# Connected gamepad
gamepad = None

# If you are using a board with pre-defined ESP32 Pins:
esp32_cs = DigitalInOut(board.CS1)
esp32_ready = DigitalInOut(board.ESP_BUSY)
esp32_reset = DigitalInOut(board.ESP_RESET)

spi = busio.SPI(board.SCK1, board.MOSI1, board.MISO1)
bp32 = Bluepad32(spi, esp32_cs, esp32_ready, esp32_reset, debug=0)
bp32.setup_callbacks(on_connect, on_disconnect)

# Should display "Bluepad32 for Airlift vXXX"
print("Firmware version:", bp32.firmware_version)


# Create a PWMOut object on the board pin connected to the servo
pwm = pwmio.PWMOut(board.A2, duty_cycle=2 ** 15, frequency=50)

# Create a Servo object using the PWMOut object
my_servo = servo.Servo(pwm)

# Define the minimum and maximum input values
min_input = 511
max_input = -512

# Define the minimum and maximum output values
min_output = 0
max_output = 180


while True:
    # Fetches data from Bluepad32 firmware, triggers callbaks, and more.
    # Must be called once per frame.
    bp32.update()

    if gamepad is None:
        continue

    print(gamepad)
    # Read the input value from the gamepad
    input_value = getattr(gamepad,'axis_x')
    # Map the input value to the output value range
    output_value = map_range(input_value, min_input, max_input, min_output, max_output)
    print(output_value)
    # Set the angle of the servo to the mapped output value
    my_servo.angle = output_value

    time.sleep(0.032)
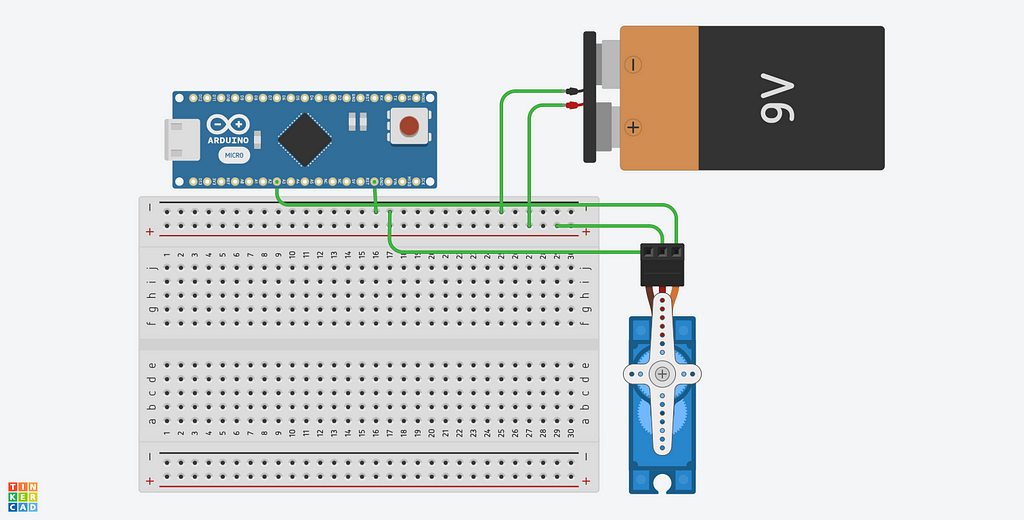
Wiring Diagram

Demo
Links
Conclusion
Well, as usual, I hope you found this article helpful. After spending a week trying to solve a problem that never existed, I’m glad to have shared my insights with you. If you encounter any connectivity issues or have any other questions, feel free to let me know in the comments. Adios!
If you liked my blogs, you could buy me a coffee.
Level Up Coding
Thanks for being a part of our community! Before you go:
- 👏 Clap for the story and follow the author 👉
- 📰 View more content in the Level Up Coding publication
- 💰 Free coding interview course ⇒ View Course
- 🔔 Follow us: Twitter | LinkedIn | Newsletter
🚀👉 Join the Level Up talent collective and find an amazing job
Wireless Servo Control: Using Bluepad32 to Connect a Gamepad to Arduino. was originally published in Level Up Coding on Medium, where people are continuing the conversation by highlighting and responding to this story.
This content originally appeared on Level Up Coding - Medium and was authored by Om Kamath
Om Kamath | Sciencx (2023-03-23T23:23:12+00:00) Wireless Servo Control: Using Bluepad32 to Connect a Gamepad to Arduino.. Retrieved from https://www.scien.cx/2023/03/23/wireless-servo-control-using-bluepad32-to-connect-a-gamepad-to-arduino/
Please log in to upload a file.
There are no updates yet.
Click the Upload button above to add an update.
