
This content originally appeared on Bits and Pieces - Medium and was authored by Quan Zhou
Concise Architecture — Component Separation Mounting
Friendly reminder: This article only shares content about “component separation mounting” using the React system familiar to the author. However, I believe the problem-solving approach can be applied more broadly and welcome any discussion.
The Beginning of the Story
We start with a particularly familiar scenario. The following is a common application structure consisting of three parts: Header, Sider, and Content
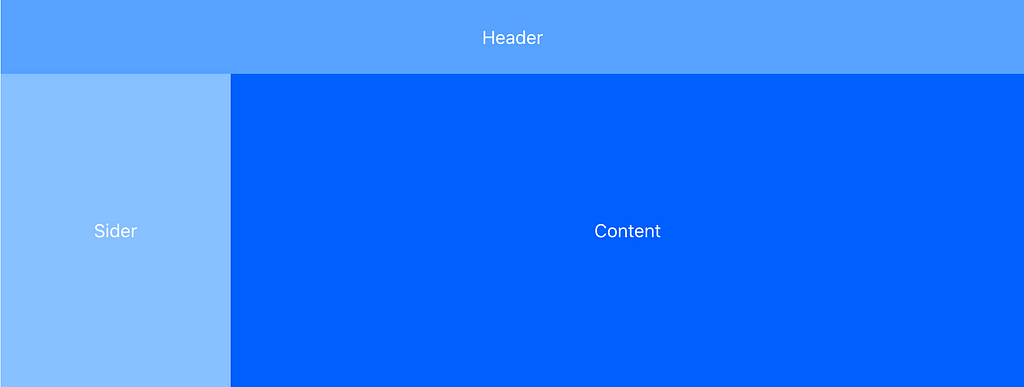
Many component libraries also provide Layout components like that for us.
Application Structure Layout
Assuming we have two routes /about, /setting corresponding to AboutPage and SettingPage respectively, the common way to implement this would be as follows:
function AboutPage() {
    return (
        <div>
            <div className="header">
                <Header />
            </div>
            <div className="sider">
                <Sider />
            </div>
            <div className="content">
                <AboutContent />
            </div>
        </div>
    )
}

function SettingPage() {
    return (
        <div>
            <div className="header">
                <Header />
            </div>
            <div className="sider">
                <Sider />
            </div>
            <div className="content">
                <SettingContent />
            </div>
        </div>
    )
}

import { BrowserRouter as Router, Routes, Route } from "react-router-dom"

export default function App() {
    return (
        <Router>
            <Routes>
                <Route path='/about' element={<AboutPage />} />
                <Route path='/setttings' element={<SettingPage />} />
            </Routes>
        </Router>
    )
}
There is no problem, except that we will find duplicate implementations of the layout in AboutPage and SettingPage.
If the overall layout changes, many pages need to be changed. The React Router v6 provides a nice API to solve this problem.
import { Outlet } from "react-router-dom"

function AppLayout() {
    return (
        <div>
            <div className="header">
                <Header />
            </div>
            <div className="sider">
                <Sider />
            </div>
            <div className="content">
                {/* Care about this */}
                <Outlet />
            </div>
        </div>
    )
}

export default function App() {
    return (
        <Router>
            <Routes>
                <Route path='/' element={<AppLayout />} />
                <Route path='/about' element={<AboutContent />} />
                <Route path='/setttings' element={<SettingPage />} />
            </Routes>
        </Router>
    )
}
In this proposal, we use the AppLayout component to define the top layer layout throughout the application (Header, Sider, Content), and reserve an Outlet component for the content that changes.
In the actual rendering, the route, Replace with the actual rendering component. For example, render the AboutContent component under the /about route and the SettingContent component under the /setting route.
For more information about outlets, see:
I want to mention this because I think the Nested Routes are similar to the topic I want to share today, “Component separate Mount”, in that they use a reserved rendering entry and then render the corresponding component based on some conditions (e.g., routing).
Well, let’s read on!
Component Separation Mounting
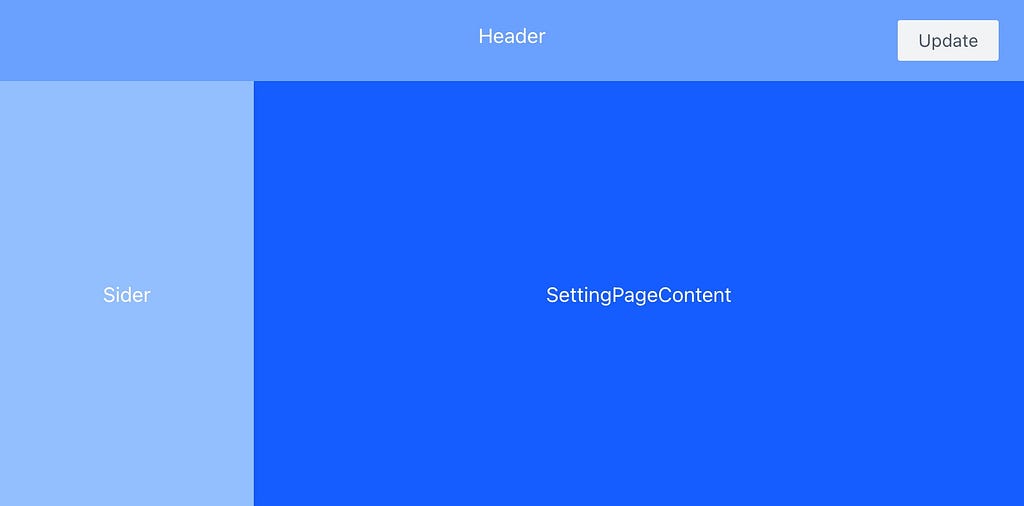
From the previous examples, we have realized that Header and Sider are generic components for the current application, while Content renders different business components depending on the route.
Of course, this is the best case. Many times, for example, headers will show different changes depending on the business:
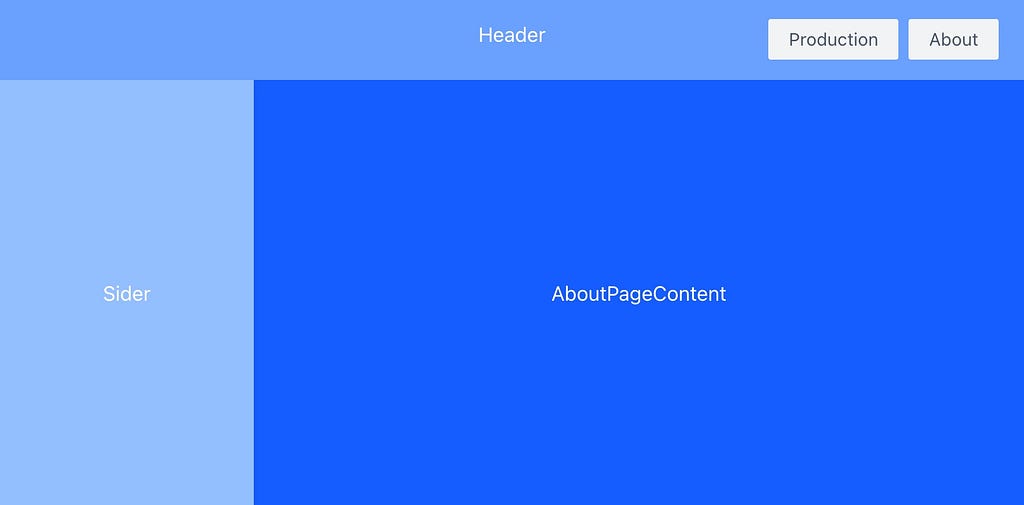
Faced with such a situation, we usually try these solutions:
Host the business in Header
The most common solution here is to host the business in the Header component, as follows:
function Header() {
    // visible condition
    const [showAboutButton, setShowAboutButton] = useState(false);
    const [showSetttingButton, setShowSettingButton] = useState(false);

    useEffect(() => {
        // to change visible conditon by router
    }, [router]);

    return (
        <div className="header">
            {showAboutButton && <AboutButton />}
            {showSetttingButton && <SettingButton />}

            {/* mybe there are more XXButton in the future */}
        </div>
    )
}
Such a solution is actually a “business intrusion”, in violation of the software design of the “open closed principle”.
As business changes iterate, more and more business entries are added to the relatively “stable” Header components, and in many cases, even part of the business logic, which is one of the main causes of “entropy increase” in front-end development.
Extend Header Component
Since I mentioned the “open closed rule” earlier, instead of modifying the Header component, I’ll give it the ability to expand. To be specific, we have the Header component implement extensions using props or children:
interface Props {
    buttonArea?: ReactNode;
}

function Header({ buttonArea }: Props) {
    return (
        <div className="header">
            {/* ... */}
            {buttonArea}
        </div>
    )
}
That way, I can just use the Header component on each business page, and I don’t need to modify it.
function AboutPage() {
    return (
        <div>
            {/* We can extend Header by use buttonArea props */}
            <Header buttonArea={(<AbountButton />)} />
            <Sider />
            <div className="content">
                <AboutContent />
            </div>
        </div>
    )
}
But did you notice that there was no way to use the previously mentioned Nested Routes scheme?
Because we need different routes, such as /about, /setting… Header component to pass different service entries, such as AboutButton, SettingButton…
What’s more, if there is any interaction logic and state that existed before AboutContent and AboutButton, you need to extract it into a third party state library or promote it into AboutPage components. This is state passing restricted to the component hierarchy. Because the extension method of a component (props or children) can only be passed on a call, for example:
function AboutPage() {
    const [disabled, setDisabled] = useState(false);

    return (
        <div>
            <Header buttonArea={(<AbountButton disabled={disabled} />)} />
            <Sider />
            <div className="content">
                <AboutContent setDisabled={setDisabled} />
            </div>
        </div>
    )
Is there a good way to do that? The next section describes “separate mounting of components.”
Separation Mounting
Let’s take a look at what “component split mount” looks like:
function Header() {
return (
<div className="header">
{/* ... */}
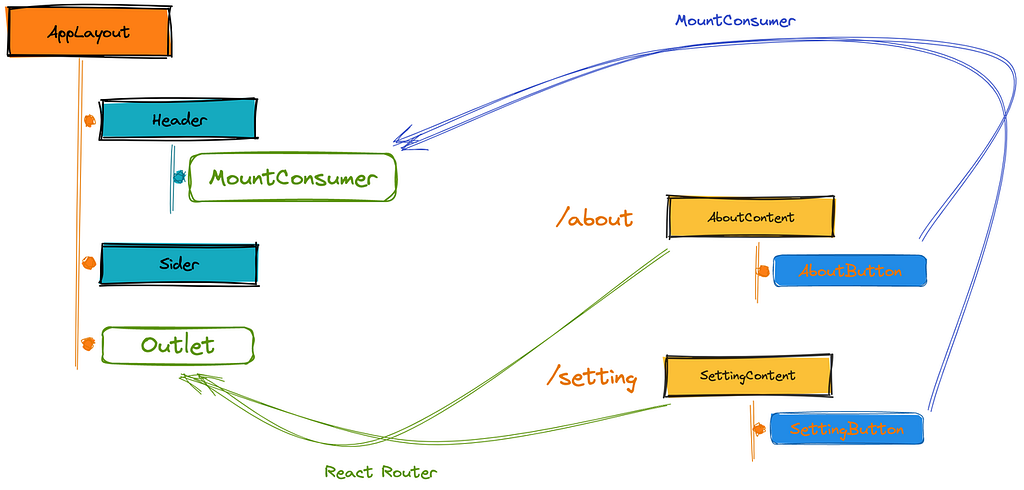
<MountConsumer name="header-button-area" />
</div>
)
}First, use MountConsumer in the Header to declare that there is a reserved mount location, identified by name, to mount the view.
function AboutContent() {
    const [disabled, setDisabled] = useState(false);

    return (
        <div>
            <MountProvider name="header-button-area">
                <AboutButton disabled={disabled} />
            </MountProvider>
        </div>
    )
}

function SettingContent() {
    const [disabled, setDisabled] = useState(false);

    return (
        <div>
            <MountProvider name="header-button-area">
                <SettingButton disabled={disabled} />
            </MountProvider>
        </div>
    )
}
In business, the MountProvider component is used to wrap AboutButton and SettingButton and is identified by name. They are not rendered there, but are rendered by the MountConsumer component in the Header.
MountProvider is used to provide components to be rendered, and MountConsumer is used to render those components in their place, similar to React.Context, except that the data they provide and consume are view components.
With MountProvider and MountConsumer, you can add extensions to the Header component without having to use props or children, so you don’t need to explicitly call the Header component to inject different extensions.
The significance of component separate mount
Different from interface or state, the organization way of component is the embodiment of UI structure and has strong structural level limitation, while interface or state is usually organized in its domain (module). At the same time, however, components often have obvious business attributes.
So for example, from the UI structure, AboutButton and SettingButton belong to headers, from the business side they belong to AboutContent and SettingContent, We often organize our component structures from a UI perspective, which is fine, and it should be the most standard way to think about applications, otherwise it’s too anti-human.
However, as in today’s example, locally, there is often an inconsistency between the UI structure and ownership of the business domain of the component. If you are also organized from the perspective of the UI structure, you will see “hosting the business in the Header component” and “extending the Header component.”
And if we do it the way the business belongs, we can declare AboutButton in AboutContent, which has smooth access to business logic and state, MountProvider and MountConsumer make it easy to mount to the target component (Header) without any intrusion.
Design inspiration
The design inspiration comes from the usage of Template and TemplatePlaceHolder in DevExtreme Reactive.
Build React Apps with reusable components, just like Lego

Bit’s open-source tool help 250,000+ devs to build apps with components.
Turn any UI, feature, or page into a reusable component — and share it across your applications. It’s easier to collaborate and build faster.
Split apps into components to make app development easier, and enjoy the best experience for the workflows you want:
→ Micro-Frontends
→ Design System
→ Code-Sharing and reuse
→ Monorepo
Learn more:
- Creating a Developer Website with Bit components
- How We Build Micro Frontends
- How we Build a Component Design System
- How to reuse React components across your projects
- 5 Ways to Build a React Monorepo
- How to Create a Composable React App with Bit
- How to Reuse and Share React Components in 2023: A Step-by-Step Guide
Concise Architecture — Component Separation Mounting was originally published in Bits and Pieces on Medium, where people are continuing the conversation by highlighting and responding to this story.
This content originally appeared on Bits and Pieces - Medium and was authored by Quan Zhou
Quan Zhou | Sciencx (2023-04-14T11:36:38+00:00) Concise Architecture — Component Separation Mounting. Retrieved from https://www.scien.cx/2023/04/14/concise-architecture-component-separation-mounting/
Please log in to upload a file.
There are no updates yet.
Click the Upload button above to add an update.