JavaScript Optimization Techniques for Faster Website Load Times: An In-Depth Guide

Front-End Development

Master JavaScript optimization to enhance website performance: minimize file sizes, reduce requests, leverage caching & async loading, and employ best practices for faster load times & improved UX.

Picture by Author

In today’s fast-paced digital world, website performance plays a crucial role in determining the success of any online venture. A speedy, responsive, and user-friendly website not only attracts and retains visitors but also contributes to better search engine rankings, higher conversion rates, and improved user experience (UX). As a software engineer or web developer, it’s essential to prioritize performance optimization techniques in your projects.

In this article, I’ll guide you through various methods to optimize your JavaScript code, including minimizing file sizes, reducing network requests, leveraging caching and asynchronous loading, and employing best practices to ensure faster load times and improved UX.

Minimizing File Sizes

One of the critical factors influencing website load times is the size of the files being served to the user.

(Markus Spiske)

Larger files take more time to download and can cause your website to load slowly, leading to a suboptimal user experience. JavaScript files are no exception, and optimizing their sizes is a fundamental step in enhancing your website’s performance.

Minification is the process of removing unnecessary characters (such as whitespace, comments, and line breaks) and shortening variable names in your JavaScript code without affecting its functionality. This results in a significantly smaller file size, which in turn leads to faster load times and improved performance.

JavaScript Code Example: Before and After Minification

Let’s take a look at a simple example to understand the effect of minification on file size:

Before minification:

// Function to calculate the sum of two numbers
function addNumbers(num1, num2) {
return num1 + num2;
}

// Use the function to calculate the sum of 3 and 5
const sum = addNumbers(3, 5);

// Log the result to the console
console.log("The sum is:", sum);

After minification:

function addNumbers(n,e){return n+e}const sum=addNumbers(3,5);console.log("The sum is:",sum);

As you can see, the minified version of the code is significantly smaller, with unnecessary characters removed and variable names shortened. This results in a smaller file size and faster load times, without affecting the functionality of the code.

Remember to always keep an unminified version of your code for development purposes and only serve minified versions in production environments.

File Compression

Compression is another technique used to reduce file sizes, leading to faster website load times.

(premium beat)

It works by applying algorithms to compress the data in the files, making them smaller without losing their functionality. When a compressed file is requested by a browser, it’s decompressed on the fly, allowing the content to be rendered and executed properly.

There are two widely used compression algorithms for JavaScript files: Gzip and Brotli. Gzip has been the de facto standard for a long time, but Brotli, a newer compression algorithm developed by Google, is becoming increasingly popular due to its superior compression ratio and speed.

Gzip and Brotli Compression Methods

Gzip: Gzip is a widely adopted compression algorithm that can significantly reduce the size of JavaScript files. Gzip uses the Deflate algorithm, which combines LZ77 and Huffman coding to compress data efficiently.
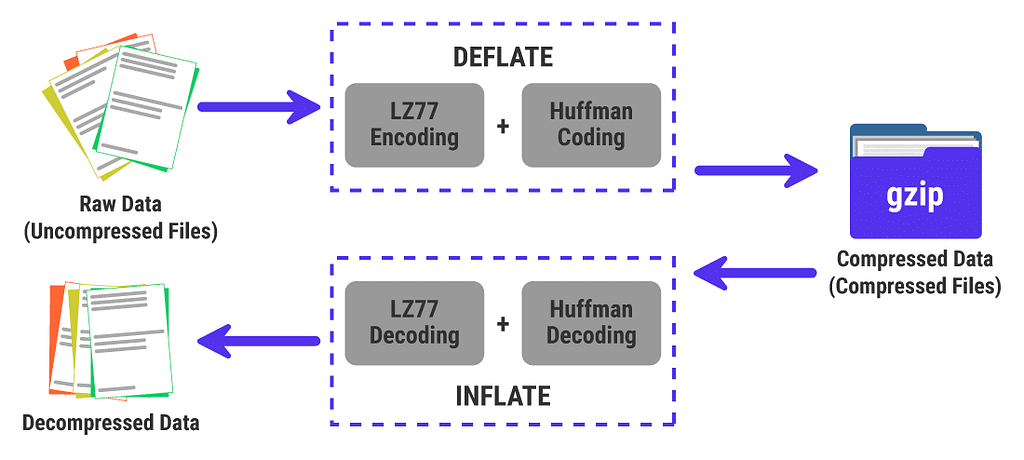
GZIP compression is based on the DEFLATE algorithm — Salman Ravoof from Kinsta

Brotli: Brotli is a newer compression algorithm developed by Google, providing better compression ratios than Gzip. Brotli uses a combination of LZ77, Huffman coding, and a novel context modeling technique to achieve higher compression rates.
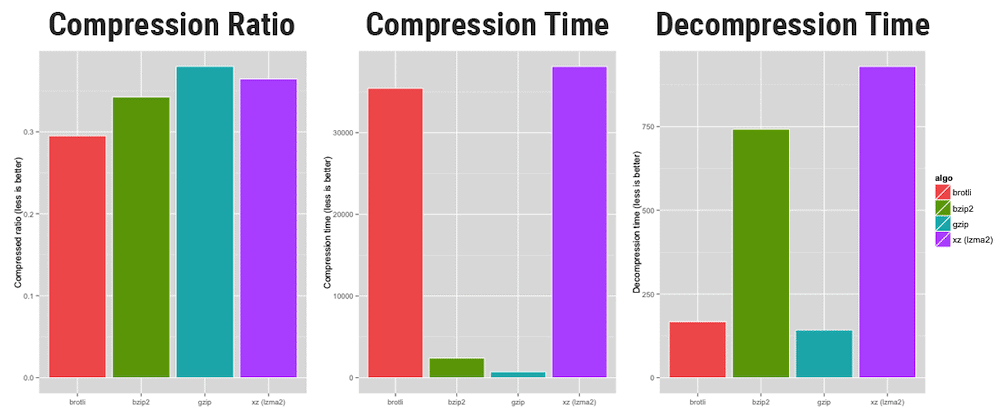
A compression performance comparison between a number of different algorithms. — OpenCPU from Kinsta

In most cases, Brotli outperforms Gzip in terms of both compression ratio and speed, making it an attractive option for modern web applications.

Server-side Configuration for Compression

To serve compressed JavaScript files, you’ll need to configure your server to compress files using Gzip or Brotli before sending them to the client. The specific configuration steps vary depending on your server type (e.g., Apache, Nginx, or Node.js). Here’s a brief overview of how to enable compression on popular server types:

  • Apache: Enable the mod_deflate module for Gzip compression or the mod_brotli module for Brotli compression, and configure the appropriate settings in your .htaccess file or virtual host configuration.
  • Nginx: Use the gzip or brotli directives in your Nginx configuration file to enable compression and specify settings.
  • Node.js: For Node.js-based servers, you can use middleware like compression for Gzip or shrink-ray-current for Brotli in conjunction with Express or a similar web framework.

It’s important to note that some browsers may not support Brotli compression, so it’s a good idea to configure your server to fall back to Gzip when Brotli is not supported. This ensures optimal compatibility and performance across all browsers.

With compression enabled, your JavaScript files will be significantly smaller, leading to faster load times and an enhanced user experience.

Bundling to Reduce Network Requests

Reducing the number of network requests is crucial for improving website performance, as each request adds latency and consumes bandwidth.

(prisync)

Explanation of Bundling

Bundling is the process of combining multiple JavaScript files into a single file. This reduces the number of HTTP requests the browser needs to make, thus speeding up the loading process. Bundling can significantly improve website performance, especially for websites with numerous, smaller JavaScript files.

Tools for Bundling

There are several popular tools available for bundling JavaScript files, each with its own unique features and advantages. Here are a couple of widely-used bundling tools:

  • Webpack: Webpack is a powerful and flexible module bundler that not only bundles JavaScript files but also handles other assets like stylesheets and images. It has a robust plugin ecosystem, allowing you to extend its functionality as needed.
  • Rollup: Rollup is another popular JavaScript module bundler that focuses on simplicity and performance. It’s particularly well-suited for bundling libraries and can output multiple formats, including CommonJS, AMD, and ES modules.

JavaScript Code Example: Bundling Multiple Files

To demonstrate the bundling process, let’s assume you have three separate JavaScript files:

// main.js
import { greet } from './greeting.js';
import { calculate } from './math.js';

console.log(greet('John'));
console.log(calculate(5, 3));
// greeting.js
export function greet(name) {
return `Hello, ${name}!`;
}
// math.js
export function calculate(x, y) {
return x * y;
}

Using a bundling tool like Webpack or Rollup, you can combine these files into a single bundled file. The output might look something like this:

(function () {
'use strict';

function greet(name) {
return `Hello, ${name}!`;
}

function calculate(x, y) {
return x * y;
}

console.log(greet('John'));
console.log(calculate(5, 3));
})();

As you can see, the bundled file contains all the necessary code from the original files in a single, self-contained unit, reducing the number of network requests required to load the scripts.

By minimizing the number of requests, you can decrease the time it takes for a browser to download and process the necessary resources, resulting in faster load times and a more responsive user experience.

Using Sprites for Images and Icons

Utilizing image sprites is another technique to reduce network requests and boost website performance.

(vecteezy)

Sprites are essentially a single image file containing multiple smaller images, such as icons or UI elements.

Explanation of Image Sprites

An image sprite is a large image containing multiple smaller images arranged in a grid-like pattern. In your CSS or JavaScript code, you can reference individual images within the sprite by specifying their position and dimensions. This method allows you to load many images with just a single HTTP request, reducing latency and improving load times.

Example of image sprite for a set of icons. — 123rf

Creating Image Sprites

To create an image sprite, you can use various tools, such as:

  • Sprite generator tools: Online tools like SpritePad or Stitches allow you to upload multiple images and generate a sprite automatically, along with the corresponding CSS code.
  • Image editing software: Programs like Adobe Photoshop or GIMP can be used to manually create sprites by arranging smaller images in a new file and exporting the result as a single image.

CSS Code Example: Using Image Sprites

Assuming you have a sprite image named “icons.png” containing multiple icons, you can use the following CSS code to display individual icons as background images for different elements:

.icon {
width: 32px;
height: 32px;
background-image: url('icons.png');
}
.icon-search {
background-position: 0 0;
}

.icon-settings {
background-position: -32px 0;
}

.icon-user {
background-position: -64px 0;
}

Each icon class specifies the position of the corresponding icon within the sprite, allowing you to display the desired image without additional HTTP requests.

By combining these smaller images into one file, the browser only needs to request a single image, reducing the number of HTTP requests.

Lazy-Loading of Resources

Lazy-loading is a technique that defers the loading of non-critical resources until they are actually needed.

(wedowe)

This means that instead of loading all the resources upfront, you only load the ones that are necessary for the immediate view, while the rest are fetched as they become relevant. Lazy-loading can greatly improve the initial load time and perceived performance of a website, particularly when dealing with large assets like images or lengthy scripts.

JavaScript Code Example: Implementing Lazy-Loading

To illustrate lazy-loading, let’s use the example of loading images only when they become visible within the viewport. This can be achieved using the IntersectionObserver API. Here’s a simple implementation:

First, add a data-src attribute to your image elements, containing the actual image source:

<img data-src="path/to/image.jpg" class="lazy-load" alt="An example image">

Then, create a script that sets up an IntersectionObserver to load images as they enter the viewport:

document.addEventListener('DOMContentLoaded', function () {
const lazyImages = [].slice.call(document.querySelectorAll('.lazy-load'));

if ('IntersectionObserver' in window) {
const lazyImageObserver = new IntersectionObserver(function (entries, observer) {
entries.forEach(function (entry) {
if (entry.isIntersecting) {
const lazyImage = entry.target;
lazyImage.src = lazyImage.dataset.src;
lazyImage.classList.remove('lazy-load');
lazyImageObserver.unobserve(lazyImage);
}
});
});

lazyImages.forEach(function (lazyImage) {
lazyImageObserver.observe(lazyImage);
});
}
});

In this example, the IntersectionObserver watches for the .lazy-load images to enter the viewport. When an image is detected, its data-src attribute is assigned to the src attribute, triggering the actual image download. Once the image has been loaded, the lazy-load class is removed, and the image is unobserved.

Using this simple lazy-loading technique, you can ensure that only the images currently in view are loaded, reducing the number of network requests and improving the initial load time of your website.

Leveraging Caching

Website performance is a critical factor in delivering a great user experience.

(nordicapis)

One essential technique for enhancing performance is caching, which allows browsers to store copies of your website’s resources, such as images, stylesheets, and scripts. This reduces the need for repeated downloads and speeds up load times. In this section, we’ll explore the concept of caching and how you can leverage it to improve your website’s performance.

Browser Caching

Browser caching is a mechanism that enables web browsers to store copies of a website’s files locally. When a user revisits your site, the browser can load these resources from the cache instead of downloading them again, resulting in faster load times and reduced server load.

By configuring your server to deliver appropriate caching headers, you can control which resources get cached and for how long.
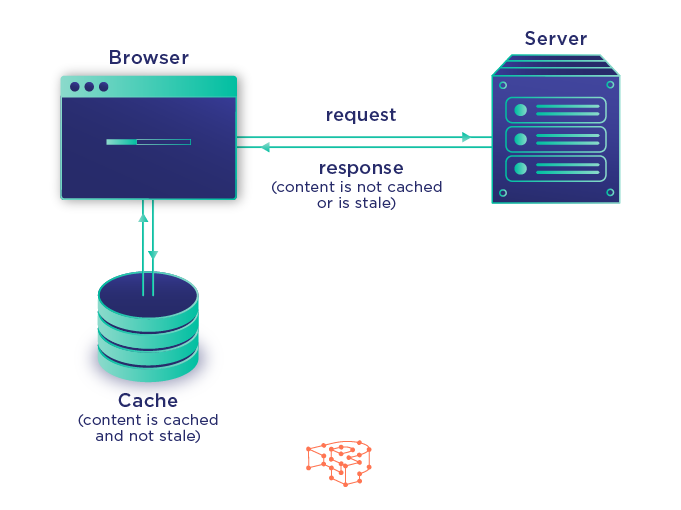
“The browser cache is a mechanism used by browsers to store locally web page resources.” — Yorgos Fountis from Pressidium

Cache-Control and ETag Headers

Two important headers for controlling browser caching are Cache-Control and ETag. The Cache-Control header allows you to set cache directives, such as the maximum age of a resource in the cache or whether it should be revalidated. For example, you can use Cache-Control: public, max-age=3600 to indicate that a resource can be cached for one hour.

The ETag header provides a unique identifier (usually a hash) for a specific version of a resource. When the browser requests a resource, it sends the ETag value it has in its cache. If the server’s ETag value matches the one sent by the browser, the server responds with a 304 Not Modified status, and the browser uses the cached version. This mechanism helps ensure that the browser always has the most up-to-date version of a resource.

Configuring Caching on the Server-side

To enable browser caching, you need to configure your server to deliver the appropriate headers for your resources. This process varies depending on your server software. For example, in an Apache server, you can use the .htaccess file to set caching headers:

<filesMatch ".(css|js|jpg|png)$">
Header set Cache-Control "public, max-age=86400"
</filesMatch>

This configuration sets the Cache-Control header for CSS, JS, JPG, and PNG files, allowing them to be cached for 24 hours.

By leveraging browser caching, you can significantly reduce the amount of data that needs to be fetched when users revisit your site, speeding up load times and improving the overall user experience.

Leveraging Asynchronous Loading

As websites grow more complex, managing the loading of JavaScript files becomes increasingly important for performance.

(talentlms)

By default, browsers load scripts synchronously, blocking the rendering process until the script is fully loaded and executed. Asynchronous loading allows scripts to be loaded in parallel with other resources, preventing them from blocking rendering and improving overall load times. In this section, we’ll discuss how to leverage asynchronous loading for your JavaScript files to enhance your website’s performance.

Asynchronous Loading of JavaScript Files

Asynchronous loading allows browsers to download and execute JavaScript files without blocking the rendering of the rest of the page. This approach not only speeds up the initial rendering of your website but also reduces the risk of a slow or unresponsive script causing delays. By using the async and defer attributes, you can control the loading and execution behavior of your JavaScript files.
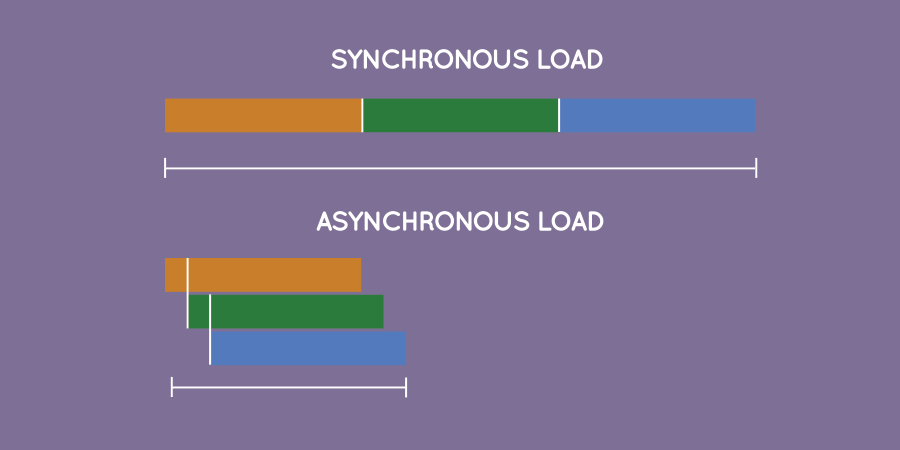
Synchronous Load vs Asynchronous Load — Arturo Navarro

Using the Async and Defer Attributes

The async and defer attributes can be added to the <script> tag to enable asynchronous loading:

  • async: The async attribute tells the browser to download the script without blocking rendering. Once the script is downloaded, the browser will pause rendering to execute it. This is useful for scripts that don’t rely on other scripts or the DOM being fully loaded.
  • defer: The defer attribute instructs the browser to download the script without blocking rendering, but delays execution until the DOM has been fully parsed. This is useful for scripts that depend on the DOM or other scripts.

It’s important to note that these attributes should only be used with external script files, as they have no effect on inline scripts.

JavaScript Code Example: Async and Defer Usage

Let’s look at an example of using async and defer attributes in the HTML file:

<!DOCTYPE html>
<html>
<head>
<!-- Using the defer attribute -->
<script src="main.js" defer></script>
</head>
<body>
<!-- Using the async attribute -->
<script src="analytics.js" async></script>
</body>
</html>

In this example, main.js is loaded with the defer attribute, ensuring that it won’t block rendering and will be executed once the DOM is fully parsed. Meanwhile, analytics.js is loaded with the async attribute, allowing it to download and execute independently of the rest of the page.

By leveraging asynchronous loading for your JavaScript files, you can minimize rendering-blocking resources and improve your website’s performance and user experience.

Employing Best Practices for Faster Load Times & Improved UX

Website optimization is an ongoing process, and to maximize performance, it’s essential to keep up with the latest best practices.

(myhrtoolkit)

Code Splitting

Code splitting is a technique that involves breaking your JavaScript code into smaller, more manageable chunks, which are loaded only when needed. This reduces the amount of code that needs to be downloaded and parsed, leading to faster initial load times and smoother interactions. Code splitting is particularly useful for single-page applications (SPAs) and large websites with complex functionality.
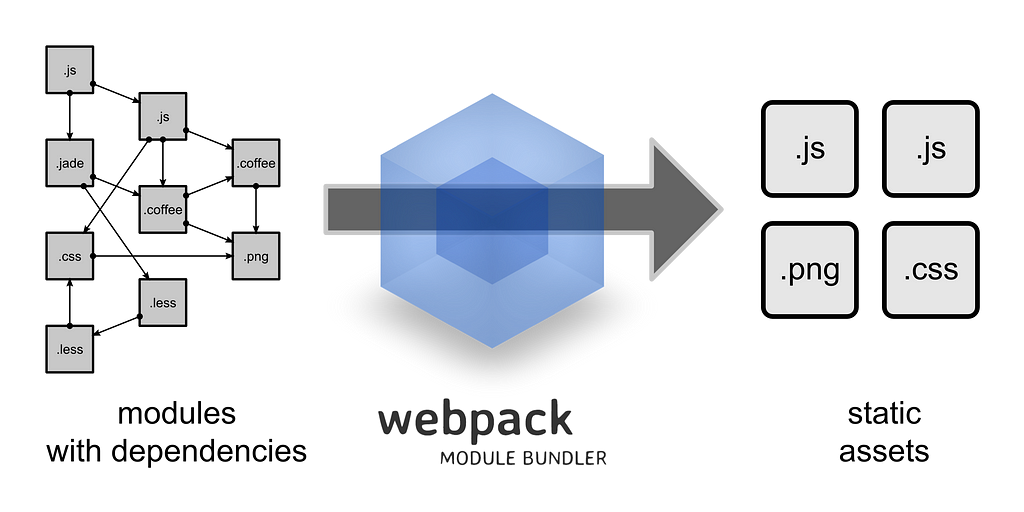
Webpack Module Bundler

Several tools can help you implement code splitting, such as Webpack and React.lazy:

  • Webpack: This popular bundler offers built-in support for code splitting. Using its dynamic import() function, you can load JavaScript modules on-demand, reducing the initial load time.
  • React.lazy: If you’re using React, the React.lazy function lets you load components lazily as they’re needed, further optimizing your application.

JavaScript Code Example: Implementing Code Splitting

Here’s an example of code splitting with Webpack and React:

// Importing the React and React.lazy libraries
import React, { lazy, Suspense } from 'react';

// Loading the component lazily using React.lazy
const MyComponent = lazy(() => import('./MyComponent'));

function App() {
return (
<div>
<Suspense fallback={<div>Loading...</div>}>
<MyComponent />
</Suspense>
</div>
);
}

export default App;

In this example, the MyComponent is loaded lazily when it’s needed, preventing it from blocking the initial rendering of the application.

Using Content Delivery Networks (CDNs)

Content Delivery Networks (CDNs) are a powerful way to improve website performance by distributing your content across multiple servers around the world.

This ensures that users can access your website’s resources from a server close to their location, reducing latency and speeding up load times. Integrating your website with a CDN can greatly improve user experience, especially for users in distant geographic locations.

Optimizing DOM Manipulation and Event Handling

Efficient DOM manipulation is crucial for improving website performance. The Document Object Model (DOM) represents the structure of your web page, and manipulating it can be resource-intensive. By optimizing your JavaScript code for DOM manipulation, you can minimize the performance impact and create a smoother user experience.

JavaScript Code Example: Efficient DOM Manipulation

Here’s an example of optimizing DOM manipulation:

// Inefficient DOM manipulation
const list = document.querySelector('#list');

for (let i = 0; i < 1000; i++) {
const item = document.createElement('li');
item.textContent = `Item ${i}`;
list.appendChild(item);
}

// Efficient DOM manipulation
const list = document.querySelector('#list');
const fragment = document.createDocumentFragment();

for (let i = 0; i < 1000; i++) {
const item = document.createElement('li');
item.textContent = `Item ${i}`;
fragment.appendChild(item);
}

list.appendChild(fragment);

In the efficient example, we use a DocumentFragment to batch DOM operations, reducing the number of reflows and repaints, and improving performance.

Browser Developer Tools

Most modern browsers come with built-in developer tools that can help you monitor and optimize your website’s performance.

For example, Chrome DevTools and Firefox Developer Tools offer features like performance profiling, network monitoring, and JavaScript debugging. By using these tools, you can identify bottlenecks and areas for improvement in your code.
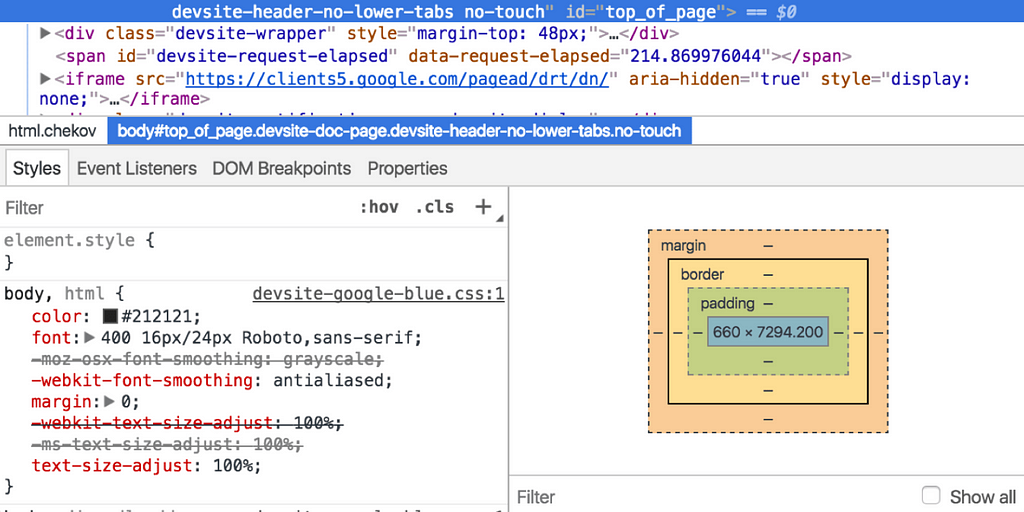
Chrome Developer Tools

Online Tools

There are also online tools available to help you analyze and optimize your website performance. Some popular options include:

  • Google PageSpeed Insights: This tool analyzes your website and provides suggestions for improving its performance. It considers factors like server response time, image optimization, and JavaScript loading techniques.
  • WebPageTest: WebPageTest is a comprehensive performance testing tool that provides detailed information about your website’s load time, rendering, and more. You can also compare your website’s performance against other sites or run tests from different locations and devices.

By staying up-to-date with the latest best practices and monitoring your website’s performance metrics, you can ensure that your site remains fast, efficient, and user-friendly.

Conclusion and Encouragement

(cheryls)

In this article, I’ve shared several JavaScript optimization techniques to help you enhance your website’s performance and user experience. From minimizing file sizes and reducing network requests to leveraging caching and asynchronous loading, these methods can make a significant impact on your site’s load times.

I hope you found this guide informative and useful. I encourage you to share your thoughts, experiences, and questions about JavaScript optimization in the comments below. Let’s learn from each other and continue to improve the performance of our websites together!

Build Apps with reusable components, just like Lego
Bit’s open-source tool help 250,000+ devs to build apps with components.

Turn any UI, feature, or page into a reusable component — and share it across your applications. It’s easier to collaborate and build faster.

Learn more

Split apps into components to make app development easier, and enjoy the best experience for the workflows you want:

Micro-Frontends

Design System

Code-Sharing and reuse

Monorepo

Learn more:

Bibliography

  • High Performance Browser Networking”, Ilya Grigorik, 2013, O’Reilly Media.
  • High Performance JavaScript”, Nicholas C. Zakas, 2010, O’Reilly Media.
  • Website Optimization: An Hour a Day”, Rich Page, 2012, John Wiley & Sons.
  • Web Performance in Action: Building Faster Web Pages”, Jeremy L. Wagner, 2017, Manning Publications.
  • Web Performance Daybook Volume 2”, Stoyan Stefanov (Editor), 2012, O’Reilly Media.
  • HTTP/2 in Action”, Barry Pollard, 2019, Manning Publications.


JavaScript Optimization Techniques for Faster Website Load Times: An In-Depth Guide was originally published in Bits and Pieces on Medium, where people are continuing the conversation by highlighting and responding to this story.


This content originally appeared on Bits and Pieces - Medium and was authored by Anto Semeraro

Front-End Development

Master JavaScript optimization to enhance website performance: minimize file sizes, reduce requests, leverage caching & async loading, and employ best practices for faster load times & improved UX.

Picture by Author

In today’s fast-paced digital world, website performance plays a crucial role in determining the success of any online venture. A speedy, responsive, and user-friendly website not only attracts and retains visitors but also contributes to better search engine rankings, higher conversion rates, and improved user experience (UX). As a software engineer or web developer, it’s essential to prioritize performance optimization techniques in your projects.

In this article, I’ll guide you through various methods to optimize your JavaScript code, including minimizing file sizes, reducing network requests, leveraging caching and asynchronous loading, and employing best practices to ensure faster load times and improved UX.

Minimizing File Sizes

One of the critical factors influencing website load times is the size of the files being served to the user.

(Markus Spiske)

Larger files take more time to download and can cause your website to load slowly, leading to a suboptimal user experience. JavaScript files are no exception, and optimizing their sizes is a fundamental step in enhancing your website’s performance.

Minification is the process of removing unnecessary characters (such as whitespace, comments, and line breaks) and shortening variable names in your JavaScript code without affecting its functionality. This results in a significantly smaller file size, which in turn leads to faster load times and improved performance.

JavaScript Code Example: Before and After Minification

Let’s take a look at a simple example to understand the effect of minification on file size:

Before minification:

// Function to calculate the sum of two numbers
function addNumbers(num1, num2) {
return num1 + num2;
}

// Use the function to calculate the sum of 3 and 5
const sum = addNumbers(3, 5);

// Log the result to the console
console.log("The sum is:", sum);

After minification:

function addNumbers(n,e){return n+e}const sum=addNumbers(3,5);console.log("The sum is:",sum);

As you can see, the minified version of the code is significantly smaller, with unnecessary characters removed and variable names shortened. This results in a smaller file size and faster load times, without affecting the functionality of the code.

Remember to always keep an unminified version of your code for development purposes and only serve minified versions in production environments.

File Compression

Compression is another technique used to reduce file sizes, leading to faster website load times.

(premium beat)

It works by applying algorithms to compress the data in the files, making them smaller without losing their functionality. When a compressed file is requested by a browser, it’s decompressed on the fly, allowing the content to be rendered and executed properly.

There are two widely used compression algorithms for JavaScript files: Gzip and Brotli. Gzip has been the de facto standard for a long time, but Brotli, a newer compression algorithm developed by Google, is becoming increasingly popular due to its superior compression ratio and speed.

Gzip and Brotli Compression Methods

Gzip: Gzip is a widely adopted compression algorithm that can significantly reduce the size of JavaScript files. Gzip uses the Deflate algorithm, which combines LZ77 and Huffman coding to compress data efficiently.

GZIP compression is based on the DEFLATE algorithm — Salman Ravoof from Kinsta

Brotli: Brotli is a newer compression algorithm developed by Google, providing better compression ratios than Gzip. Brotli uses a combination of LZ77, Huffman coding, and a novel context modeling technique to achieve higher compression rates.

A compression performance comparison between a number of different algorithms. — OpenCPU from Kinsta

In most cases, Brotli outperforms Gzip in terms of both compression ratio and speed, making it an attractive option for modern web applications.

Server-side Configuration for Compression

To serve compressed JavaScript files, you’ll need to configure your server to compress files using Gzip or Brotli before sending them to the client. The specific configuration steps vary depending on your server type (e.g., Apache, Nginx, or Node.js). Here’s a brief overview of how to enable compression on popular server types:

  • Apache: Enable the mod_deflate module for Gzip compression or the mod_brotli module for Brotli compression, and configure the appropriate settings in your .htaccess file or virtual host configuration.
  • Nginx: Use the gzip or brotli directives in your Nginx configuration file to enable compression and specify settings.
  • Node.js: For Node.js-based servers, you can use middleware like compression for Gzip or shrink-ray-current for Brotli in conjunction with Express or a similar web framework.

It’s important to note that some browsers may not support Brotli compression, so it’s a good idea to configure your server to fall back to Gzip when Brotli is not supported. This ensures optimal compatibility and performance across all browsers.

With compression enabled, your JavaScript files will be significantly smaller, leading to faster load times and an enhanced user experience.

Bundling to Reduce Network Requests

Reducing the number of network requests is crucial for improving website performance, as each request adds latency and consumes bandwidth.

(prisync)

Explanation of Bundling

Bundling is the process of combining multiple JavaScript files into a single file. This reduces the number of HTTP requests the browser needs to make, thus speeding up the loading process. Bundling can significantly improve website performance, especially for websites with numerous, smaller JavaScript files.

Tools for Bundling

There are several popular tools available for bundling JavaScript files, each with its own unique features and advantages. Here are a couple of widely-used bundling tools:

  • Webpack: Webpack is a powerful and flexible module bundler that not only bundles JavaScript files but also handles other assets like stylesheets and images. It has a robust plugin ecosystem, allowing you to extend its functionality as needed.
  • Rollup: Rollup is another popular JavaScript module bundler that focuses on simplicity and performance. It’s particularly well-suited for bundling libraries and can output multiple formats, including CommonJS, AMD, and ES modules.

JavaScript Code Example: Bundling Multiple Files

To demonstrate the bundling process, let’s assume you have three separate JavaScript files:

// main.js
import { greet } from './greeting.js';
import { calculate } from './math.js';

console.log(greet('John'));
console.log(calculate(5, 3));
// greeting.js
export function greet(name) {
return `Hello, ${name}!`;
}
// math.js
export function calculate(x, y) {
return x * y;
}

Using a bundling tool like Webpack or Rollup, you can combine these files into a single bundled file. The output might look something like this:

(function () {
'use strict';

function greet(name) {
return `Hello, ${name}!`;
}

function calculate(x, y) {
return x * y;
}

console.log(greet('John'));
console.log(calculate(5, 3));
})();

As you can see, the bundled file contains all the necessary code from the original files in a single, self-contained unit, reducing the number of network requests required to load the scripts.

By minimizing the number of requests, you can decrease the time it takes for a browser to download and process the necessary resources, resulting in faster load times and a more responsive user experience.

Using Sprites for Images and Icons

Utilizing image sprites is another technique to reduce network requests and boost website performance.

(vecteezy)

Sprites are essentially a single image file containing multiple smaller images, such as icons or UI elements.

Explanation of Image Sprites

An image sprite is a large image containing multiple smaller images arranged in a grid-like pattern. In your CSS or JavaScript code, you can reference individual images within the sprite by specifying their position and dimensions. This method allows you to load many images with just a single HTTP request, reducing latency and improving load times.

Example of image sprite for a set of icons. — 123rf

Creating Image Sprites

To create an image sprite, you can use various tools, such as:

  • Sprite generator tools: Online tools like SpritePad or Stitches allow you to upload multiple images and generate a sprite automatically, along with the corresponding CSS code.
  • Image editing software: Programs like Adobe Photoshop or GIMP can be used to manually create sprites by arranging smaller images in a new file and exporting the result as a single image.

CSS Code Example: Using Image Sprites

Assuming you have a sprite image named “icons.png” containing multiple icons, you can use the following CSS code to display individual icons as background images for different elements:

.icon {
width: 32px;
height: 32px;
background-image: url('icons.png');
}
.icon-search {
background-position: 0 0;
}

.icon-settings {
background-position: -32px 0;
}

.icon-user {
background-position: -64px 0;
}

Each icon class specifies the position of the corresponding icon within the sprite, allowing you to display the desired image without additional HTTP requests.

By combining these smaller images into one file, the browser only needs to request a single image, reducing the number of HTTP requests.

Lazy-Loading of Resources

Lazy-loading is a technique that defers the loading of non-critical resources until they are actually needed.

(wedowe)

This means that instead of loading all the resources upfront, you only load the ones that are necessary for the immediate view, while the rest are fetched as they become relevant. Lazy-loading can greatly improve the initial load time and perceived performance of a website, particularly when dealing with large assets like images or lengthy scripts.

JavaScript Code Example: Implementing Lazy-Loading

To illustrate lazy-loading, let’s use the example of loading images only when they become visible within the viewport. This can be achieved using the IntersectionObserver API. Here's a simple implementation:

First, add a data-src attribute to your image elements, containing the actual image source:

<img data-src="path/to/image.jpg" class="lazy-load" alt="An example image">

Then, create a script that sets up an IntersectionObserver to load images as they enter the viewport:

document.addEventListener('DOMContentLoaded', function () {
const lazyImages = [].slice.call(document.querySelectorAll('.lazy-load'));

if ('IntersectionObserver' in window) {
const lazyImageObserver = new IntersectionObserver(function (entries, observer) {
entries.forEach(function (entry) {
if (entry.isIntersecting) {
const lazyImage = entry.target;
lazyImage.src = lazyImage.dataset.src;
lazyImage.classList.remove('lazy-load');
lazyImageObserver.unobserve(lazyImage);
}
});
});

lazyImages.forEach(function (lazyImage) {
lazyImageObserver.observe(lazyImage);
});
}
});

In this example, the IntersectionObserver watches for the .lazy-load images to enter the viewport. When an image is detected, its data-src attribute is assigned to the src attribute, triggering the actual image download. Once the image has been loaded, the lazy-load class is removed, and the image is unobserved.

Using this simple lazy-loading technique, you can ensure that only the images currently in view are loaded, reducing the number of network requests and improving the initial load time of your website.

Leveraging Caching

Website performance is a critical factor in delivering a great user experience.

(nordicapis)

One essential technique for enhancing performance is caching, which allows browsers to store copies of your website’s resources, such as images, stylesheets, and scripts. This reduces the need for repeated downloads and speeds up load times. In this section, we’ll explore the concept of caching and how you can leverage it to improve your website’s performance.

Browser Caching

Browser caching is a mechanism that enables web browsers to store copies of a website’s files locally. When a user revisits your site, the browser can load these resources from the cache instead of downloading them again, resulting in faster load times and reduced server load.

By configuring your server to deliver appropriate caching headers, you can control which resources get cached and for how long.

“The browser cache is a mechanism used by browsers to store locally web page resources.” — Yorgos Fountis from Pressidium

Cache-Control and ETag Headers

Two important headers for controlling browser caching are Cache-Control and ETag. The Cache-Control header allows you to set cache directives, such as the maximum age of a resource in the cache or whether it should be revalidated. For example, you can use Cache-Control: public, max-age=3600 to indicate that a resource can be cached for one hour.

The ETag header provides a unique identifier (usually a hash) for a specific version of a resource. When the browser requests a resource, it sends the ETag value it has in its cache. If the server's ETag value matches the one sent by the browser, the server responds with a 304 Not Modified status, and the browser uses the cached version. This mechanism helps ensure that the browser always has the most up-to-date version of a resource.

Configuring Caching on the Server-side

To enable browser caching, you need to configure your server to deliver the appropriate headers for your resources. This process varies depending on your server software. For example, in an Apache server, you can use the .htaccess file to set caching headers:

<filesMatch ".(css|js|jpg|png)$">
Header set Cache-Control "public, max-age=86400"
</filesMatch>

This configuration sets the Cache-Control header for CSS, JS, JPG, and PNG files, allowing them to be cached for 24 hours.

By leveraging browser caching, you can significantly reduce the amount of data that needs to be fetched when users revisit your site, speeding up load times and improving the overall user experience.

Leveraging Asynchronous Loading

As websites grow more complex, managing the loading of JavaScript files becomes increasingly important for performance.

(talentlms)

By default, browsers load scripts synchronously, blocking the rendering process until the script is fully loaded and executed. Asynchronous loading allows scripts to be loaded in parallel with other resources, preventing them from blocking rendering and improving overall load times. In this section, we’ll discuss how to leverage asynchronous loading for your JavaScript files to enhance your website’s performance.

Asynchronous Loading of JavaScript Files

Asynchronous loading allows browsers to download and execute JavaScript files without blocking the rendering of the rest of the page. This approach not only speeds up the initial rendering of your website but also reduces the risk of a slow or unresponsive script causing delays. By using the async and defer attributes, you can control the loading and execution behavior of your JavaScript files.

Synchronous Load vs Asynchronous Load — Arturo Navarro

Using the Async and Defer Attributes

The async and defer attributes can be added to the <script> tag to enable asynchronous loading:

  • async: The async attribute tells the browser to download the script without blocking rendering. Once the script is downloaded, the browser will pause rendering to execute it. This is useful for scripts that don't rely on other scripts or the DOM being fully loaded.
  • defer: The defer attribute instructs the browser to download the script without blocking rendering, but delays execution until the DOM has been fully parsed. This is useful for scripts that depend on the DOM or other scripts.

It’s important to note that these attributes should only be used with external script files, as they have no effect on inline scripts.

JavaScript Code Example: Async and Defer Usage

Let’s look at an example of using async and defer attributes in the HTML file:

<!DOCTYPE html>
<html>
<head>
<!-- Using the defer attribute -->
<script src="main.js" defer></script>
</head>
<body>
<!-- Using the async attribute -->
<script src="analytics.js" async></script>
</body>
</html>

In this example, main.js is loaded with the defer attribute, ensuring that it won't block rendering and will be executed once the DOM is fully parsed. Meanwhile, analytics.js is loaded with the async attribute, allowing it to download and execute independently of the rest of the page.

By leveraging asynchronous loading for your JavaScript files, you can minimize rendering-blocking resources and improve your website’s performance and user experience.

Employing Best Practices for Faster Load Times & Improved UX

Website optimization is an ongoing process, and to maximize performance, it’s essential to keep up with the latest best practices.

(myhrtoolkit)

Code Splitting

Code splitting is a technique that involves breaking your JavaScript code into smaller, more manageable chunks, which are loaded only when needed. This reduces the amount of code that needs to be downloaded and parsed, leading to faster initial load times and smoother interactions. Code splitting is particularly useful for single-page applications (SPAs) and large websites with complex functionality.

Webpack Module Bundler

Several tools can help you implement code splitting, such as Webpack and React.lazy:

  • Webpack: This popular bundler offers built-in support for code splitting. Using its dynamic import() function, you can load JavaScript modules on-demand, reducing the initial load time.
  • React.lazy: If you’re using React, the React.lazy function lets you load components lazily as they’re needed, further optimizing your application.

JavaScript Code Example: Implementing Code Splitting

Here’s an example of code splitting with Webpack and React:

// Importing the React and React.lazy libraries
import React, { lazy, Suspense } from 'react';

// Loading the component lazily using React.lazy
const MyComponent = lazy(() => import('./MyComponent'));

function App() {
return (
<div>
<Suspense fallback={<div>Loading...</div>}>
<MyComponent />
</Suspense>
</div>
);
}

export default App;

In this example, the MyComponent is loaded lazily when it's needed, preventing it from blocking the initial rendering of the application.

Using Content Delivery Networks (CDNs)

Content Delivery Networks (CDNs) are a powerful way to improve website performance by distributing your content across multiple servers around the world.

This ensures that users can access your website’s resources from a server close to their location, reducing latency and speeding up load times. Integrating your website with a CDN can greatly improve user experience, especially for users in distant geographic locations.

Optimizing DOM Manipulation and Event Handling

Efficient DOM manipulation is crucial for improving website performance. The Document Object Model (DOM) represents the structure of your web page, and manipulating it can be resource-intensive. By optimizing your JavaScript code for DOM manipulation, you can minimize the performance impact and create a smoother user experience.

JavaScript Code Example: Efficient DOM Manipulation

Here’s an example of optimizing DOM manipulation:

// Inefficient DOM manipulation
const list = document.querySelector('#list');

for (let i = 0; i < 1000; i++) {
const item = document.createElement('li');
item.textContent = `Item ${i}`;
list.appendChild(item);
}

// Efficient DOM manipulation
const list = document.querySelector('#list');
const fragment = document.createDocumentFragment();

for (let i = 0; i < 1000; i++) {
const item = document.createElement('li');
item.textContent = `Item ${i}`;
fragment.appendChild(item);
}

list.appendChild(fragment);

In the efficient example, we use a DocumentFragment to batch DOM operations, reducing the number of reflows and repaints, and improving performance.

Browser Developer Tools

Most modern browsers come with built-in developer tools that can help you monitor and optimize your website’s performance.

For example, Chrome DevTools and Firefox Developer Tools offer features like performance profiling, network monitoring, and JavaScript debugging. By using these tools, you can identify bottlenecks and areas for improvement in your code.

Chrome Developer Tools

Online Tools

There are also online tools available to help you analyze and optimize your website performance. Some popular options include:

  • Google PageSpeed Insights: This tool analyzes your website and provides suggestions for improving its performance. It considers factors like server response time, image optimization, and JavaScript loading techniques.
  • WebPageTest: WebPageTest is a comprehensive performance testing tool that provides detailed information about your website’s load time, rendering, and more. You can also compare your website’s performance against other sites or run tests from different locations and devices.
By staying up-to-date with the latest best practices and monitoring your website’s performance metrics, you can ensure that your site remains fast, efficient, and user-friendly.

Conclusion and Encouragement

(cheryls)

In this article, I’ve shared several JavaScript optimization techniques to help you enhance your website’s performance and user experience. From minimizing file sizes and reducing network requests to leveraging caching and asynchronous loading, these methods can make a significant impact on your site’s load times.

I hope you found this guide informative and useful. I encourage you to share your thoughts, experiences, and questions about JavaScript optimization in the comments below. Let’s learn from each other and continue to improve the performance of our websites together!

Build Apps with reusable components, just like Lego

Bit’s open-source tool help 250,000+ devs to build apps with components.

Turn any UI, feature, or page into a reusable component — and share it across your applications. It’s easier to collaborate and build faster.

Learn more

Split apps into components to make app development easier, and enjoy the best experience for the workflows you want:

Micro-Frontends

Design System

Code-Sharing and reuse

Monorepo

Learn more:

Bibliography

  • High Performance Browser Networking”, Ilya Grigorik, 2013, O’Reilly Media.
  • High Performance JavaScript”, Nicholas C. Zakas, 2010, O’Reilly Media.
  • Website Optimization: An Hour a Day”, Rich Page, 2012, John Wiley & Sons.
  • Web Performance in Action: Building Faster Web Pages”, Jeremy L. Wagner, 2017, Manning Publications.
  • Web Performance Daybook Volume 2”, Stoyan Stefanov (Editor), 2012, O’Reilly Media.
  • HTTP/2 in Action”, Barry Pollard, 2019, Manning Publications.

JavaScript Optimization Techniques for Faster Website Load Times: An In-Depth Guide was originally published in Bits and Pieces on Medium, where people are continuing the conversation by highlighting and responding to this story.


This content originally appeared on Bits and Pieces - Medium and was authored by Anto Semeraro


Print Share Comment Cite Upload Translate Updates
APA

Anto Semeraro | Sciencx (2023-04-14T06:01:39+00:00) JavaScript Optimization Techniques for Faster Website Load Times: An In-Depth Guide. Retrieved from https://www.scien.cx/2023/04/14/javascript-optimization-techniques-for-faster-website-load-times-an-in-depth-guide/

MLA
" » JavaScript Optimization Techniques for Faster Website Load Times: An In-Depth Guide." Anto Semeraro | Sciencx - Friday April 14, 2023, https://www.scien.cx/2023/04/14/javascript-optimization-techniques-for-faster-website-load-times-an-in-depth-guide/
HARVARD
Anto Semeraro | Sciencx Friday April 14, 2023 » JavaScript Optimization Techniques for Faster Website Load Times: An In-Depth Guide., viewed ,<https://www.scien.cx/2023/04/14/javascript-optimization-techniques-for-faster-website-load-times-an-in-depth-guide/>
VANCOUVER
Anto Semeraro | Sciencx - » JavaScript Optimization Techniques for Faster Website Load Times: An In-Depth Guide. [Internet]. [Accessed ]. Available from: https://www.scien.cx/2023/04/14/javascript-optimization-techniques-for-faster-website-load-times-an-in-depth-guide/
CHICAGO
" » JavaScript Optimization Techniques for Faster Website Load Times: An In-Depth Guide." Anto Semeraro | Sciencx - Accessed . https://www.scien.cx/2023/04/14/javascript-optimization-techniques-for-faster-website-load-times-an-in-depth-guide/
IEEE
" » JavaScript Optimization Techniques for Faster Website Load Times: An In-Depth Guide." Anto Semeraro | Sciencx [Online]. Available: https://www.scien.cx/2023/04/14/javascript-optimization-techniques-for-faster-website-load-times-an-in-depth-guide/. [Accessed: ]
rf:citation
» JavaScript Optimization Techniques for Faster Website Load Times: An In-Depth Guide | Anto Semeraro | Sciencx | https://www.scien.cx/2023/04/14/javascript-optimization-techniques-for-faster-website-load-times-an-in-depth-guide/ |

Please log in to upload a file.


There are no updates yet.
Click the Upload button above to add an update.

You must be logged in to translate posts. Please log in or register.